Quite often you can hear the question: how to change shock absorbers, because there are many people who want to repair the suspension themselves, both among experienced car owners and among novice motorists. But contrary to popular belief, it is not difficult and not difficult. The answer to the question will vary slightly depending on the car model and whether the shock absorbers are front or rear. But if you replaced the front strut of the car with your own hands, then you will not have any questions when replacing the rear one.
Tool kit for replacing shock absorbers
For DIY repairs you must have:
Wrenches included. It has a special design designed to facilitate the work process in a small, confined work space.
The tool consists of a handle as a single unit and a working part, which has a special design. Keys included:
- Carobaceae. Used for screwing fasteners that have a hexagonal shape;
- Caps. Work with cap devices;
- Combined. On one side there is an open-end wrench, and on the other a spanner;
- End A type of wrench used to turn a fastener;
- Adjustable. A universal tool that has adjustments;
- Balloon. Unscrews car wheel mounts.
- Jack. A special mechanism for lifting loads of various volumes, without auxiliary devices;
- Screwdriver Set. For ease of use, some types are produced with a magnetized tip. Handles can be of various modifications;
- A puller is a specialized device that allows you to compress shock absorber springs for repair work;
- Stoppers. An auxiliary tool that supports a car on a jack.
Signs of problems
If the right or left rack fails, this can lead to an emergency situation. It is for this reason that it is so important to carefully monitor your vehicle. Timely repair work will avoid a large number of problems.
The following signs and characteristic symptoms indicate a breakdown of the front struts:
- during the movement there is a constant creaking, knocking and clicking sound;
- the car constantly rocks and oscillates from side to side;
- the car skids seriously when turning;
- To perform braking, a much longer braking distance is required than with working shock absorbers;
- the vehicle squats heavily as soon as the driver accelerates or brakes. Unpleasant sensations are present both behind and in front;
- the machine clings to the surface very poorly;
- rubber wears out very quickly and unevenly;
- Brake fluid leaks from the shock-absorbing system;
- the supports, spring and rod become covered with destructive corrosion;
- a significant increase in noise level during acceleration. This indicates that the fasteners of the built-in bushings have been damaged;
- the housing is deformed, which is why the piston cannot move normally in the inside of the cylinder;
- The springs are not positioned very correctly, as a result of which the car body begins to sway while driving.
Such phenomena usually occur due to the poor quality of the main elements of the racks, due to improper installation, as well as due to the natural process of wear and aging of the built-in elements.
It is impossible to say which racks you need to buy. It all depends on material wealth and the vehicle itself. In any case, there is no need to save on these elements. It is worth buying designs that have a large number of positive reviews and are produced by trusted manufacturers.
Replacing shock absorbers (step by step instructions)
The top part of the shock absorber is installed to the body, the bottom part is installed to the suspension. This fastening method simplifies future replacement. Replacing front suspensions is much more difficult.
With the expansion of automotive production of front-wheel drive vehicles, difficulties arise in replacing the suspension.
There are two replacement methods
How to prevent damage to a shock absorber strut?
In order for the shock absorber to work out its declared life, it is worth adhering to some operating rules:
- Regular inspection of not only the struts, but also the entire chassis will help prevent unexpected breakdowns.
- Replacement of shock absorbers must be carried out as planned, according to the manufacturer's regulations, even if there are no noticeable signs of wear.
- If the car owner does not have experience in replacing struts on his own, it is better to contact specialists. You can also consult with them on the issue of choosing new spare parts.
- If there are signs of a breakdown, you should immediately go to a service center for diagnostics and subsequent repairs. A car with faulty suspension is a threat to the safety of not only its owner, but also other road users.
For installation, it is worth purchasing those shock absorbers that meet the operating conditions, even if their cost is higher than those offered by the automaker. The difference in price will be compensated by an increase in service life.
The first method of replacing shock absorbers
The complexity of the work is easier. Its use is not often used. Installing the shock absorber through the U-shaped bracket, through the drive shaft.
The replacement technology consists of:
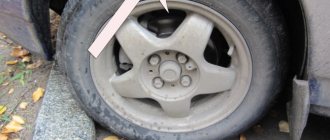
- We dismantle the wheel;
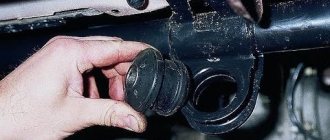
- Remove the plugs under the hood of the car. Slightly loosen the nut that holds the shock absorber rod. Do not twist it completely. The spring may jump to the side, which is not safe for your health;
- Do not completely unscrew the fastening nuts of the upper support;
- Using a puller, remove the tip;
- We mark with a marker the location of the upper adjustment bolt, which adjusts the wheel alignment angles;
- Unscrew the mounting nuts of the shock absorber strut. We knock out the fastening bolts themselves with a hammer or sledgehammer;
- Pull the hub down;
- Under the hood there are three mounting nuts that need to be unscrewed;
- Release the rack;
- We hold the shock-absorbing spring with ties;
- Unscrew the shock absorber rod;
- Carefully remove the support and the bowl with the spring. Let's take it out. The shock absorber is located in the strut housing.
- After going through the removal process, the shock absorber has become unusable. We install the new part in the reverse order. Starting with the bump stop.
The main thing is that after replacing with new ones, it is necessary to bleed the shock absorbers. Sometimes a shock absorber may be called a cartridge. In some cars, you can replace the cartridge.
When replacing which, we disassemble the rack further. We proceed further according to the scheme.
- Using a hammer and chisel, knock out the support washer from the car body;
- Under the washer you can see the fixing nut; it needs to be unscrewed. Now you can see the cartridge that needs to be replaced;
- We replace it with a new cartridge.
- We screw it on. We make a fixation;
- We place all previously removed parts on the rack;
- We install the replaced rack on the car.
Strict control of the tightening of bolt connections is necessary. On the opposite side of the car we perform work similar to what was done.
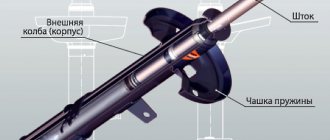
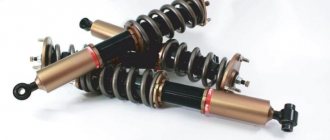
The principle of operation of shock absorber struts in a car
The operating principle is based on the conversion of mechanical energy into thermal energy. Oscillations are damped in a liquid (oil) or gas (gas) environment; options for integrated use are possible (such models are called gas-oil models).
Any vibrations and irregularities are absorbed precisely by the shock-absorbing struts
The second method of replacing shock absorbers
This method is more labor intensive. Back in the thirties, an interesting design was developed for the Chevrolet Cadet, where the shock absorber and spring were placed in one strut, which on one side had a hinge installation.
With the help of which the stand rotates. Provided that any angle of inclination is determined. This design of shock absorbers allows you to reduce the cost by completely removing the upper arm.
Fastening is done directly to the shock absorber strut. The design was named after mechanical engineer Earl McPherson.
Workflow diagram:
- Using a jack, remove the wheel from the front, first turning the hub drive shaft nut;
- We release the shock absorber rod by unscrewing the brake caliper. The rubber pipeline must be in a free, non-tensioned state; the brake pads can be inspected immediately;
- Release the tie rod end;
- Unscrew the ball joint and release the front drive lock;
- Carefully, pulling towards you, pull out the hub;
- By unscrewing the upper support, we remove the stand itself;
- We replace the worn cartridge with a new one;
- By analogy, we assemble everything in reverse order. Using the same algorithm;
Necessarily. After going through the process of replacing the shock absorber, it is necessary to perform wheel alignment adjustments.
The MacPherson suspension design is the same on different car models; they may differ in manufacturing design. Replacing front shock absorbers differs in some details. The shock absorber can only be replaced together with the body.
Some car models do not have an adjustment bolt. These car models use a bolted connection. The replacement process is complicated by removing the hub. To do this, you need to loosen the lugs by driving a chisel between the lugs. We release the hub. The replacement algorithm does not change further.
Due to the heavy load, the elements of the front shock absorbers become unusable and require replacement. If you decide to make the replacement yourself, with your own hands. Feel free to get down to business.
What equipment is needed for repairs?
Before replacing it yourself, you need to carefully read the video, which shows the main points of installation. The list of required tools and materials includes the following:
- jack or lift;
- a set of heads – it is desirable to have knobs and extensions;
- open-end and ring wrenches;
- screwdrivers: slotted and Phillips (different sizes);
- iron brush;
- hammer (metal, rubber);
- pliers;
- spring ties.
Another must-have product for working with old shock absorbers is WD-40. If it is missing, it will be impossible to disassemble the threaded connections. Especially if the car has traveled 50 thousand km or more.
There are many ways to check the performance of a shock absorber. The simplest and most accessible to everyone without exception is the visual method. The presence of oil leaks and other defects are the first signals that a part needs to be replaced. The replacement process includes many steps. Car repairs must be approached responsibly. This will avoid many difficulties and difficulties.
Timely replacement of struts will save the car owner from expensive subsequent repairs. Since if the suspension malfunctions, all components that include rubber wear out without exception. These are anthers, ball joints and many others.
Photo instructions for replacing front shock absorbers
Causes of wear
On average, the shock absorber life is 70,000 km. But, as a rule, replacement of racks is required earlier. The reasons for this are:
- Poor quality of road surface.
- Driving style of the car owner. The more often the driver uses sudden starts and braking, tries to take a turn at high speed or overcome a road obstacle without slowing down in front of it, the more stress the entire suspension experiences.
- Installation of a counterfeit (low-quality) part. Cheap cannot be high quality. Such a shock absorber will not only not work as expected, but will also lead to an imbalance of the entire suspension, accelerating the occurrence of breakdowns.
- Incorrect element installation. You can't just remove the old shock absorber and put a new one in its place. This requires knowledge of some nuances, otherwise the recently purchased part will again require replacement.
- Damage to the suspension in an accident.
Installation
Position the top end of the suspension strut in the head, then install the nuts and tighten them to specification.
Apply a small amount of molybdenum disulfide grease to the drive shaft splines, then insert the end of the shaft into the hub. Install a new washer and tighten the new hub nut by hand.
Connect the suspension strut pivot joint to the lower control arm, then install the castle nut and tighten it to specification. insert a new cotter pin.
Tighten the new hub nut in stages as specified. Install a new cotter pin.
Connect the tie rod to the suspension strut and tighten the new lock nut to specification.
Install the brake caliper onto the hub support as described in Chapter 9.
If necessary, install the ABS sensor on the wheel hub support (see Chapter 9) and connect the wire.
Place the road wheel and lower the vehicle to the ground.
After this, check and, if necessary, adjust the wheel alignment as indicated below in the relevant section of this chapter.
Source