Replacing ball joints
One of the reasons for the appearance of extraneous sounds (knocks) from the front suspension of the Priora is wear of the ball joints.
This usually happens closer to 100,000 km on normal roads and quiet driving. But cases cannot be ruled out when the ball joints have to be changed every 15-20 thousand km, in the conditions of Russian roads. To replace the supports yourself, you will need the following tool:
- Ball or end cap remover
- Hammer
- Mount
- Keys for 17 and 19 or heads
- Driver and ratchet
- TORX E12 head (on later versions)
- Penetrating lubricant
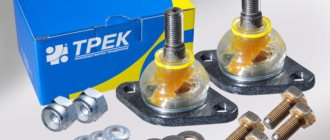
Article number and cost of ball joint analogues
There is a constant debate among car owners about which ball joints are best to install. Some drivers believe that original parts are optimal in terms of price to reliability ratio. Other owners claim that the instability of the quality of their original balls completely eliminates the possibility of purchasing them. They advise buying analogues from third-party manufacturers, especially since the cost of non-original components is quite attractive. According to driver reviews, below is a list of pole brands that they recommend as an alternative to the original.
Table - Good analogues of the Lada Priora ball joint.
| Manufacturer | vendor code | Approximate cost, ruble |
| Delphi | TC583 | 340-400 |
| Denckermann | D110112 | 210-250 |
| Teknorot | L303 | 230-280 |
| Lemforder | 1545602 | 420-500 |
| TRW | JBJ156 | 445-490 |
How to change it yourself: step-by-step instructions
There are two methods for replacing a ball joint on a Renault Logan - with and without removing the lever. In the first case, it is more convenient to dismantle the faulty ball joint, in the second - there is less assembly and disassembly work. In the instructions we consider both options. Basic steps:
- remove the wheel;
- remove the caliper;
- unscrew and knock out the ball joint;
- remove the lever (with the first method);
- press out the old support;
- press in a new one;
- assemble in reverse order.
Article on the topic: Repair and replacement of the gas tank on a VAZ 2108/09/14/15: how to do it quickly, accurately and with your own hands
Let's take a closer look at each point.
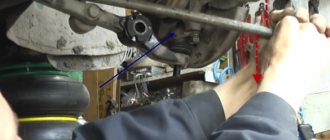
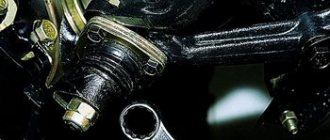
- There shouldn't be any problems removing the wheel. But when removing the caliper, you need to unscrew the two 18mm mounting bolts, and then release the brake pads. This can be done using a screwdriver or a small pry bar. To decompress, rest not against the disc, but against the pad. After dismantling, hang the caliper higher on the suspension spring using wire or rope.
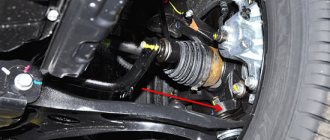
Now we have access to the ball joint. It is secured with a bolt and nut. Immediately unscrew the nut and knock out the bolt or gradually unscrew it, pressing from the reverse side. At the mounting point on the steering knuckle there is a special slot into which you need to drive a large screwdriver (like a wedge). After which you can pull out the ball.
Drive a screwdriver into the slot of the steering knuckle and remove the ball
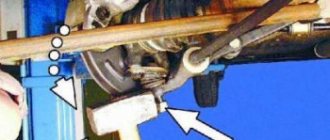
The next step depends on the replacement method you choose. If you decide to try to pull out the support without removing the lever, then you need to select a suitable piece of pipe or other spacer. The main conditions are that the length allows one end of the device to rest against the ground, and the other end against the suspension arm. And the diameter should be slightly larger than the bottom of the ball, so that when knocked out it will fall inward. If the boot remains intact, it is better to remove it. It may come in handy in the future, since the anthers are not supplied separately (some install them from the Gazelle, but you will have to struggle with installation).
If the old boot is intact, it is better to keep it
- Next, knock out the old part with a hammer. Be sure to check for the presence of a retaining ring on the ball housing. The original supports do not have them, but some “analogs” are included. If any are found, remove the ring and then knock it out.
- To install a new spare part, a 34 or 36 head is suitable. Use it as a spacer, resting it on the lower part of the support. The splines of the ball must match the splines of the lever. There is no need to rush at this stage. If the new support enters the lever at an angle, you will not be able to press it in correctly. What’s worse is that in this case the seat in the lever is deformed, and you will have to buy the lever assembly. Therefore, proceed carefully.
How to remove a ball joint without a VAZ 2107 puller
Now I offer you a step-by-step summary of how to replace ball bearings on a VAZ 2107, with a detailed description of the process, supported by informative photographs. Ball bearing replacement for professionals was designed to be automatic and has changed only slightly in the long term thanks to new tools and capabilities.
In my case, replacing the ball joint from a VAZ 2107 is done on an inspection pit or a lift. Firstly, at least smooth out any security work If you are going to work on an inspection pit. Install the wheel chocks, apply the handbrake and engage second gear. Only the jack is strictly prohibited from being used without the above safety measures.
- Metal brush;
- Liquid WD-40;
- Key for 22 and 7;
- Rod for ball bearings;
- Ball joint lubricant;
- Honey syringe (without needle);
- Adjustable wrench.
1. First, women appreciate, you need to remove the wheel.
4.5. Then use a wire brush to clean the ball joints.
3. Treat our customer with the connections you unscrew (as shown in the photo) using WD-40 thread penetrating fluid in a different way.
4. Turn the wrench to 22 and unscrew the nuts of the upper and one of the ball bearings by about one and a half to two turns.
5. Now install the special ball bearing puller.
6. You come out at once to pull out two ball bearings at once: first shoots from the top and then from the bottom. If for some reason the ball does not fit and remains in the zone, then, of course, using an iron and a hammer, of course, help it get out. Impacts must be applied to the projection on the handlebar.
Replace the ball bearing VAZ 2101 without a puller
How to check a ball joint?
The ball is very easy to check. It is enough to get to the part and check it for play. At the slightest play it should be replaced. You can even try to shake the ball with your hand, and then everything will become clear. It is best to replace in pairs, since taking everything apart and then reassembling it twice in a short period of time is a dubious pleasure.
Signs of a faulty mechanism are as follows:
Generally speaking, the car will immediately signal if the ball joint needs to be replaced urgently. In some cases, work has to be done every 30 thousand kilometers; much depends on the quality of the road surface.
Article number and price for the original ball joint
The original ball joint of the Lada Priora car has article number 21082904185. The price for the product varies from 150 to 420 rubles. The quality of auto parts varies from batch to batch.
Ball joint for Priora
When purchasing an original product, special attention should be paid to the presence of lubricant under the boot. In some cases it is completely absent. Such a ball can last no more than a couple of thousand kilometers.
How to replace a ball joint on a VAZ 2109, 2114.
To replace the ball joint of a VAZ 2109, 2114, place the car on a jack and remove the wheel. Now unscrew one nut securing the ball joint to the lever and two bolts securing the ball joint to the hub.
If you have a ball joint remover.
If you have a puller, place it as shown in the photo and remove the ball.
How to remove a ball joint without a puller on a VAZ 2109 - 2114.
If there is no puller, you will have to remove the lever completely. To do this, unscrew the bolt securing the stabilizer bar (egg), the nut securing the “saber” to the lever and the bolt securing the lever to the body. We remove the lever, take a heavier hammer and knock out the ball.
There are situations when the bolts stick to the silent blocks or you are simply too lazy to remove the lever. In such cases, you can use a backup option, but it may not always work.
In this option, the ball should not be unscrewed from the hub. Unscrew only the nut securing the ball to the lever. Use a gas torch to heat the lever where the ball pin fits into it. It should be heated for about 3 minutes. Next, just as in the method of checking the ball for malfunction, insert a crowbar between the ball and the lever and press on the crowbar. The longer the crowbar, the easier it is to remove the ball in this way - this is important.
You learned how to change ball joints on a VAZ 2109 - 2114. If you have any questions, write them in the comments and I will definitely answer you!
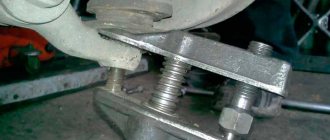
Wedge type puller.
The simplest in its design, however, it also copes well with the task assigned to it. To make it you will need:
This is the kind of bracket you should end up with.
Then it's a matter of technique:
IMPORTANT!
When using this type of puller, there is always a risk of damage to the boot, so this tool can only be used in the event of a planned replacement of tips or supports. If the repair of the steering mechanism or suspension does not require such a replacement, it is better to abandon the “wedge” type puller.
Algorithm for replacing ball joints on Lada Priora cars
- Tighten the handbrake, support the wheels with wheel chocks, jack up the car, and remove the wheel.
- Using a "19" wrench, unscrew the ball stud nut.
- Use a ball joint remover to remove the support from the lever.
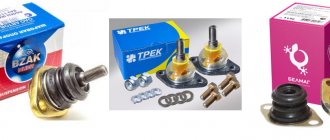
Which ball joint to choose for Lada Priora
Today, a fairly large selection of balls is offered, from Chinese to conveyor and even reinforced ones. The choice is up to the buyer.
- BZAK BA08-2904192-01 from 250 rub. piece
- TRACK BJ70-107, 2108-2904192 from 300 RUR
- LADA IMAGE 2110-2904192-82 from 400 RUR
- AMT-Miass AM08-2904192 from 220 rub.
- BELMAG BM10-2904192-01 reinforced with fastening (conveyor) from 500 rub.
- VAZINTERSERVICE /OAT/ VIS08-2904185-10 sunset – from 350 rub.
- ASOMI, Tolyatti A110.2904.193 Comfort PRO from 500 rub.
The most expensive conveyor ball joints are from the BELMAG company; also in terms of price, the ball joints from ASOMI, which also produces front and rear struts, as well as support bearings, stand out.
Diagnostics
How to remove a ball joint without a puller? This question is asked by people who are faced with replacing a ball joint. Especially in cases of unexpected breakdown. To prevent this from becoming an unpleasant surprise for you, you need to know how to correctly diagnose a breakdown. The first sign of a malfunction is a knocking sound in the suspension when driving over uneven roads. But here you need to take into account that in extreme cold the lubricant can freeze. In this case, knocking noises may be observed when starting to move.
Don't panic, this is completely normal. Also, with severe wear, the car may wander along the road, and increased tire wear is observed.
Do not forget that it is not only ball joints that can knock in the suspension. Therefore, be sure to carefully inspect the suspension. The easiest way to diagnose is to check the play. To do this, you need to jack up the car. After that, they try to shake the wheel; if there is play, the ball must be replaced. At the same time, we determine which support has failed. This is true for machines with two supports on each side. In some models, it is possible to measure the level of wear of the hinge through a hole in the lower part of the support.
How to identify the source of a knocking noise in a car
First, put the car on the parking brake. After this, you can already lift the side of the car that bothers its owner using a simple tool - a jack. This way the vehicle wheel will rotate freely.
Before carrying out the described manipulations, do not forget to place wheel chocks under the rear wheels. Experts strongly recommend never inspecting or performing work on a car that is secured solely with one jack! If you ignore this simple rule, irreparable disaster can happen.
Next, we take the wheel in the upper and lower parts with both hands, after which we swing it with maximum effort relative to the axis (vertical, of course). Please note that even if a knock is detected, replacing the ball joint is not yet necessary. For example, a similar sound on a Priora may appear due to wear on the wheel hub bearing. Precisely because, in order not to waste precious time and your honestly earned money on replacing an adequately functioning ball joint, it is worth making sure that the bearing is working properly.
Checking the bearing is easy. You need to find an assistant who will press and hold the brake pedal for some time. Your task will only be to repeat the check described above from the very beginning. If after all the manipulations the ominous knock does not disappear, it means that the support on the Priora has completed its allotted time. But if the knocking noise disappears, you will simply need to replace the wheel bearing.
You can finally dispel doubts about the malfunction of ball joints in a simple way. Place your hand on the lever and ball joints. Use your free hand to loosen the wheel. You will hear and feel the movement of suspension parts.
Replacing a ball joint on a VAZ 2109 car.
This process is carried out not only when the ball joint is worn out, but also when there is a breakthrough in the boot. This cannot be ignored, as it poses a danger to passengers and the driver.
It is most advisable to use a lift or inspection hole for work. If you don't have one, you can use a jack. What you need to do:
- Remove the wheel on which the diagnostics revealed problems with the wheel brake.
- All structural parts are cleaned of dirt. Plus, the fastening elements are treated with a special rust removing compound. This will make installation and dismantling easier.
- Using a 19mm wrench, unscrew the nut that secures the ball joint to the suspension arm.
- Using a hammer and a pry bar, the SHO pin is pressed out of the suspension arm. To do this, the nut is not completely unscrewed, but several strong targeted blows are applied to the lever.
- Using a pry bar, the suspension arm is moved down to free the SHO pin from the lever.
- The bolts connecting the ball joint and the steering knuckle are removed using a 17mm wrench.
- The damaged ball joint is removed.
- The condition of not only the support, but also the boot is checked. Sometimes replacing the latter may be enough to fix problems. If obvious damage is detected, the ball joint is removed, a new one is installed, and the unit is put back together.
- It is necessary to pay attention to the condition of the finger. It should contain a spacer sleeve. If it is missing, it should be returned to its place, otherwise the updated SHO will not work correctly.
- The rubber boot is lubricated with grease before the reassembly process. Plus, grease will need to be applied to the installation site of the boot in the ball joint.
Repair of gear shift lever VAZ 2170 Priora
- Repair manuals
- Repair manual for VAZ 2170 (Priora) 2004+.
- Gear shift lever repair
The gear shift lever should turn freely and without jamming in the ball joint.
Otherwise, check and replace the ball joint and spherical washer if necessary. If, after pushing down all the way, the lever does not return completely to its original position, check and, if necessary, replace the spring. Remove the floor tunnel lining (see “Removing and installing floor tunnel linings” ).
You will need: a 13mm wrench, pliers with thin jaws.
1. Remove the lever axle, plastic and spacer bushings (see “Replacing the gearshift lever axle bushings” ).
| 2. Use a screwdriver to pry... | 3. ...and remove the retaining ring. |
| 4. Remove the ball joint with the lever from the cage. | 5. Remove the spring from the cage. |
| 6. Inspect the reverse lock bracket trim... | 7. ...and a plastic axle stop. Replace parts if they are broken or show signs of wear. |
| 8. To remove the cover, unscrew two nuts and remove one bolt securing it. | 9. By spreading the spherical washer, remove the ball joint. |
| 10. Remove the spherical washer from the spherical pin of the lever. | 11. This is what the parts of the gear shift lever look like. |
| 12. Replace broken or badly worn spherical washer and ball joint. | 13. Replace a broken or loose spring. |
14. Reassemble and install the gear shift lever in the reverse order, having previously lubricated the ball pin of the lever and the internal cavity of the race with grease.
| 15. When installing the ball joint, make sure that the protrusions on it fit into the grooves of the spherical washer, thereby... | 16. ...fixing the clip in the washer. |
↓ Comments ↓
1. Car structure
1.0 Car structure 1.1 General information about the car 1.2 Passport data 1.3 Car keys 1.4. Controls 1.5. Heating and ventilation of the cabin 1.6 Ensuring a comfortable air temperature in the cabin 1.7. Doors 1.8. Passive safety equipment on the car 1.9. Seats
2. Recommendations for use
2.0 Recommendations for use 2.1. Safety rules and recommendations 2.2 Running in the car 2.3 Operating the car during the warranty period 2.4. Preparing the car for departure
3. Problems along the way
3.0 Malfunctions along the way 3.1. The engine does not start 3.2 Malfunctions of the fuel injection system 3.3 Idle speed has disappeared 3.4. Interruptions in the operation of the 3.5 engine. The car moves jerkily 3.6 The car accelerates poorly 3.7 The engine stalled while driving 3.8. Oil pressure dropped to 3.9. Engine overheating 3.10. The battery does not recharge 3.13. Knocks in the engine 3.16. Wheel puncture
4. Maintenance
4.0 Maintenance 4.1. General provisions 4.2. Inspection work 4.3. Lubrication and filling works 4.4. Diagnostic work 4.5. Repair and adjustment work
5. Engine
5.0 Engine 5.1 Design features 5.2 Possible engine malfunctions, their causes and solutions 5.3 Useful tips 5.4 Checking compression in the cylinders 5.5 Removing and installing the decorative engine casing 5.6 Removing and installing the engine splash guard 5.7 Installing the piston of the first cylinder to the TDC position of the compression stroke 5.8 Replacing the drive belt gas distribution mechanism and tension roller 5.9 Replacing the power unit supports 5.11. Replacing engine seals 5.13. Engine cylinder head 5.15. Engine repair 5.16. Lubrication system 5.17. Cooling system 5.18. Power supply system 5.19. Design Features
6. Transmission
6.0 Transmission 6.1. Clutch 6.2. Gearbox 6.3. Front wheel drives
7. Chassis
7.0 Chassis 7.1. Front suspension 7.2. Rear suspension
8. Steering
8.0 Steering 8.1 Design features 8.2 Possible steering malfunctions, their causes and solutions 8.3. Steering column 8.4. Steering linkage 8.5. Steering gear
9. Brake system
9.0 Brake system 9.1 Design features 9.2 Possible malfunctions of the brake system, their causes and solutions 9.3 Bleeding the brake system hydraulic drive 9.4 Removing and installing the vacuum brake booster 9.5 Replacing the brake pedal axle bushings 9.6. Main brake cylinder 9.7. Front wheel brakes 9.8. Braking mechanisms of the rear wheels 9.9. Pressure regulator 9.10. Brake hoses and tubes 9.11. Parking brake
10. Electrical equipment
10.0 Electrical equipment 10.1 Design features 10.2. Battery 10.3. Mounting block (relays and fuses) 10.4. Generator 10.5. Starter 10.6. Ignition switch (lock) 10.7. Electronic engine control system (ECM) 10.8. Ignition system 10.9. Lighting, light and sound signaling 10.10. Windshield cleaner 10.11. Washer reservoir 10.12. Electric fan of the engine cooling system 10.13. Electric motor of the heating and ventilation system fan 10.15. Cigarette lighter 10.16. Instrument cluster 10.18. Electronic anti-theft remote control system 10.19. Immobilizer 10.21. Replacing sensors and switches
11. Body
11.0 Body 11.1 Design features 11.2 Possible body malfunctions, their causes and solutions 11.3 Removing and installing windshield frame lining 11.4 Removing and installing soundproofing upholstery in the engine compartment 11.5. Removing and installing bumpers 11.6 Removing and installing the fender liner and protective wing cover 11.7 Removing and installing the front fender 11.8 Removing and installing decorative sill trims 11.9. Hood 11.10. Trunk lid 11.11. Doors 11.12. Seats 11.13. Seat belts 11.14. Rear view mirrors 11.15. Interior fittings 11.16. Instrument panel 11.17. Heater 11.20. Body care
12. Applications
12.0 Appendix 12.1 Appendix 1. Tightening torques of threaded connections, Nm 12.2 Appendix 2. Fuels, lubricants and operating fluids 12.3 Appendix 3. Nominal filling volumes 12.4 Appendix 4. Basic data for adjustments and monitoring 12.5 Appendix 5. Spark plugs used on vehicles 12.6 Appendix 6. Lamps used on a car 12.7 Appendix 7. What you need to have in a car 12.8 Appendix 8. Tools used when repairing a car
13. Electrical diagrams
13.0 Electrical Diagrams 13.1 Diagram 1. Instrument Panel Harness Connections 13.2 Diagram 2. Vehicle Front Wire Harness Connections 13.3 Diagram 3. Engine Electronic Control System (ECM) Harness Connections 13.4 Diagram 4. Vehicle Rear Wire Harness Connections 13.5 Diagram 5. Light Harness Connections license plate light 13.6 Diagram 6. Left front door wiring harness connections 13.7 Diagram 7. Right front door wiring harness connections 13.8 Diagram 8. Rear door wiring harness connections
Design
Structurally, the ball joint is not complicated. There is a housing that is either bolted to the suspension arms, or is part of the design of the arm itself. A finger is placed inside this body.
The part of the pin protruding beyond the body has a conical shape, and a thread is cut at the end to secure the pin in the hub.
Inside the body, the finger has a spherical or mushroom-shaped shape.
Between the body and the latter there are plastic bushings that act as sliding bearings.
A boot placed on the body protects the ball from dust getting inside.
Thanks to this design, the finger can not only rotate around an axis, but also change its angle relative to the body. This allows the wheel to turn.