Published: March 16, 2016
Rating:
Tags:VAZ KalinaAdjusting headlightsLED backlight
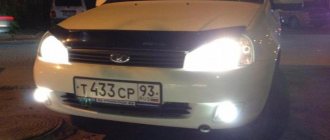
The headlight is a source of directional lighting on the Lada 1118. It is installed in front of the car, illuminating the road surface and the surrounding area. Due to the huge range of lighting systems to choose from, the elements of which can be installed on the Kalina, lights are often the subject of replacement or modification. To replace the Kalina headlight unit, it is worth first considering its structure. On this model, the car manufacturer installs 2 headlights equipped with 3 sections:
- low beam;
- side and main beam;
- turn signals.
Block headlight of Lada Kalina
When you turn on the low beam, only the low beam lights come on, and when you turn on the high beam on the 1118 model, the low and high beam complex with a power of 55 W each starts to burn. The sections of the front indicators have transparent light diffusers. The 21 W turning lights have an orange glow.
To be able to adjust the headlights on the Lada 1118, the package includes a headlight leveler with an electromechanical drive. The adjustment system has a device that is installed on the dashboard, as well as a connection wire and electric drives pre-installed in the lights.
The plant where Kalina is produced provides for installed lights from two manufacturers:
- Bosch;
- Avtosvet CJSC (Kirzhach).
Front optics of Kalina
To determine which company is the manufacturer of the flashlights on the 1118 model, you just need to carefully inspect the glass. If there are AL symbols on the glass, then the lighting complex was manufactured by Bosch. If the material for the flashlights is polycarbonate, which does not have a low beam lamp cap, then this model is also made by Bosch. However, if a polycarbonate flashlight has a low beam lamp cover, then it is made.
Among the main reasons why it is necessary to remove or replace the lighting system are:
- replacing old components with new ones;
- the need for tuning or adjustment of the device.
Tuning headlights for Kalina
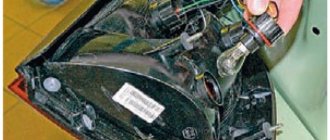
Disassembling the headlights of Lada Kalina (Kirzhach)
You will need : hair dryer, utility knife, flat-head screwdriver.
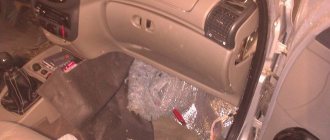
Removing the glass of these headlights without breaking it is not an easy task, requiring time (sometimes up to 6 hours) and patience. The difficulty of disassembly is that the sealant in this case is more “difficult”. Often, heating it with a hairdryer causes the plastic of the headlight housing to melt faster, so many people resort to other disassembly methods. For example, heat the entire headlamp unit in a cardboard box using a technical hair dryer to a certain temperature. After this, the sealant will easily give in under a little pressure from a screwdriver.
Recovery method No. 2
This DIY repair method involves gluing metalized foil to epoxy glue. The foil is wear-resistant and can withstand temperature changes well. The only drawback of the method is that the glue takes a long time to dry. The procedure is as follows:
- after removing the headlight glass, make a mock-up of the product of the required shape, attach it to the foil and cut off the required piece;
- Apply glue to the foil and attach the product to the reflector.
The headlight glass is installed back only after the glue has dried.
Headlights for Kalina - design, adjustment, replacement
The headlight is a source of directional lighting on the Lada 1118. It is installed in front of the car, illuminating the road surface and the surrounding area. Due to the huge range of lighting systems to choose from, the elements of which can be installed on the Kalina, lights are often the subject of replacement or modification. To replace the Kalina headlight unit, it is worth first considering its structure. On this model, the car manufacturer installs 2 headlights equipped with 3 sections:
Lighting system design
Optics for Kalina are manufactured at two factories:
- Bosch;
- JSC "Avtosvet"
Both types of optics have excellent characteristics and provide high-quality illumination of the road. You can recognize Bosch products by the missing cap on the lamp in the near module, as well as by the AL code on the glass.
The headlight design of the Lada Kalina is no different from most cars. The flashlight has low and high beam modules, blocks with turn signals and side lights. In the new Kalina body, the dimensions also play the role of running lights.
The following lamps are used in Kalina optics:
- low – H7, 55W;
- long range – H1, 55W;
- direction indicators – PY21W, 21W;
- Dimensions – W5W, 5W.
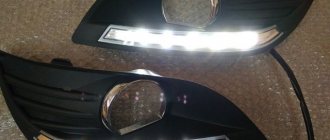
Light elements from the dimensions fit into the license plate lighting module on the trunk lid. Since 2013, modernized optics have been installed in Kalina, where part W21/5W is responsible for the clearance and daytime light. The fog lamps are equipped with H11 lamps with a power of 55W.
The procedure for dismantling the lights
You should know that the Lada Kalina 1118 flashlight system consists of:
- housings;
- glass (polycarbonate);
- lamps;
- reflector;
- wiring;
- lamp plugs;
- decorative inserts (masks).
As for the ease of removal and subsequent replacement of the lamp on the 1118 model, the process usually involves removing the front bumper. After this, the screws on the top and bottom of the lighting fasteners become accessible. After dismantling them, you can immediately remove the headlight unit, not forgetting to first remove the blocks with wires.
Removing the front optics
However, not all car enthusiasts have a lot of time to replace the lighting system or experience in removing the bumper. For this reason, a more popular method is to change the Kalina headlight without removing the bumper.
To do this you will need to use:
- key for 8 and 10;
- a set of screwdrivers (flat and Phillips);
- new lighting system component.
Set of tools
In order to adjust the block lighting on the Lada. You will need to complete the following steps:
- Remove the air filter housing, as well as the coolant unit.
- Remove the PTF plug using a screwdriver.
- Unscrew the bolt on the lower fastener of the lighting component using a 10mm wrench. Insert your hand into the PTF hole.
- Remove the bolts located on the upper fastener of the light block component. They are located closer to the radiator. Use the key at 8.
- Unscrew the screw securing the product to the car fender using a large Phillips screwdriver.
- Expand the Lada Kalina headlamp so as to move the part closest to the radiator closer to the car engine. This measure will allow you to remove the lower fasteners from the seat.
- Remove the lower iron fasteners of the headlight. To do this, you will need to remove a couple of bolts with a short head.
Removing the headlight on Kalina
- Remove the car light by moving towards you. At the same time, try not to damage the paint layer, since during dismantling the lamp will be located as close as possible to the bumper and fender.
After this, you can install a similar device in reverse order.
Next stage
We rotate the headlight unit so that the part of it that is located near the radiator moves closer to the engine.
When the headlight is deployed and moved closer to the engine, carefully remove the fasteners located below from the seats. Then we take the pre-prepared head. Using it, unscrew the bolts and remove the lower fastenings of the block.
The last operation - with a slight movement towards you, remove the headlight
A little earlier it was said about the need to be careful
In this case, special attention is required. It is at the last stage that it happens that the driver engaged in repairs damages the paint of the wing
The scratches, however, are small, but still, there is nothing pleasant about it.
Disassembling lanterns
To disassemble headlights of any brand on a Lada, you will need:
- hair dryer (household or industrial);
- flat screwdriver;
- stationery knife.
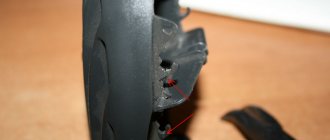
To separate glass or polycarbonate, you will need to remove the material's fastening brackets. After this, heat the sealant that holds the glass or polycarbonate in place with a hairdryer. Next, the softened sealant can be cut off. This makes it possible to remove the glass with a flat screwdriver.
Source: okuzove.ru
Recovery method No. 1
To repair the reflector, completely disassemble the headlight. To do this, it is enough to heat the sealant securing the glass with a hair dryer so that it loses its properties and separate the glass. Next, wash and dry the glass. The next step involves purchasing metallized tape that will be secured inside the reflector. The procedure is as follows:
- try on the tape and cut pieces of the desired shape;
- degrease the surface of the reflector;
- stick tape;
- cover the corrugated part of the part with chrome paint.
Restoration method using metallized tape
How to disassemble a headlight on Kalina
Your VAZ: how to disassemble the headlight
Removing the headlight during its next repair is quite difficult. Especially for a driver who does not have relevant experience. However, you may need to do this at any time, since no car is immune from breakdowns.
If a certain element of a car light fails, you need to know exactly how to properly disassemble the device. These acts can be applied to various brands and models of cars (Vortex Tingo, VAZ 2110 and other cars).
Without proper experience, disassembling headlights is unacceptable!
How to disassemble spotlight: cooking tools
It is worth noting that the process of disassembling a car flashlight requires certain skills. In order to perform all the necessary manipulations, you must first prepare the following description:
- a set of matching screwdrivers;
- a fairly powerful household hair dryer (it heats up the sealant);
- sockets and keys;
- mounting knife (this tool is used to remove sealant from the headlight housing);
- sealing composition.
Which optics is better to choose
While using the machine, the lights are subject to sudden temperature changes, impacts from stones and small grains of sand. These factors negatively affect glass, reducing its transparency, worsening light characteristics.
High-quality headlights that meet safety requirements are installed from the factory. Unofficial replacements are equipped with xenon lenses, “angel eyes” and modified reflector geometry. These lights look beautiful, but wear out faster due to poor quality materials and can fog up in humid weather.
When choosing new optics, it is better to trust the official ones. When purchasing, it is important to clarify the modification of the body and the year of manufacture of Kalina. Depending on the configuration, there are darkened masks or improved lighting characteristics.
Low and high beam optics
Depending on the body type, Kalina has different parts installed:
- sedan, hatchback – standard optics;
- sport, station wagon - are equipped with a more elongated reflector with an increased area to increase the lighting area by 20%.
To connect improved optics to Kalina, you do not need to lay additional wires or change contact connectors. The optics are no different in mounting points and shape.
When purchasing flashlights, you should pay attention to original parts with improved performance. This will improve the characteristics of the beam without interfering with the wiring or altering the standard fasteners.
Method number 4 - with paint
This is the latest reflector restoration technology available at home. The difference between this method is its simplicity. All you need is a can of spray paint. You can purchase chrome paint at any automotive stores. Restoring the chrome of headlight reflectors using this method is simply spraying paint onto a grease-free reflector. The downside is low durability.
Acrylic and alkyd paints perform well. You can even find special products for headlights on the market. They are more expensive than chrome in a can, but the product will eliminate the problem for a long time.
Restoring headlight reflectors with paints has a significant drawback - the optics will not shine so brightly. This can be explained by the fact that the paint is not highly reflective. But this is the simplest recovery method.
Method No. 2 with glue and foil
Buy foil and glue. Before gluing, the headlight is thoroughly cleaned and then degreased. Next, they make patterns, first from paper - at this stage you should show all possible care and accuracy. The paper is applied to the inside of the headlight and the blanks are marked. Then the elements are cut out according to the template from foil. All that remains now is to coat the elements with glue, glue and level the pieces. When the glue dries, the restoration of the headlight reflector is completely completed. You can test the result.
Reasons for reflector failure
These devices are identical in operating principle and equipment. They perform the same task - they direct the light flux from the rays that the lamp produces. To do this, the inside of the reflector should be as smooth as possible, and ideally mirror-like.
During the operation of the car, this surface is destroyed. Often, destruction is caused by physical impacts, a violation of the tightness of the headlight, or sudden and large temperature changes.
Recovery method No. 3
Restoration of headlight reflectors can also be done using mirror film. For such work, experts recommend using Oracal film - films No. 351 and No. 352 are perfect for the job. They are made on a polyester basis and guarantee good reflection and are not susceptible to moisture or mechanical damage. Provided that the film is in a sealed space (a properly installed headlight is sealed), such material can be used for years. After removing the headlight and cleaning the reflector, follow these steps:
- create a layout for cutting out a piece of film using tape. Cover the entire surface of the reflector with it, smooth it and cut off the excess parts;
- Based on the layout you have made, draw and cut out the required piece of film;
- stick the film strips using a hair dryer;
- smooth the film, removing air bubbles from under it and stretching the material along the edges of the reflector;
- Paint the corrugated surface of the reflector with chrome paint, which is sold in cans.
Restoring the reflector using Oracal film No. 351
Method No. 1 with metallized tape
Using this method, the reflectivity of the reflector can be easily restored. The method is inexpensive, and a huge number of car enthusiasts have experienced it. This restoration technology is based on the use of metallized tape. The previously dismantled headlight must be disassembled and thoroughly cleaned. When disassembling the optics, it is necessary to take into account that the factory sealant can hold the parts well. To neutralize the effect of the sealant, you need to heat the headlight, and then everything will come apart easily. You can do this in the oven. A hair dryer will also work.
The reflector can be easily pulled out if you pry it with a knife. Next, the headlight is washed, cleaned and dried well. Then measure out the required pieces of pre-prepared tape and cut it off. Be sure to degrease the bottom of the headlight, otherwise the tape will not stick. The tape is carefully applied to the damaged reflector.
Recovery method No. 4
This method of restoring a reflector is similar to the first method, but is a simplified version of it. If you don't have foil, tape or metallic film on hand, you can simply use paint with chrome chips, which can be purchased at any auto store.
Before applying paint, you must thoroughly wash and degrease the reflector. After this, apply a thin layer of paint and let it dry for several hours. Once the chrome has dried, the DIY reflector repair is complete and the headlight can be put back together.
Self-recovery methods
You can restore the reflector with your own hands almost in a garage. Of course, if you use these methods, the reflector will not work as it did from the factory. But at least the headlight will “live”.
Restoring a headlight reflector with your own hands is possible using metallized tape, glue and foil or mirror film. The method of painting the reflector with chrome is also being considered.