The clutch in a car serves as the connector between the engine and transmission. This unit takes on all the load that occurs when changing gears. Accordingly, the part can rightfully be considered a consumable item, because car owners regularly face the need to replace it or schedule maintenance.
It is almost impossible to influence the degree of wear of this unit. Therefore, after the clutch has exhausted its service life, it must be replaced partially or completely (in case of serious malfunctions).
Signs and causes of clutch failure
The VAZ 2108, 2109, 21099 clutch consists of a basket, a pressure bearing, a drive and driven disk. The main signs of a clutch malfunction are clutch slipping and incomplete disengagement:
- When switching off is incomplete (the pedal is pressed), there is difficulty shifting gears with the engine running, noise and crackling noises when changing gears, and large free play of the clutch pedal.
- When the clutch “slips” (the pedal is released), a burning smell may be felt in the cabin from the burning of the clutch disc linings, the car’s dynamics will deteriorate, the engine may overheat, and fuel consumption will increase.
Most often, the cause of a breakdown of the VAZ 2109 clutch is improper operation of the car. For example, if the car “sits down” in the snow and you continue to accelerate hard, or really like to start with slipping, all this shortens the life of the clutch.
In addition to the clutch disc itself, the release bearing can also fail - it serves to smoothly engage and disengage the clutch. When the release bearing wears out to the limit, you can hear a characteristic squealing sound - this is a sure sign that the bearing needs to be replaced. The cause of clutch failure may also be a breakdown in its drive mechanism, for example, a break or jamming of the clutch drive cable, a breakdown of the lever system, a fluid leak from the hydraulic drive if the clutch is hydraulic, or other similar breakdowns in the drive.
By the way, when replacing the release bearing at a service station, they may advise you to also replace the clutch disc. Usually, if problems begin with the clutch, it is better to replace all these parts, because replacing the clutch is very difficult: you need to remove the gearbox. But if someone wants to save on this, then all clutch parts can be purchased separately.
To work you will need the following:
- wrenches 8, 10, 13, 17 mm;
- torque wrench, 8 mm socket;
- jack;
- container for draining oil;
- inspection hole or lift.
- flat screwdriver, hammer.
When removing or installing the gearbox, do not rest the input shaft of the gearbox on the clutch pressure spring petals, so as not to damage them.
https://youtu.be/https://youtu.be/1858lZXHZ-g
_
Design
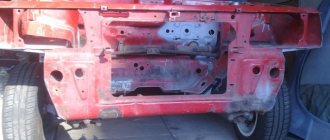
The clutch is located between the gearbox and the engine and is bolted to the flywheel. To remove it, you need to disconnect the box from the engine. There is nothing complicated, but the box is quite heavy, so it is better to remove the box together. For convenience, you can use a lift, a hole in the garage, or an overpass, but you can make repairs simply on the ground; you only need a jack to remove the wheels.
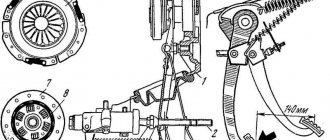
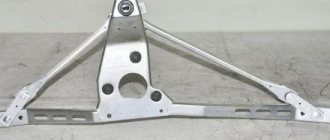
The picture shows:
- Clutch cable bracket
- Oil level dipstick
- Box casing for mounting to the engine
- Rod and fork for pressing the release bearing
- Primary shaft
- Release bearing
- The wheel drive shaft oil seal, behind it there is a differential with which the drive is connected.
- Gear shift mechanism with protective cover
- Side cushion
- Speedometer drive
And to remove the box, you need to disconnect it all. Moreover, this can be done in several ways. For example, the box can not be completely removed, but only moved away from the engine to provide enough space to access the clutch. The wheel drives can be disconnected from the box, or you can remove the box along with the drives by unscrewing them from the wheels. In this case, there will be no need to drain the oil from the box, since the drives will close their mounting holes.
Replacing the clutch on a VAZ 2109/21099 without removing the gearbox
Replacing the VAZ 2109/21099 clutch without removing the gearbox is quite difficult. You will not find instructions or recommendations on this topic in the car's owner's manual. These recommendations are based on the experience of car enthusiasts who share their experience of replacing the clutch.
The main problem when replacing a clutch is that not every motorist has an overpass, a pit, and especially a lift, and it is necessary to make sure that the massive gearbox does not fall to the ground. But lifting it is problematic, since it is impossible to crawl under the car with it.
All steps for removing the gearbox are almost the same as the instructions above, with the exception of some nuances:
- Purchase two bolts from the upper arm of the classic front suspension from the store. Their threads are exactly the same as those on the bolts that secure the box and the engine block together.
- Screw them in from above, only after that, with a small crowbar or screwdriver, we begin to disconnect the nodes. After moving away, the rear part of the box will rest on the transverse rod, and a gap of about 15 centimeters will form between the clutch housing and the flywheel.
- The release bearing is removed through the resulting gap and the bolts on the basket are unscrewed.
But the installation is slightly different from the process shown in the instructions:
- Place the new release valve in its place. Then a disk is installed on the flywheel and a basket on top of it.
- Just tighten the bolts a couple of turns, but do not overtighten!
- Carefully begin to slide the input shaft onto the splines in the disc.
- Then we move the box back and tighten the bolts on the basket. The basket fastening bolts are tightened only after the box is installed in its place.
- After this, you can install the gearbox and tighten the bolts on it.
When replacing the clutch without removing the gearbox on a VAZ 2109/21099 car, there is no need to center the disc!
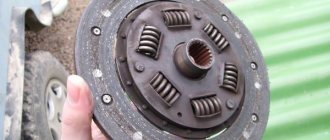
Replacing the disk yourself
Clutch disc basket VAZ 2109
It should be noted right away that on front-wheel drive cars, replacing a disc is a little more difficult than on classic models. In addition, different brands and models of cars have their own nuances for removing and installing the clutch. First you need to read the instructions and recommendations for changing the clutch yourself. It would be a good idea to consult with experts.
Note! In the process of replacing a damaged part, there is no need to skimp; it is better to immediately replace all elements that cause suspicion. As for rubber products, they need to be changed unconditionally. According to experts, the release bearing also needs to be replaced.
When replacing the clutch on a VAZ 2109, there is no need to completely dismantle the gearbox, drain the oil, completely remove the VAZ CV joints, etc.
Which clutch bearing should I install?
The original clutch bearing number is 2108 1601182.
Analogues:
- Pilenga PC-P 2108 — 360 rub.
- Luk 500 0439 20 — 1156 rub.
- Fenox TP2116C3 — 345 rub.
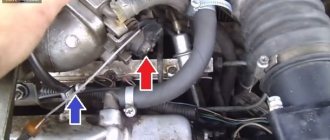
1. Remove the “negative” terminal from the battery “4”, remove the connector from the mass air flow sensor (MAF) “2”, loosen the clamp securing the corrugation to the MAF “3”, remove the air filter housing “1” from the car.
2. Remove the clutch cable from the clutch fork. Loosen the two nuts securing the cable to the bracket on the gearbox.
3. Remove the clutch protective cover. Disconnect the ground wire and the top dead center sensor from the clutch housing. Disconnect the wires from the reverse light switch. Drain the oil.
4. Unscrew the 3 bolts securing the bracket to the body. Unscrew the nut securing the arm extension.
5. Jack up the car. We remove two bolts “1” and disconnect the ball joint of the suspension arm from the steering knuckle. Unscrew the nut “2” securing the brace to the suspension arm, and remove the longitudinal brace together with the lever.
6. Remove the wheel, unscrew the hub nut and unscrew the fastening of the ball joint to the steering knuckle, then remove the CV joint from the bearing hole.
7. Having rested the pry bar against the gearbox housing, we press the internal drive joint from the side gear, to do this we sharply hit the body of the internal joint with a hammer. We knock out the hinge from the side gear.
8. Fastening the ball joint without driving the front wheel.
9. Loosen the clamp and disconnect the gear shift rod from the gear selection hinge. It is also necessary to support the engine, otherwise it may drop too low and tear off the interior heater hoses.
10. Having unscrewed the bolts securing the rear suspension support of the power unit, remove the suspension bracket from the eyes of the body spar.
11. Using a 17mm wrench, unscrew the nut and remove the bolt of the left engine mount. Unscrew the three starter mounting nuts and remove the starter.
12. Using a 19mm wrench, unscrew the three bolts and one nut securing the clutch housing to the cylinder block, remove the gearbox from the engine and remove it.
14. Using an “8” spanner, unscrew the six bolts securing the clutch housing to the flywheel. To loosen the bolts easily, tap their heads with a copper hammer. You can also use a 8mm socket to loosen the bolts.
15. Remove the driven and driven clutch discs. We check the degree of wear of the friction linings. If the rivet heads are recessed less than 0.2 mm, the surface of the friction linings is oily or the rivet joints are loose, the disc must be replaced. Cracks or mechanical damage to parts of the driven disk are not allowed.
16. If a visual inspection reveals loosening of the rivet joints of the clutch basket parts and the drive disc, then the clutch drive disc assembly should be replaced.
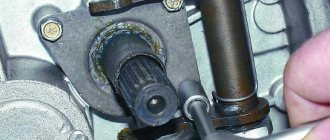
17. Lubricate the release bearing seat on the shaft, as well as the clutch guide forks, then install the bearing.
18. When installing the clutch, we orient the driven disk with its protruding part towards the drive disk and insert the centering mandrel.
19. We insert the mandrel into the hole in the crankshaft and secure the clutch drive disc in this position, tightening the bolts evenly (one turn per pass). We tighten the bolts no more than one turn each so as not to deform the flange of the clutch drive disc. We assemble everything in reverse order.
Sequence of operations
You need to start by placing the car on a level place so that it won’t roll anywhere when you jack it up and unscrew the wheels. Before jacking up, we need to break off the bolts - we need to remove the left front wheel. We also unscrew the nuts on the wheel drives, those on the hub, from both front wheels.
I am of the opinion that the fewer movements during repairs, the better. Therefore, I prefer to remove the box together with the drives, so as not to drain the oil and then fill it again, because if you remove the drive from the box, the oil will definitely flow, but as a rule, it is not possible to drain all the oil and it constantly drips. Therefore, we remove the entire transmission assembly. It is also not necessary to completely remove the box - just move it a little a few centimeters to get the necessary space. This will not affect the convenience, and unnecessary fuss can be eliminated, although everyone does things differently here. So, the front wheel has been torn off, the nuts have been unscrewed from the wheel bearings, you can lift the car, we only need to lift one side - from the side of the box. We remove the wheel. The stand along with the steering knuckle and hub prevents us from leaving the box. We remove the strut assembly with the hub; you can read how to do this in the article about replacing struts. Now we need to disconnect everything from the gearbox. We remove the starter, speedometer drive, clutch cable and gear shift mechanism. To free up some space under the hood and de-energize the starter, remove the battery. The starter is located in the front and is easy to reach; unscrew the bolts and move it to the side. The speedometer drive is located behind the box when viewed from the front of the car, but it is quite easy to reach with your hand. We unscrew it, if it doesn’t work by hand, you can tighten it with some pliers. The gear shift mechanism is screwed on with a bolt, unscrew it and pull it out. The box is ready to be removed.
Typical breakdowns
The clutch can fail for several reasons:
- The surfaces of the friction linings on the driven clutch disc have worn out, or defects or cracks have formed on them;
- Diaphragm springs are worn out;
- There is wear on the clutch flywheel;
- The release disc blades are worn out or broken;
- The release bearing is broken or worn.
To find the reasons for the failure of the clutch, you will have to disassemble it. But don't be afraid of this process. Even beginners can disassemble and return the unit to functionality if they study the instructions, design, and watch visual videos.
When is it necessary to change the unit?
The mechanism requires servicing in the following situations:
- The clutch "drives". Motor power drops.
- The unit slips or incomplete activation occurs.
- Clicking noises are heard when changing gears.
- The clutch disengages automatically.
- Vibration is noticed when the clutch pedal is pressed.
In each of the above cases, it is recommended to carry out partial maintenance or replace the unit in question.
Clutch selection
When choosing a clutch kit, you should focus not only on your available budget. By saving or buying a fake, you risk getting even more problems in the future.
Today there are several main manufacturers whose clutches should be purchased for the VAZ 2109.
| Manufacturer | Peculiarities |
| VIS | This is a stock clutch that the VAZ 2109 is equipped with from the factory. If there are laser markings on the discs, this is definitely not a fake. Plus, the company allows you to send an SMS indicating an identification code. If it is a fake, you will be notified accordingly. Not bad quality, but nothing special can be said about them. |
| Valeo | A French manufacturer, which is actively counterfeited on the domestic market. To catch fraud, pay attention to the cost and quality of components. Although the brand is from France, Valeo couplings can be produced in Italy, Spain, and South Korea. Good quality components ensuring smooth, easy operation. Perfect for female drivers. If you use the clutch correctly, it will last for about 150 thousand kilometers. The flywheel is almost eternal, and the discs are not afraid of overheating within acceptable limits. |
| Luk | A German company that has proven itself well in its homeland and has also earned a lot of praise among Russian motorists. They dampen vibrations perfectly, and real Luk clutches always have an element for damping vibrations of the pressure and driven disk. |
| Kraft | You can only find negative reviews about Kraft couplings from competitors. An impressive part of the sets under the Kraft brand, presented in Russia, were produced in Turkey, but under a German license. The kit includes a soft release bearing that performs well even under heavy use. The flywheel is very durable. On average, the clutch can withstand 150 thousand kilometers. But if you don’t spare the clutch, the service life will be significantly reduced. |
Regardless of the quality of the selected kit, if it is installed incorrectly or due to rough operation of the vehicle, the life of the clutch will not be able to reach those declared by the manufacturer. Therefore, drive your car accordingly.
Repair work
If you decide to do everything yourself, follow the following sequence of actions.
- Drive onto an overpass or pit. This will make it more convenient for you to work.
- Raise the front of the car using a reliable jack and securely fix the nine.
- Remove the wheels.
- Disconnect the clutch housing ground and clutch cable. Next you will have to remove the transmission.
- To do this, remove the starter by disconnecting the wires, terminals and unscrewing the three mounting nuts.
- Disconnect the speedometer cable and reverse cable.
- Remove the brace fastenings to the suspension arms and move them to the sides.
- Disconnect the ball joints from the swing arms. To do this, you need to remove the cotter pin, unscrew the nut, and knock out the support pin. Then the two nuts are unscrewed and the hinge is disconnected.
- Using a pry bar, press out the tip of the inner CV joint. Be sure to plug the hole formed in the gearbox using improvised means, otherwise oil will begin to pour out of the gearbox.
- Remove the lower clutch housing protection. There are only 3 bolts holding it in place.
- Make supports from bars, bricks for the box and engine.
- Remove the rear supports.
- Unscrew the remaining fasteners and pull the gearbox horizontally. Be careful not to deform the pressure spring lobes with the input shaft.
Removal and inspection
- When unscrewing the mounting bolts, it is better to secure the driven disk with something. A regular large screwdriver will do.
- Be careful not to give out the driven disc and remove the clutch assembly.
- Examine the current condition of the parts. If mechanical damage is noticed on them, we recommend replacing them immediately.
The next step is to check the condition of the parts.
| Object to be checked | Peculiarities |
| Release bearing | Try to crank it up. If crunching or extraneous sounds occur, the part must be replaced. |
| Driven disk | Check it for signs of wear and damage on rubbing surfaces. Also, the rivets should be located at a depth of at least 0.2 millimeters, and the springs in the sockets should only be solid and tightly installed. Otherwise replacement. |
| Basket | This is the pressure plate. Check it for damage or cracks on the working surface. Plus, the condition of the flywheel is checked. |
| Diaphragm spring | If there are cracks here, the petals dangle or are located in different planes, the part goes to scrap, and a new one is installed in its place. |
It is quite rare that individual components of the clutch change independently of the others. Mostly repairs involve replacing the assembly, which includes the pressure plate, release bearing and clutch driven disc.
Assembly of the unit is performed in reverse order. Just make sure that you choose really high-quality parts for replacement. For example, a normal quality clutch disc will cost about 1,000 rubles today. We do not recommend taking cheaper options.
How to check disk thickness
- Using a measuring gauge, you can accurately determine the thickness of the disc. There is no need to remove the clutch to complete the process. You can't do without a lift with a gauge and instructions for use. This gauge is connected to the active clutch cylinder.
- It is not recommended to abuse traditional methods, since their use can increase wear on the clutch disc. You need to start the engine with 4th-5th gear active, press the gas with the clutch. If the engine does not stall, this indicates wear on the driven disk.