Some car owners are wondering how to change the throttle cable on a VAZ 2114. The reason for this is the great importance of this element for the entire car. Without a cable, no mechanical unit can function in normal mode, because it is this that allows the power unit to operate in the mode desired by the driver. We are talking about increasing or decreasing speed at a certain point in time.
If the driver cannot regulate the engine speed while driving, this can lead to an accident. Also, if problems arise with the cable on the mechanical damper, the machine will also not be able to operate normally. In particular, the car will idle, and pressing the gas pedal will not lead to any effect. It is for this reason that not a single throttle valve has ever been done without a cable.
Replacing the throttle cable
In order to replace a faulty or damaged throttle cable 2114, you need to have a whole set of tools on hand.
Among the most important tools are:
- Spanners.
- Screwdrivers.
- High quality pliers.
Where is the throttle cable located?
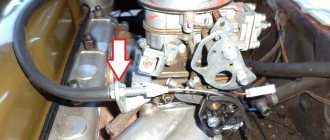
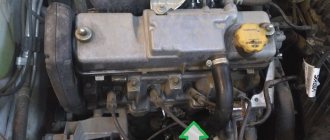
It starts from the sector of the damper itself (the sector is indicated by a red arrow, and if you look closely, you can see how the tip of the cable is attached to it) and ends with the gas pedal, that is, in other words, it goes from the throttle valve, passing through the entire engine compartment of the car and through the front shield (This is a metal shield that separates the car’s engine and body) it enters the car’s interior and is already attached there with its second tip, to the top of the gas pedal (You won’t even see the cable with the naked eye).
Cleaning
Using a special aerosol to clean the remote control without dismantling it is possible only when it is lightly soiled. Therefore, if problems arise, it is better to dismantle the throttle and remove dirt using a carburetor cleaner.
For this you will need:
- Phillips and flathead screwdrivers.
- 13mm head with extension.
- A can of cleaning product (“Carb & Choke Cleaner” or equivalent).
Attention: cleaning of the diaphragm must be performed after the engine has cooled down. Otherwise, there is a risk of getting burned by the coolant or hot parts of the engine and throttle.
To clean the throttle valve, you must perform the following steps:
- Remove the ground wire from the battery.
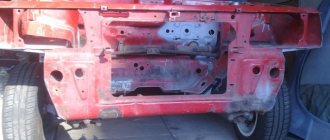
- Remove the plastic engine screen.
- Loosen the air duct clamp.
- Remove the air supply hose from the fitting on the throttle body.
- Loosen the clamps and remove the crankcase ventilation, coolant and adsorber pipes from the throttle pipes.
Attention: place a small container under the cooling system hoses to collect antifreeze.
- Bend the cooling system pipes upward and tie them to the hood pillar.
- Disconnect the wiring harness from the throttle position sensor (TPS).
- Disconnect the terminal from the idle speed control.
- Remove the spring clip from the drive pulley and unhook the cable.
- Unscrew the two nuts securing the throttle assembly.
- Remove the throttle.
- Unscrew the fastening screws and remove the idle speed control and TPS.
- Treat the insides of the throttle body with a cleaning agent.
Due to the fact that the liquid from the can is supplied under pressure, it effectively washes away plaque.
Reassembling the mechanism after cleaning is performed in the reverse order. Before installing the clamps, they should be lubricated with machine oil. This makes tightening easier and increases the reliability of the connection.
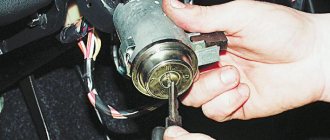
This is interesting: Removing and installing the Chevrolet Niva ignition switch (lock)
When should you change your throttle cable?
Over time, it wears out and therefore begins to jam, this is very dangerous and if you have not yet encountered this and your cable is already quite old, then soon this will overtake you, we will explain briefly, when the cable wears out it begins fray (the cable itself is metal) but besides all this, it is located in a sheath and as the cable wears out, it begins to catch on this sheath and therefore it jams and the throttle valve remains in one position, that is, you pressed the gas, for example, They took their foot off the gas, but the car still starts to pick up speed very quickly, all this is due to the fact that the cable is caught on the sheath, in this case you will need to press the gas pedal and also squeeze the clutch if there are a lot of cars around (When you squeeze the clutch, the car will start roar but will not accelerate), as soon as you encounter such a situation, we recommend that you immediately go to a car store and buy a new throttle cable; in addition, the cable must also be replaced if it is no longer adjustable (read about how to adjust the cable in the article: “Adjusting the throttle cable on a VAZ”) due to which the throttle valve either does not open completely or does not close completely.
Checking and adjusting the throttle valve control cable
As a rule, during the operation of a car with an automatic transmission, various failures and malfunctions may occur. In this case, most often the driver may notice the appearance of jerks and jolts when changing gears, a car with an automatic transmission begins to consume more fuel, etc.
In this case, there may be many reasons, but among them the automatic transmission cable should be singled out. In this article we will talk about when and why the so-called automatic transmission tuning is needed, as well as how to check and adjust the automatic transmission cable.
Step-by-step replacement of the gas cable of a VAZ 2114
Today in my recording I will highlight a problem that is familiar to many Samara drivers.
These are unstable idle speeds (float a little), jerking of the car when moving quietly in first gear, jerks in motion and incorrect speeds after resetting to neutral. For me they set it to 1500 until you touch the gas pedal.
I determined that the problem was clearly in the cable, or in the throttle itself. I decided to take a comprehensive approach to the issue.
It was purchased: Throttle cable (Cedar), throttle cleaner and TPS sensor (Arzamaz).
Now I will write a short instruction for those who have encountered a similar problem and want to fix it themselves.
Replacing the throttle cable is not a complicated procedure, but it is not fully covered in the Murzilka.
Note! To replace the cable with a new one, you will need the following tools: Wrenches, as well as screwdrivers and possibly pliers will come in handy, so stock up on them too!
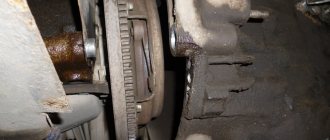
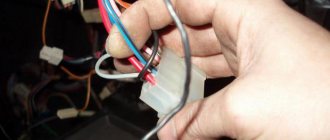
So, first of all, remove the cable end from the throttle valve drive (hereinafter referred to as DZ). We unscrew the cable mounting bracket from the receiver and, by unscrewing the adjusting nuts, release the cable.
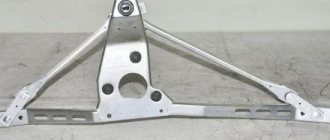
Let's go to the salon. We need to remove the end of the cable fastening from the pedal. This cannot be done in an enclosed space, so we need to remove the pedal itself. It will be faster this way.
Design and principle of operation of “e-gas”
By default, an electronic pedal consists of: an electronic damper, the pedal itself, and a chip sensor on the pedal itself. The operating scheme is as follows: when you press the accelerator, the electronic sensor amplifies the signal and transmits it to the electronic control unit (ECU), which indicates to the damper the degree of opening or closing.
But sometimes these transitions can't always keep up with the software. In this regard, sensors often produce “correlation violation” errors. There are two ways to cure the problem of “dampness” in the system:
A complete replacement of the chip board with a re-flashed (unlocked) one with the ability to set modes “for yourself” and regulate emissions into the atmosphere yourself. As a rule, in such situations, drivers return to Euro-2 standards
and increase engine power by 15-20% plus;
The electronic gas pedal on the VAZ 2114 is replaced with a similar new one, but the chip remains the same - not hacked, which means it will not break again for the first time.
E-Gas (electronic gas pedal) is an electronic gas pedal that replaced the cable-operated throttle valve. Email The gas pedal controls the throttle electronically rather than physically. AvtoVAZ began producing models with E-Gas at the beginning of 2011, the reason was the environmental standards Euro-4 and Euro-5, which must be observed.
To understand how to change the clutch cable on a VAZ 2114, you need to remember the following algorithm:
- Open the hood.
- Remove the negative terminal from the battery.
- Find the cable under the hood.
- Using a 17 key, unscrew the fastenings of the element.
- Remove the part from the clutch fork and bracket.
- Move into the car interior.
- Remove the driver's foot mat and lift the carpet.
- Remove the cable eye from the pedal mount. The locking bracket, which allows you to release the element, sometimes causes difficulties for some VAZ 2114 owners.
- Pull the element out from under the hood into the interior. It is not advisable to remove it from the engine compartment, as there is a risk of damage to the wiring and other parts of the machine.
- Disassemble the housing and remove the cable.
- Place the new part in the housing and assemble.
- Perform the previously described steps in reverse order.
- Adjust the cable tension. It is necessary to ensure free movement of the pedal. But it should not be pressed too tightly or too lightly.
You can replace the part yourself. It is recommended to work in a garage, especially in the cold season. It is not necessary to contact a car service to check and replace the element. This may only be necessary as a last resort if the cause of unusual clutch behavior cannot be found. Perhaps it was not the cable that failed, but other parts of the mechanism that broke.
Diagram of a car clutch
Most car enthusiasts and owners of the VAZ-2114 are accustomed to doing most of the repair and restoration operations on their car with their own hands. Replacing the clutch cable is no exception. Of course, not everyone is able to do this on their own, because they do not know where to start and carry out the process.
Tool
So, what tools will you need to perform this action: a new cable, WD-40, a 17mm wrench and Litol-24.
Algorithm of actions on the VAZ-2114
In principle, when everything is put together, you can proceed directly to the repair process:
- We remove the negative terminal from the battery to disconnect the power to the car.
- We find the cable and begin the dismantling process.
- Using a 17mm wrench, unscrew the fastening nuts.
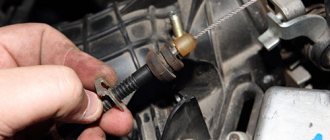
We remove the clutch cable from the seat from the fork
We completely dismantle the cable
Clutch cable adjustment process
Cable selection
The old clutch cable is worn out and needs to be replaced.
While researching the spare parts market while searching for a clutch cable for a VAZ-2114, it turned out that there is an original part, as well as several analogues that are no different in quality, and in some cases even better.
Original article
2109-1602210-10 – original catalog number of the clutch cable manufactured by AvtoVAZ. It is installed quite easily and simply, and also does not require modifications or improvements. The cost of the product is 1200 rubles.
Analogs
In addition to the original part, you can find analogues that are recommended for installation on the VAZ-2114. So, what non-original parts can be found on the spare parts market:
When the cable needs to be replaced
The cable is located in the engine compartment between the gas pedal and the throttle valve. The service life of the unit is not limited, but the tensioner may wear out over time.
The reasons for replacing a structural element may be the following factors:
- Mechanical wear of the material (the most common problem). The cable begins to jam, which leads to incorrect operation of the throttle lever.
- Incorrect throttle adjustment, resulting in the throttle being difficult to open.
- Frayed shell (by visual inspection) in which the tensioner is located.
A malfunction of the mechanical air regulator can lead to irreversible consequences on the road. At the moment when you need to accelerate the car, it will not react. Conversely, if you take your foot off the gas accelerator, the car gains speed. Therefore, the faulty element should be replaced immediately.
Important! It is necessary to monitor the technical condition of the cable. Its failure can lead to emergency situations on the road.
Automatic transmission diagnostic procedures
It is recommended to troubleshoot an automatic transmission in the following sequence:
Checking the throttle valve control cable
An important detail in automatic transmission control is the throttle valve control cable. It connects the automatic transmission control mechanism with the engine throttle sector or the fuel injection pump control lever. The cable consists of a metal base placed in a plastic sheath, rigidly fixed on both sides. During long-term use, the cable sheath dries, shortens and comes out of the attachment points.
A misaligned cable may cause gear shifting at higher or lower speeds. Shifting gears at high speeds leads to premature wear of gearbox parts and may cause increased fuel consumption. Some automatic transmission malfunctions can be eliminated by adjusting the throttle valve control cable.
We find out how to change the throttle cable on a VAZ 2114
Some car owners are wondering how to change the throttle cable on a VAZ 2114. The reason for this is the great importance of this element for the entire car. Without a cable, no mechanical unit can function in normal mode, because it is this that allows the power unit to operate in the mode desired by the driver. We are talking about increasing or decreasing speed at a certain point in time.
If the driver cannot regulate the engine speed while driving, this can lead to an accident. Also, if problems arise with the cable on the mechanical damper, the machine will also not be able to operate normally. In particular, the car will idle, and pressing the gas pedal will not lead to any effect. It is for this reason that not a single throttle valve has ever been done without a cable.
In order to replace a faulty or damaged throttle cable 2114, you need to have a whole set of tools on hand.
Among the most important tools are:
- Spanners.
- Screwdrivers.
- High quality pliers.
Feedback on the E-Gas modification
Car enthusiasts who have already completed the adjustment note that if you move the pedal assembly cover clockwise, the car becomes a little more lively. If you press the pedal as before and the car starts to move, you have to get used to it and not press the gas so hard. When you press the pedal to the floor, you can't feel the difference.
Those who adjusted the E-gas for a quieter ride noticed that driving on the highway became more comfortable. Now, to maintain speed, you need to press the gas pedal a little harder, which allows your leg to not be as tense as before.
Other motorists do not believe in the positive effect, saying that it is all self-hypnosis. The operation of the electronic gas pedal is based on changing the resistance difference. And even if you move the cover, when the engine starts, the ECU will still consider it to be zero and adjust the throttle from this point. And if you increase the sector stroke, the E-gas error “signal outside the permissible limits!” will appear.
Have you encountered such modification of E-gas? What feedback can you leave about such adjustments? Is there a positive effect or is it all at the level of self-hypnosis? Let us remind you that if necessary, you can check the E-gas yourself. By the way, an alternative to modifying the electronic gas pedal is chip tuning.
How does an electronic gas pedal work, how are its advantages and disadvantages manifested, what malfunctions are most common, and how to deal with them? All these questions are very relevant, because today many car manufacturers have replaced the traditional cable drive with a more modern electronic pedal.
How to replace the throttle cable on a VAZ 2114
In order to begin the process of replacing the cable, you first need to find it. If a car enthusiast does not know how to remove the throttle cable on a VAZ 2114, then he should act exactly according to the instructions below.
Usually the cable is located between the throttle sector and the gas pedal. Finding the sector will not be difficult, because if you look closely, you will notice that the tip of the cable is attached to it. The cable runs in the area of the car's engine compartment and front shield.
Additional Information. The front shield refers to the metal shield that separates the car's body and engine. It can be difficult to locate the cable, so in order to find it, you should be as careful as possible during your search.
When the cable needs to be replaced
- One of the most common reasons for cable replacement is that it wears out over time. When this happens, it starts to seize. This is quite dangerous, because in such a situation the car may not respond correctly to pressing the gas pedal. If a driver encounters a similar problem, he needs to immediately address it, otherwise he may get into an accident.
- Also, the cable should be replaced as soon as possible if it cannot be adjusted. In such a case, it will be almost impossible to open the damper.
Disadvantages of the electronic pedal
- A slight “thought” at first when pressing the accelerator;
- The “E-pedal” does not make it possible to carry out deep tuning, since for this it is necessary to convert to a “cable” system, and this is an additional expenditure of about 20-25 thousand rubles plus a bunch of sensors and cables. Not everyone will agree to such a hassle;
- Exclusively on the first (raw) versions with “e-gas” the pedals stuck, the engine speed fluctuated and random periodic self-pressing occurred;
- Most likely the second point is to blame, which does not allow you to upgrade the car.
But what to do if an avid driver wants to drive recklessly?! Our craftsmen found the optimal solution without removing the “e-gas” - this is re-flashing the sensors and adjusting the turbochargers.
Quick replacement of throttle cable VAZ 2114
The replacement process is not difficult if you act carefully and carefully. To briefly describe the process of replacing the cable, you just need to unscrew 2 nuts under the hood (in the place where the cable is attached), and then slowly pull it out.
In order to install a new cable, you do not need to have any expensive tools. It is enough to stretch a new cable and tighten the same nuts that were unscrewed. The only thing that can cause difficulty is adjusting the gas pedal, but this will simply require spending more time than unscrewing the nut.
Detailed instructions on how to remove the cable:
- First you need to remove the cable end from the gas pedal. After this, the tip must be pushed into the engine compartment of the car through the front shield.
- After this, you need to open the hood and find the damper sector. When this is done, you need to disconnect the bracket from it using pliers.
- Now it’s the turn to press the sector with your hand and disengage the cable. This way the cable will be disconnected from the sector.
- All that remains is to move the protective cover and secure the nut from turning. Then you need to unscrew the nut. When it is unscrewed, you can pull the cable. This way it will be removed from the car.
Checking the solenoid block
Automatic transmission tuning includes checking the solenoid unit. Due to incorrect operation of the electric valves on the control plate, the machine can not only be pushed or kicked, but also go into emergency mode.
To carry out the procedure for checking the serviceability of the electrical valves of the hydraulic plate, you must take the following steps:
- Drive onto the overpass.
- Drain the operating oil and tighten the bolts on the pan. Then remove it.
- Disconnect the filter device.
- Remove the hydraulic unit.
- Disconnect the contacts of each solenoid valve.
- Now you will need to call them.
- To determine whether the solenoid is working or not, you need to know the resistance rate. It can be found in the instruction manual. For example, for EV1 modifications at a temperature of 20 plus Celsius, the resistance is 65 Ohms.
And also at a service station, experienced mechanics can connect a computer and use it to check the faulty solenoid. After checking, you need to remove the faulty one and install a new one.
When checking solenoids, you must remember that they are different. Here are some types:
- by functional value: TCC and EPC. The first is responsible for blocking the fluid coupling, the second is responsible for distributing oil through the channels;
- The Shift solenoid is responsible for downshifting and upshifting;
- linear - the simplest and easiest to replace solenoid valves;
- VFS is complex to control, but simple in design, like linear ones. Its service life is noticeably limited.
The solenoid valve is replaced as follows:
- Unscrew the fastening of the faulty solenoid from the valve body removed from the automatic transmission.
- Install the correct one.
- Connect it to the connectors.
- Assemble and install the hydraulic plate into the machine.
After each assembly and disassembly of the box, experts advise adapting the box. This is done in order to set up the machine for smooth operation and unquestioning obedience to the driver.