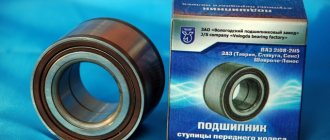
How a puller makes life easier for a car owner
Using this tool, you can dismantle bearings, bushings, pulleys, flanges and other components, remove or fix rings and gears, and repair chassis elements. It greatly facilitates the process of maintenance and repair of various parts of the vehicle. Using the right puller, you can quickly and easily replace a damaged element without the risk of damaging the machine elements connected to it. In addition, the tool can be used to work with hard-to-reach parts of the car, in a convenient position.
Products can have different designs, but the most common is the following - several gripping arms, which are shaped like hooks, and a threaded rod between them. Thanks to this structure, you can easily grab the required element and press the bearing out of it.
Let's look at what the design of a bearing puller is
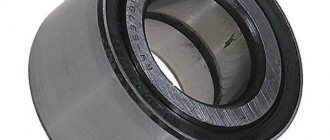
A bearing puller is a device, usually made of steel, consisting of several claws and a metal rod. This type of tool is used to firmly grip the bearing in order to remove it. The bearing removal process occurs due to tightening force. The ease of operation of the puller and the absence of the risk of injury depend on the quality of the design.
Types of mechanical pullers:
- Pullers with two gripping arms.
- Pullers with three gripping arms.
- Internal pullers.
Pullers with two gripping arms are a fairly simple and reliable mechanism. Made from high strength steel alloys. Allows you to easily control the work process.
Pullers with three claws are the same pullers with two claws, but improved. As a rule, they are made of hard alloy tool steel.
Internal pullers are used to remove coupling shafts when the part is firmly attached to the structure.
There is also another unofficial type of puller - this is a special one. As a rule, it is used to remove generators, cylinders, and motors. These pullers are exclusive, made to your specific dimensions. This is the main advantage of such a product; you can be sure that the puller one hundred percent fulfills its promises.
Today we will look at how to make a reliable and, most importantly, simple puller that will help you out in difficult times. For this we need:
- A piece of thick pipe.
- Steel plate.
- Nut, bolt.
- Dye.
- Kernel.
- Welding machine.
- Bulgarian.
- Drill.
- Lathe.
- Sanding disc.
Kinds
Tools are divided into two groups.
- Hydraulic. When they operate, hydraulic traction is used; removal and landing are performed in semi-automatic mode. The main part of such a puller is a hydraulic nut, the internal cavity of which presses on a special piston. This, in turn, transfers the force to the desired part. The hydraulic model is in demand among owners of trucks and other large vehicles - with its help you can easily remove the most massive internal parts.
This is what a hydraulic bearing puller looks like
- Mechanical. They operate from human muscular strength and are in demand for mounting/dismounting wheel bearings. There are two-jaw, three-jaw and internal ones. Two-grip ones are the simplest. They are used where maximum process control is needed. Three-jaw machines are equipped with three paws and are used for working with the front hub and generator. Internal options are useful for removing ball and needle roller bearings; in addition, they can be used to dismantle various brass couplings.
This is interesting: Used cars from America
Mechanical three-jaw model
Bearing pullers can come in different sizes, but the most popular are universal ones. Their parameters can be adjusted manually, adjusting them to any diameter.
You can make different tools with your own hands, but it is best to make a universal three-jawed version - it is convenient to use.
Diagram of a two-jaw puller
Universal wheel bearing puller
CV joint puller
A universal puller is a kind of working metal tool that is used to remove and replace wheel bearings. Due to the fact that this puller is universal, it is perfect for servicing many cars, such as:
As well as a large number of other cars from various manufacturers. This is the main difference between a universal puller and others designed for a specific brand of machine.
Manufacturing Features
The manufacturer offers only high-quality bearing pullers made of good material. Production is carried out in accordance with ISO 9001 standard technologies. A mandatory procedure is for the parts of the tool to undergo heat treatment. As a result of this procedure, the wear resistance of the puller increases several times. To combat corrosion of metal parts, a special chemical coating of mandrels and rings is used. Such a complex manufacturing procedure is the key to long service life and proper operation of the device. Moreover, manufacturers offer a wide range of models for different types of cars.
Features of the universal puller
- Among the special characteristics are, first of all, versatility. By purchasing one set of pullers, a car enthusiast gets the opportunity to use it to repair different cars. This characteristic will be especially appreciated by professional craftsmen working in services.
- A universal wheel bearing puller helps in a large number of diverse jobs. It is involved in the installation and dismantling of similar parts, replacing several tools at once.
- The puller is purchased as a kit. There is also a puller screw and a drive handle. In other words, the tool is completely ready for use and you won’t have to buy anything else.
- The removable supports are quite easy to install. To do this, they are installed in the required position for removing the hub. In this case, the circumference of the bolt fastening is no more than 190.2 mm.
Application area
Such a tool for car maintenance will be indispensable, both for personal use and in a car service center. In the latter option, it is simply necessary, as it helps to cope with a large volume of work much faster and with better quality. In this case, labor costs will be minimal.
Using this tool makes it possible to perform many types of car repair and installation work.
With its help, you can remove axle shafts, brake drums, hubs and many other similar parts in a short time. In addition, the pressed brake drums are dismantled.
The cost of such a device is slightly higher than other similar devices aimed at a specific car. However, its scope of application is so wide that it easily compensates for the price.
Making a universal three-gripper with your own hands
To make a universal three-jaw puller designed for working with bearings ranging in size from 202 to 308, you will need:
- sheet metal (10 mm wide);
- round metal with a diameter of 30 mm.
If you plan to remove large bearings, take sheet metal 15 mm wide and round timber 30 mm in diameter.
- The first stage of production is sketching. Calculate the length of the legs - it should be 200 mm. Sketch the sheet metal according to the drawing and cut out the tabs with a gas cutter that runs on propane and oxygen.
- Sand the workpiece with heavy sandpaper. The dimensions of all paws should be approximately the same, but absolutely perfect parameters are not required - a difference of approximately 1 mm is allowed. When this part of the work is completed, you need to drill two holes in the top of each tab - these will be used to expand the tool. The diameter of the holes must correspond to the diameter of the 8 or 10 bolts. If you plan to work with large bearings, drill 3 holes for 12 or 14.
- Making the core. It is made of round metal with a diameter of 30 mm and a length of 35 mm (50 and 45 mm if it is necessary to work with massive bearings). We take the workpiece and drill a hole in it for a 16 mm thread (30 if necessary in a larger product), cut the thread with a fine pitch. We apply marks on the sides every 120 degrees, to which we then weld the paw holders. The distance between them should be equal to the width of the foot. Now you need to drill holes in the holders. They should be positioned at a certain distance from the center so that the foot can grip the large bearing.
This is what the parts of the future puller should look like - The final part of the work is making the screw. For a standard puller you will need a screw 350 mm long with a thread length of 280 mm, for a large one - 500 mm with a thread of 420 mm. We process the workpieces on a lathe and cut the threads. We leave the upper part without threads - there you need to drill through holes located perpendicular to one another, having a slight offset in height.
This is interesting: ABS operation
Appearance of the finished product
Wheel bearing puller drawings.
A 320 mm long stud was also needed and a nut was welded to it. I also pressed the ball from the bearing into the center of the stud.
According to the drawings, they made these:
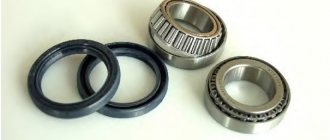
Cup with mate.
Also two washers measuring 74 mm and 62 mm.
This is what the entire set of tools for pressing out wheel bearings looks like.
In this video, the author shows in detail a wheel bearing puller.
Software: KOMPAS-3D 13
Composition: Puller (SB), detailing (handle, paws, etc.), specification, technological map for the cultivation of sugar beets (RP), technological map for the cultivation of sugar beets
Software: T-flex 8, grs.
Contents: Assembly drawing (SB) + detailing, specification.
Software: KOMPAS-3D 13
Composition: Assembly drawing (AS), Detailing, 3D Assembly
Software: KOMPAS-3D 17.1
Contents: Assembly drawing (AS), Detailing (screw, cam, tab, strip, pipe), Specification
Software: KOMPAS-3D 17.1
Composition: Detailing, Specification, Assembly.
It is desirable for every man to have such a tool in the garage. Sometimes situations arise when it is necessary to repair a power tool, namely to replace bearings that are subject to a high degree of wear. You can, of course, remove the bearing with a hammer and screwdriver, but there is a risk that the threads or axle may be damaged during removal, as a rule, this usually happens. Or there is an option that the bearing is so seated on the part that even a special device cannot remove it.
A simple way to make a homemade removal device
This option is easier to implement, but the product will not be as convenient. You will need the following tools and materials:
- steel pipe, the internal diameter of which will be greater than the diameter of the bearing;
- metal plate more than 5 mm thick;
- Bulgarian;
- stud with nut or bolt with long thread;
- a few nuts.
- Cut a piece of pipe with the required parameters.
Cutting off part of the pipe - We mark all the necessary elements on a metal sheet, outline the pipe and bearing.
Marking out future details - We cut out the parts with a grinder and grind them to meet the exact parameters.
Cut parts - We drill holes for the bolt in the obtained washers.
Drilling holes for bolts - That's it, the remover is ready!
Ready puller
Unscrewing the hub nut on a VAZ: “burn, hit and twist!”
Now let’s look at the methods that may be the only effective ones in your case, but that doesn’t make them any less radical, even barbaric.
Strong hammer blows
If you hit the hub, you hit the bearing! If you are going to make a replacement, then go ahead! If you value the bearing, avoid this method.
Warming up the hub nut with a burner. Not recommended!
Using the burner
The law of physics is guaranteed to work, and the body (read: hub nut) will expand. And this will make it much easier to remove the stubborn part. There is one “but”: not only this one part heats up, but also everything else in the area of the burner. For example, a bearing. And it’s better not to allow this. As a more gentle option, we can suggest using a soldering iron and... patience. You'll need it.
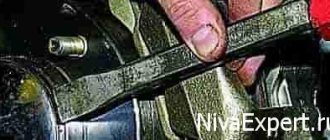
Jumping on a lever
A chisel will help you remove the hub nut.
The “method” is fraught with the danger of unexpectedly breaking off the edges of the nut, breaking the key, and so on. Just don't do it.
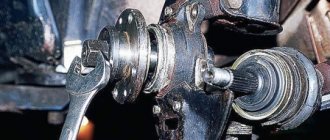
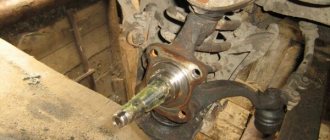
Determining the condition of parts
To determine the condition of the hub parts, it is necessary to lift the car wheel so that one or more wheels are above the ground. And shake them simulating vertical and horizontal load. Before checking the wheel, it is necessary to check the stability of the body; to do this, push the body from the side; the body must stand securely; if there are vibrations, it is better to shift the safety pad. If the wheel play is no more than 2 mm, then you can try to adjust the gap in the rolling elements of the product.
Replacement methods
First way
So:
- In the first case, it is necessary to use a puller to remove the bearing;
- Simply carefully remove the bearing and replace it with a new one;
- After installation, all the steps above should be carried out in reverse order.
The main advantage of this method is the fact that the technician will not need to touch the camber adjustment bolt, which is very difficult to put in place later.
Bearing puller from the hub
If we talk about the disadvantages, we can note the following: the master will have to take a very uncomfortable position to perform actions. That is why it is necessary to prepare a lift and climb into the inspection hole.
But it is still very inconvenient for a car enthusiast to knock out the hubs in this position and press in the bearing assembly.
Second way
Consists of the following steps:
- To remove the bearing using the second method, you must carefully dismantle the steering knuckle and completely remove the hub;
- After this, the master will need to go to the workbench;
- The VAZ 2110 wheel bearing is replaced directly on the workbench;
- After this, everything is installed back, just as it was removed before.
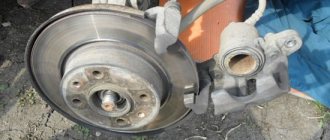
Remove the retaining ring
Relying on the inner ring of the bearing, use a piece of pipe to knock out the bearing
Or press it out with a puller
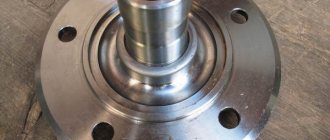
Press a new bearing into the cleaned and lubricated hub.
This method is undoubtedly much easier than the first, but since it affects the camber, problems with adjustment cannot be avoided. Before you begin to unscrew the knuckle mounting bolts from the strut, you need to mark their position with chalk or a marker.
The first mark in this case will indicate the location of the adjusting bolt on the rack. The second mark will indicate the previous position of the fists.
After the master begins assembly, he will focus precisely on these marks. Of course, it will be difficult to achieve great accuracy and it will not be possible to return the parts to their place. But with careful work, installation errors can be minimized.
There are some steps to follow:
- The master puts marks;
- Knocks out the knuckle bolts;
- Unscrews the mounting bolts from the lower ball joint;
- The bearing must be knocked out of the hub;
- The retaining rings are dismantled;
- Using a vice, the bearings are pressed out.
Before reassembly, the space in the fists must be thoroughly and thoroughly lubricated.
This method is often used when repairing not only one bearing component, but the entire chassis. As a result of this method, it will also be possible to safely replace ball joints, silent blocks of levers and steering tips.
Third way
It is carried out in the following order:
- In this case, you will need to remove the entire rack completely;
- After all the components have been removed, the technician will need a special vice;
- The wheel bearing will be replaced at the vise and all parts will be reinstalled.
This method is the most complex and difficult because it requires the technician to dismantle the entire rack. In addition, it will be necessary to unpress the steering tip, and you also need to unscrew the fastening nuts, they secure the upper support to the body base.
Direct removal of this VAZ 2110 unit is carried out only after the entire rack has been removed from the car. And this process takes a lot of time.