How to replace the Grant alternator belt
The replacement process is not simple and depends on the equipment of the car: whether there is a tensioner, air conditioning. In the latter case, you cannot do without a lift and dismantling the engine mount due to the air conditioning compressor clutch pulley.
For a Granta with air conditioning, for installation you will need to hang the wheel and remove one engine mount.
How to change a belt on a Grant 8 and 16 valve without air conditioning and tensioner
What you will need for work :
- a knife, if you just need to cut off an old part;
- crank or ratchet with head 13;
- long strong wire;
- flat screwdriver;
- partner – you can replace it yourself, but it’s easier with an assistant.
Step 1. Dismantling
The car is on a flat surface, neutral is engaged without the handbrake. The battery is disconnected .
If the old belt is not needed, we cut it in an accessible place and take it out.
Car with air conditioning: the differences are not only in the presence of a tensioner
Owners of cars with air conditioning will need to stock up on WD-40 or similar lubricant, a 10" wrench, and also a balloon, since the right front wheel will need to be removed.
We do not change the procedure, otherwise the lubricant will not have time to act.
- Moisten the bolts holding the pad and bracket.
- We support the front part of the car on the right with a jack.
- We remove the wheel.
- Lowering the car, unscrew the tensioner pulley.
We work carefully because only a small engine overhang is needed.
Please note that to work you need to lower the car without the wheel.
An attempt to reduce the cost of low-cost bag configurations resulted in the absence of a tensioner on the alternator belt, which could result in the alternator belt being over-tightened and resulting in failure.
Problems with the generator are typical for Granta: whistling under load or in the rain, bearings break due to narrowing. If there is no tensioner, problems are inevitable. Let's look at how to replace the Grant generator belt.
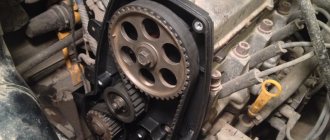
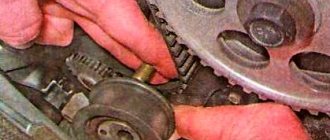
Instructions on how to assemble a tensioner on a grant
Any Grant has space for installing a tensioner. To assemble this you will need:
- generator bracket from Kalina;
- tension roller and its bracket;
- screw tensioner;
- new belt from Kalina;
- bushings and bolts.
Assembly diagram, full list of parts with article numbers, see below:
The tensioner is not installed from the factory in order to save money. SCHEME: Lada.online
in detail here:
2302-6-01-03_cr
So far we have shown steps that will allow you to change the tension of the accessory drive belt if necessary. But to replace the belt, we need to disassemble the right power unit holder, since it passes through the belt.
Remove the center and right wings of the engine compartment from the bottom of the car. You can see how to do this in the article “Replacing the Lada Granta coolant.” Next, you should remove the wheel arch liner of the right front wheel or, having loosened all the fastenings of the wheel liner in the front and middle parts, fold the wheel liner behind the brake disc of the wheel.
We go out and remove the right front wheel and release the fender liner supports according to the diagram.
General questions about working with the Grant generator
Let's consider general questions: everything except replacement.
Tension check
There are two approaches: visual assessment and physical.
Visual assessment of condition:
- the car is on a flat surface, the gear is in neutral, the handbrake is off, the hood is open;
- We don’t start the car - we put it in 5th gear;
- We opened the hood and found a generator: we push the car back, resting against the bumper;
- We inspect the required part along its entire length: are there any breaks or cracks? It needs to be changed.
Poor quality will lead to unexpected problems on the way.
Physical assessment:
- if you have a tool that measures pressure force: press the belt with a force of 10 kg*s - the deflection should be no more than 10 mm;
- there is no special tool: we try to turn it across - it should turn no more than 90 degrees.
How to tighten the alternator belt on a Grant
This section applies only to machines with a tensioner. No - change the part or see above how to install it.
Subsequence:
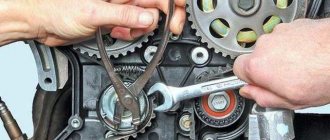
- we use ring wrenches 8, 19;
- Throw key 19 onto the lead screw;
- wrench 8 for locknut;
- we touch;
- Now you can turn the lead screw: clockwise to loosen, counterclockwise to tighten;
- got the desired result - tighten the locknut.
It is better to take ring wrenches, since a head with a ratchet or a wrench will not work.
When to change: technical regulations for replacing a VAZ 2190 belt
AvtoVAZ requires checking the condition of this part every 15,000 kilometers .
every 30,000 kilometers, regardless of condition.
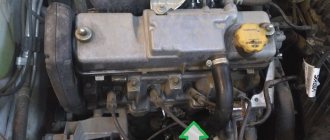
How to remove a generator on a Grant
It needs to be removed for repairs, replacement of bearings or rollers.
The step-by-step process involves:
- remove the negative terminal from the battery;
- working with the generator: disconnect the wiring harness from it;
- remove the cover of the power wire nut, remove the nut and remove the wire from the bolt;
- unscrew and pull out the upper and lower fastening bolts - to work with the lower one, you may need to climb into a hole, throw off the tin protection of the internal combustion engine and dismantle it from below;
- move the part to the right mudguard, remove the belt, and remove it.
You can do without a hole . Example:
Let's summarize
To work with the generator and replace the belt you must:
- set of Torx keys t20 and 27, ratchet with head or handle, knife;
- if there is no tensioner, it can be assembled and delivered;
- if there is no air conditioner, replacement is the easiest;
- is there air conditioning? Work requires a pit or lift with disassembly of the engine mount;
- consumables are changed every 30 thousand runs according to regulations.
Write comments, share your experience.
In accordance with the maintenance regulations for Lada Granta and Lada Kalina cars, we check the condition of the auxiliary drive belt every 15 thousand kilometers, and replace it every 90 thousand km, regardless of the condition of the belt.
LADA > Granta
LADA > Kalina
It is more convenient to work on an inspection ditch or overpass.
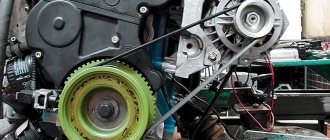
Replacing the alternator belt
You will need : a new Lada Granta/Kalina 2 generator belt (price about 800 rubles, length 823 mm, catalog number 1118-1041020-07, marking 6РК 823), a long screwdriver, a knife and a “13” wrench.
Procedure:
Cut off the old belt with a knife. Unscrew the lower mounting bolt of the generator a few turns using a 13mm wrench.
Use the same key to unscrew the nut and remove the bolt from the upper mounting of the generator.
Rotate the generator so that the upper mounting eye goes beyond the protrusion on the bracket. Press the generator against the bracket and tie it with a piece of wire to the nut securing the cylinder head cover.
Place the belt on the generator pulley (in Fig. No. 2) and the upper part of the generator drive pulley (in Fig. No. 1). Engage 5th gear and, pressing the belt against the pulley, push the car backward until the belt is put on. Then untie the wire and use a screwdriver to press the generator away from the bracket. Insert the upper generator mounting bolt.
All that remains is to tighten the lower bolt and the nut of the upper generator mounting bolt.
Let us remind you that due to the lack of a tensioner, the alternator belt is often overtightened, which contributes to rapid wear of the alternator bearing and the occurrence of howling. The problem can be solved by installing an alternator belt tensioner.
Snapshot53252323
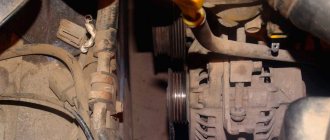
To improve visual inspection, remove the plastic engine cover. To check the condition of the belt, engage the manual transmission in fifth gear, push the car (or turn a suspended wheel) and inspect the entire length of the belt. On a car with an automatic transmission, remove the right fender from the engine compartment and, turning the crankshaft using the accessory drive pulley bolt, check the condition of the belt.
With any of the gearboxes, the following method is also possible: mark sections of the belt with chalk and, briefly turning on the starter, turn the crankshaft at small angles. We inspect the tape along its entire length, checking the areas covered with marks.
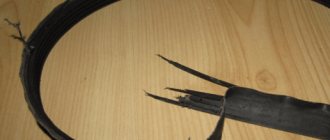
The belt should not have cracks, tears or detachments of rubber from the base fabric. A faulty belt must be replaced. To do this, from the engine compartment side...
With him
Using the E-14 head, unscrew the two screws securing the support to the engine cylinder block bracket. Using the “17” head, we unscrew the two nuts and the bolt securing the support to the body spar (shown by arrows). Using the E-14 head, we unscrew the two screws securing the support to the engine cylinder block bracket. Using a 17mm socket, unscrew the two nuts and the bolt securing the support to the body side member (shown by arrows).
Signs of wear on the RPM
Before you start replacing the RPM, conduct your own diagnostics and evaluate the actual condition of the parts and mechanisms. Perhaps the cause of the malfunction is in another unit adjacent to the generator.
- We open the hood, the engine must cool down so as not to damage the skin of the hand and fingers.
- We put the gear in neutral and turn the alternator belt. Rotation occurs quite easily, by hand, without special equipment.
- We inspect each area one by one.
Signs of wear on the RPM
The following will indicate the need to replace the RPM:
- fraying, side abrasions;
- peeling of rubber, thread fiber;
- other mechanical damage;
- teeth tears;
- the presence of oily traces and streaks on the surface of the belt.
If there are no comments on the RPM, we proceed to inspect the tensioner roller. Often the reason for the appearance of third-party noise is precisely this, worn-out roller bearings. We loosen the structure with our hands and check that it is working properly.
It is important to know!!!
If the belt breaks on the way, it is allowed to travel on the battery's reserve energy, but not more than one hour. In practice, experts recommend no more than half an hour of free movement.
Basic faults
Failures associated with the failure of the Granta generator lead to discharge or, conversely, overcharging of the battery and its boiling. In both cases, this will make further operation of the car impossible. If the belt is overtightened, problems with high bearing wear will soon arise. If the belt tension is insufficient, slipping will occur and the battery will receive too little charge.
Normally, a working generator produces 14.5 V; exceeding this value is most often due to a breakdown of the voltage regulator. Without urgent replacement of the element, constant recharging of the battery will lead to shedding of lead plates and battery malfunction. If the unit does not produce the required voltage, and it is below 13 V, then the problem may not only be with the regulator, but also with the fact that the brushes are worn out, the diode bridge or windings are damaged.
| Analogs | |||
| GATES 6PK1113 | From 400 – 450 | LYNXAUTO 6PK0823EL | From 400 – 450 |
| GATES 6PK1123 | —/— | LYNXAUTO 6PK0995 | —/— |
| GATES 6PK745 | —/— | AYWIPARTS AW2120354 | —/— |
| LYNXauto 13X1050LX | —/— | AYWIPARTS AW2120037 | —/— |
| LYNXauto 10X938LX | —/— | LYNXauto 10X825LX | —/— |
| LYNXauto 10X750LX | —/— | CONTITECH AVX13X1050 | —/— |
| CONTITECH AVX10X750 | —/— | CONTITECH AVX10X825 | —/— |
| JP GROUP 1118005100 | —/— | FLENNOR A5361 | —/— |
| Cause of malfunction | Remedy |
| The warning lamp on the instrument panel does not light up | |
| Open circuit in the power supply between the generator, ignition switch or the lamp itself. | Check the wiring and eliminate the break. |
| The charge indicator lamp does not go out after starting the engine | |
| Insufficient belt tension. | Adjust the belt tension, replace the belt, and replace the tensioner if necessary. |
| Wear of the brush assembly, short circuit of the windings, malfunction of the diode bridge or voltage regulator. | Replace faulty components. |
| Short to ground in the power wire from the generator to the control lamp. | Insulate the power wire. |
| The generator does not provide sufficient charge | |
| The battery terminals have oxidized. | Clean the terminals and replace them or wire tips if necessary. |
| Battery failure. | Replace battery. |
| Insufficient belt tension. | Adjust the tension and replace the belt if necessary. |
| Malfunction of the diode bridge or voltage regulator. | Replace parts. |
| The battery is being recharged | |
| Failure of the voltage regulator or diode bridge. | Replace components. |
| Voltage drop in the generator-battery circuit section. | Check contact connections, clean or replace if necessary. |
The table shows the main faults. Mechanical and other damage is also possible.
Reviews
| Analogs | |||
| GATES 6PK1113 | From 400 – 450 | LYNXAUTO 6PK0823EL | From 400 – 450 |
| GATES 6PK1123 | —/— | LYNXAUTO 6PK0995 | —/— |
| GATES 6PK745 | —/— | AYWIPARTS AW2120354 | —/— |
| LYNXauto 13X1050LX | —/— | AYWIPARTS AW2120037 | —/— |
| LYNXauto 10X938LX | —/— | LYNXauto 10X825LX | —/— |
| LYNXauto 10X750LX | —/— | CONTITECH AVX13X1050 | —/— |
| CONTITECH AVX10X750 | —/— | CONTITECH AVX10X825 | —/— |
| JP GROUP 1118005100 | —/— | FLENNOR A5361 | —/— |
| № | Positive |
| 1. | Victor: The factory RPM served me for 35,000 km, after which it was replaced by LYNXauto 13X1050LX. Both are good quality at an affordable price. |
| 2. | Ivan: after 30,000 km the RPM whistle appeared, tightened it a little, disappeared. It served for another two thousand, after which it broke off. I am satisfied with the quality of the original belts, there are no complaints. |
| 3. | Vladlen: I’ve heard negative reviews about RPM, I can’t confirm. Every 15,000 km I carry out diagnostics, moderate driving style, do not exceed 3500 rpm. |
| 4. | Ignat: at the first maintenance after purchase, the master tightened up the RPM a little, after which it served for more than 35,000 km. This is very good for the domestic auto industry. |
| 5. | Gennady: at the third maintenance, he did not change the “traditions”; he bought the original RPM, since there were no problems with the previous one, and served over 30,000 km. |
| 6. | Vasily: my recommendations to motorists, install the original RPM. Mine worked 33,000 km. I'm happy with the quality, no complaints. |
| 7. | Georgy: Every maintenance in a row I carry out RPM prevention, keep the engine compartment clean. There are no complaints about the quality of the belt, my recommendations are to buy the original one. |
| Negative | |
| 1. | Victor: My RPM has already flown 15,000 km. A whistle appeared and after 50 km it was torn into pieces, fortunately the speed was 90 km/h. |
| 2. | Gennady: despite the manufacturer’s specified service life of 30,000 km, my strap only lasted 20,000 km. I don’t recommend domestic ones; I think it’s better to pay extra for imported ones, but in good quality. |
| 3. | Vladimir: I join the negative reviews addressed to RPM, since domestic ones do not last more than 20,000 km. |
What tools and auxiliary materials are needed?
To successfully replace a Lada Granta car, you should stock up on the following list.
- Naturally, with a new “consumable” (belt).
- A piece of soft wire or a suitable cord.
- Socket head (13th dimension).
- Regular keys.
- With a pry bar (shovel) or, alternatively, a heavy-duty screwdriver.
Conclusion
https://www.youtube.com/watch?v=k8L4V9Y6wAM
This technical “mistake” did not happen by accident. The fact is that the Lada Granta was developed with a low retail price in mind. And, given the depreciation of the ruble, this car managed to enter the top ten cheapest cars in the world. At the same time, the equipment of the Lada Grant is much higher than that of its competitors on the list.
And some problems, like the alternator belt tensioner, can be solved yourself. Only consider warranty issues that may be violated during installation.
Despite the external similarity of the Lada Granta models with 8 and 16 valves, the method of replacing the alternator belt is different. 8-valve modifications: “Norma”, “Standard” are not equipped with an air conditioning system. The gas distribution design does not have a mechanical belt tensioner.
The Lada Granta “Lux” version with a 16-valve mechanism and pre-installed air conditioning has a built-in drive belt tensioner.
In order to provide methodological assistance to inexperienced Lada Granta owners, we will consider two ways to replace the alternator belt.
The manufacturing quality of domestic alternator belts is quite decent. Subject to the manufacturer's recommendations, the service life exceeds 30,000 km. This is a good indicator for the Lada Granta.
Negative reviews are largely unfounded, as they are caused by violation of the operating conditions of the technical equipment by the driver. Often, owners exceed maintenance deadlines, buy cheap consumables, and practice an aggressive driving style.