VAZ 21010 or simply “kopek” as people say - this is exactly the car that can be called an old workhorse. AvtoVAZ stopped production of this model back in 1988. However, as you know, the kopeck became the ancestors of the whole classic family of Lada cars from models 1 to 7. Many Zhigulis of the first model, even despite their very advanced age, still serve their owners well. There is no need to hide, of course, that very often a car requires repairs and, like any equipment, it has its own weak points. In the case of Zhiguli, this is the chassis, namely the driveshaft crosspiece. The part really doesn’t like shaking and vibration and wears out quite quickly on our roads.
VAZ 2101
Purpose of the VAZ 2106 cardan cross
When a car is moving, the axles of the vehicle are not always on the same straight line. They change their position relative to each other and the distance between the axes also changes. On the VAZ 2106, as on many other cars, torque from the gearbox to the rear axle is transmitted through a cardan, at the ends of which crosspieces (hinges) are installed. They are the main link of the cardan transmission, which connects the gearbox and the drive gear of the rear axle gearbox. Another important function is assigned to the universal joint crosspiece - the ability to dampen possible deformation of the universal joint due to the constant movement of all its elements.
The VAZ 2106 cardan cross is designed to connect the rotating axles of the transmission
What are cardan crosspieces made of?
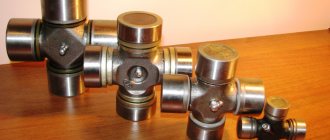
Structurally, the universal joint is made in the form of a cross-shaped part with needle bearings, seals and covers, which are fixed with a stopper.
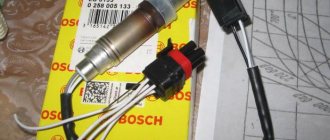
The device of the cross: 1 - cross; 2 — boot; 3 - lip seal; 4 — needle bearing; 5 - thrust bearing; 6 — needle bearing housing (glass); 7 - retaining ring
Cross
The cross itself is a product with perpendicular axes in the form of spikes, supported by bearings. The material used to manufacture the part is high-alloy steel, which has high strength. Such properties allow the crosspiece to withstand heavy loads for a long time.
Bearing
The outer part of the bearings is a glass (cup), the inner part is a spider spike. The movement of the cup around the axis of the tenon is possible thanks to the needles located between these two elements. To protect the bearing from dust and moisture, as well as to retain lubricant, boots and cuffs are used. In some designs, the end of the crosspiece tenon rests against the bottom of the cup through a special washer, which is a thrust bearing.
The crosspiece bearing consists of a cup and needles, and its inner part is the crosspiece spike
Stopper
Bearing cups in the holes of forks and flanges can be fixed in different ways:
- retaining rings (internal or external);
- clamping strips or covers;
- punching.
On a VAZ 2106, a retaining ring secures the bearing cup from the inside.
Correct operation of the cardan shaft
It is worth noting that the VAZ 2101 is a very old car and does not like shaking and bad roads. That is why in our realities we have to service and repair this vehicle so often. All this, of course, comes down to finances and it is in the interests of every driver to reduce the funds needed to repair his iron horse.
In the case of the VAZ 2101, this can be done in the following ways:
- First, and perhaps most important, avoid bad roads. Naturally, this problem is difficult to solve, but still, if possible, it is better to make a small detour along the asphalt than to drive off-road or on gravel. Shaking and impacts on the bottom have an extremely negative effect on the driveshaft of the VAZ 2101, and it is the driveshaft cross that suffers especially.
- Pay special attention to lubrication - it significantly increases the service life of parts. This must be done using a special syringe or grease gun, and experts recommend using lithium grease for the cardan. For VAZ 2101 parts it is ideal.
- You can notice and eliminate a minor malfunction in a timely manner if you pay special attention to the condition of the driveshaft parts. Therefore, if possible, try to go to an overpass or inspection pit at least once every two months and inspect the components and assemblies of the transmission.
That's probably all, however, even these 3 simple rules can work a miracle for your car. If you properly care for your VAZ 2101, your old penny will serve faithfully for many years to come.
Signs of faulty crosspieces
The VAZ 2106 crosspiece, like any other car part, has a certain service life. Theoretically, the service life of the part is quite long, about 500 thousand km, but the real figures are 10 times less. Therefore, replacement has to be carried out after 50–70 thousand kilometers. This is due not only to the quality of the parts, but also to our roads and the intensity of vehicle operation. Lack of periodic maintenance of crosspieces only brings the need for their replacement closer. The following characteristic signs indicate that there is some problem with the hinge:
- blows and knocks;
- chassis vibrations;
- squeaks when driving or accelerating.
Clicks and bumps
Often problems with crosspieces appear when the seals are damaged and dust, sand, dirt and water get inside the bearings. All these factors negatively affect the service life of the product. When the joints wear out, clicks will be heard when changing gears while moving, impacts at a speed of about 90 km/h, and a crunching or rustling sound will also appear. If metallic sounds occur, it is recommended to twist parts of the cardan, for example, by placing the car on an overpass. If large play is detected, the crosspieces will need to be replaced.
When diagnosing the gap in the crosspieces, the gearbox must be in neutral gear.
Video: play of the cardan cross
If clicks appear in the cardan area on my car, but I am sure that the crosspieces are still in good condition and should move, then, most likely, there is simply not enough lubrication in the hinges, for which they need to be injected. If clicks appear, I advise you not to delay maintenance, since the bearings will break and it will no longer be possible to do without replacing the crosspiece.
Creaks
The cause of squeaks in the area of the driveshaft is usually associated with souring of the crosspieces. The problem is clearly noticeable at the beginning of the movement and when driving at low speed, while the car creaks like an old cart.
The crosspiece may squeak due to lack of lubrication
The malfunction occurs when the hinges are not maintained, when the bearing simply cannot cope with its task. Sometimes, after removing the cardan, it is discovered that the crosspiece does not move in any direction at all.
Video: how the cardan cross creaks
Vibration
Malfunctions in the form of vibration with the universal joints can occur when moving forward or in reverse. The problem can be present with both old bearings and new ones. In the first case, the malfunction is caused by jamming of one of the hinges. If the vibration persists after replacing the crosspiece, then a low-quality part may have been installed or the installation was performed incorrectly. The crosspiece, whether old or new, should move in any of the four directions freely and without jamming. If you have to exert little effort when moving the hinge by hand, you can lightly tap the bearing cup; it may not be seated properly.
Vibrations in the driveshaft may be due to imbalance. The reason may lie in the impact on the cardan with something hard, for example, when hitting a stone. The balancing plate could also fall off the shaft. In such situations, you will have to visit a car service to eliminate the imbalance, and possibly replace the shaft itself.
Cardan vibrations are caused not only by the failure of the crosspiece. From personal experience I can say that the problem also manifests itself when the outboard bearing breaks, when the rubber in which it is held breaks off. The vibration is heard especially clearly when reversing and when starting to move in first gear. Therefore, before you start replacing the crosspiece, it would be useful to check the driveshaft support.
Diagnostics
It is very easy to find out that it is the VAZ driveshaft crosspiece that is faulty. An experienced car owner will certainly not miss these signs:
- A hum and mechanical knock is heard in the chassis.
- The sounds intensify and turn into metallic rattling at the moment when the car starts moving or picks up speed.
Having noticed such signs, the first thing you can suspect is that the driveshaft crosspiece is worn out. The part will most likely have to be replaced - it cannot be repaired. The procedure is quite simple and, if you have been driving for more than a year and know the structure of the VAZ 2101 chassis, complete it without any problems. By the way, for that matter, when replacing the crosspiece, it is best to install new bearings. In this case, the parts will last much longer.
Tools you may need
You shouldn’t even start work if you haven’t stocked up on the mandatory set of tools for a novice auto mechanic.
Cardan shaft crosspiece VAZ 2101
To repair or replace the driveshaft crosspiece you will need:
- Two sets of keys - socket and open-end.
- Copper or aluminum attachment.
- Screwdriver Set.
- Spitz and pliers.
- Hammer.
VAZ 2101, a simple car, was designed by Soviet engineers. Therefore, the above set will probably be enough for any repair work related to this vehicle.
The main thing, as everyone knows, is practical skills. If they exist, and you are confident in your abilities and know what the driveshaft crosspiece looks like, you can safely get down to business.
Lada 2106 “Red Garnet” › Logbook › Replacing crosspieces
Good day to all!
Yesterday we replaced the universal joint crosspieces. Due to noise during gear shifting. As it turned out, the bearings on the crosspiece were worn out.
How to determine crosspiece wear
If, when lowering the pedal, when shifting gears, or during sudden acceleration or braking, you hear a knocking sound in the cardan drive, vibration of the axle, this indicates severe wear of the crosspiece and bearings. It is urgent to carry out work to replace these worn-out parts. You can, of course, ignore the symptoms, but then there is a high probability that the bearing will collapse and the cardan will fall out someday right on the road. The gearbox may also be damaged.
You should have the following tools at hand: open-end wrenches 12 and 13, a copper or aluminum adapter, compression pliers, a hammer, a socket wrench 13 and 27. If it becomes necessary to replace the outboard bearing, you will need a tension puller and an old flange of the elastic coupling.
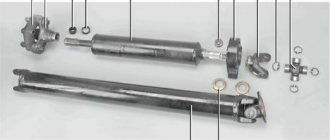
Removing the cardan on a VAZ 2106 Sequence of actions when removing the cardan
Using round nose pliers or pliers, disconnect the tension spring from the body bracket and remove it.
Mark with paint the joint between the gearbox flange and the cardan (this will be useful during assembly). Having jammed the cardan with a screwdriver so that it does not turn, unscrew the self-locking nuts (there are four of them) with a No. 13 wrench.
After the nuts are unscrewed, one end of the cardan can be easily removed.
The relative location of the elastic coupling flange and the cardan should also be carefully noted.
Bend back the 4 locking tabs on the seal ring near the elastic coupling.
Carefully move the cage towards the cardan (together with the seal).
Using a 13mm socket, unscrew the two nuts and remove the safety bar.
Using a 13mm wrench, unscrew the two nuts and remove the plate of the outboard bearing, secured to the body through rubber washers, from the studs that secure it to the body.
Remove the cardan shaft from the splines of the flexible coupling flange and remove it.
Which crosspiece is better to install?
Car service specialists say that if the time has come to change the crosspiece, then it is better to change them as a set, both of them. In fact, this is not always the case. The front crosspiece, as a rule, lasts much longer than the rear one. Sometimes three crosspieces are replaced at the shank, but at the outboard bearing the crosspiece remains fully functional.
Experts advise not to “kill the ears of the cardan”, and not to change the crosspiece unless necessary.
When purchasing, you should not save on cost, it will be more expensive. Quite good crosspieces made in Germany are of high quality and come complete with retaining rings, which come in very handy if the “original” ones break during disassembly.
Trialli reinforced crosspieces (with an oiler at the end of the tenon) - made of high-carbon steel, uniformly hardened over the entire surface. Withstands high static and dynamic loads. The improved seal design provides reliable protection from sand and dust to the bearing units.
The crosspieces (with oiler) are made of a special stainless steel alloy that is resistant to corrosion. The manufacturer guarantees high quality based on multi-stage control during the production process.
Crosspieces from Weber, GKN, etc. The only disadvantage of imported crosspieces is that the retaining rings often need to be adjusted.
Installation of crosspiece VAZ 2106
First, you should check the presence of lubricant in the new crosspiece on the inner surface of the bearing housings and the spikes of the crosspiece. If necessary, lubricate the crosspiece bearings with Fiol. Place seals and plastic plugs on the crosspiece. Insert the spider spikes into the fork. Place the bearing housings and press them into the fork holes. The bearing should go deeper than the groove for the retaining ring. Install retaining rings. Tap the forks with a hammer (preferably one with a plastic striker). The gap between the bottom of the bearing and the retaining ring is eliminated under the influence of impacts and gaps will appear between the ends of the crosspiece studs and the bearing housings. Use a feeler gauge to check the axial free play of the crosspiece - it should not exceed 0.04 mm. If the axial stroke is greater, replace the ring with a larger diameter. Retaining rings are available in five sizes. For clarity, each size has its own color. Rings with a thickness of 1.5 mm are unpainted, 1.52 mm are dark brown, 1.56 mm are blue, 1.59 mm are black, 1.62 mm are yellow. Check the balancing of the cardan drive and the ease of rotation of the hinge forks.
Which crosspieces to put on the “six”
If you listen to the opinion of service station specialists, they recommend replacing both universal joint crosspieces, even if only one of them fails. But not everything is so simple. The crosspiece located at the front of the driveline travels much longer than the rear one. There are situations when a part in the shank is changed three times, but near the outboard bearing there is no need to replace it. When choosing crosspieces for your car, you should not chase a low price, since repairs will ultimately cost more. Let's look at some hinge manufacturers that you can trust with your choice:
- Trialli. Made of high carbon steel and evenly hardened over the entire surface. The product is able to withstand high impacts of dynamic and static nature. The seal has an improved design, which increases reliability and protection against dust and sand getting inside the bearings.
Before purchasing and installing a universal joint, be sure to consider the size and shape of the cups. Attention should also be paid to the hinge pins. They should not have any burrs, marks or other defects. For domestic cars, it is better to give preference to crosspieces with a grease fitting, i.e., serviceable ones, which will allow you to periodically renew the lubricant in the bearings. The seals must not have any defects, such as visible tears or manufacturing defects.
Table: parameters of the universal joint for the “classic”
| Number | Application | Dimensions DxH, mm |
| 2101–2202025 | Cardan crosspiece VAZ 2101–2107 | 23.8x61.2 |
| 2105–2202025 | Cardan crosspiece VAZ 2101–2107 (reinforced) | 23.8x61.2 |
Step-by-step installation of the part
Before installation, the crosspieces are checked and lubricant is applied to the parts. For lubrication, use “Fiol” or another substance of similar effect. The bearing housing is inserted into place, the forks are pressed into place. Then the retaining rings are installed. They hit the forks with a hammer. All gaps existing between the bottom of the bearing and the ring disappear. To check the free movement of the main part, use a feeler gauge. The stroke should not exceed 0.04 mm. Otherwise, a larger diameter ring is installed.
The rings come in 5 sizes, each with its own color. If the thickness of the part is 1.5 mm, then the product is not painted.
Disassembling the cardan to remove the cross
Replacing the crosspiece involves installing a new outboard bearing. This procedure is carried out after dismantling the cardan and crosspiece. Then unscrew the front shaft nut. The puller is fixed to the fork. Using a hammer, the fork is moved and pressed from the splines. The outboard bearing fixing bolts can be unscrewed with a 13 key.
The main part is knocked out of the shaft. Reassembling the cardan is carried out in the reverse order. If the above process is carried out without dismantling the cardan, then an assistant will be required.
What does the price depend on?
There are several different factors that influence the final cost of a given item. The first is characteristics . The crosspiece is a very important part that is constantly under influence, therefore its degree of wear is greater than that of some others. Therefore, there are two main types of crosses: reinforced and not. The first one will obviously be more expensive, but it will also last longer.
The second is a sample . It's no secret that VAZ has improved its cars over the course of its existence, changing some elements, which is why they produce old and new crosspieces. It is not recommended to install new crosspieces on the VAZ 2107, because this will significantly affect the rigidity of the hinges.
The third is the manufacturer. Obviously, car owners will only buy spare parts from a reliable manufacturer. Today, the best companies in the production of these spare parts are: GKN (Germany), VolgaAvtoProm LLC, AVTOVAZ OJSC.
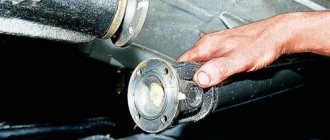
Removing the cardan.
1. We carry out the work on an inspection pit or a lift. Remove the handbrake cable spring.
2. Apply marks to the joint between the cardan and the gearbox flange. Using a 13mm wrench, unscrew the four self-locking nuts. At the same time, we hold the cardan from turning with a large screwdriver.
3. Remove one end of the cardan.
4. We note the relative position of the cardan and the centering flange of the elastic coupling...
5. Next, bend the 4 locking tabs on the seal ring near the elastic coupling...
6. ...and move the holder along with the seal towards the cardan.
7. Using a 13mm socket, unscrew the two nuts and remove the safety bar.
8. Holding the cardan, use a 13mm wrench to unscrew the two nuts and remove the outboard bearing plate from the mounting studs to the body. It is secured to the body through rubber washers.
9. We take out the cardan from the splines of the elastic coupling flange and remove it.
- We first mark the relative positions of the parts (cardan joint forks) so as not to disturb the factory balancing of the cardan shaft during assembly.
- Then we mark the locking rings and their seats in order to install them in their standard places during assembly. Remove the retaining rings (four from each hinge).
- We press the bearings out of the hinge fork using mandrels of a suitable diameter.
- Since the bearings are not pressed in completely (the joint cross rests against its fork), we remove the bearing using pliers
- We disconnect the cardan joint by moving its crosspiece in the direction of the removed bearing, slightly turn the crosspiece and remove it from the hinge fork.
- Press the opposite needle bearing out of the hinge fork.
- We carry out steps 3 and 4 for other needle bearings and remove the cross.
- We do the same with the second cross if necessary.
As you can see, replacing the crosspiece on a VAZ 2106 with your own hands is not particularly difficult.
If necessary, replace the intermediate bearing
- Unlock the nut securing the front shaft fork. We unscrew it and press the fork using a puller from the front shaft.
- Remove the dust deflector from the front shaft.
- Screw the nut onto the threads of the front shaft so that it is flush with the shaft itself
- We compress the intermediate shaft support (we apply force to the inner race of the bearing) and unscrew the nut.
- Remove the support along with the bracket from the propeller shaft
- We unscrew the bolts securing the bracket to the support, remove all the washers and disconnect the bracket from the intermediate shaft support.
Defective parts
- We thoroughly clean the parts with a brush before inspecting them.
- To cull the cardan transmission elements you will need: a bore gauge, a dial indicator.
- Since we have removed the cardan and disassembled it (albeit partially), we check the integrity of the welds. Drive shaft splines so that they do not contain wear marks
- For the rear cardan shaft, we check the presence of balancing weights, the condition of the seams and measure the diameters of the fork holes for the needle bearing. Dents of pipes and misalignment of the holes of the cardan forks are not allowed.
- We check the condition of needle bearings, oil seals, their cages and spider spikes for damage and significant wear.
- At the same time, check (while the cardan is removed) the condition of the rubber coupling of the cardan.
- The presence of cracks, mechanical damage or detachment of rubber from steel liners is not acceptable.
- We check the intermediate support for deformations. Cracks or ruptures of the elastic clip, as well as peeling of the rubber, are not acceptable. Replacing the defective support assembly
- We check the intermediate support bearing, rotate its inner race in two directions, while pressing it against the outer race (the inner race should rotate smoothly). We check the bearing seals for mechanical damage.
- We replace all defective parts.
We assemble the cardan in the reverse order, taking into account the features given below:
- Before installing the front shaft fork, lubricate the splines of the fork and shaft with grease.
- When installing the front shaft fork, tighten the nut securing it with a torque wrench 8.1-10 kgf•m (79.4-98 N•m) and tighten the nut with a chisel.
- When installing the oil seal race, the oil seal itself with the flange onto the front driveshaft splines, we fix the oil seal race by bending its three “tendrils”.
- Using an oil syringe, coat the splined part of the front driveshaft. Remove excess grease with a rag. We unscrew the grease nipple and screw in the plug in its place.
- Lubricate the needle bearings and stud surfaces of the universal joint with grease.
- Having installed the bearing races, we determine the gaps between the end part of the bearings and the upper edge of the annular groove located on the hinge fork using a flat feeler gauge. The permissible gap is within 1.5-1.66 millimeters.
- We select the thickness of the locking rings based on the obtained gap values (we measure the rings with a micrometer).
- After installing the rings, we apply a couple of blows with a rubber hammer to the hinge forks from the reverse sides (this ensures the contact of the needle bearing races with the locking rings and the free movement of the cross).