After long periods of operation and considerable mileage, the car will most likely need to dismantle some parts of the brake system, which is associated with unscrewing the union tubular nuts at the ends of the brake pipes. Over time, this becomes difficult to accomplish due to souring of the thread. If the tube needs to be replaced and there is no need to save it, the mating part can be expensive and is in working condition. We have to look for a way to safely unscrew the tube fasteners.
How to unscrew a brake pipe. If it has soured and the edges are torn off! Let's disassemble the hose and cylinder
Not long ago I wrote an article about how to unscrew a stuck bolt, say on a muffler .
My readers liked the article, they asked me to tell you about dismantling a soured brake pipe. After all, on used cars this is a real problem, and it is difficult to unscrew both from the caliper or cylinder, and from the brake hose itself. WE WILL solve the problem. Well, today there are some useful tips on installing these tubes, there will be a video, so read and watch... ARTICLE CONTENTS
I myself have encountered brake pipes many times on our VAZs, from 2101 to 2114; of course, if you go to a service station, they will easily and quickly unscrew them for you. But if you climbed it yourself, and have never done this before, and even if the mileage on the car is huge and the brake fluid has almost never been changed! It will be triple difficult to do this.
About brake pipes
It itself is usually made of a thin copper tube, at the ends it is flared and covered with metal nuts. It is these nuts that are attached to the calipers , brake cylinders and screwed to rubber hoses. And it is they (in threaded connections) that “sour” or, as many say, “stick”; it is really very difficult to unscrew!
Especially if you are a beginner and go in with a regular wrench, which can tear off the edges and make the nut round, then be careful, it’s not so easy to unscrew. Well, I present to you several methods according to complexity.
Why do they sour so much?
There are several reasons:
- They are located next to the wheels of the car. And this is water, snow, dirt and other delights of our roads, that is, a banal external factor
- Warming up calipers and drums. When braking, a lot of heat is generated, so the elements of the braking system can heat up, and after getting into a puddle they can cool down sharply
- Brake fluid is hygroscopic. If it takes up water more than 3.5% of the total volume, then it urgently needs to be replaced. However, even if the proportion is only 2.5 - 3%, then such brake fluid will oxidize metal parts from the inside
These are the most basic points why sticking and souring occurs so strongly.
The essence of the problem
- After many years of use, the thread on the fitting turns sour, corrodes, and is very difficult to unscrew.
- The flange of the tube sticks to the fitting and when it rotates, the tube also rotates.
There are several prerequisites.
Snow, mud, and water regularly get on the brake mechanisms - that's it. In the rain, after numerous brake applications, water gets onto the heated calipers. Water sharply cools the parts, causing them to stick to each other - that's two. And three - brake fluid is hygroscopic and accumulated water also causes corrosion, but from the inside. In general, the problem of dismantling brake pipes looks like this: an attempt to unscrew a soured fitting with a regular open-end wrench fails - the edges are licked off and dismantling is doubly difficult. Now special equipment is required, and in advanced cases also inventive skills. We will present a method for correctly dismantling brake system fittings and work out deviations from the intended scenario.
Unscrew the loose nut
If the tube has never been unscrewed, then its edges are intact. However, the mileage is high, then there is a 95% chance that it has gone sour! I EXTREMELY DO NOT ADVISE you to climb and unscrew with a regular wrench, be it an open-end wrench or a socket wrench!
What you need to do initially:
- Clean the mounting area. Often there can be so much dirt that the nut is not visible at all.
- Treat the fastening area with liquids like WD-40 ( they made a homemade one here ) and wait 30 - 40 minutes
- We need a special wrench to remove the brake pipes. It has an extra bolt that fits very tightly around the edges of the nut.
Here the principle is simple, throw on the wrench, tighten the bolt on it and unscrew the nut. In 60-70% of cases everything works out quite quickly and easily. Watch the video
However, there are still 30 - 40% of cases. And here it is not always so simple.
Method No. 1: dissolving rust
How to unscrew a rusty nut? We will not suffer with the tool, wasting our strength in vain. Let's go in search of a substance that will help dissolve rust and reduce friction. Of the most famous ones that have proven themselves well:
- Special product WD-40.
- Kerosene.
- Brake fluid.
- Petrol.
- Carburetor cleaner.
- Alcohol.
- Table vinegar.
- Iodine.
- “Coca-Cola” and other drinks containing inorganic phosphoric acid.
We are sure that at least one of the above is at your fingertips. Next, the algorithm of your actions is simple:
Wet the nut well with
Wait about half an hour. After this, try to carefully unscrew the part with a tool. If it doesn’t work out, apply the substance again and wait. The product will work better if you soak a rag or napkin in it and wrap it around the nut. You can then speed up the unscrewing by lightly tapping the part with a hammer. Another effective way is to try to twist the nut with a strong and sharp jerk after exposure to the solution. For a small nut, the “rocking” method will help - back and forth.
The edges are broken, what should I do?
Not everyone reads my articles and, as usual, we go under the car with a regular key. What happens, the oxidation is very strong, we try to unscrew it and “bang” - the edges are torn off, the nut becomes round, it is almost impossible to unscrew it. What to do? There are several ways, but often the only thing that will help you is “breaking off” the tube and removing the caliper, cylinder or hose completely!
No matter how sad it sounds:
- Again, we try to work out the place with WD-40. This product knows its stuff and often helps even problem areas
- We take the key (which I wrote about above), put it on, and tighten the bolt. We try to unscrew it, the whole point is that sometimes some edge remains and it can get caught on it. If it scrolls, you need to cut the tube
Actually, next we break (cut) the tube and remove the caliper or cylinder itself, here again we have several ways:
- You need to take the correct head, in which the force is applied not to the corners of the nut, but to the edges. Let's watch this useful video and you'll understand everything.
- If the case is completely advanced, you can try to grind off a few edges with a file, give it a square look and then clamp it in a vice and try to unscrew it
However, it happens that the nut simply breaks, and a part remains inside; this is an even more complicated case.
Here again there are several options:
- Drill out. That is, take a drill of approximately the same diameter as the hole, then drill out a part of the nut and tube EXACTLY, after that we take a tap and cut the thread. This is a VERY complex and precise process, not everyone can handle it
- This is to weld a washer or a nut of larger diameter to part of the nut and try to unscrew it. It’s also difficult, but you don’t need to cut anything. Again a useful video.
In conclusion, I would like to say that I have had cases when I had to buy a new brake cylinder because the old one just wouldn’t budge. And after drilling out the tube, the drill went in the wrong direction, and it was impossible to cut the thread! Fortunately, for a VAZ, a rear brake cylinder costs a penny, as do brake hoses.
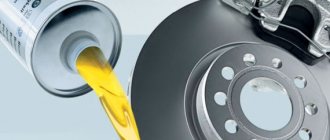
I also want to note - CHANGE THE BRAKE FLUID ACCORDING TO REGULATION (usually 2 - 3 years), do not let moisture accumulate in it! You may not even need to remove anything.
I end here, SINCERELY your AUTOBLOGGER. We like and repost the article.
( 11 votes, average: 4.82 out of 5)
Similar news
Rust converter composition. Can I do it myself?
Brake fluid composition. Basic properties, necessary information
Anti-squeak plates for brake pads. Why are i needed?
Add a comment Cancel reply
TOP articles for the month
The holidays are coming, which means most of our country will be drinking alcohol. Easy: -…
I have many different articles and videos on various gearboxes, for example here...
The vehicle battery voltage, as well as its capacity, are the most important indicators of this automotive unit,...
Source: avto-blogger.ru
How to dismantle correctly
The task is divided into two parts - to preserve the edges of the nut as much as possible and not allow it to be cut off, leaving a fragment in the body of the mating part.
If the whole faces
While the edges of the nut are still intact, you should use the correct loosening tool. The use of a spanner or even more so an open-end wrench is inappropriate here.
For brake pipes, special spanners are produced that are of considerable width, equipped with a slot for the pipe and a clamp with a power screw. The key is put on the nut with the tube passing into the slot and securely fixed with a threaded clamp. In this case, it will no longer be possible to tear off the edges.
There remains a danger of shearing the nut due to excessive applied torque. The part is thin-walled and weak, and is damaged by very moderate force on the short lever of the key, so the soured connection should be loosened as much as possible.
There are several methods that must be applied sequentially to avoid troubles:
- the connection must be flushed with a penetrating compound such as a “liquid wrench”; usually a universal lubricant such as WD40 or the like is sufficient; it will take about half an hour to obtain the effect of wetting the thread;
- the nut must be carefully tapped in the lateral and axial directions; it is convenient to do this along the axis using the same special wrench, but smaller, placed on the tube and placed firmly on the nut; the blows are applied with a small hammer close to the head of the wrench, sharply and abruptly;
- from the side you should hit through the blunt beard along the edges of the nut with the same hammer, it is not strength that is important, but sharpness and repeated repetition, between attempts you should try to unscrew the nut without applying excess force, skill and a sense of proportion play a big role;
- An extreme but effective measure would be to repeatedly heat the part with a gas burner with a thin point nozzle; when heated and cooled, the expanding porous products will be crushed; you should not twist the hot nut, since it is expanded and clamped even tighter; you can cool it with the same penetrating liquid.
Of course, when working with heat, the brake fluid must be completely drained and fire safety measures must be taken.
If the edges are torn off
It happens that illiterate attempts at turning away have already led to damage to the edges. At a certain stage, this will not prevent you from reliably hooking with the same special key; it will tightly embrace and clamp everything that is still left.
Alternatively, you can cut off the tube and use a reduced-size socket head that grips the middle of the edges. But the special key is still more effective.
Sometimes a welding machine is used for dismantling, welding another, larger diameter, to the protruding part of the nut. The main effect with this method is the extreme heating of the part, after which it turns away surprisingly easily with a little effort.
The last option is to drill out the remaining nut and remove the threads. Work carefully so as not to damage the mating part.
Even if the tube was removed, it would be better to replace it. After dealing with soured threads, the connection will lose properties such as strength, reliability and tightness. You can use standard parts or make a new copper tube yourself, using repair technologies for flaring it on the side of contact with the caliper or hose.
Copper is much less corrosive, which will ensure increased safety in the operation of the braking system. Factories do not use it to save money in mass production.
belstunter › Blog › How to remove a broken bleeder fitting. Experience.
I literally had to do this procedure the day before yesterday. And since I came across a couple of interesting points, I decided to share my experience with the people. The bleeder fitting on my front caliper refused to come out. At first he resisted, and then he completely broke down. And the bastard broke down right at the very root, there was nothing to catch it. I started trying different methods. 1. I tried to unscrew it with a hammer and chisel, striking tangentially to the circle. Method tested on other fasteners. Didn't work. The metal is very soft and has a hole in the center. It wrinkles even when using a punch with a blunt tip, not to mention a chisel. 2.Use of extractors or analogues. Hammered the TORX sprocket. As a result, when trying to unscrew it, the sprocket broke off and a fragment remained sticking out in the ill-fated fitting. I took out the fragment with pliers, picking out the metal around it with a small chisel. After thinking about it, I didn’t take any further risks with the extractors I had already purchased. The prospect of drilling out tool steel did not appeal at all (I had experience. A drill hardened with the addition of cobalt does not work). But if someone decides to try this method, there is one piece of advice - take an extractor that is as thick as possible for a given thread. Usually on the box it is written which extractor number is suitable for which thread range. My ill-fated TORX broke only because it was not designed for the torque required to unscrew the M8 thread. So if you have a thread, for example, like I have M8, and there are two extractors M3-M8 and M8-M10, then it is better to choose the second one... so as not to regret it later. 3. Having suffered, I decided to drill out the thread. Ahead of the story, I’ll say right away that this is the most successful method I’ve tried and if there are problems with the fitting again, I’ll immediately go to it. It is impossible to drill out the threads without removing the caliper from the car. You need to remove the caliper and secure it in a vice. You need to plug the hole where the brake hose is screwed in with a rag, otherwise you will fill everything around with brake fluid and it will be dirty.
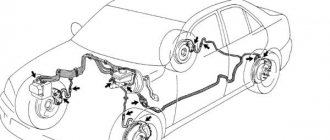
Unscrewing the fitting or pipe of the brake system
A new car is a pleasure to maintain and repair: all the nuts come off easily, there are no difficulties with broken studs or bolts broken in the body of any body. As the number of kilometers traveled increases, parts and fasteners rust, especially those located under the bottom of the car.
It is sometimes very difficult to unscrew the brake pipe from the cylinder, which makes repairs more difficult. But you can remove the brake cylinder, tube, hose, and other parts that are difficult to dismantle without much difficulty, you need to know various tricks, removal methods, and approach the matter competently.
Features of unscrewing a rusted tube
Parts of the brake system (TS), except for “consumables”, last quite a long time, mainly the pads and, if necessary, discs are changed on the car. Connections of brake pipes (TT), cylinders, hoses “sour” over time for a number of reasons:
- Dirt, salt, and moisture enter the parts located at the bottom of the car from the road;
- the temperature difference influences - when the pads interact with the drums/discs, heating occurs, when water or snow “porridge” gets in, a sharp cooling occurs;
- nuts, fittings, bolts are not loosened for a long time, a kind of sticking occurs.
Unscrewing a stuck TT from the working cylinder after a long mileage (say, after 100 thousand km) is problematic if you don’t know how to do it correctly, because many people pick up a regular open-end wrench. As a rule, the key immediately slips through the fitting, the edges roll up, and then difficulties arise in disconnecting the CT, and you have to contact specialists.
Basic rules for unscrewing the tube:
- You only need to use a special split wrench with a fixing bolt;
- Before you start unscrewing, it is necessary to thoroughly clean the parts of the connection from dirt;
- before starting work, you should treat with WD-40, wait 5-10 minutes for the “Vedashka” to eat away the rust;
- In some cases, it is not harmful to unscrew the brake bleeder fitting, as it will get in the way, and it can also be accidentally broken.
Using a special wrench is quite simple: twist the clamping bolt, place the wrench on the fitting, tighten and clamp the bolt so that the hexagon is tightly grasped, without any play. After this, we begin unscrewing, but we cannot use much force, as the tube may break off.
In a car service center, they often use a gas cutter and heat the joint. But here you need to heat it extremely carefully; it is possible that the cylinder cuffs will be damaged.
How to disable ABS
Almost all modern cars are equipped with an ABS anti-lock brake system as standard, and the presence of this system requires motorists to undergo appropriate maintenance, including, among other things, regular bleeding of the brakes. This operation requires certain skills and familiarity with the design of the brake system equipped with the ABS system.
Bleeding methods may differ depending on the design features of the anti-lock brake system, and not in all cases maintenance can be carried out independently, since special equipment is required to carry out routine maintenance on some ABS models.
It is easiest to maintain systems in which the hydraulic valve block, pump and hydraulic accumulator are assembled into a single unit. In this case, bleeding the brake system and replacing used brake fluid is carried out in the same way as servicing cars not equipped with ABS. The anti-lock braking system is disabled by removing the corresponding fuse, after which the following operation is carried out:
- The RTC bleeder screw is unscrewed and the circuits are bled while the brake pedal is pressed.
- After turning on the ignition, the pump displaces accumulated air from the circuit.
- The RTC fitting is tightened and the brake pedal is lowered. The effectiveness of the operation is indicated by the extinguishment of the ABS malfunction indicator.
In car models in which the components of the brake system with ABS are assembled as separate units, the brakes are bled using a special scanner that allows you to read information from the electronic control unit. Naturally, not every car owner has such a diagnostic scanner in their technical arsenal, and to service the brake system you should contact specialists from service centers.
Brakes while bleeding
If the design of the ABS system provides for the presence of electronic activators ESP or SBC, bleeding of the brake system can only be carried out in specialized car services.
It makes no sense to talk about step-by-step actions when bleeding brake systems that require the use of special equipment in our story, and we will focus on describing the maintenance of simpler structures that are available for independent bleeding.
Disconnecting the brake hose from the tube
The same nuances with removal often arise when replacing brake hoses (BL), and due to inexperience, you can roll up the edges not only on the BL, but also on the hose fitting. If the TS needs to be replaced, it’s not so bad to ruin it, but the tube still needs to be preserved.
Let's consider, for example, how the brake hose is disconnected from the tube on a VAZ 2114 car:
- remove the wheel;
- Use a metal brush to clean the connection between the hose and the tube from dirt;
- Spray from a can of VD-40 onto the TT fitting, wait some time for the impregnating oil to penetrate into the dirt:
- Use a 15mm wrench to keep the brake hose from turning, and with a 10mm wrench we begin to unscrew the pipe fitting.
When the TS is being replaced, and the connection is “dead to death” and does not give in, you should cut the hose, disconnect it first from the caliper, and in this case it is better to hold the other half with a spanner. But still, unscrewing must be done carefully, without excessive force; it is very easy to break off the tube, especially if it is old and rusty.
Causes of souring
It is quite easy to see the soured element, called the brake pipe. To do this, do not change the brake fluid for a long time and do not carry out any repair and maintenance work related to unscrewing it.
A common component that is stuck on a car engine is associated with temperature loads. Namely, with an increase in the temperature under which a particular unit operates. No questions arise here, since the engine really gets very hot during operation.
But then it is not entirely clear why the tube gets stuck, which sometimes simply cannot be unscrewed. To remove a brake pipe that is strongly stuck to the joints, you can use different methods.
The adhesion in this place is also quite expected. When the braking system operates, the drums and calipers actively absorb energy, generating heat. Because of this, strong heating occurs. But the most important factor is rapid cooling. This is possible when, after active braking and heating of the brake mechanisms, the car falls into a deep puddle or plunges into the snow. This leads to a sharp temperature change.
Additionally, car brake pipes are affected by auto chemicals, chemicals on the roads, dirt and various liquids that end up on the element and in the areas where it is connected to the caliper or cylinder.
It is worth highlighting one more point. Then there is a large volume of water in the brake fluid, and the process of internal oxidation begins. That is, oxidative reactions occur internally, and sticking occurs under the influence of internal provoking factors.
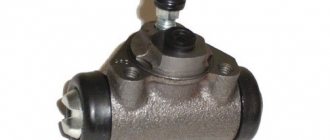
Removing the brake wheel cylinder
On cars with drum brakes, working cylinders are installed on the rear axle; the problem is that their mounting bolts boil and break off in the housing. When the cylinder is being replaced, there is no problem, but in some cases the part needs to be preserved, and after removal it must be put back in place.
In order not to break off the fasteners (usually the cylinder is held on by two bolts), before unscrewing, you should also tap with a hammer through a drift; you can knock on the bolts themselves (being careful not to spoil or flatten the edges), next to the fasteners on the cylinder body. And here we don’t forget to use WD-40, this usual method helps without fail. You should unscrew the bolts with a socket wrench, do not force the bolts off and, again, do not rush.
Breaking off the bleeder fitting
Another trouble is the breakdown of the bleeder fitting (PH) in the working cylinder or caliper; this often happens when trying to bleed the brakes. The PN also boils due to the fact that it is rarely unscrewed, and in many cases, after the upper part of the “bleeder” breaks off, the entire assembly has to be replaced. To ensure that the fitting moves out of place and does not break, we use the same methods as when unscrewing a brake pipe or hose. Here, the method of tapping the metal around the “pumping” with a hammer is very effective; in no case should you knock on the PV itself.
If a piece of metal still remains in the caliper body, you can try to remove it:
- drill with drills of suitable size;
- drive the base of the file into the hole under the handle (non-working part), try to unscrew the fragment;
- weld a piece of metal to the fitting (if the tip sticks out and there is something to weld to).
Before removing the remains of the fitting, you should also thoroughly tap the metal around it, this helps very well, it has been tested many, many times. If, when drilling, the drill goes to the side, the thread inside is damaged, the cylinder (caliper) must be replaced, such a part cannot be used further.
When the edges are rolled up
If the edges of the brake line, hose or bleeder are already rounded, it is difficult to loosen the connection, but there are ways to help solve the problem. You can do the following:
- use a special grip wrench (plumbing pliers) to unscrew;
- to remove the brake pipe, make a cut on the side in the wrench head of the appropriate size (using a grinder), cut off two edges on top to install the wrench, secure the resulting device to the TT and unscrew the fitting;
- To “bleed” it, use a new hex head; trying to unscrew the fitting with a spanner, or even more so with an open-end wrench, is no longer acceptable here - the edges will become even worse.
To “soak” a soured connection, you should use not only WD-40, but also diesel fuel or kerosene; it is important to unscrew it not immediately, but in small jerks, then the tube or fitting will not break off. And don’t forget about heating and tapping; such methods are more effective than various cunning devices.
Source: avtobrands.ru
How to unscrew a broken brake bleeder fitting
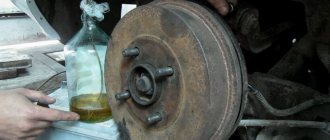
If you find that your brake line is leaking, it will need to be replaced. Any hydraulic system operates only as a closed system. Air inside or leaking fluid can compromise its potential and result in soft or no brakes at all. But how to bleed the brakes if the fitting is completely licked or destroyed.
How to unscrew a licked bleeder fitting
Removing the fitting is as simple as removing the bolt from the nut. But the braking system can be damaged by road debris and corrosion from salt, water and plating. Most fittings are made of steel, and although they are anodized to reduce rust and corrosion, they can corrode. If your brake bleeder is broken, use one of the methods described.
The process will involve disassembling the caliper. If you don't have a rebuild kit, you should order one, otherwise you need to be careful when removing the dust boot and square cut. After removing the caliper, secure it in a vice. Use a hacksaw to cut a hole for the screw in the top of the broken fitting. If the fitting is broken flush with the housing, you will have to drill out the housing. This part of the caliper is non-structural and if done correctly it will not damage the component or cause it to break.
Next, get a container large enough to hold the entire caliper body and fill it with enough water to completely submerge the caliper. A 5 liter bucket is perfect for this. Now apply heat to the caliper body around the fitting. Once warmed up, grab the caliper with a pair of wrenches, remove it from the vise, and place it in a bucket of water. Let the caliper sit for a minute and then remove it and place it back in the vise. Using a flat-blade screwdriver with a tip that fits snugly into the hole for the broken fitting, try to remove the stuck component. You may need to force the tip of the screwdriver into the screw slot using a hammer to ensure a good fit. In most cases, pumping will go without problems.
This process will “shock” the caliper body and fitting, and will cause the connection between the two parts to break. Experts note that in rare cases it is necessary to heat it twice. This method can also be used on wheel cylinders.
ADVICE! Precautions to be observed:
- Never attempt this on an aluminum caliper or wheel cylinder.
- Never heat the caliper or wheel cylinder while it is still assembled. Heat can damage internal rubber parts.
- Always check the device for leaks after completing work.
After removing the fitting, the caliper can be reassembled. If necessary, clean the hole with sandpaper and rinse with hot water. Blow the housing dry with compressed air. Make sure your hands are clean during the assembly process. When installing the square cut piston and boot, use either brake fluid or silicone as a lubricant for the assembly.
Install the piston by hand. If the device uses a press in a dusty case, be sure to install it completely. Complete the process by installing the caliper, making sure it is properly lubricated. Install the part and bleed it, checking for leaks.
Second way
If you apply brute force to a broken brake fitting, you will immediately break off the nipple and hex part of the exhaust valve. You don't have to worry about this since you're probably planning on replacing the entire exhaust valve as soon as you manage to get it out. But breaking the fitting can actually make it difficult to remove the remaining part.
Many craftsmen automatically apply heat to a stuck fitting head. But when it comes to jamming screws, this is not a good idea for several reasons. First, the heat can damage the caliper's O-ring, forcing you to buy a new component, eliminating the entire benefit of trying to remove the blocked fitting. Second, the heat expands both the drain screw and the caliper casting, making it even more difficult to remove.
Sequence of work
There is a certain procedure for bleeding the brakes, which is strongly not recommended to be violated.
- The rear right one comes first.
- The second is the front left.
- Third - rear left.
- The last fourth thing to bleed is the front right brake.
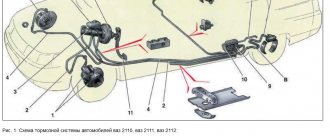
So, we come to the main question - how to properly bleed the brakes on a VAZ 2110. But the important point here is whether you are going to do the work yourself, or call a friend for help. Depending on this, pumping is performed in a slightly different way. Let's talk about each of them.
Self-leveling
If you couldn’t find an assistant, you can easily handle the task yourself.
To get started, arm yourself with:
- Brake reservoir cap without sensors, regular black;
- Automotive nipple;
- Use a round file or a 14 mm drill.
- Make a hole in the lid, insert a nipple into it so that there are no gaps and the element fits tightly. This device replaces a ready-made aerator, which is sold in stores.
- Using the manufactured device, connect the valve of the spare tire or removed wheel with the valve of the reservoir.
- Jack up the car and remove all wheels.
- Unscrew the fitting intended for bleeding the brakes. The air will expel the brake fluid with air bubbles.
- If it is not possible to use a tire or you have a compressor, use it. Just make sure the pressure is no more than 1 atmosphere.
- Perform a similar sequence of procedures on each brake, following the sequence indicated above.
Emergency method of bleeding the brake system
If for some reason your fitting turns out to be broken or licked, use the emergency bleeding method. You can simply bleed the brakes using a brake hose.
- Raise the car on a lift or securely fix it on the ground.
- Remove the wheel.
- Take a spanner and run the brake hose. Then tighten it.
ATTENTION! At this point, some brake fluid will leak out.
- Signal your partner to start pumping the brakes.
- After pressing a few times, run the brake hose again and drain some brake fluid.
Repeat the procedure 5-10 times until the brake pedal becomes hard again. You can bleed the brakes this way at any time.
Source: drivertip.ru
Thread restoration method
Damaged threads can be completely restored using the following technology:
1. Drill the threaded hole to the diameter indicated in the table below 2. special profile thread in it Screw a spiral repair insert (a durable stainless steel sleeve) into the resulting thread using a special tool.
Threaded insert
After such an operation, the thread becomes stronger than the original one in good condition. This effect is especially noticeable when the carving is made in a soft material such as aluminum. When a bolt (stud) breaks off in a threaded insert, there is no “biting” effect. A broken bolt (stud) can be easily removed.
Watch a video of how the threaded insert is used
What capabilities do threaded inserts have?
This method is especially relevant for restoring threaded holes in body parts of automobile engines, for example, a spark plug hole. The candle thread becomes very durable and reliable.
Threaded insert is screwed in Threaded insert is screwed in
If the thread for a stud is broken, sometimes they drill it out and cut the thread to the next size. In this case, you have to use a stepped stud of unknown origin and dubious quality. And not every stepped hairpin can be found at the right time. If you repair the hole using a threaded insert, you still have the option of using a standard, branded pin.
Another application for repair threaded inserts is in brass exhaust manifold nuts. The result is a nut that combines a very strong thread and the property of not “sticking” to the studs.
Owners of some foreign cars should pay attention to the possibility of replacing the M12 x 1.5 thread with an M12 x 1.25 thread. It often happens that a bolt with such a thread is damaged, and it is almost impossible to find it in a retail chain in your city (we have such bolts in our store). A turner will not turn out a decent bolt, because... The threads on factory bolts are formed by pressure (knurling), which provides the necessary strength. And on a lathe, the thread is made with a cutter, while the fibers of the steel bar are cut and the threads cannot bear the required load.
Brake bleeder fitting: how to unscrew?
Moderator: Moderators
Brake bleeder fitting: how to unscrew?
by Fedor » Oct 04, 2010 10:13 am
The process of pumping the brake circuit of the front left wheel stopped because I could not unscrew the fitting through which the brake fluid is drained. Apparently, he got used to it.
I tore off the edges of the fitting, it’s not difficult
Share your experience and thoughts on what to do next.
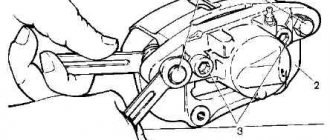
Question for materials scientists: what is the caliper made of?
The fitting is the protrusion under the longest bolt in the figure
Re: Brake bleeder fitting: how to unscrew?
shyrik974 » Oct 04, 2010 10:19 am
Re: Brake bleeder fitting: how to unscrew?
by Fedor » Oct 04, 2010 10:23 am
Re: Brake bleeder fitting: how to unscrew?
shyrik974 » Oct 04, 2010 10:26 am
Re: Brake bleeder fitting: how to unscrew?
Bang » 04 Oct 2010, 10:28
Re: Brake bleeder fitting: how to unscrew?
by Fedor » Oct 04, 2010 10:31 am
Re: Brake bleeder fitting: how to unscrew?
shyrik974 » Oct 04, 2010 10:33 am
Re: Brake bleeder fitting: how to unscrew?
Bang » 04 Oct 2010, 10:37
Re: Brake bleeder fitting: how to unscrew?
DJEM » 04 Oct 2010, 10:40
Re: Brake bleeder fitting: how to unscrew?
by Fedor » 04 Oct 2010, 11:03
Re: Brake bleeder fitting: how to unscrew?
Ferapont » 04 Oct 2010, 11:07
Re: Brake bleeder fitting: how to unscrew?
Bang » 04 Oct 2010, 11:08
There is an option to drill a hole in the fitting using a three-piece for bleeding and then a bolt there.
Added after 1 minute 13 seconds:
Re: Brake bleeder fitting: how to unscrew?
shyrik974 » Oct 04, 2010 11:13 am
Re: Brake bleeder fitting: how to unscrew?
Pat » 04 Oct 2010, 11:16
Re: Brake bleeder fitting: how to unscrew?
Bang » 04 Oct 2010, 11:33
shyrik974 , And in your opinion, “drilling” means using a ten where there was an eight? Then of course it's a shame.
To drill correctly is if, say, there was a ten, drill with a six, if it went normally in the center, then with an eight. There is a huge chance that the bolt will move during the process - then unscrew it. If not, then we hammer a hexagon or an asterisk into the drilled hole, or I forgot what the cone is called, there is one specifically for these purposes and we tear it off with it. Even if the sprocket starts to scroll, eventually the hole is developed to the point where only the thread remains in the thread itself - and then it comes out with a bang. If not, then use an awl to clear the entry into the thread so that the tap goes along the thread and, with oil, we go through the thread with a tap. The fact that this thread of the thread will become stuck to such a state that it can no longer be removed even if you go through the thread with a tap - I have never seen this. If done carefully, the likelihood of stripping the thread is extremely low. Only if your hands are extremely crooked, there is no habit of turning your head on in time and there is zero experience.
Re: Brake bleeder fitting: how to unscrew?
DJEM » 04 Oct 2010, 11:37
Re: Brake bleeder fitting: how to unscrew?
Ferapont » 04 Oct 2010, 11:47
Re: Brake bleeder fitting: how to unscrew?
by Fedor » 04 Oct 2010, 12:03
I wonder where the end of the drill will end up? won't drilling with a smaller diameter spoil the part in the brake cylinder (the cylinder itself, for example)
By the way: I tried to unscrew it the same way as in the picture, only the key is set to 8, having first doused it with anti-rye from LiquiMoli and waited a little:
Then he poured it on him many times and hit him with a hammer. No sense. So I don’t really believe in soaking anymore. When I tore it off, I twisted it with pliers: it didn’t help.
The fitting is screwed into the caliper. This is 100%. Apparently the thread is also cut in the caliper. Here’s the question: if you drill out and do it carelessly, is it possible to then restore the threads in the caliper (to the question of what is it made of)? If you go in with a drill more than necessary, what are the dangers?
My questions are exclusively mercantile. Here's the thing: the caliper is sticking. If you hang the wheel, the wheel makes about 4 turns due to rustling noises, if you turn it by hand with all your heart. I've already rebuilt the caliper, replaced the rubber bands and guides - it didn't help. All that remains is to bleed the circuit. This should remove the wedging. But on the other hand, you can drive further and, in principle, without problems. Or repair it, but at the risk of getting 8 thousand, not counting the work (if I kill the caliper). It looks like the brake fluid hasn't been changed since birth - that's another reason to do it.
Re: Brake bleeder fitting: how to unscrew?
by stiffmaster » Oct 04, 2010 12:28 pm
So carve 2 faces parallel to each other or a square. Grab it with a gas wrench and, first, slightly in the direction of twisting, then in the direction of unscrewing. I did this on 10. everything OK! I don’t think it will be possible to drill it out, although drilling will be useful! The fitting will heat up well.
Re: Brake bleeder fitting: how to unscrew?
KATALA » 04 Oct 2010, 12:36
How to restore threads on a caliper
There are a lot of posts about rebuilding rear brakes, so I got around to it. In December, after braking and starting slowly in a traffic jam, the rear began to whistle wildly, and even howl when reversing; the sound disappeared if the brake pedal was pressed several times. Because I installed a set with a used disc and used pads, so I thought about them first. An autopsy showed that the disc still has 1 mm of run, but the pads have about 3-5 mm left, because... I had new pads ATE 13.0460-2886.2 with me and the wheels were still removed, so I decided to change them. But it was not there. The piston stubbornly refused to screw in. I screwed it in only after removing the caliper, holding it in a vice and attaching the lever to the device for recessing the piston of the brake cylinder MASTAK 102-00003, which I bought a long time ago to simplify the replacement of pads. This state of affairs did not suit me, and there was nothing to sort out the caliper. Therefore, new pads were installed and repair kits were purchased consisting of:
ATE 03.3518-5200.2 Brake bleeder pipe connection short for rear calipers. ATE 03.3518-4200.2 Brake bleed pipe fitting on M7x1 FRENKIT 238010 Repair kit for rear caliper due to brass insert FRENKIT 86249 Brake caliper bolt diameter 10 mm.
Because I had to disassemble it twice, then I purchased additionally: TRW SJ1039 Brake caliper repair kit | ass | rubber bands and boots FRENKIT P385101 Caliper piston To remove the retaining rings, a ROCK FORCE RF-9U0102 puller was purchased. TRW PFG 110 lubricant and ATE 03990205112 paste were already in stock at home.
Unfortunately, there will be no photos of the processes, because... The phone began to glitch and show empty files instead of photos, and the cleaner also deleted these empty files, so the recovery program couldn’t find them, which I could attach.
Replacing the handbrake rod bolt: Option with a clamp, which I chose: www.drive2.ru/l/518101424953884675/ Or two keys: www.drive2.ru/l/498938311671284497/
In general, the autopsy showed that the piston was clamped by rubber bands, under which there were rocky formations of oxides:
Powder from these oxides and deposits in the form of white mica got inside the caliper and scratched grooves and craters on the pistons along the path of rotation in the rubber bands. One side of the boot has been worn down to a hole: