4.1/5 — (54 votes)
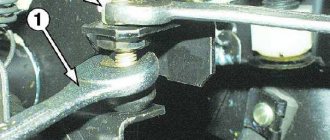
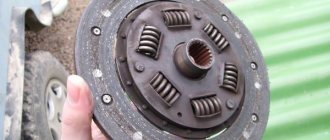
1 - clutch housing, 2 - working cylinder rod, 3 - fork, 4 - adjusting nut, 5 - lock nut, 6 - return spring, 7 - friction linings, 8 - driven clutch disc, 9 - steel casing, 10 - drive disc ( basket).
Today, the article will talk about procedures such as replacing and adjusting the 2106 clutch with your own hands. As we like to repeat, everything can be done without the help of car service specialists; there are no difficulties in repairing VAZ cars and there cannot be any. Often, drivers try to solve all the problems with the car on their own, because the cost of maintenance is absurdly high.
Even despite the fact that the VAZ 2106 has not been produced for ten years. And we will try to help as much as possible with the repair. If you have any questions, leave comments, share your experience, and describe unusual situations. After all, the topic is quite interesting and rich.
Clutch mechanism of a VAZ 2106 car
Description of design
1 - guide sleeve, 2 - basket
You all know that the clutch pedal is installed in the driver’s feet. For some, this is enough and they don’t go any further. But if you’ve already decided to take on the repair, you’ll have to study the entire rest of the chain. On the VAZ 2106, like on all other classics, the clutch drive is hydraulic. The pedal drives the master cylinder rod, which moves a small piston inside it.
An expansion tank is connected to this cylinder. On 2106 and similar VAZ models it is located on the partition between the engine compartment and the passenger compartment. It is worth noting that on nines and newer cars the expansion tank was installed directly on the cylinder body - a significant saving in space and a slight increase in reliability. After all, rubber tubes tend to wear out and leak brake fluid.
Clutch failure
The clutch can fail for several reasons:
- Resource development.
- Presence of a manufacturing defect.
- Harsh operation.
- Mechanical damage during operation.
Very often, the cause of premature failure of VAZ 2106 clutch elements is the presence of manufacturing defects and increased loads. In particular, traffic jams in the city make themselves felt quite quickly.
Symptoms of malfunctions
Depending on the type of breakdown, the following symptoms may appear:
- The clutch pedal fails, the engine and gearbox shafts do not open.
- The clutch works, but there is an extraneous sound.
- The engine picks up speed, but the speed does not increase - the clutch slips.
- Shifting gears is difficult, the clutch “leads” and does not disengage completely.
- The appearance of leaks from the expansion tank, pipes, cylinders.
It has already been said that the master cylinder is mechanically connected to the pedal. But the clutch fork and slave cylinder are mounted directly on the gearbox. With the help of these mechanisms, the release bearing moves along the axis of the input shaft.
How does the clutch drive work?
The operating principle of the entire clutch drive mechanism on a VAZ 2106 car is as follows:
- The driver presses the pedal.
- The rod moves and along with it the piston in the cylinder.
- The pressure in the pipeline between the main and working cylinders increases.
- Due to the increased pressure in the working cylinder, the piston and rod move, which drives the clutch fork.
After all this, the VAZ 2106 clutch disc and the basket move away from each other, the crankshaft does not rotate the primary one. Therefore, the car does not move. And now about the repair procedure.
Fault diagnosis
How do you understand that the clutch release bearing (hereinafter referred to as the clutch release bearing) has already reached the end of its service life and is time to change it? This question interests many VAZ 2107 car owners. And for good reason, because although this element can be called insignificant, a lot depends on it.
The service life of the clutch device on domestic cars depends not so much on the conditions of use of the car, but on its mileage. A car owner who likes to squeeze the gas all the way down and drive on the roads will need to change clutch elements more often than a driver who prefers a measured way of driving.
When the wear of the clutch elements reaches the point of no return, the device begins to slip if the engine picks up speed. If you regularly drive with such a clutch, then in the future, and maybe even on the next trip, the driven disk of the mechanism will overheat, which will not allow the driver to continue driving. And even get moving.
A failed UPS that has exhausted its service life
Help, I have a problem! About two weeks ago, the clutch pedal in my car (VAZ 2107) failed! At first I thought that the cable was “covered”. I thought about changing it, but then I saw that the cable was intact. I’ll even say more - the cable is in excellent condition. Then I decided to adjust the rod. Having done this, I was able to travel for about five more days. The pedal has failed again, can you tell me what to do?
And there are hundreds of such questions on the Internet. As you understand, we are gradually bringing the topic to signs of a faulty clutch system. What are the signs that it is time to replace the release bearing of the mechanism? There may be several of them:
- the clutch pedal falls to the floor, although the cable is fine;
- while driving, when pressing the clutch pedal, a slight grinding noise is heard;
- first gear does not engage, therefore, movement can only be started from second speed;
- While driving, some noise appeared, which disappeared when the clutch pedal was depressed.
VPS at the installation site
If at least one sign of a malfunction appears in your car, then it’s time to change the VPS.
Preparing for repairs
Before putting the car in a pit and removing the box to replace the clutch, you need to visit the store and buy all the necessary spare parts:
- Clutch disc.
- Basket (drive disk).
- Release bearing.
- If necessary, clutch fork.
- If there is significant wear, the crown on the flywheel will also need to be replaced.
- Bolts securing the basket to the flywheel.
It is also important to have a good set of tools on hand, WD-40 penetrating lubricant, sometimes even a gas torch is necessary (if the bolts and nuts are very rusty).
It is advisable to carry out all the work in an inspection pit or overpass (it is unlikely that the average driver of a six will have a lift in the garage, so we do not mention it). If everything goes smoothly and the nuts unscrew well, you will complete all the work very quickly.
Place the car on the pit, fix it in one position by placing stops under the wheels. All work is divided into two stages: under the car and above it. Please note that there is no need to drain the oil, since if you dismantle it carefully, you will not spill a drop.
And don't forget about the alignment of the clutch disc. The price of a special device is quite high - about 500 rubles. but you can use a small piece of pipe without any problems, as long as the diameter is suitable.
We change the release bearing on a VAZ 2114 with our own hands - dismantling the gearbox
Advice:
Please note that it is recommended to perform operations on a pit or a lift. The instructions provide an example of car repair on an overpass, but if there is none, then watch the video at the end of the article, where the replacement is carried out in a garage without a pit. To properly dismantle the gearbox, refer to the figures presented above.
Provide sufficient lighting above the hood of the car, put the car in first gear, and release the handbrake. If possible, ask a partner for help. Below is a detailed dismantling technology, according to the diagrams presented above.
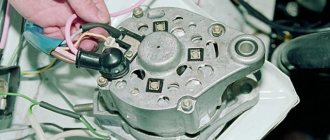
- Open the hood, unscrew the air filter mounts, disconnect the wire and remove the assembly (see photo). After this, disconnect the battery terminals, and to be safe, remove the battery.
- Now we get access to the upper gearbox mounting bolts. Unscrew the long bolt at the back, the short one at the front.
- Let's move on to the starter. We unscrew the two upper studs, then remove the terminals. Now we look for the clutch cable that comes out of the gearbox, twist the nut to loosen the tension.
- We go down to the wheels, tighten the bolts, and remove the chassis. We tear off the nuts of the VAZ wheel bearings to remove the drive axle shaft on both sides. Use the pipe to extend the key.
- We remove the anthers (mud flaps) with a 8mm wrench, then unscrew the engine crankcase protection bolts.
- We find the suspension arm extension bracket (3.4 in the diagram), unscrew the rear nut with the lower bolts.
- Now unscrew the anti-roll bar bolt (8) on the right side, then the ball joint bolts on both sides (key 17). Then remove the lever (7) together with the stretcher (4).
- The gearbox is half disconnected, now we unscrew the plug to drain the oil.
- After draining the oil, remove the wheel drives. First, we remove the CV joint “grenades” from the hubs with the bearing, then we take the splined side of the shaft out of the box using a pry bar.
- On the side of the box we disconnect the reverse terminal. We find three bolts securing the gearbox to the engine and twist them.
- To remove the starter, unscrew the two bolts from the bottom.
- Now we disconnect the gear shift rod (10) and dismantle the rocker. The speed sensor terminal is located nearby; disconnect it (see photo).
- We unscrew the locknut to disconnect the gearbox from the side support (cushion), then use a long wrench to unscrew the two fasteners of the rear cushion (9).
- All that remains is to unscrew the two gearbox bracket bolts (2) and disconnect the unit from the engine.
- We dismantle the assembly, hold the body with one hand, and move it with the other using a mount. After removing the assembly, we proceed to replacing the release bearing.
It is important to know:
Be sure to watch the video “How to replace the clutch release bearing on a VAZ 2114”, since the disassembly process in the video is shown in full, with additional comments from a specialist. The first video shows the replacement process without removing the gearbox.
How to change the clutch without removing the gearbox
Detailed replacement process on video
Work on top of the car
So, a start has been made, the goal is to remove the gearbox to replace the clutch. On VAZ 2106 and similar cars this is done quite quickly, it is only important to follow a certain sequence:
- Inside the car, remove the gear shift knob. It is attached using plastic latches. Sometimes difficulties arise with dismantling, and it gets to the point where the latches break off. The price of a new set of fastenings is no more than one hundred rubles, and you can purchase it even after repairs have been carried out. Therefore, do not be afraid if you suddenly break the plastic antennae.
- Go to the engine compartment, unscrew the four nuts that secure the exhaust pipe to the manifold. The fact is that the exhaust pipe will interfere with the removal of the box, but it is enough to move it a little to the side.
- Disconnect the battery and remove it from the car.
- Unscrew the two top bolts of the starter, disconnect the power wires for the windings and the solenoid relay from it.
- Disconnect the ground wire that goes to the gearbox.
Carefully inspect whether there are any “upgrades” on your vehicle specifically that will interfere with the removal of the transmission. If there are any, then make sure that they do not complicate further repairs.
How to change the release bearing on a VAZ 2114 with your own hands - step-by-step instructions with a disassembly diagram
It was previously noted that the process of replacing the VP is difficult precisely when removing the gear shift unit, so first study the device to understand the intricacies of dismantling.
List of necessary tools for replacement:
- Two jacks and supports;
- Set of spanners with ratchet;
- Mount;
- Minus screwdriver;
- Torque wrench;
- Container for draining oil.
Work under the car
This is perhaps the most difficult part of the entire repair, since there are many more steps to be taken here. So make yourself comfortable and proceed to the following operations:
- Unscrew the last (lower) nut securing the starter and remove it. This nut is the nastiest, since it is difficult to get to it using simple wrenches; you will need to use a socket, a ratchet and a cardan. True, it was possible to work with an ordinary open-end wrench installed in the end.
- Unscrew the suspension bearing mount.
- Disconnect the cardan and rear axle flange. Hold the bolt head from turning with a 12mm open end wrench.
- Apply sharp blows to the driveshaft to dislodge it from the rubber coupling on the transmission shaft. Move the cardan to the side.
- Unscrew the mounting of the pillow, install a support under the gearbox.
- Remove the slave cylinder from the clutch fork. Be careful not to lose the bar underneath and the spring.
- Remove the speedometer cable.
- That's all, now all that remains is to unscrew the four bolts that secure the box to the engine block.
Remove the gearbox carefully, try to move it as far as possible from the engine block. The fact is that you can damage the VAZ 2106 clutch drive disc. And this is quite easy to do.
If we take nines and newer VAZs as an example, then the clutch drive discs on them are more reliable and durable. It is advisable to set the gearshift lever to the position corresponding to the third speed.
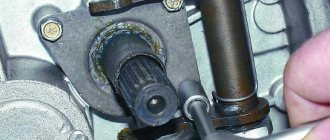
Release bearing device
Structurally, the release bearing is a ball or radial roller bearing, the inner ring of which is wide and closed, all parts are pressed into a clutch called an overrunning clutch.
Release bearing device
VPs can be of two types:
- Mechanical - the bearing is moved by a system of cables and rods;
- Hydraulic - the VP moves using a hydraulic drive.
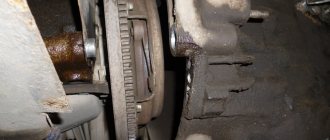
Clutch replacement
Please note that it is imperative to install new clutch basket mounting bolts. On old ones, the threads already have minor deformations, therefore, the connection will be very unreliable. The price of all elements will be approximately 2000-2500 rubles.
If you prefer foreign-made units, it will be more expensive. However, it is worth wondering about a simple truth: the service life of imported ones is sometimes shorter than domestic ones, and the price can be twice as high. Why pay extra money? And in general, if the price of a car is 20-40 thousand rubles, why invest a lot of money in it?
But let's return to the replacement procedure. Unscrew all the bolts from the basket, remove it and the clutch driven disc. Install new elements in the same way, but tighten the bolts, do not tighten them. It is advisable to look at the condition of the crown before installation. If it is deplorable, then you should immediately install a new one.
In stores, its price is about 200-250 rubles, which is not very expensive. But you can reduce the cost of repairs by simply removing the crown, heating it and installing it on the reverse side. But you will have to buy a new one if this procedure was previously performed.
Pay attention to the VAZ 2106 clutch fork; if it is damaged, be sure to replace it. A new release bearing is installed in any case. You can apply CV joint grease to it, for example. This can slightly increase its resource.
Almost finished, all that remains is to take the guide sleeve and install it in the hole of the clutch disc. Without removing the shaft, tighten all the basket mounting bolts crosswise. Do not allow distortions, otherwise the clutch will not work correctly and its service life will decrease.
That's all, the clutch replacement was completed successfully, now all that remains is to assemble the car. But here no difficulties will arise, since all the actions are the opposite of those that were described in detail in this article. If you also need to replace the brake fluid in the drive system, then read on.
How to replace?
If you have no idea what a VPS is or what a clutch disc looks like, then entrust bearing repair work to professionals. If you think that you can cope with this, then we suggest that you familiarize yourself with our car repair manual.
Which to choose?
Selecting an IPS is the first point that must be completed if you decide to replace an element.
There is nothing difficult in choosing an element. Classic VAZ models (2010 - 2107) are equipped with a release bearing of the same type. Just buy the appropriate part at a car store or market, indicating the model of your vehicle. To make it more clear to you what the UPS looks like, you can look at it in the photo below.
What will you need?
What you will need to replace the UPS:
- the new UPS itself;
- flat head screwdriver;
- set of wrenches;
- lubricant "Litol-24";
- jack as support.
Source
Bleeding the system
Draining fluid from the clutch drive system is very simple:
- Using a blower, pump out the liquid from the expansion tank.
- Unscrew the fitting on the working cylinder and wait until all the fluid is gone.
- Press the clutch pedal several times to remove any remaining brake fluid.
- Change tubes if necessary.
- Tighten the fitting.
- Fill the reservoir with fresh brake fluid.
- Place a transparent tube onto the fitting.
- Have an assistant press the clutch pedal several times. With the last press, you need to hold it in the extreme position.
- Unscrew the fitting half a turn, allowing fluid and air to escape.
- Repeat the procedure until liquid begins to flow without air bubbles. Don't forget to monitor the level in the expansion tank.
In fact, two or three passes are enough to get rid of air in the system. As you understand, pumping the clutch on a VAZ 2106 is not difficult. The procedure is very similar to bleeding the brakes, only it is much faster - the line is very short.
After replacing the clutch, it will need to be adjusted. Pay attention to the working cylinder rod - it has a thread along which you can move the nut. It is by moving it that the clutch is adjusted on VAZ 2106 cars and the rest of the classic series. It is also possible to adjust the free play of the clutch pedal; for this purpose, a special bolt is provided directly above it.
Adjusting the pusher on the working cylinder
The clutch adjustment of the VAZ-2106 is carried out in the following order:
- Clean all elements from corrosion and dirt. Treat threaded connections with penetrating lubricant.
- Unscrew the nut located on the working cylinder pusher.
- Use one wrench to hold the bolt for adjustment, and use the other to loosen the locknut.
- Secure the pusher so that it cannot turn.
- Adjust the free play empirically and tighten the locknut.
- Reinstall the spring.
Check the operation of the entire clutch system, measure the free play of all elements. If it is larger than expected and there are gaps, you need to repeat the adjustment.
Bushing, cover VAZ 2101-07, 2121-213 release bearing guide with oil seal
Dear customers, in order to avoid errors when sending the front bearing cap for VAZ 2101-2107, please indicate your car model and year of manufacture in the “Comment” line.
The gearbox is designed to change the torque developed by the engine in order to obtain different traction forces on the drive wheels when starting the car, accelerating, moving and overcoming road obstacles; changes in vehicle speed and direction; the possibility of driving the car at low speeds, which cannot be provided by the engine, and disconnecting the engine from the transmission for a long time when parked or when the car is moving by inertia (coasting).