Print this article Font size 16
Owners of the domestic VAZ 2110 car often encounter a whistling noise in the clutch , which is caused by the release bearing of the unit. Moreover, this is a problem not only of the “tens”, but also of other cars from different manufacturers, the clutch design of which involves the use of this element. Therefore, replacing the release valve on a VAZ 2110 is not at all an exceptional problem. But it needs to be solved.
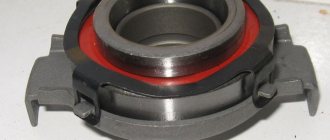
Release
What you need to know
The release bearing is not the weakest link in the clutch system, but for some reason it is the one that causes problems and troubles.
coupling
Some car owners have gotten used to the whistle and simply ignore it. But this cannot continue for long, since untimely solution to the problem can lead to even more complex and expensive repairs. If the situation gets worse, then a simple replacement will not be enough for you.
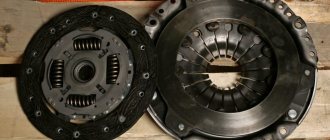
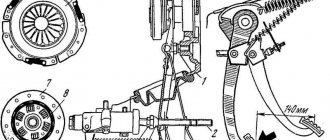
The clutch serves to act on the leaf spring of the clutch basket. It is also called diaphragm, so don't be confused if you hear this designation. Due to this impact, the driven disk is disconnected from the flywheel and the pressure plate of the basket. This disengages the clutch.
If the squeezer is faulty, this can lead to various consequences:
- The clutch fork will be damaged;
- The integrity of the clutch spring petals will be compromised;
- The guide bushings are deformed.
In order not to pay twice, or even three times, promptly react to the appearance of a whistle in the clutch and try to quickly take action.
Replacing the VAZ 2110 clutch step by step instructions
1. “Tear off” the left wheel mounting bolts, then jack up the front of the car and place it on the sawhorses.
2. Remove the wheel and unscrew the two lower ball joint bolts.
3. Remove the “-” terminal from the battery.
4. Remove the mass air flow sensor, then loosen the clamp securing the mass air flow sensor corrugation and remove the air filter.
5. Now you need to remove the clutch cable from the clutch fork. Loosen the two mounting nuts that secure the cable to the bracket on the gearbox.
6. Unscrew the bolt securing the starter to the box, then unscrew the first bolt securing the gearbox.
7. Head on “19” amplifier pipe. There is another gearbox mounting bolt nearby.
8. Loosen this nut and the upper starter mounting bolt.
9. Remove the connector from the speed sensor, then unscrew the speedometer cable.
10. Remove the longitudinal brace paired with the lever.
11. Now unscrew the lower starter mounting bolt.
12. Unscrew the 3rd gearbox mounting bolt; in the area of the right CV joint there is another nut that needs to be unscrewed.
13. Unscrew the two torque rod mounting bolts.
14. Loosen the nut located on the clamp of the gearbox control drive rod, then remove this rod from the box.
15. Place a support under the engine, then unscrew the two nuts securing the rear cushion. This is done just in case, so that if the engine lowers too much, your hoses do not break.
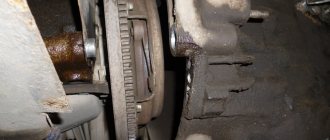
16. Carefully move the gearbox away from the engine and lower it to the floor, it will hang on the axle shafts.
17. I recommend replacing the clutch release bearing at the same time.
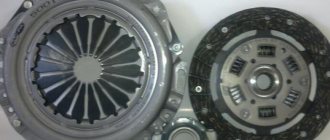
Assess the wear, replace the disc, and if necessary, the clutch basket, check whether the petals are normal.
Further assembly is carried out in reverse order. Thank you all for your attention, this is actually the simple way to replace a VAZ 2110 clutch without removing the box and draining the oil.
Is noise a sign that replacement is needed?
Not really. If noise occurs, this does not mean that you should immediately replace the element. But it is strongly not recommended to delay repairs. Let's just say this is a signal for certain actions, which you will have some time to complete before the consequences become catastrophic.
In some cases, the noise occurs when the engine is started, and it persists until the car warms up, after which it disappears. In other cases, the noise returns every time you try to disengage the clutch.
The worst option is a grinding sound. This sound indicates that the element is rubbing against the leaf spring, and wear will form on the petals. If you are “lucky enough” to encounter such a situation, there is no time. Replacement needs to be done quickly.
By the way, there is no point in repairing it. Release bearings cannot be repaired, so the only solution is replacement.
Clutch adjustment on Lada Kalina. Subtleties and different points
- By systematically pressing the accelerator pedal, analyze its movement, the presence or absence of noise or squeaks, smoothness and freedom of movement. The presence of the above reasons will be the basis for carrying out repair work;
- Using a ruler, measure the distance from the pedal along the outer contour to the floor. If the distance is more than 14-14.6 cm, then the cable should be slightly tightened;
- The distance to the floor may be a little less, but not more, the free play of the pedal should be no more than 2.5-3.0 cm.
- Remove the air filter;
- Use your fingers to tighten the cable as freely as possible;
- Using a caliper, we take a measurement between the fork lever and the leash (rubber base);
- The distance should correspond to the figure 2.7 cm. Otherwise, tighten or loosen the tension nut using an open-end wrench;
- Take test measurements. If it does not match, repeat the procedure again;
- Reinstall the air filter.
AutoFlit.ru
Bearing removal
Broken
To remove this device, you will have to perform a series of sequential actions.
- Raise the car or drive it into a hole to gain access to the underbody of the car.
- Use appropriate tools to remove the gearbox.
- Squeeze the special clamps from the release bearing.
- Remove the element from the gearbox shaft.
- Press the locking tabs to remove the spring holder.
- After this, it will not be difficult for you to remove the damaged release bearing from the clutch.
The complexity of the process lies in the fact that in preparation for removing the release bearing it will be necessary to dismantle several components and mechanisms, such as:
- Accumulator battery;
- Clutch cable;
- Air filter box together with air flow sensor;
- Upper gearbox fixing bolts;
- The nut responsible for fixing the starter.
Diagnosis of clutch faults
Typically, malfunctions of this unit have such corresponding manifestations as atypical sounds while the vehicle is moving when the device is turned on, difficulties with the gear shift function, lack of clutch when overtaking, and others. Under such circumstances, intervention in the operation of the device is necessary; accordingly, taking a number of measures to adjust the clutch on the VAZ 2110 becomes inevitable.
Despite the corresponding difficulties of diagnostics and repair work, for an initial assessment of the condition of the unit, purposefully apply your knowledge and abilities without additional consultations at a car service center. Calling a service station even if there are minor defects will incur financial costs.
As experience shows, of the abundance of car brands, the VAZ 2110 is the easiest to repair. How to adjust the clutch
, using a minimum of keys and devices, can be found on the websites of car owners, in magazines aimed at a specific topic, also on forums in personal conversations with leading auto mechanics or with more experienced motorists.
First, the owner of the vehicle must have knowledge of the structure of the box, front suspension, and also certain abilities to care for the car. Typically, it is best to carry out repairs in a garage with an inspection pit or a lift.
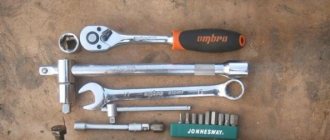
The standard list of tools needed to adjust the 10-wheel clutch includes the following parts:
auto supports;
In addition to garage equipment, a mechanic's workbench or any free table will be useful in order to comfortably position the clutch during the repair process. For quick work, you should first study the list of possible problems with the transmission of a VAZ 2110 car. How to adjust the clutch, and what technical techniques to use in doing this, will help by analyzing the problems identified during diagnosis.
How to adjust the clutch
for
VAZ
2110,2111,2112.
All adjustments, as well as replacing the clutch
, took a lot of work.
So, problems arising due to breakdowns or wear can be as follows:
- broken drive cable;
- broken fork;
- destroyed release bearing;
- worn friction components;
- broken disk springs;
- deformed disk due to overheating;
- broken basket.
You can control the supply of torque from inside the car using a distant pedal on the left. In the process of pressing on it, muscle tension is transformed and directed along the fork. Measures for adjusting the VAZ 2110 clutch include adjusting the movement of this mechanism. The iron structure moves the release liner along the axis of the gearbox cylinder, acting on the diaphragm spring. It also deflects the pressure plate from the driven one, as a result of which the gearbox is disconnected from the electric motor.
Among the available methods of transferring load from the pedal to the friction device, hydraulic and mechanical ones should be distinguished. A mechanism operating through a liquid system requires the least cost to ensure its operation. A VAZ car has a mechanical unit installed, so the load is transferred to the fork through a cable. The disadvantage of wire-type parts is fatigue stretching under load after a certain period of time.
Installing a new element
When you have completed the entire range of dismantling work, you can move on to the final stage - installing a new component.
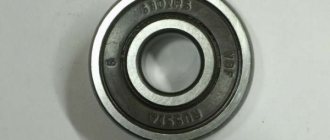
- The first thing to do is check the condition of the new clutch release bearing. For some reason, many car owners forget to make sure that the bearing that replaced the old one is actually in good working order. This is easy to check. Rotate the bearing, pull it in different directions. If there is no jamming during rotation, and there is also no play, then you bought a really serviceable, good release bearing.
- Insert the new part into the coupling. This must be done so that the protruding part of the inner ring is directed towards the coupling.
- After inserting the element, secure it using the holders.
- Before inserting the new release bearing onto the bushing (guide), do not forget to lubricate it with a grease. The layer of lubricant should be thin, do not overdo it.
- Secure the coupling and bearing using a spring lock.
- Place the gearbox and other dismantled elements in their rightful places.
- The entire repair process is completed by adjusting the clutch.
Replacing the release bearing yourself is not very difficult. The main problem is removing the gearbox. All other events cannot be called difficult. However, you will need to be careful, consistent and careful.
Do not ignore the most useful thing that you can need when repairing your favorite VAZ 2110 - the instruction manual. Literally everything a car owner needs to know is described in detail there. With its help, you can even perform complex repairs, the cost of which at a specialized service station would be prohibitive.
Clutch replacement is necessary in the following cases:
- If the clutch begins to “lead”, that is, when engine power decreases.
- If the clutch is not fully engaged, that is, it “slips.”
- If you hear extraneous sounds when turning on - clicks, jerking, etc.
- In case of unauthorized disengagement of the clutch.
- In case of vibration when pressing the clutch pedal.
In this article I will tell you how to replace the VAZ 2110 clutch at home without removing the box and draining the oil.
To work you will need:
- Jack;
- Inspection pit or lift;
- Set of socket and open-end wrenches: “19”, “17”;
- Mount or amplifier pipe.
Causes of brake failure
So:
- If your car suddenly loses its brakes, do not rush to blame the master cylinder.
- The cause may be a leaking slave cylinder. If it is leaking, the liquid may flow out gradually, or maybe much faster.
- Check the brake fluid level in the reservoir and the condition of the main brake.
- If traces of leaks are visible on the master cylinder, then this is the cause.
- The cause of a brake fluid leak may also be a broken brake line. The rubber brake hoses may fray or the tubes may become rotten or ruptured.
Brake hoses fray
The working cylinders could also be jammed.
If the master cylinder does not work:
- It will show traces of brake fluid leaks.
- The brake pedal will not be pressed.
- Also, the brake pedal can simply move to idle without creating any effort.
Main causes of malfunction
The VAZ 2110 caliper is structurally an element that holds the brake pads and is responsible for the degree of their pressure on the brake discs. It is also responsible for uniform wear of the brake pads and guarantees the driver reliable braking in extreme situations.
Thus, the importance of the caliper in the operation of the car is difficult to overestimate. If by this time you have a completely reasonable question, what can happen to the caliper on a VAZ 2110 (2112), we will be happy to answer you
The main cause of malfunctions is “acidification” of moving elements, coating them with an oxide film, clogging due to the destruction of protective boots or the use of incorrect lubricant, namely:
If by this time you have a completely reasonable question, what can happen to the caliper on a VAZ 2110 (2112), we will be happy to answer you. The main cause of malfunctions is “acidification” of the moving elements, coating them with an oxide film, clogging due to the destruction of protective boots or the use of improper lubricant, namely:
- acidification of the main piston mechanism;
- acidification of guides.
A clear sign of problems that the caliper can cause on VAZ cars is uneven wear of the brake pads and an increased braking distance. In this case, the VAZ pads must be changed, and the caliper mechanism itself must be subjected to comprehensive diagnostics:
- check the condition of the piston, its degree of freedom, the presence of moisture, metal oxide, oxide formations and build-ups, the condition of the protective boots;
- Similarly, check the condition of the guides, make sure that there are no uncharacteristic scuffs, abrasions or deformations of the rod on the surface.
We must also not forget about regularly replacing the brake fluid in the system. This should be done approximately every 40 thousand km. mileage of VAZ-2110.
Since brake fluid is hygroscopic, it easily absorbs moisture, thereby oxidizing the piston mechanism and causing it to fail. The piston stroke becomes difficult and uneven wear of the brake pads and wheel wedge occurs.
Service
It comes down to checking the condition of the pads, drums and discs, checking and adjusting the free play of the pedal, periodically replacing the fluid, checking the rubber part of the lines for leaks.
Checking the condition of the cuffs of the working cylinders and bleeding the system to remove air from it.
Read on the topic: What to do if there is air in the brake system.
All elements of the VAZ 2110 brakes are repairable, except for the vacuum booster and rubber parts of the lines.
The amplifier and rubber lines cannot be repaired, so if problems arise, they are replaced.
Repair of the master cylinder comes down to replacing all rubber elements (cuffs, gaskets).
It is performed when liquid leakage is detected from it. The same applies to working cylinders.
Repair of VAZ 2110 brake mechanisms includes replacing pads, discs and drums if severe wear is detected.
Some tips
- If you start having problems with the brakes, first of all you need to carry out an external inspection of the vehicle: check the fluid level in the reservoir, make sure that the front/rear cylinders are not leaking. There should not even be stains of brake fluid in the brake hydraulics.
- “Brake fluid” must be filled with the same brand; it is recommended to completely replace the brake fluid at least once every two years.
- If faults are identified in the gas turbine engine, and it has already served for at least a year, it is more advisable to replace it completely than to repair it. The same can be said about the rear working cylinders.
- Before changing the turbocharger, the brake fluid should be removed from it; this operation is usually done using a syringe.
- Usually a leak in the master cylinder is not visible, but if there is any suspicion that this part is faulty, you should remove the main cylinder - there will be traces of leaks at the rear, and this indicates its faulty condition.
- If, during an external inspection, cracks were found on the brake hoses, it is better not to take risks and immediately replace the defective parts.
Didn't find the information you are looking for? on our forum.
We recommend reading:
Which gasoline is better for VAZ 2114
Air leakage through injectors symptoms of VAZ 2114. Possible malfunctions, cleaning and adjustment
Vibration in the cabin when idling VAZ 2114 injector causes
Repair of the underbody of a VAZ 2107
VAZ 2114 injector boils, reasons
Error p1602 vaz 2114 how to fix
What is an ESD for a VAZ or an ECU for a VAZ 2114
Master cylinder, slave and clutch VAZ 2101. Replacement and repair, fluid pumping