After the euphoria with the birth of my son, I still found some time to continue our long-term project). Now we are planning to replace the radiator frame.
The reason for the replacement was a crack in the hole for the radiator on the right in the place of the front airbag (it was welded by someone), overcooked pieces of patches on the bottom in the area of the crab fastenings, and general rotting of the entire structure as a whole.
The car received a blow in the area where the front engine mount was mounted, the right mudguard was displaced, and, it seems to me, there was a problem with the right front spar. All this needs to be considered in detail and a solution planned.
Replacing the front panel is one of the most important moments for us, on which the appearance of the car, the gaps and the correct fit of the main parts that assemble the entire front of the car will directly depend. These parts are: the face assembly itself (radiator frame + radiator frame panel), both headlights, two wings and a hood.
And by the time welding begins, all these spare parts will need to be available. There are several additional important points: the problem of the front panel fitting perfectly to the short-winged mudguards, which have a slightly different shape than the modern stock long-winging panel. Also, the old fender mounting brackets do not line up with the holes in the long fenders themselves. There are also issues with the headlights. They measured the sports, they become bulging forward. Will need to be customized.
At the beginning of the process of working on all this, we removed the wheels, both struts, rack, rods, i.e. Completely freed up the engine compartment. Thus, we plan to process, prime the engine compartment and the muzzle welded to it together, and paint it all at once.
Let's divide our work into several main stages: 1. Front panel section 2. Preparing and welding the front panel into one piece3. Preparing the engine compartment
- 4. Welding the front panel and adjusting the external parts of the front end
- Stage 1. Cutting the front panel
There was nothing particularly complicated or unusual about the front panel section. The main thing we wanted was to see if we could leave or change the lower panel fastenings to the mudguards. It turned out that it needed to be changed.
The front panel is where we started
View of the left side of the panel: rough welding, broken bolt, everything is as it should be))
View of the right side of the panel: the same thing - rough welding, broken bolt))
Impact location
Ugly patch on the bottom left
The right patch under the crab is no less ugly
This is the reason for replacing the front panel - a crack in the hole for mounting the radiator
A more detailed view of the crack, it’s immediately clear - replacement and only replacement
We set the car level, supporting the front jacks with identical pinocchio). stump in the center - for insurance
Everything is ready for cutting, we cut
It was necessary to leave the lower panel fastenings in order to better consider whether to change them or not
Now you need to carefully cut off the remaining rags and look at the condition of the fasteners
There is a lot of dirt, sand and stones inside the radiator frame
We drill out the remains of the front panel, everything is clear: a mountain of rust in inaccessible places. The fasteners will also have to be changed.
Cracks around the crab nut
Finally the frame is cut off, we also cut off the rotten stand for the battery)
We clean the entire engine compartment with a machine
After we cut off the front panel, we could clearly see what we needed to do next. Let's move on to stage 2 i.e. radiator frame assembly.
Source: https://www.drive2.com/l/1807539/
Sequencing
First, we’ll tell you how to replace this part yourself. You will need to prepare the car - sequentially disassemble it from the engine compartment so that you have access to the radiator. Dismantle it and the old part. Next you need to do:
- Sand the new part (it is covered with shipping primer) and re-paint it with automotive primer. Do this only in advance, since later it will be impossible to do this work from the engine compartment.
- Use a chisel and hammer to remove the old grate.
- Clean the welding points, putty and coat with primer. Take measurements and weld the new frame. Place the weld points where they were.
- Paint the outside of the structure. It is advisable to additionally cover it with anti-gravel.
- Reassemble the car in reverse order.
Article on the topic: An air conditioner that works without electricity
Replacing a TV is extremely important, since if it is weak, it may sag and break. The cost of this work at a service station is quite high, so car enthusiasts often try to make the replacement themselves.
Postcard template for February 23
December 13, 2022 admin
Postcard template for February 23 » Allday - all the best in the world of graphics and design!
DIY postcard stencils for February 23
Gallery.ru / February 23 – humorous postcard (PSD) – TEMPLATES FOR PHOTOSHOP – download (1) – solncewo
Congratulations » Department of Education of the Molchanovsky District Administration
Happy Defender of the Fatherland! — Union of Free Trade Unions
Background for postcards for February 23 (33 pictures)
Make a postcard for February 23rd. Postcard template included Tatyana Saxon's blog
Download postcard frame for February 23
Templates for presentation February 23 – Templates for presentations – File catalog – Everything for the Schoolchild
DIY postcard stencils for February 23
DIY postcard stencils for February 23
Postcard design for February 23
February 23 /templates/-article on the website “ADVERTISING SERVICES CENTER”
Postcard template for February 23 » ALLDAY - people's website about design
Lika Golden VK
February 23 frame
PSD source of the poster-card for February 23rd! » 3drus – 3D graphics, 2D graphics, web design, 3d Max, Maya, Blender, ZBrush, Adobe P
Holiday February 23rd Defenders of the Fatherland Day - For kindergarten teachers - Maam.ru
Leave a comment
How to amplify a new TV on a VAZ-2109
In the process of self-repair, you can strengthen the structure. To automate the process, the old TV is removed using a drill. Therefore, the upper and lower parts are often removed separately. During the process, monitor the condition of the bottom - the place where the part is attached to the body. You will need to join two sheets of metal. To do this, leave the width only 2 millimeters, many masters leave 5, which is wrong. Carefully, slowly, remove the metal to leave the desired sheet width.
It is necessary to drill holes around the perimeter of the new TV to help secure the part more securely. Through them you can fasten the grille with self-tapping screws. Next, install the headlights, look at the gaps and weld the structure. Clean the weld spots.
To strengthen the structure, weld a profile pipe at the bottom. Weld it to the walls, and then install the second part of the TV. The pipe profile should be square 50x50 millimeters. Thanks to this profile, the structural parts will not rotate. On 16-valve engines, it is imperative to use a pipe, since this power unit is heavier in weight. After you have made the first welding points and secured the part, remove the screws and weld the structure again.
Replacing a TV on a VAZ 2109 is not changing the wing; you have to work hard. In terms of time, this activity can take 5-6 hours. The reason for replacement is most often the age of the car and the constant exposure of the lower part of the radiator grille to an aggressive environment, which actually causes it to rust. In a weak spot, the TV may burst and lead to breakdown with serious consequences, since the motor may sag. You can replace the radiator grille yourself (if you have a welding machine), but it is better to take it to a service station.
Article on the topic: How to update the TTK player on a Samsung TV
Replacing a TV with a VAZ 2109, consisting of two parts, is carried out both as a complex and separately. If it breaks or cracks, you can weld the broken area, but it’s better to replace everything together.
Removing rotten parts
We begin repairs by removing rotten, rusty and deformed parts. I will describe the process using the example of a car, a VAZ 2109, which I was tasked with repairing. First, I’ll give you my problem areas in the car. The front floor of the car is completely rotten with all the jacks and reinforcements. And the jack could only be used with a sub-engine beam. The rear floor was also rotted. Corrosion also affected the car doors. In general, the bottom was almost absent. The wings were not in the best condition.
The front hood was noticeably rusty, all the floor connectors and the floor of the gas tank and spare tire were missing. The same fate befell the reflectors of almost all headlights. The front spar burst in the gearbox area. And above the muffler, in the floor of the trunk, there was a huge hole. The corners of the door were “eaten” by corrosion.
I describe in detail the condition of my car so that car enthusiasts can identify similar faults in theirs and draw the right conclusions. Once the necessary tools for car body repair are at hand, we begin installation.
Sequence of actions when replacing a TV on a VAZ 2109
1. All spare parts of the new radiator are covered with shipping primer, which will have to be torn off, re-primed with automotive primer and painted. This must be done before installation on the car, since after, from the engine compartment, there will be no such opportunity. 2. Dismantle the old radiator grille. Basically, it is always attached by welding, and no bolts are used, so we remove the spot weld using a chisel and hammer. 3. The next stage of replacing the VAZ 2109 TV will be the installation of a new radiator grille. It is necessary to make a control measurement and weld a new frame. A mandatory procedure is to clean the welding points with a grinder, followed by putty and primer of the entire surface. 4. The preparatory stage is completed, you can start painting the TV from the outside. The TV is not necessary, but it is also advisable to treat it with anti-gravel. 5. Install all car parts in reverse order. Replacing the TV on a VAZ 2109 is completed.
The VAZ-2109 is a car that is not distinguished by a strong body; iron quickly succumbs to corrosion, and almost all body parts rust. Replacing the front spar is required when its metal is rotten in different places; the part is also replaced if it is severely deformed after an impact (accident).
Article on the topic: Is it possible to take a TV with you on a plane?
What causes damage to the body of the “nine”
ATTENTION! A completely simple way to reduce fuel consumption has been found! Don't believe me? An auto mechanic with 15 years of experience also didn’t believe it until he tried it. And now he saves 35,000 rubles a year on gasoline! Read more"
There is an opinion that Soviet cars are equipped with an “indestructible” body. It is impossible to say this one hundred percent, but it is also wrong to refute such a statement. Indeed, the body of the VAZ 2109, the diagram of which is presented in the article, is made to perfection, but over time, any quality will come to an end.
Almost all car bodies older than 5-7 years need repair. And there is nothing surprising about this. The living conditions of recent years, the huge amount of harmful substances, the general deterioration of the environment - all this cannot have a positive effect. Difficult, almost extreme, modern operating conditions also cause a lot of harm.
As a result, the state of the metal surface becomes deplorable, the internal combustion engine and parts are sent for disassembly, and instead of a worn-out but close-to-the-heart car, a new car takes its place. All this can be avoided if you know the features of the body layout, understand the intricacies and carry out preventive maintenance in a timely manner.
Purpose of the spar
The spar is a load-bearing body element, which is a beam, serves as the basis for fastening the components and components of the car, and also plays the role of a shock absorber, softening the impact, absorbing deformation. The “nine” is equipped with paired front and rear spars; these body elements experience significant load.
If a car can move without problems with a dented fender and a rusty door, then the car should not be driven with a deformed front spar (PL). If this part is damaged, quite serious problems may arise:
- tires will quickly begin to be eaten away;
- the car is poorly controlled;
- the body loses strength and collapses.
If the condition of the spar is not the most critical, it can be welded, the geometry can be corrected on a special stand (slipway); in case of severe deformation or if there are cracks, the body element should be replaced. But it should immediately be noted that it is very difficult to do such work with your own hands - here it is important to accurately install the part, you must use welding. If the body element is installed incorrectly, the geometry of the body will be disrupted and the work will have to be redone.
Strengthening and modernization
Strengthening or tuning the body of a VAZ 2109 according to the instructions should be carried out only if the owner is well versed in the design features of the car, has an appropriate understanding of the device, and knows the technical data on weight and other parameters. Otherwise, it is better to entrust the modernization work to professionals at the service station. True, the price of their services in these matters is too high, but you will be satisfied with the result.
So, tuning a VAZ 2109 car is, first of all, upgrading its body. The process always begins with this, and only after that the power unit and other components of the machine are brought to the desired state.
The need for reinforcement at “nine” and the quality of life indicator
It’s interesting that many owners of the “Nine” install modern amplification components more for the sake of beauty. This cannot in any way be a plus for reinforcement, since for the most part such elements can only provide decorative benefits.
On the contrary, if the goal of tuning is primarily to strengthen the body, TK*, spacers, rods and gussets can be selected accordingly. They will significantly strengthen the frame and increase its ability to withstand external influences.
TK* - tubular roll cage
Strengthening, as mentioned at the beginning of the article, is a mandatory procedure. By installing longitudinal and transverse reinforcing elements into the body structure, you can achieve a significant increase in the rigidity of the body frame, and this is already very good. The integrity of the original design obtained at the factory will be maintained and at the same time the corresponding torsional rigidity parameters will increase. At the same time, the weight of the car will practically not increase.
No matter how rigid the body is, it will have weak, vulnerable areas. Even if, under the influence of external forces, these places receive only microscopic damage, over time this will inevitably develop into a big problem.
The cost of the front side members of the VAZ-2109
The right front spar is very similar in design to the left one, but the parts are not interchangeable, they seem to be a mirror image of each other. Body parts for the “nine” are sold in almost every specialized auto store; you can buy a front spar for an average price of 1,800 to 2,200 rubles.
You can also purchase a PL repair insert; it can be useful if the entire body part does not change and needs to be repaired. The average cost of an insert on the right or left side is 800-1000 rubles, like the spars themselves, the repair inserts from the “nine” are identical and fit on models 2108, 21099, 2113-14-15. There are no side member reinforcements as such for the front part of the body on the VAZ-2108-09-099; rigidity is added to it by the lower radiator frame (“TV”), which is a connector and is welded in front between the left and right load-bearing parts of the body, and the front wing mudguards.
Article on the topic: Where can you sell old TVs in Astana
Similar products
| Catalog no. | Name | Manufacturer | Price | Price* |
| 2108-8401050-10 | radiator frame (top) VAZ 2108 | Start | 854.00 rub. | 793.00 rub. |
| 2108-8401052 | radiator frame (bottom) VAZ 2108 | Start | 1050.00 rub. | 975.00 rub. |
Price* – price for registered users
The main reasons for the destruction of the front spar
As noted above, the submarine bends from impact and rusts over time. The following also have a destructive effect on this body element:
- constant engine vibrations, especially if the engine or gearbox mounts are loose;
- driving a car on bad roads;
- extreme driving.
Since the side members are practically the skeleton of the body, a large load falls on them. All vibrations and shocks are transmitted to these elements; as a result, the body parts cannot withstand, become deformed, and cracks appear on them.
How to replace the front spar on a Nine
Replacing the front side members 2108-09 must be done on a slipway; in a regular car service without special equipment, it is very difficult to perform such work, and in some cases it is simply impossible. Before starting body repairs, it is necessary to partially disassemble the car, remove from the car:
- front optics and bumper;
- hood;
- radiator grille;
- expansion tank;
- radiator;
- front wing (on the side where the submarine changes);
If the car's hardware is sufficiently rusty that you have to additionally change (repair) other body elements, you may have to remove the gearbox and engine. The body repair itself is performed in the following order:
- the old spar is cut off (usually using a grinder or a gas cutter) so that the new part “falls” into place better, a beveled cut is made;
- the new submarine is cleaned of transportation soil;
- At the seat, rust, dust and dirt are removed from the metal; a grinder is used for this. A good result can be achieved by using a sandblasting machine; to remove traces of corrosion, a rust converter is needed;
- The new spar is butt welded, first tackling it in several places. Before final welding, the geometry of the body is checked; if the work is not done on a stand, the correct installation of the part is verified using control points:
- after welding work, the metal surface is cleaned again, degreased, the weld seam is treated with mastic, and primer is applied;
- After the primer has completely dried, the replaced body part is painted in the color of the body, and the car is assembled.
Article on the topic: How much does it cost to clean an air conditioner in Mariupol
As a rule, one body element on a car is rarely changed; along with the submarine, a new “TV”, upper radiator frame, and panels (mud flaps) of the front wings have to be installed. And the front spar on the nine is not always completely changed; most often it is cut off along the “glass”.
The problem of domestic cars
Car body repair begins with the selection of tools. I’ll say right away that the list will be quite large, because the work is labor-intensive and requires a large number of devices, including electronic and gas models. We will need at least three types of hammers of different sizes, a flap wheel and a sanding wheel (it removes paint and light rust well).
VAZ 2109
A grinder will also come in handy, a 10 cubic meter carbon dioxide cylinder, a welding machine with a maximum current of 150 amperes, several chisels, and a set of metal drills. You can’t do without a jack here either; it’s better to have two of them.
Stock up on cutting wheels of approximately 1-2 millimeters and one cleaning wheel. Any type of jigsaw will do. Brush with rust converter, fiber disc (can be replaced with a simple budget brush). Standard driver's set, 2mm cord and plumb line. It seems that I have listed everything that is needed. It's time to get to work.
The cost of replacing the front side member of a VAZ-2108-09 in a car service center
Since replacing a submarine is not an easy job even for an average car service center, not all craftsmen undertake it, especially since not everyone is eager to begin restoring the body of a used Nine. Mostly, small auto repair shops carry out minor and medium body repairs, while large auto repair centers do not want to deal with domestic cars at all. Prices for body work from auto repair companies and private owners are most often approximate; often the final cost of the repairman is announced closer to the end of the repair. The fact is that “pitfalls” may unexpectedly appear, and as a result of their identification, the work is delayed and becomes more complex.
Some car service centers indicate two values in the price list at once - the upper and lower limits; in large cities or the capital, they charge from 3,500 to 9,000 rubles for replacing the front side member; usually, work from private repairmen in garages costs less. Often, along with the submarine, it is necessary to change the wing splash guard, sills, and repair the bottom; some auto repair shops note in their prices that the cost of repairs in the price list is indicated without painting.
Article on the topic: How to choose the size of an LED TV to suit the size of the room
Design features of rotary oil pumps
As a rule, a rotary-type oil pump consists of a small number of parts, including:
- suction and discharge cavities;
- external and internal rotors;
- drive shaft.
Oil pump operation
with rotors is based on the interaction of two rotors. In unregulated designs, the oil that is drawn in is transferred into the system by rotor blades. If the pressure becomes excessive, the pressure relief valve opens and excess oil is released.
What makes them adjustable is the presence of a movable stator. It has a special adjustment spring, by tightening or twisting it you can change the volume of the chamber with the rotors, due to which the overall pressure in the system also changes. Thanks to the stator, it is possible to achieve stable pressure in the lubrication system, regardless of how intensely the crankshaft rotates.
Advantages of variable oil pumps
Today, adjustable oil pumps are considered much more acceptable than unregulated ones, because they have a number of significant advantages, including:
- about a third less power taken from the engine;
- less oil wear due to reduced frequency and speed;
- the oil foams less.
That is, an adjustable oil pump allows for smoother oil circulation and a longer interval between oil changes, which makes it a more preferable equipment.
Repair of the front side member of the VAZ-2109
The main reasons why submarines have to be repaired are the appearance of cracks on the body element. In some cases, the spar bursts in a circle, the metal rots through and through, if the part itself is not yet in a completely deplorable state, patches are put on it, and the iron is strengthened using spot welding. If the spar is pulled away as a result of an accident, it is pulled out on a stand. You can try to pull out the submarine without a slipway; in garage or field conditions, craftsmen carry out a similar operation using a strong metal chain, a hand winch and some kind of support, for example, wood.
In this case, the rear beam must be fixed so that the car does not move forward; it should be pulled carefully, constantly checking for deformation of the rear axle. If the beam bends due to excessive force, it will have to be replaced. Only professionals can say whether it is worth repairing a car after damage to the spar; in some cases it is easier to sell the car for spare parts than to restore it.
Delivery by transport company
Delivery by one of the transport companies with a representative office in your city. Delivery time: 2-10 days depending on the distance of your locality from Togliatti. The most convenient and fastest way to deliver orders of different sizes. Delivery cost from 250 rub. depending on weight and delivery distance.
Orders are sent by transport companies based on 100% payment for the order. Dispatch by transport companies PEK, KIT, Baikal-Service is carried out on Wednesday, Thursday and Friday.
How to weld a TV on a VAZ 2109
Continued from Part 2.
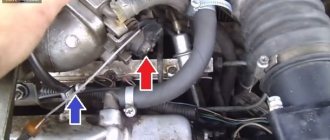
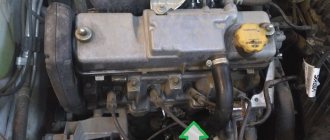
Stage 3 of our approximate plan for welding work on the radiator frame, described in part 1. Now is the time to prepare the engine compartment, so that later (after welding the muzzle) there will be no difficulties with access when stripping, welding and straightening the engine compartment parts. The main task is to accurately weld two things on the ends of the front side members, onto which the bumper mounts are screwed. The correct installation of the new radiator frame will depend on this.
Article on the topic: How to flash a dexp f40b7000c TV
For this we need: Right front spar amplifier 2108-8403314 Left front spar amplifier 2108-8403315 those same two things and the battery platform - 2108-8403400 - all of them are cleaned and primed in advance as bequeathed by the great and mighty triEM.
We didn’t find anything supernatural or particularly interesting in the preparation of the engine compartment. We made a hole for the wiring from the brain (60mm), cut off the fastening of the diagnostic connector for carburetor VAZ-2108. The clutch cable hole has not yet been made (remember: it was originally torn and we simply patched this place). We inspected and identified all the small places where welding was required. They cooked them. We stripped it down to bare metal, primed the entire engine compartment and welded the prepared parts.
Dedicated to those fighting the darkness. ...let's still race!
We've sorted out the support, now let's move on to the bottom of the TV! Again you need to slowly walk around the car for some time. What to shake and shake, sit in a chair and understand what should happen when the work is completed)) The sad picture of a car hanging on logs makes you think and work faster...
First of all, the bottom is loaded with reactions from the front suspension stretch marks. I already wrote about the consequences of long-term alternating loads on this part in the previous part... We must also remember that it is the lower half of the frame that is connected to the front side member reinforcements. The market, as always, is sensitive to the needs of citizens, offering ready-made radiator frame amplifiers. Well, it’s convenient - I bought a GY-shaped piece of iron, welded it and everything was ready.
Article on the topic: In what episode do Dean and Sam end up on TV?
We will take a different path, said Comrade Lenin. Again I’ll squeal with a grinder and cook))))) Let’s strengthen the bottom and front of the frame... But maybe we should look further, let’s reinvent the wheel?) I’ll start with the reinforcements of the lower cross member for attaching the brace brackets... It’s worth noting that initially, all reactions from the suspension braces are through the threaded The bonks perceive precisely these details. Then, due to the welding points, the load is transferred to the lower part of the frame... Both on factory and repair crossbars, the amplifiers are noticeably thicker than the lower part of the frame itself. Reinforcement asks for itself: weld the amplifier with an intermittent seam along the contour, additionally add several welding points...
The VAZ-2109 was produced quite a long time ago. Over the years of service, its radiator grille was exposed to an aggressive environment in the form of salts and moisture. It is for this reason that more and more often motorists have to change it. Replacing a VAZ-2109 TV yourself can only be done if you have a welding machine.
Sequencing
First, we’ll tell you how to replace this part yourself. You will need to prepare the car - sequentially disassemble it from the engine compartment so that you have access to the radiator. Dismantle it and the old part. Next you need to do:
- Sand the new part (it is covered with shipping primer) and re-paint it with automotive primer. Do this only in advance, since later it will be impossible to do this work from the engine compartment.
- Use a chisel and hammer to remove the old grate.
- Clean the welding points, putty and coat with primer. Take measurements and weld the new frame. Place the weld points where they were.
- Paint the outside of the structure. It is advisable to additionally cover it with anti-gravel.
- Reassemble the car in reverse order.
Article on the topic: How to watch TV through a computer without traffic
Replacing the TV is extremely important, as if it is weak, it may sag and break. The cost of this work at a service station is quite high, so car enthusiasts often try to make the replacement themselves.
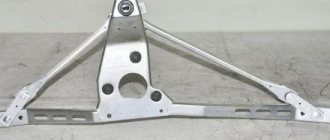
Radiator frame
This body part of the “tens” is called a TV. The element is replaced in the event of a strong front impact, when the “original” part is easier to replace than to repair.
As a rule, in an accident during a frontal impact, the upper frame and the beam, which serves as a reinforcement for the bumper, are most deformed. But the TV is changing completely in any case.
According to experts, replacing a TV on a “ten” is much easier than on a “nine” or other models released by AvtoVAZ earlier. This is explained by the simplicity of the design of the “Desyatovskaya” radiator frame.
Note. In some cases, you can find the upper frame and lower beam separately for sale.
The TV is mounted to the body using welding points. They are located in 4 places - the radiator frame is attached in the places where it connects to the wing reinforcements (“booms”) and to the side members. To dismantle the TV, it will be enough to drill out the points in these places and then cut them off with a sharp chisel.
Advice. In the process of removing the TV, it is possible to dismantle the radiator itself, only in this case you must remember to disconnect the radiator pipes.
After the new radiator frame is put in place, the welding areas will need to be thoroughly cleaned with an emery wheel and puttied. In places where the frame touches the body, sealant must be applied.
Article on the topic: How to update Android on your TV
How to amplify a new TV on a VAZ-2109
In the process of self-repair, you can strengthen the structure. To automate the process, the old TV is removed using a drill. Therefore, the upper and lower parts are often removed separately. During the process, monitor the condition of the bottom - the place where the part is attached to the body. You will need to join two sheets of metal. To do this, leave the width only 2 millimeters, many masters leave 5, which is wrong. Carefully, slowly, remove the metal to leave the desired sheet width.
It is necessary to drill holes around the perimeter of the new TV to help secure the part more securely. Through them you can fasten the grille with self-tapping screws. Next, install the headlights, look at the gaps and weld the structure. Clean the weld spots.
To strengthen the structure, weld a profile pipe at the bottom. Weld it to the walls, and then install the second part of the TV. The pipe profile should be square 50x50 millimeters. Thanks to this profile, the structural parts will not rotate. On 16-valve engines, it is imperative to use a pipe, since this power unit is heavier in weight. After you have made the first welding points and secured the part, remove the screws and weld the structure again.
Comments • 143
Why change something that's already normal?
How much does this procedure cost?
4.05 not two sheets of metal, but three bumper mounts, don’t forget
Aren't you going to Movilit?
Tell me, what is the difference between the finished radiator frame and the prefabricated one? I’m just thinking of replacing it due to the fact that the engine is tilted on its side, and the frame was torn, we were reassembling it..
The finished welded together, the assembly consists of two main parts
I really like how well they did it. How long did this repair take?
A couple of leisurely evenings
Well done! Everything is calm! Competently! We viewers of your channel say thank you to your parents for raising an intelligent, smart, well-mannered son! Not a boor! Not a swearer! But a serious, well-mannered man! For respect for us viewers, great respect to you! And an explanation very competent! LIKE PARENTS, LIKE SON.
I respect such work, well done
How much does this kind of work cost?
Guys, who knows how much it will cost to install a TV?
Simple, but understandable.
Replacing a TV on Russian cars is more difficult and takes longer than on foreign cars. And will you paint it? Otherwise it will rust.
A friend’s car, everything has been painted there a long time ago)
( 1 rating, average 4 out of 5 )