Charge circuit design and diagram
The technical condition of the main components of the car is displayed on the instrument panel. Thus, the performance of the vehicle depends on the reliable operation in any weather of the electrical equipment power system. It consists of a generator, battery, fuse F16, terminals, connecting wires and a control light. A defect in one of these elements is the reason why the VAZ 2114 injector lost charging.
At the initial moment after turning on the ignition key, sufficient voltage is supplied through the light bulb and the isolation diode (terminal D) to excite the generator. Further, during rotation, mechanical energy is converted into electrical energy.
Malfunctions of the VAZ 2108, 2109, 21099 generator
The generator is responsible for power supply to the entire on-board network of a car with a running engine.
Signs of a malfunction of the generator of VAZ 2108, 2109, 21099 cars
After starting the engine, the battery discharge indicator lamp in the instrument panel lights up
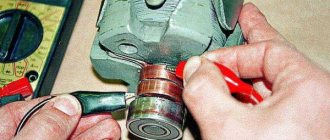
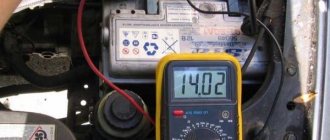
The generator does not produce the required charging current. Simultaneously with the light on, the voltmeter readings tend to zero. The battery is constantly not recharged. Using a voltmeter (multimeter), we check the voltage at the battery terminals (the engine is idling). The voltmeter readings should be as follows: generator 37.3701 - 13.6 V, generator 9402.3701 - 13.2 V.
The “folk” method of checking a generator by removing the terminal from the battery while the engine is running is only suitable for carburetor engines. If the engine stalls after removing the terminal, it means the generator has stopped producing electric current.
If it is less, then the problem is not in the faulty wiring going to the control lamp and voltmeter, but in the generator. Next, sequentially, from simple to complex, from the most probable to the least probable, we look for the cause of the malfunction.
— The generator drive belt tension is loose
The belt slips on the pulley, and the generator rotor stops rotating at the required frequency. In this case, a “whistle” from the generator drive is possible. We check and adjust the belt tension if necessary.
— The generator voltage regulator is faulty
There may be a short circuit between its terminals “B” (“D+”), “W” (“DF”) or “stuck” (the brushes of the brush assembly have worn out). The easiest way to check the voltage regulator is to install a known good one. We replace the faulty regulator with a new one. Read more: “Checking the generator voltage regulator for VAZ 2108, 2109, 21099 cars.”
— The diode bridge (rectifier unit) of the generator is faulty
Most likely there is a “break” in its valves or a short circuit in the negative valves. The power diodes of the excitation winding may also be damaged. The diode bridge can be checked using an ohmmeter (multimeter in ohmmeter mode) both directly on the car and on a removed generator.
Checking the diode bridge of the generator of VAZ 2108, 2109, 21099 cars
— The generator stator is faulty
“Open” or short circuit in the stator winding. We check the stator with an ohmmeter, and if there is a malfunction, replace it with a new one.
checking the stator windings of generator 37.3701 for “break”
— The generator rotor is faulty
Perhaps the leads of the excitation winding located on the rotor have become detached from the contact rings to which the brushes are pressed. We check the rotor and replace it with a new one if necessary.
generator winding terminals 37.3701 for VAZ 2108, 2109, 21099 cars
The battery is recharged and “boils”
The generator produces too much charging current, higher: generator 37.3701 - 14.6 V, generator 9402.3701 - 14.7 V, which is checked with a voltmeter at the battery terminals. The needle on the standard voltmeter is in the red zone at the end of the scale.
— The voltage regulator is faulty
Most likely there is a short circuit between its terminal “Ш” (“DF”) and “ground”. Replace the voltage regulator with a new one or a known good one.
The generator makes noise or “howls” when operating
The nut securing the generator pulley has come loose, the generator bearings are worn out, there is an interturn short circuit or a short circuit to ground in the stator winding (the generator “howls”), a short circuit in one of the generator valves.
Notes and additions
— The causes of such malfunctions as: the warning lamp does not light up after turning the key in the ignition switch and starting the engine (the standard voltmeter shows normal voltage) or the lamp does not light up and the voltmeter does not work (or the control devices do not work completely) are not a malfunction of the generator, but a burnout of the control panel lamp, a break in its power supply circuit, a blown fuse No. 5 (F16) in the mounting block (responsible for supplying current to the excitation winding of the generator), a break in the power supply circuit of the instrument cluster (orange and orange-blue wires), a malfunction of the ignition switch.
— If the discharge warning lamp lights up at idle, and goes out when you press the gas pedal and while driving, you must first check the tension of the generator drive belt, and if that doesn’t help, then the problem is most likely in the additional resistors located in the relay mounting block and fuses. If they fail, the generator is not excited at low speeds, and therefore does not charge. It is necessary to either completely change the mounting block, or unsolder additional resistors and replace them with new ones.
More articles on generators for VAZ 2108, 2109, 21099 cars
Stator problems
Similar problems can arise in stator windings. In particular, if there is an interturn short circuit, the battery will not charge. Of course, the generator can work, but in emergency mode. Firstly, its power will drop significantly. Secondly, the batteries will not be charged. Thirdly, excessive heating of the generator housing occurs. The winding may also short-circuit to the housing. Excessive heating, humming, loss of power - all those signs that are inherent in rotor winding failures. The check is carried out in the same way as in the case of a rotor winding. To carry out repairs, it is necessary to replace all faulty coils. It even happens that in generators the positive terminal is closed to the housing. Consequently, a short circuit also occurs between the terminals of the battery. This poses the risk of a fire. Of course, the generator does not charge in this case.
Generator overload
If the battery is charging, but the voltage is insufficient, it means the generator is overloaded. This is facilitated by the installation and connection, in addition to standard electrical equipment, of various gadgets that require electricity. The generator is operating at the limit of its capabilities.
Modern drivers love various car tunings. Thus, serious music systems, powerful lighting and other equipment are installed. Someone also increases the battery power. So, with a 70 Ah battery, the standard VAZ generator cannot fully charge it. It just doesn't have enough power. As a result, the generator provides little charge.
What kind of charging should go to the battery from the generator?
It is traditionally believed that 13.5-14.5V should be supplied by the generator to the battery and this is absolutely enough to replenish the battery costs.
It is worth considering that using a battery with a higher power in a car than the manufacturer recommends also requires the installation of a more productive generating device.
It is necessary to take into account the load that the generator must withstand - it is calculated based on the maximum indicators of all electrical appliances and car systems.
Do not forget that the charging current from the energy-generating device will allow you to start the car in the cold season. In order to avoid problems with starting the car, we recommend purchasing generating equipment, the charge current of which will be approximately 10% of the capacity of the power source. That is, a battery of 100 A/h requires a generator that can produce 10A. Please note that for many cars, 100 amp equipment will operate at its maximum capacity, because the power consumption of the automotive system is in the region of 80 amps. Therefore, the choice of a source generating energy must take into account both the battery capacity and network consumption.
Why is the battery not charging?
Before writing about the main reasons why the battery may not charge on VAZ 2109-2108 cars, I would like to warn all readers that the list I have given is not complete and is compiled only based on personal operating experience. So, during my short 10 years of driving experience, I had to operate a lot of cars and there were quite a lot of problems with charging the battery, and I will try to write about the main ones here.
It's no secret that the main device that is responsible for the normal operation of electrical appliances in a car is the generator. It is precisely because of the failure of some of its parts that charging may disappear completely or become weak. The main malfunctions of the generator, which entail a decrease in the charge current to the battery:
- Wear of generator brushes. This is a very common and most common reason. If they are worn down to the minimum permissible height, then the charge may disappear gradually, and then disappear altogether. To solve this problem, you just need to replace the brushes with new ones and that’s it.
- Failure of the diode bridge. The most reliable diode bridges are usually installed on VAZ 2109-2108 cars from the factory. And they are the ones who travel the most kilometers! This has already been tested not only by me, and any experienced auto electrician will confirm this. If one of the diodes or the entire rectifier unit burns out, then it also needs to be replaced. The procedure is not very fast and pleasant, but it will not cause much difficulty. Just below I’ll put a link to a page that describes the entire generator repair process.
- A more complex generator breakdown, such as a break in the rotor or stator winding. Of course, this is rare, but it still happens sometimes. The cost of these spare parts is quite low, so it is better to buy new ones and install the burned ones together than to buy a new generator.
- Poor charging may be due to slipping of the alternator belt. This becomes especially noticeable in damp or rainy weather, or when water gets on the belt. It begins to whistle, causing it to slip on the pulley, thereby preventing the generator from gaining sufficient speed to optimally charge the battery.
If you have problems with your car that are described above, then you can read all the maintenance procedures here: Repairing a generator on a VAZ 2109-2108 with your own hands. Everything is described there in quite detail and even for beginners the information will be very useful, and understanding it will not be difficult.
The generator produces insufficient voltage. What to do?
Insufficient charge level of the car battery causes the engine to fail to start. At night, insufficient voltage at the generator output can cause the engine to stop while driving. If the battery charging indicator light on the dashboard begins to blink or stays on while the engine is running, you should immediately measure the generator voltage supplied to charge the battery. You should also measure the voltage on the battery with the engine running.
Causes of low voltage, methods of control and repair
The voltage supplied to the battery during operation of the power unit should be in the range from 13.2 to 15.0 Volts. If it is more than 15 Volts, the battery may be overcharged and the vehicle's electronic devices and additional devices may fail. If the voltage is less than 13 Volts, the battery is charged ineffectively; when powerful power consumers of the car are turned on, an extreme drop in the on-board network is possible. If less than 12 volts, the battery does not charge at all.
1. Weak belt tension. Often this reason is accompanied by a belt drive whistling. It is also possible that lubricants and other liquids may come into contact with belt drive areas (pulleys, rollers). The belt should be cleaned using non-aggressive solvents. The belt also needs to be tightened. The level of “sagging” of the belt on a long free section when pressing on it with your thumb should be in the range from 0.5 to 1.0 centimeters. Over-tensioning is also dangerous: it leads to premature failure of rollers, bearings and bushings.
2. Failure of the “tablet” (chocolate) of the generator . This is sometimes called a voltage regulator relay. Usually it cannot be repaired; it should be replaced with a similar one. In many cases, the regulator can be replaced without dismantling the generator.
3. Wear of generator brushes. Sometimes they are included in the relay-regulator system and are replaced together with it. The remaining length of the brushes must be at least 7 millimeters; if less, they must be replaced.
4. Breakdown of rectifier diodes . This malfunction occurs when the battery polarity is reversed. The generator becomes very hot when the engine is running. The diode “horseshoe” is changed completely or the diodes are replaced element by element.
5. Break in the generator windings. Inoperability can be determined by the different colors of the varnish insulation of the windings. In this case, the stator or rotor assembly is replaced. Rewinding windings is unprofitable.
BRUSH DEVICE
The generator brushes are also located inside the housing and perform a very important task - they are responsible for transmitting voltage between the slip rings. The brush assembly itself includes two small so-called brushes, which are made of graphite and pressed by several springs inside their seat. Since the brushes heat up quite strongly, they are covered on top with an aluminum cover, which is quite easily cooled by the oncoming air flow when the machine moves. If you need to replace the generator brushes on a VAZ 2114, then you don’t need to worry about the price; you can find the option of good brushes with a price of up to 200 rubles.
Article on the topic: VAZ 2114 malfunctions: error codes
Location of brushes in the generator
How to choose a replacement generator
When purchasing a new generator with a warranty, this item will be unnecessary. But most often it will be cheaper and more practical to purchase a used part from disassembly. When purchasing a generator secondhand, there is a risk of receiving a faulty part.
When purchasing, you need to check the generator using the following algorithm:
- Visual inspection . Dents, cracks on the body, broken seats and broken fasteners are a reason to bargain or refuse to purchase.
- Pulley rotation. The shaft should not jam and rotate silently; radial and axial play is unacceptable.
- Inspection of the plate. It is better to choose a generator that is completely identical to the standard one in voltage and speed.
- Inspection of slip rings and brushes. If there are deep grooves from brushes on the copper tracks of the rotor, then the generator has served for a long time.
- Checking the functionality of the generator. You will need a battery and a 3-volt control lamp. We connect the minus of the battery to the body of the part, the plus to the excitation terminal, marked with the number “30”. We connect one wire of the light bulb to ground, the second to the “+” terminal of the generator. We sharply turn the generator pulley by hand. If it is working properly, the three-volt light bulb will flash brightly.
- Checking the generator for breakdown of the windings. The technology is described above.
Why is the battery not charging?
The generator stops charging the battery if the brushes, diode bridge, rotor or stator winding, as well as the belt connecting the rotor to the crankshaft fail.
| What's wrong | What to do |
| Worn graphite brushes are the most common generator malfunction. | They have their own resource and wear out over time. Thus, the contact of the brushes and rings on the rotor weakens, and the VAZ 2109 does not charge. There is only one solution to the problem: replacing the brushes with new ones. They are inexpensive and are sold at any auto store. |
| Due to poor connection of the output contact, diode bridge and stator winding, the bridge heats up, melts and fails. | But it was precisely on the VAZ 2109 and VAZ 2108 models that the most reliable diode rectifiers were installed from the factory. Tested by time. Therefore, the bridge on the “nine” rarely fails. Well, in the event of a breakdown, the entire bridge will have to be replaced. |
| Another common case is a broken, slipping or insufficient tension of the generator drive belt. | To check whether the belt is tensioned, press in the middle part and check the downward deflection. The permissible deviation standards are specified in the VAZ operating manual. The pulleys can also wear out, causing the belt to slip. Well, if the belt breaks, we simply replace it with a new one. |
The most difficult malfunction is damage to the stator winding or rotor electromagnet. Buying new wiring does not cost much, but the complexity of the repair is ensured. If all these elements of the generator are in working order, but the battery still does not charge, the cause of the breakdown lies in the on-board network circuit or the condition of the battery itself.
There are cases when charging on a VAZ 2109 is lost not because of the generator. The on-board network circuit involves connecting the battery to the generator through a charging relay, fuse box and ignition switch. To identify faults of this kind, open the operation and repair manual and look at the order of connections. First of all, we check the fuses. Maybe one of them just burned out.
If you find an error, please select a piece of text and press Ctrl+Enter.
Current leakage and faulty video generator
You might find these helpful articles helpful:
If you found this article useful, please share it on social networks.
Thank you .
Charging does not occur, the voltage supplied by the generator is 9.5 volts. After replacing the brushes nothing changed.
- Checking the battery charge from the generator in a VAZ 2110 – 5 answers
- The charging voltage on the VAZ 2110 floats – 4 answers
- The diode bridge of the VAZ 110 burned out - 4 answers
- There is excitation on the generator, but no current, VAZ 2110 - 3 answers
- Why does the voltage on board the VAZ 110 network increase - 3 answers
Apparently the problem is something else. For example, the armature coil is broken.
What is the voltage at the thin terminal of the voltage regulator? Check the regulator. And the connection between the battery and the engine.
One of the stator windings is broken, the diode bridge, the relay regulator.
There may be a break in the circuit of one phase. The most likely place for a break is a loose fastening of the output of one phase on the diode bridge.
Check the line voltage between the three phases with an AC voltmeter. If there is somewhere around 15 V in three dimensions, then the break is where I indicated. If different, then the winding inside the generator is broken.
Subscribe
to our channel in
Index.Zen
Even more useful tips in a convenient format
What to do if the required voltage is not produced by the 2110 generator? No matter how carefully the owner takes care of his car, some kind of breakdown can still happen. And generator malfunctions also happen, even if it is a VAZ 2110.
How to check the generator on a VAZ-2109 yourself
The generator in the car provides the generation of electricity through the power plant. If it breaks, then first of all the battery runs out, and as a result the car simply cannot move.
This article tells you how to check with your own hands the generator installed on a VAZ-2109 car.
It is worth noting that it makes no difference which engine is installed on the car - an injector or a carburetor. In both cases, diagnosis is made using the same algorithm.
In order to determine the nature of the breakdown at home, you first need to know how to diagnose the generator.
The first stage is carried out without removing the device from the machine. There are several options, but the best quality is a multimeter. True, for this it is best to involve someone you know.
First of all, you need to find out whether the voltage regulator is capable of doing its job. Experts note that most often it is because of this that the generator may not function properly. The problem with it arises due to excessive voltage in the electrical network.
The generator itself is tested like this:
- set the multimeter to volts;
- start the power unit;
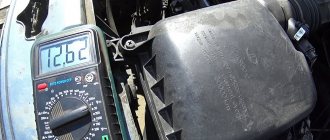
- measure the voltage at the battery and at the generator terminals.
Normally, the device will show from 14 to 14.2 volts. After this, you will need to depress the gas pedal - the voltage increase should not exceed half a volt in this case.
An increase in this indicator indicates that the generator’s performance is impaired. Most likely, the voltage relay will need to be replaced.
Alternatively, you can also do this:
- start the engine and let it run for a while;
- press the gas and bring the crankshaft to 3 thousand revolutions;
- turn on the headlights (high beam);
- heated rear window;
- stove fan.
With such a load, the battery voltage should be more than:
- 13.2 volts (generator type – 9402.3701);
- 13,6 (37.3701).
Indicators different from normative ones indicate:
- winding faults;
- failure of the voltage regulator;
- brush breakage.
To exclude the regulator from the list, you need to de-energize all devices except the headlights and measure the voltage again. If the specified node is serviceable, then the indicators will be as follows:
- for 37.3701 – up to 14.6;
- for 9402.3701 – up to 14.7.
How to avoid serious damage
To minimize the risk of generator and wiring failure, scheduled maintenance should be carried out on time.
- Replacing generator brushes.
- Timely tension of the belt.
- Bearing inspection and replacement.
- Be careful when carrying out repair work.
- High-quality insulation of contacts and twists.
- The use of crimp terminals and terminal contacts when repairing wiring.
To carry out routine maintenance, it is advisable to contact a specialized service that can check the condition of the electrical wiring and promptly carry out maintenance.
Malfunctions of the generator or electrical wiring can cause many unpleasant moments for the car owner. Difficulties with starting, dim headlights, slow wiper blades... Gasoline engines cannot go very far without a generator - it takes a lot of energy to form a spark on the spark plugs. At the first signs of malfunctions, it is better to carry out a full diagnosis and maintenance of the vehicle’s electrical systems.
Probably every car owner has encountered power supply problems. Even on foreign cars, not to mention domestic cars, it happens that the generator does not charge the battery. This is a serious problem. Someday, at the most crucial moment, the car simply won’t start because the battery has not been charged properly. But often we need a car right now.
How much does a generator produce: what to pay attention to
First of all, if there are problems with the battery, you need to check both the battery and the generator. Moreover, it often happens that the generator seems to be working normally, but the battery is not charging enough or the battery charge is high, which leads to the electrolyte boiling
In this case, it is important to determine how much charging from the generator goes to the battery. In other words, you need to know how to test the generator
As for the main symptoms, the signs of a generator malfunction are as follows:
- the battery icon is lit on the panel;
- the battery does not charge or boils;
- headlights and sidelights shine dimly;
- noises, whistling or grinding noises have appeared in the generator area.
The check begins with inspecting the generator drive belt and its tension, as well as analyzing the performance of other elements (wiring, terminals, connections, generator belt rollers and pulleys, etc.). If there are no comments, then you should evaluate how the generator itself works, whether there is any extraneous noise when the rotor rotates.
If no deviations from the norm are identified, you can proceed to measuring voltage and current. It is necessary to measure voltage, current, resistance. To take measurements, you should have a multimeter or voltmeter on hand (you can also use a load fork).
So, normally the battery should receive 5-14.5V from the generator. This is the indicator that the generator is required to provide to the battery. If the generator charge is different, then this indicates problems with the unit.
To measure, you need to consider how to check the generator voltage on the battery. There are two ways to do this - you can measure it on the generator, and also through the battery. The fact is that the generator is directly connected to the battery and the potential difference can be measured directly on the battery.
The easiest way is to use a multimeter, which is connected to the battery in any order. If you use a load plug, it must be connected to the battery terminals, and the polarity is strictly observed.
So, the standard voltage in the network should be no lower than 12 volts. If you start the engine, in idling mode and power consumers are turned off, the voltage on the battery should be 13.5-14V. If there is a noticeable decrease in readings (for example, to 13.3-13.8 volts), this is a clear deviation from the norm, indicating a problem.
Another useful information may be how many amperes the generator supplies to the battery. In fact, this is the current strength, and on different cars it differs depending on the electrical consumers. In this case, the charging current must be such as to ensure the operation of the network and charge the battery.
To measure this indicator, it is necessary to create a load in the vehicle’s on-board network (turn on “heavy” energy consumers) after starting the internal combustion engine. After the engine is started and the consumers are turned off, the charging current is 6-10 amperes, then the figure decreases as the battery charges. If you turn on the dimensions, headlights, heated windows, seats, mirrors, then the charging current increases. If this does not happen, again, there is clearly a problem.
Please note that to accurately determine what the current strength should be for a particular load, you can use the table (the table is often found on specialized forums, in specialized literature, etc.). It contains the data that the generator should produce at different loads
The characteristics of the generator are tied to the number of engine revolutions, that is, the device must produce different current at different speeds.
Let us also add that it would also be a good idea to check the resistance of the generator components (rotor, stator and diode bridge). As for the rotor, resistance is measured on the winding. Simply put, the multimeter probes are connected to the slip rings (readings from 2.3 to 5.1 Ohms will indicate that the element is working). If the winding consumes current between 3 and 4.5 amperes, then this is normal. The operating resistance should be 0.2 Ohm.
Currently reading
To check the diode bridge, it is necessary to determine whether resistance is present or absent, and the indicators themselves are not important. The main thing is that there are no “zero” indicators. You need to measure in pairs (plus and all the plates on this side / minus and all the plates on its side).
Theory of the issue
While the car is moving, a dead battery receives a charge voltage of 13.6 to 14.2 V. For the correct and stable operation of all systems in the car, these voltages must be maintained until the engine starts and the crankshaft rotates. Together with the motor, torque is supplied to the generator through the drive belt. At this moment, an amount of energy is generated that will be sufficient for the stable functioning of all systems and to maintain a charge on the battery.
The internal combustion engine can operate in different modes. At the same time, the number of revolutions on the crankshaft changes. The number of revolutions of the pulley also changes, this leads to an increase in the voltage produced by the generator. To maintain a level of 13.6-14.6 V in the on-board network, there is a special relay in the excitation circuit. It regulates the voltage level. When the rise exceeds the normal value, then the current supplied to the winding will decrease. At the same time, the magnetizing force of the rotor also decreases. This leads to a decrease in output voltages.
If the generator does not charge, then in most cases the reasons must be sought in the excitation circuits, as well as in the output voltage circuits from the generator to the battery. But this is not always the case. Sometimes problems are related to the generator itself.
When the driver turns the key in the lock, the relay in the ignition system also starts at the same time. “Plus” flows through the relay and fuse in the mounting block. Next, the voltage passes through the on-board network, reaching the battery charge lamp and charge sensors. It then passes through diodes, relays, elements in the mounting block and finally to the connector in the generator. There, electricity comes to the relay-regulator and, passing through brushes and slip rings, enters the exciting winding. As the crankshaft speed increases, the phase stresses increase. Then, through a diode block, they increase the voltage on the excitation winding and on the diode of the control lamp. When the output phase voltage reaches 12 V on both terminals, the voltage will be equalized. Due to the lack of voltage difference, the control lamp will go out. In this case, the generator produces a voltage that is higher than 12 V.
Poor battery indicators
When the battery is constantly discharged, this is indicated by indicators on the instrument panel.
- Illuminated warning lamp on the instrument panel.
- Low voltage reading on standard voltmeter.
- Dim light from lighting fixtures.
- Weak rotation of the crankshaft when starting the starter.
The most obvious indicator is a light on the instrument panel with a battery icon
Pay attention to it by turning the key once in the ignition switch. It should light up brightly along with other icons
Lights up, but dimmer than others? The first bell is that there is no charging. Start the engine. When the battery is charged, the icon should go out.
If the lamp is still dimly lit when the engine is running, the battery is definitely not receiving the required charge. If you have a voltmeter on your dashboard, it should read between 13.5 and 14 V. If the number on the screen is lower, the alternator is not fully charging the battery.
How to determine that the generator is not charging the battery
The easiest way to check that the generator is not charging (VAZ-2110 is no exception) is by looking at the dashboard. There is a control lamp on it. Classic VAZ models also have a voltmeter. The arrow should be in the green zone, and the control lamp should be in normal mode (when everything is working properly, it does not light up). If this is not the case, then charging does not occur. It is worth considering the problem in detail.
A better and more accurate way to help determine that the generator is not charging is to check the voltage at the battery terminal with a multimeter. If there is a charge, then the device will show from 13.6 V to 14.6 V. If there is no charge, then the readings will be from 12 V and below.
Main reasons
The charging indicator informs the driver about its operation. If the circuit is working properly, it lights up when the ignition is turned on and goes out when the engine is running, since the voltage at terminal D and the battery become approximately equal.
Damage to every part of the circuit is the reason why the battery does not charge. The defect can be either electrical or mechanical. For example:
- oxidation, poor contact of the positive wire terminal between the battery and the generator;
- in electrical wiring - breakage, damage to insulation;
- generator malfunction;
- belt wear - broken or stretched;
- battery problems;
- a light bulb, fuse or poor (oxidized) contact has burned out;
To restore normal operation of the circuit, these elements should be checked.
Basic faults
In the event that generator malfunctions begin to appear, you must first pay attention to the entire on-board network. It is quite possible that the wiring that records the excitation winding of the generator in the installation is broken. Please note that the generator provides little charging if its power is much lower than the total of all consumers. This happens when you have installed on your car, for example, a very powerful sound system, lighting, as well as other gadgets that are not provided as standard. This leads to the fact that when the internal combustion engine is running, the entire on-board network is powered not only from the generator, but also from the battery. In this case, the battery actively releases its charge. But it itself does not recharge at this time. Therefore, when tuning domestic cars, be sure to pay attention to the generator set. It is advisable to have a reserve of power. Only in this case will you ensure the most complete charging of the battery, as well as ideal operation of all consumers.
Winding destruction
It is not very pleasant if the excitation winding is suddenly destroyed. If such a malfunction is present, the generator will not work completely, since there is no magnetic field. The fact is that the operating principle of any generator is based on the presence of a moving magnetic field. This malfunction can be identified very simply. Firstly, if you touch the generator housing during operation, it will turn out to be too hot. Secondly, a light with a battery drawn on it will definitely light up on the dashboard. It indicates that the battery is not charging. You can also use the multimeter in resistance measurement mode. To do this, you need to measure the resistance value between the rings. But these are not all the reasons why the generator does not charge well.
If there is no current leakage in standby mode
It is much worse if there is no current leakage with the engine turned off, but the battery is discharged. To do this, it is necessary to inspect the generator more carefully. There can be many reasons for its failure. Often there is no contact or it is very weak in the brush assembly. In this case, of course, the generator does not charge the battery. This happens when the brushes are almost completely worn out. There may be destruction of the field winding. It is also possible that a short circuit between the turns appears in this winding. On the rotor, the winding can be short-circuited to the housing. Similar faults are sometimes present in the stator. It has three windings, which may also have breaks, a short to the body or between the turns. If the rectifier unit contains one or more faulty semiconductor diodes, the generator will not produce voltage at its output. And of course, various mechanical influences are capable of exerting their influence. For example, stretching the drive belt. It’s worth talking about all these breakdowns in more detail.
Consequences of overcharging
So, for those who believe that all this is not serious and you can ride with it, I’ll dedicate it to you, I’ll break it down point by point:
Overcharging causes the electrolyte to boil, it splashes onto the surface of the battery, and then flows onto many parts under the hood, for example: - terminals, pipes, body metal, radiator, wires, etc. Since there is acid present here (even if not concentrated), it can still corrode everything that I have listed for you, even if not immediately, but it will do it.
Terminal oxidation. Since acid gets on the terminals, they will oxidize very quickly and a green coating will appear.
- The electrolyte level drops, the lead plates are exposed, but the charge continues! Thus, they will heat up, which has a negative effect on them - if you do not dry them out for a long time, they will “crumble”, the banks may short out, or the battery will die altogether. Just throw away the battery.
- Since the electrolyte evaporates, and these are essentially explosive gases (oxygen and hydrogen), the battery itself can explode, and it won’t seem like much. The entire engine compartment will be covered in acid.
- Some fuses may fail because they are not designed for 17 Volts.
- If the regulator relay is covered, then sometimes it can heat up, to such an extent that it almost melts, and this can indirectly cause a fire, or the wiring will get better.
Fix this breakdown, it's serious! Believe me! My battery exploded in an old VAZ.
As you can see, everything is banal and simple, but these simple “little things” make up complex things or entire systems, such as an electrical circuit: generator – battery – starter.
I think this article was useful to you, read our AUTOBLOG, there will be many more interesting things.
(35 votes, average: 3.77 out of 5)
Repair and troubleshooting
All mechanical problems are eliminated by replacing faulty components and parts (brushes, belt, bearings, etc.) with new or serviceable ones. Older generator models often require grinding of slip rings. Drive belts are replaced due to wear, maximum stretching or expiration of service life. Damaged rotor or stator windings are currently being replaced with new assembled ones. Although rewinding is common among auto repair services, it is becoming less and less common - it is expensive and impractical.
But all electrical problems with the generator need to be solved by checking both other elements of the circuit (in particular the battery), and directly its parts and output voltage. One of the common problems that car owners have to deal with is overcharging , or, conversely, low voltage of the generator . Checking and replacing the voltage regulator or diode bridge will help eliminate the first malfunction, but low voltage output will be a little more difficult to deal with. There may be several reasons why the generator produces low voltage:
- increased load on the on-board network by consumers;
- breakdown of one of the diodes on the diode bridge;
- failure of the voltage regulator;
- slipping of the poly V-belt (due to low tension)
- poor contact of the ground wire on the generator;
- short circuit;
- drained battery.
Checking the voltage on the generator
According to the operating rules, a control measurement of the voltage produced by the generator is carried out every six months. It is ideal to do this in autumn and spring (before and after cold weather). The thing is that it is during this period that the device experiences peak loads
It is important to remember that the check is done regularly and in full according to the algorithm given below
This procedure should not be ignored, since the value of the element in question is very large. After all, if it is not able to produce electricity, then pretty soon the battery will run out, and the engine, at one far from perfect moment, simply will not start. Moreover, if the output voltage is too high, then the chance of failure of other components or the wiring itself increases, and looking for a breakdown in which will be a dubious pleasure.
What malfunctions can occur in the generator?
What could be the problem with the generator when, when you turn on the ignition, the light flashes or does not turn on at all and the control devices do not function? You should check to see if the fuse located in the mounting block is ok. If there is a break in the power supply, the following may occur:
- the “O” wire with the wires from the mounting block to the devices is broken;
- there was a breakdown of the “GP” wire with the wires from the ignition switch to this unit.
When the switch does not work due to breakdowns, it is enough to replace only the contact part that has become unusable.
If the battery is discharged, the generator voltage will not give the desired figure.
And the reason may lie in the fact that the control lamp has burned out, or perhaps the socket contacts are not pressed sufficiently against the printed circuit board. In this case, the lamp or faulty contacts are replaced.
You should look to see if there is an open circuit in the circuit connecting plug “D” of the generator and the devices. If this is exactly the case, then you need to look at the “KB” connections.
A lot also depends on the brushes if the VAZ 2110 generator does not produce the required power. They can wear out, freeze, the contact rings can oxidize, then you need to replace the entire brush holder along with the brushes. Oxidized parts are wiped with gasoline.
Basic problems
If the generator begins to act up, then the main causes of the malfunction should be sought either in the on-board network, or these are problems with the generator itself. If the generator gives a charge, but not enough, then perhaps it has been “loaded” too much by installing many other gadgets in addition to the standard electrical equipment, and it is already working at the limit of its capabilities.
Our motorists really love tuning the VAZ 2110, adding, for example, speaker power, enhancing the light, etc. In such cases, some people change the battery, for example, installing it with a capacity of 70 Ah, instead of the usual VAZ one with 55 Ah.
But although this may help at first, over time such a battery will run out even faster, since a standard generator will not be able to provide it with a full charge; it does not have enough power for this.
Troubleshooting
A lot depends on the operation of the VAZ 2110 generator. If it malfunctions, what can start the battery? And when it stops providing the required voltage, you have to urgently figure out what the reason is. But just by external signs you can determine that the generator is creating problems:
- The charging light starts flashing at low speeds;
- there may be a burning smell in the cabin;
- there are mechanical damages.
If a visual inspection does not bring results, you must:
- remove the plastic cover from the generator;
- check all electrical connections;
- Unscrew the diode bridge, as well as the voltage regulator relay with brushes.
Diodes are checked with a special tester. When they operate normally, the current will only flow in one direction. If the current flows in two directions or the diodes do not pass it at all, then the reason has been found.
The cause of poor performance may be the belt. If it is worn out, it can be seen immediately. If the generator winding “flies”, it is better to entrust the solution to this problem to a specialist.
Winding break
If the excitation winding is broken, then there is no charging of the battery. To determine this, it is often enough to place your hand on the generator. When it breaks, it heats up. For an accurate check, you need to disconnect the end of the excitation winding from the brush, connect the battery wires to it, and connect the battery wires to terminal Ш of the generator (via a voltmeter or a light bulb).
If there is a break, the voltmeter needle will not deflect and the light bulb will not light up. To find which of the coils prevents the generator from working, connect the wires from the battery to each individually. Finally, check the soldering and coil terminals. If the break is internal, the coil needs to be replaced; for external ones, soldering helps.
Shorting the windings to the housing
In the event that there is a short circuit in the winding specifically to the housing, the generator set stops working. Most often, a short circuit occurs in the place where the terminal leads are located. These are the places where the winding is soldered to the slip rings. To check the rotor winding, you need to take a lamp with an operating voltage of 220 volts. Please note that all safety precautions must be followed. You will need to connect one terminal from the lamp to power. Connect the second pin to the slip ring. The second power wire must be connected to the rotor housing. In the event that there is a short circuit of the rotor winding to the housing, the light will definitely light up. If there is no short circuit, the lamp will not light up. And if there is, then you were able to understand the reason why the generator does not charge the battery.
Lada 2115 2005, 77 l. With. — self-repair
Comments 7
Participate in the discussion can only registered users.
Yesterday I decided to measure whether the charge was going to the battery, started 13.6 at xx, gave the gas the same 13.6, what could be the joke? Tell me?
Great! I also had a moment when the charge disappeared, as it turned out later, one diode also burned out. I drove almost 200 km with a charge of 12.3 and sometimes 11.8. These are the kind of electricians we have, they know what’s going on but don’t really want to do it. What happened to the money?
I bought “brushes” and “chocolate” for 150r; the diode bridge was from an electrician for 500r
Good luck with the repair. Tell me what happened. It became interesting for me.
They made me a generator, it turns out that when I was doing electrics for the first time, one diode was a little bad (he admitted it to me when I arrived at his place) due to the fact that the generator was giving some kind of charge, he didn’t touch it, but this time that diode died altogether just changed the diode bridge and now charging with a load of 13.8.
There was the same crap, the battery was covered with pussy. I changed both the diode bridge and the winding in the gene. And somehow they don’t advise removing the terminals from the battery, if I’m not mistaken, then the brains may burn out... Maybe someone can correct me, of course. So write down what happened!
I’ve already removed the terminals many times, so I had to install another battery to start it, until I was lucky and my “swallow”’s brains didn’t burn out. I still haven’t had time to figure it out, but yesterday my generator stopped producing it altogether... I’ve now removed the generator, I’ll go tomorrow and give it to another technician, maybe he’ll tell me in more detail what’s wrong with it, as soon as I find out, I’ll write back immediately.
Full version of the site
Lada 2115 › Logbook › The generator gives little charge
I recently got into the car and tried to start it, but the battery was dead, I charged it and checked why I didn’t get it right away. he is already old, but then after a couple of days he sat down again, decided to check the charge at xx and the charge is 12.7. and this without any load. The plumb line to his friend said he fixed it and installed it and the charging is the same. cleaned the mass. Does not help. I tried to measure it without a battery and it shows 13.8-14.1. can anyone tell me what?
Issue price: 300 ₽
Like 4 Subscribe
Replacing the generator voltage regulator on VAZ 2113, VAZ 2114, VAZ 2115
Welcome! Voltage regulator - it is present in any generator on any car, thanks to it the voltage in the on-board network does not jump and stays even, also thanks to it the voltage in the on-board network does not go too high (The higher the voltage in the on-board network, the faster the wiring will burn out) and as it should be within normal limits (Basically for all cars, the norm is 13.2-14.7 volts in the car’s on-board network), this voltage is enough for the battery to charge and for other devices to still light up (The more devices in the car you turn on, the voltage and will become stronger, thanks to the same voltage regulator), when the regulator becomes unusable, the first thing that begins is a problem with the voltage and, in connection with this, a problem with the wiring occurs, for example, if the regulator suddenly stops restraining the voltage then it will rise to high marks, then the wires will begin to melt first, but if you have all the fuses for the required amperes, then there is nothing to be afraid of, you’ll just change the fuses every five minutes when the voltage jumps and this will continue until you change the regulator to a new one (But this may not be from him, fuses in general can blow out for various reasons, one of the most striking is water getting on the wiring, after which the fuse immediately blows).
Note! Replacing the voltage regulator that is on the generator is not so difficult, especially if you have a set of tools, in this set you should have: Wrenches, as well as screwdrivers, you will also need a test (This is a 12-volt test lamp) and a megohmmeter (Data devices are needed only to check the regulator for operability, if you don’t need to check anything and you are sure that your regulator has become unusable, then in this case you don’t have to stock up on these things)!
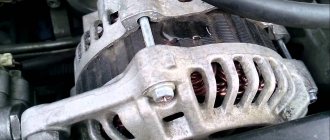
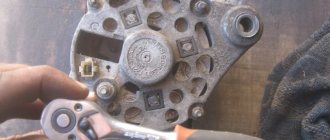
Where is the voltage regulator located? It is located, as we said a little earlier, on the generator itself and bolted to it; for clarity, we have attached a photo below, in which the generator removed from the car is clearly visible and the arrow to all this indicates the voltage regulator itself, the replacement of which we are talking about today In this article.
When should you change the voltage regulator? The regulator, the name itself even speaks for it, namely, it regulates the voltage in the on-board network and it should not exceed or fall below the norm, but if the voltage fluctuates (either high or low), then the regulator needs to be replaced, by the way, there is no way to check its functionality will not be difficult, for this you will need to use a 12 Volt test lamp, namely, connect the leads from it to both brushes of the regulator and at this time apply a voltage of 12 Volts (a battery is perfect for this) to the positive terminal, and apply a negative one to the negative one wire coming from the battery (the minus in the voltage regulator can be bushings, one of these is shown in the photo below in the detailed diagram).
Note! If after such manipulations the control lights up, then this indicates that the regulator is working, but this does not mean that it is completely working, and in order to make sure of this completely, do the same operation, but only not 12 volts in this In this case, apply 15 V and see the result, a normal working voltage regulator should not allow the lamp to light up, but if the lamp does light up, this indicates that this regulator is faulty and needs to be replaced!
How to remove the generator?
You will need the following set of tools:
- Mounting blade.
- Two keys for 17, one for 10 and 13.
- Penetrating lubricant such as WD-40.
The latter is extremely necessary if the generator has not been removed for a long time, and there is a lot of rust and dirt on the threads. If this is the case, be sure to treat all connections with penetrating lubricant an hour before starting work. This will make the work easier. At the same time, pay attention to the condition of the belt; there should be no cuts or other damage on it. If there are any, be sure to install a new one during assembly. It is quite possible that the generator does not charge precisely because the belt tension is weak or it is broken.
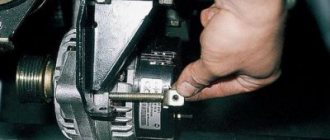
Disconnect the “–” terminal from the battery, after which you can proceed to further work. Unscrew the nut that secures the “+” wire to terminal 31 of the generator. You've sorted out the connection, move on. Using a 17mm wrench, unscrew the nut from the top mounting and move the generator towards the engine. At the same time, the belt tension becomes weaker, and it can be quickly removed. Then unscrew the nut on the lower fastening, holding the bolt with a second 17mm wrench.
What generator for VAZ 2115
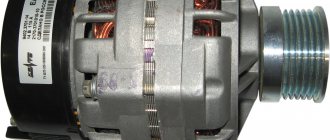
VAZ 2115 cars are equipped with three-phase alternating current generators of type 94.3701, which have a built-in rectifier unit and an electronic voltage regulator. They have the following technical characteristics:
- The motor-generator gear ratio is 1:2.4.
- The highest recoil current reaches 55 A at 5 thousand rpm. and 13 V.
- The adjustable voltage range is 14.1±0.5 V.
A special indicator light helps to monitor the operation of the device, which lights up when the ignition is turned on and goes out after it starts. But if the light remains on, this indicates a malfunction.