In addition to the fact that a car is a means of transportation, it is also a source of a wide variety of sounds. Sounds can tell a lot to an experienced owner. Many can easily make a diagnosis without even opening the hood or looking under the bottom. It is enough, as an experienced doctor, to listen to the nature of the noise, and the malfunction is clear in the palm of your hand. Some nodes cannot be diagnosed any other way. This is especially true for bearings. Today we will be interested in the generator bearing.
Signs of a faulty VAZ 2114 generator bearing
- If during operation of your car you hear a strong noise in the area of the generator, developing into a high-frequency howl, then you can assume that the generator bearing or both have failed.
- In turn, bearing failure may be indicated by excessive play on the pulley rotation axis, accompanied by drive knocking.
In such cases, repairs must be made as soon as possible, since delays in repairs may cause failure of other components and mechanisms of the generator. If you delay the repair, you may need to replace the generator.
Unit Removal Guide
If the bearing is destroyed, disassembly of the generator is necessary, and for this you will have to dismantle it. The generator set is attached to the engine cylinder block on a special bracket. There is also a bar for adjusting the belt tension.
To remove the generator set on a VAZ 2114, you need to stock up on the following tools:
- a set of wrenches, preferably both box and open-end wrenches;
- socket head at “15”;
- mount, or a piece of metal pipe.
There are options for dismantling the generator set with or without removing the power unit protection. We will consider the option without dismantling the protection. Before removing the generator set, you must disconnect the negative terminal on the battery to avoid short circuiting.
The procedure consists of the following steps:
First, using a key set to “17”, you need to loosen the tension on the generator belt. To do this, you need to unscrew the fastening nut from above and move the unit to the cylinder block. Next, you need to unscrew the nut on the output bolt “31” and disconnect the supply wire that goes to the rotor excitation winding. The generator is attached to the bottom using a nut and a long bolt; they need to be unscrewed. To make it more convenient to remove the generator, you need to unscrew the bar with which the unit is attached to the engine cylinder block
To do this, you need to unscrew two bolts. You should also carefully unscrew the nut securing the bar to the starter. If the fasteners are stuck, you can use a penetrating lubricant, which makes it possible to remove rust and dirt. To remove the axis of fastening the generator to the bracket, it is better to turn it clockwise. Next, use a key set to “19” to unscrew the nut and remove it and the spacer sleeve. Now the generator unit can be lifted up.
If you dismantle the generator through the bottom, you need to remove the protection.
Tips for replacing the VAZ 2114 generator bearing
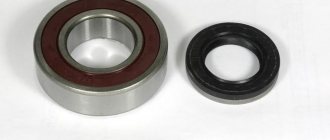
Before disassembling the generator, it is necessary to purchase the necessary spare parts that are out of order or rusty. You can only understand which bearing has failed by disassembling the unit. Therefore, when replacing a bearing, it is better to purchase a pair of bearings at once, since they are inexpensive; a large bearing from the VAZ manufacturer with article number 180303 is about 150 rubles and a small bearing with article number 24940220 is about 60 rubles. You can also purchase a set of analog bearings from PILENGA, article number PWP0201, costing 110 rubles.
The price is indicated for spring 2022 in Moscow and the region.
The bearings are located inside the device, and to replace them you will need to completely disassemble the generator. Knowledge of the device, operating principle, and design of the autogenerator will greatly facilitate this work.
Care should be taken when reassembling the generator. It is important not to miss a single detail and to connect the electrical contacts correctly. In addition to the correct installation of bearings, it is also necessary to correctly install the brushes and check the belt tension.
Of course, every car owner has the right to choose the method of troubleshooting, for example: replace or lubricate the bearing with your own hands or contact a specialized workshop.
If you decide to repair the generator yourself, you will need the following tools:
- hammer;
- flat and Phillips screwdriver;
- chisel;
- WD 40 lubricant;
- a set of new bearings for the VAZ 2114 generator;
- keys to “8”, “13”;
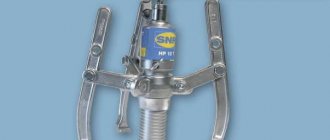
- special puller;
- ratchet with a set of attachments “13”, “14”, “15”, “32”.
In general, after washing the engine, the generator bearings began to make noise, my patience lasted for a week. I read the information on replacement on the internet and found out that there are 5 types of bearings: 201, 202 and 301, 302, 303, 2 types of front and 3 types of rear, or vice versa, I don’t remember exactly. I went to Ladya and decided to buy 202 and 302, they cost me 105 rubles, I was more worried that they wouldn’t fit. Here they are:
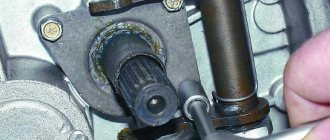
I came to my friends’ service and started filming. I unscrewed the upper tension pin of the generator, removed the belt, unscrewed the bolt on the generator, removed the terminals from it, began to unscrew the lower bolt of the generator, but it did not come out, it rested on the side member, we unscrewed the generator mount from the block with 3 bolts of 15. In the end, here he is the hero of the occasion .
Remove the relay regulator (brushes) by unscrewing 2 bolts. We remove the plastic cover from the generator, we see the diode bridge. It is secured with 4 bolts.
This is a very important point. 3 bolts to which the terminals from the winding are attached, they have a textolite washer (we found out through trial and error about this later), which prevents the winding from shorting to ground. Unscrew the 4 bolts and remove the diode bridge.
Next, insert a screwdriver between the blades and the generator housing and very carefully unscrew the pulley mounting nut.
We unscrew the 4 bolts that connect the 2 parts of the body to each other, after spraying everything with water. I personally managed to unscrew only one bolt with a regular screwdriver. The rest were unscrewed with an impact screwdriver.
We put 2 marks on both parts of the case so as not to confuse it later, unscrew the 4 bolts, now we put screwdrivers on both sides between the 2 parts of the case and try to open it. The back part is removed from the plastic sleeve; it is easier to get the bearing out. We removed the back part, put the front part of the generator with the armature between 2 bricks, screw the nut onto the end, and hit it from above in order to remove the armature from the bearing.
In the end it should turn out like this.
We take the front part as tightly as possible, place it on something hard, take the 30 or 32 head, put it on the bearing and start pounding as hard as we can, only gently so as not to break the front part of the body.
Next we take a puller for the generator bearings; without it it will be very difficult to remove the rear bearing. We remove the bearing.
We take a caliper and measure the old and new bearings. Hurray, I was lucky to buy the ones I needed!
We inspect the armature contacts where the regulator relay (brushes) is pressed; if there are grooves, we refine them with sandpaper.
before:
after:
Let's see how to check the serviceability of the generator in the Murzilka.
Next, we press the bearing into the front part of the generator housing, using the same 30 or 32 head with powerful blows, take a chisel and punch the bearing in a circle, you will see grooves there. We put the anchor in the front cover, place it again between 2 bricks, put on the rear bearing and carefully, with powerful blows, press it into the center of the bearing until it stops. We put on the back cover, carefully pushing the winding terminals through it.
Here, too, the main thing is to orient the winding terminals according to the fastening of the diode bridge. we put on the diode bridge, bend the winding terminals to it and tighten 4 bolts, 3 bolts with textolite washers we tighten where the winding terminals are, take a tester and check whether the winding is shorted to the housing, if not, then everything is tightened correctly. We put on the relay regulator, a plastic boot, screw the generator into place, tighten the belt, start it and see if the battery discharge lamp on the instrument panel is on.
see also
Battery charging lamp is on
- 6 0 22k
Strut support bearing
- 81 1 100k
Repair of VAZ 2115 generator
- 3 0 7k
Generator malfunctions - signs, diagnostics, causes, testing
- 797 13 648k
Replacing the front wheel bearing of a VAZ 2114
- 4 0 11k
Current to power conversion calculator
Convert how many amperes a kW has online. Calculator for converting current amperes to power watts
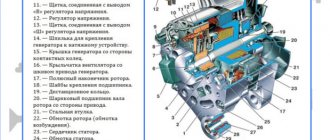
In a modern car, the generator provides current to the entire power supply system: powering the engine, lighting devices, and recharging the battery. On VAZ 2113/2114/2115 cars, generators of type 5102.3771 and 94.3701 are installed. Both generators are a three-phase AC electric motor with electromagnetic excitation, with a built-in rectifier unit and voltage regulator. The generator on cars of the Samara and Samara-2 family is traditionally located in the same way as on the “Classic”, on the right side of the engine compartment - near the headlight on the passenger side.
Instructions for replacing generator bearings on a VAZ 2114
The generator is an incredibly important component of the car, the functioning of which determines the performance of the entire car.
If you hear a grinding noise coming from under the hood, you can immediately suspect that the generator bearings are faulty. This metal element often becomes deformed during operation and loses its performance characteristics.
This may manifest itself as annoying grinding, ringing or whistling noises. If the situation is really bad, the bearing may be even louder than your running engine.
Generator bearing
Node diagnostics
When the generator set produces insufficient charge, the incoming voltage is not sufficient to power all electrical equipment. In this case, the battery comes to the rescue. As a result, it may completely discharge. Too high voltage is even more dangerous for the on-board network, as it can cause fuses to blow and electrical components to burn out.
Knowing what voltage the VAZ 2114 generator should produce, you can diagnose it to identify faults (the author of the video is Ildar Latypov).
Diagnostics is performed using a multimeter set to voltage measurement mode.
Checking the VAZ 2114 generator consists of a sequence of actions:
- First you need to turn on the ignition and start the engine.
- If there is damage in the rotor winding circuit, the warning light on the instrument panel will constantly light up.
- The power unit should be warmed up to approximately 90 degrees. The crankshaft speed should be about 2500-3000 rpm.
- Then you should turn on the low beam and radio.
- Now you need to measure the voltage supplied to the battery terminals. It should be around 13 V.
- Turning off the radio and turning off the low beams, we measure the voltage again. It should increase to 14.7 V.
During diagnostics, you should listen to the operation of the rotor. If the bearing in the front cover fails, noise will be heard.
A voltage drop is possible for the following reasons:
- weakening the tension of the generator belt;
- brush wear;
- malfunction of the relay regulator;
- wear and tear of the entire generating set.
If the generator unit is completely worn out, it must be completely replaced. Before replacing the generator on a VAZ 2114, you should diagnose it. If the battery is not charging, the reason may be a broken belt.
Ways to solve the problem
If such a malfunction occurs, you need to solve the problem as quickly as possible. Basically, there are three main ways to do this.
- Seek assistance from specialists at the nearest service station.
- Replace the complete prefabricated generator, rather than trying to solve the issue with a more budget-friendly method.
- Purchase a new bearing for the generator and replace it yourself.
What nuances does one or another method presented above have?
- The first option is reliable, but requires costs not only for the part itself, but also for the expensive services of craftsmen.
- The second option is more financially accessible, but you will have to do quite difficult work.
- Option number three is the most difficult from the point of view of independent execution, but is the most budget-friendly. Consequently, you will be able to save an impressive amount of money.
What to use
Before you start replacing the bearings on the generator, you need to determine what elements are on your car, and also what they can be replaced with
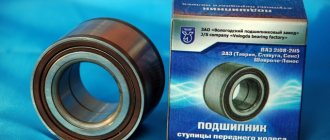
When choosing bearings, pay attention to the hub manufacturers. For VAZ 2110, bearing hubs are produced in the city of Samara and are marked SPZ-4
But there are also Vologda and Saratov hubs marked 23 GPZ and 3 GPZ, respectively. It is not recommended to purchase bearings with unmarked hubs, much less use Chinese generator elements.
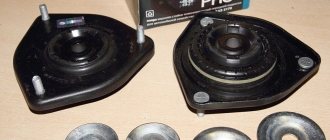
Front and rear.
Dimensions
It will not be superfluous to know what dimensions the standard front and rear generator bearings for your “ten” should have in order to make sure that the spare parts are selected correctly. The rear bearings of the new type, marked 6202, have the following dimensions:
- Inner diameter - 15 millimeters
- External diameter - 35 millimeters
- Width - 11 millimeters.
The front bearings marked 6303 have the following dimensions:
- Inner diameter - 17 millimeters
- External diameter - 47 millimeters
- Width - 14 millimeters.
The device is being disassembled.
Repair
So, you have decided to purchase new bearings and follow a difficult but fairly economical path. For cars like the VAZ 2114, self-repair is a common thing. Such work, even in the absence of impressive experience and knowledge, is not difficult to do. Simple follow the instructions.
- Disconnect the generator from the battery to deprive it of power.
- Remove the timing belt.
- Using wrenches of the appropriate size, remove the fastening nuts.
- The film is removed, after which the sleeve is removed.
- The generator itself is carefully removed from its seat.
Subsequent work is more subtle and complex. After all, you have to disassemble the generator in order to get to the bearings. The task is not an easy one, but you can handle it yourself.
- There are nuts on the generator housing that need to be unscrewed;
- Remove the cover and remove the regulator from under it. This element is responsible for brushes and tension;
- Disconnect the stator from the cover. This operation should be done as carefully as possible so as not to damage the copper winding;
- Sometimes the housing can become rusty, making the stator difficult or even impossible to remove. In such a situation, arm yourself with a hammer and an impact screwdriver. With the help of these tools it is necessary to deliver the most accurate blows. This way you will be able to divide the element into blocks;
- Separating the generator from the stator, you will see both bearings - front and rear;
- Remove the damaged component and install a new alternator bearing in its place. Don't forget that there are two of them. For prevention, you can replace both at once, even if one of them is in completely good condition;
- Assembly is performed strictly in reverse order.
Working as a puller
Important Tips
There are several questions that you should know the answers to before you begin the job of replacing alternator bearings.
- Installation must be carried out using a special press. Theoretically, it is possible to install a new element in place of the damaged one with an ordinary hammer, applying directed blows to the bearing. But this way you can damage the new spare part, plus additional damage to neighboring elements.
- Make sure the new element is firmly in place. Only after this proceed with installing the pulley and impeller.
- When purchasing a part, ask the seller what kind of vehicle this particular bearing is designed for. These parts differ in size.
- During the replacement process, be sure to check the tension of the timing belt. If the tension is not strong enough, voltage sag may occur.
If the above operations do not produce results, you should look for other potential problems with the generator.
Disassembled generator
Consequences of a malfunction
A faulty bearing, like any other failure associated with generator components, leads to its malfunction. It is impossible to predict the consequences of such a breakdown.
Let’s just say that both an inadequate and an excessive charge pose a potential threat.
- If the alternator does not provide sufficient charge, the battery will quickly discharge, so you will not be able to start the car or go anywhere.
- If a charge is too powerful, the consequences are even sadder, since this puts the entire electrical circuit of your VAZ 2114 at risk.
Problems and solutions
There are several common generator problems that are more than possible to repair. Here you just need to follow certain recommendations and rules.
We invite you to familiarize yourself with the malfunctions and methods for solving them in the corresponding table.
| Malfunction | Remedy |
| Regulator or brushes not working | The unit is non-separable, so the only way to solve the problem is complete replacement |
| The rotor bearing has failed | We looked at the first bearing. The second one is rolled on the rotor shaft. If damaged, it must be replaced. The device is removed with a special puller and a new bearing is mounted in its place. |
| Diodes don't work | You can unsolder the leads and pull it out of the holder. The area is cleaned with epoxy and reverse soldering is performed. Then the lead with the colored mark is soldered to the bus, and the diode body is mounted on the holder using epoxy resin |
| Alternator belt tension is loose | It needs to be adjusted. The work is done very carefully so that the tension is not excessive. If you make a mistake, the load on the bearing will increase and it will quickly fail. |
Some motorists consider a number of car-related problems to be trivial and not worth paying much attention to. But they can sometimes lead to very serious, unpleasant consequences, the elimination of which will require not only a lot of effort and time, but also an impressive amount of money.
The generator and its components, including bearings, are complex elements that are quite difficult to repair or replace. If you do not have experience and skills in such matters, it is better to entrust the work to specialists.
"Symptoms" of a breakdown
There can be a lot of breakdowns, including burnt-out diodes and complete discharge of the generator. But these are all separate topics, but when the bearings start to act up, it cannot be confused with anything. When the car is running, there is a loud noise, and often a squeaking sound. The reason for this is (usually) the grease in the bearings has worn off. As long as it is there, everything will work fine. But if there is no longer enough lubrication, there won’t be enough work for a long time. As soon as the first symptoms appear, repairs must be made immediately.
If the bearing housing itself is intact, then lubricating it will not be a problem.
But you need to get to them first. The VAZ assembly uses generators from the Eltra series of models, which, of course, is a plus. But for home disassembly it promises a little more work and attention. To get to the ill-fated bearings, you need to highlight a number of unpleasant points:
- special tools are needed, and without a puller it will be difficult to check;
- problems with checking the bearing in the front cover (in the article a little later).
This process is very difficult. First of all, in these generators, as a rule, the bearing is sealed. Therefore, in order to get it without the above-mentioned devices, it must be knocked out, having first selected the desired nozzle. But since it is cored, before doing this you should remove part of the metal that holds it there. If not operated correctly, the generator cover can easily be damaged, in which case you will have to purchase a new one. For reference, it should be noted that the service cost of replacing bearings (as a rule) also includes the cost of a new cover.
In order for everything to be correct, you should follow simple instructions. You need to take a drill and a drill bit with a diameter of 4 mm. We set the drill at 45 degrees so that the drill is in the cored hole. We drill 2-3 mm in each hole. This way, both the bearing and the residual metal will have somewhere to go.
Other work tips can be found below. The described tips will be a good recommendation on how to correctly replace the bearings of a VAZ-2114 generator with your own hands. Video instructions will become an even better advisor, since in auto repair theory alone is not enough.
An example of disassembly is shown on a newer generator model, which differs from its predecessor only in a number of indicators and characteristics.