All devices have the same ISO and mini-ISO connectors on the back.
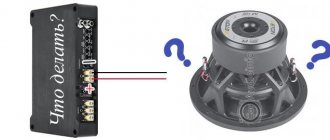
The amplifier can have two groups of inputs:
- linear
- high level input
We make the connection according to any of the schemes proposed below.
There are three options for connecting a subwoofer to a standard radio: output a linear output from it, use a separate high-level converter, or connect to the high-level inputs of the amplifier. Let's look at them below.
First option
In the first option, a procedure is performed that is called “ unsolder the rulers .” In this case, the head unit is removed from the car, disassembled, and linear low-level outputs are output from its board.
They look like two regular RCA connectors. After this operation, you can connect an amplifier to them, and a subwoofer to the amplifier.
A person far from electronics is unlikely to be able to do this on his own. Therefore, it is easier to remove the head unit and take it to people who repair car audio. After the phrase “I need to desolder the rulers,” specialists usually don’t have any questions.
The process of removing the standard radio may be a little difficult. At first it seems like an impossible task. In fact, everything is simple here. You just need to read the instructions, if there are any. Or find a guide on the Internet for removing the GU. Often people post photos or videos that will help you with this.
Usually, in order to remove the standard radio, you need to disconnect the adapter frame, if necessary. Then, using two or four knitting needles, which are inserted into small holes on the radio, the latches are snapped off and the control unit is removed. Instead of knitting needles, you can use other available means, for example, thin metal strips or something else, depending on the model of the head unit.
Second option
The second option is even simpler. For an amount that can range from $20 to $100, you purchase a high-level converter , which is a plastic box with wires sticking out of it.
On one side there are “tulips”, on the other there are wires for acoustics. For example:
- Audio Control LC7i,
- Connects 2
- Hollywood HLC 3,
- Helix AFC Competition,
- Helix AAC Active,
- Carpower FGA 22HQ,
- Stinger SG N12 and other similar models.
Then you need to find the wires going to the rear speakers. They can be detected directly at the output of the head unit. To find out what wires you need, look for the pinout for your GU model.
You can also find them in the area of the central pillar, before they pass through the door, this will be even easier. Wires for acoustics are connected to the transducer on one side. And the “tulips” are connected to the linear input of the amplifier using an interconnect cable.
Third option
The third option is to connect the wires going to the rear speakers to the high-level inputs on the amplifier, if available. If the subwoofer is active, that is, with a built-in amplifier, high-level inputs may also be present in it.
You can find the speaker wires that go to the rear speakers in the same way as in the second option. Moreover, cutting them off completely is not necessary. It is enough to remove the insulation and, without cutting the cable, connect the subwoofer amplifier.
Of course, if the speakers are in the rear parcel shelf and the subwoofer is in the trunk, then it is better to choose one or the other. Working together with the subwoofer and rear speakers is not recommended, as the subwoofer will interfere with the bookshelf speakers, worsening their sound.
If the speakers are in the rear doors, you don’t have to turn them off, but listen to them first.
Connecting a Lada Granta subwoofer
Connecting the subwoofer directly to the standard Grant radio will not work due to the design features of the product. In order to achieve the best sound reproduction properties, it is necessary to use an additional amplifier. Auto ULF can be of any type and design. If a single-channel device is used, then only a bass speaker is connected to it. When using multi-channel ULF, you can completely change the interior acoustic systems, which are not of the highest quality, and install the highest level acoustics with crossovers. Connecting the amplifier to Grant's standard radio begins with determining the location for its installation. Typically, a car's low-frequency unit is located in the luggage compartment, next to the low-frequency speaker.
After installing the unit, it is necessary to connect power wires and audio signal strips to it. The power is connected by a special power cable, the cross-section of which is selected depending on the power of the amplifier. At a distance of 10-15 cm from the car battery, it is necessary to install a fuse block. Its rating should not exceed 50 A. The negative power terminal is connected to the ground of the vehicle. The signal from the radio output can be supplied using 2 methods. On the back wall of the car radio there are regular rectangular connectors.
To connect LF (low frequencies)
devices can be used with contacts from blocks “B” and “C” of yellow color. They are designated ISO and mini-ISO respectively. On block “B” there are contacts for connecting the front and rear speaker systems, and on block “C” there are linear ULF outputs of the standard radio. The low-frequency auto block can be equipped with linear inputs and high-level inputs. The connection of the amplifier to the standard grant button radio can be done through the contacts of the ISO block with the index “B”. The signal created for the operation of speaker systems cannot be applied directly to the input of the low-frequency system. The output voltage is very huge and can destroy the semiconductor devices of the input circuits of the external system. To correctly connect a car radio and an external power amplifier or unit, it is necessary to use level converters. They can be purchased at any specialty store. The front panel of the converter indicates how the connecting wires should be soldered. The device connects the front and rear channels twice and reduces the output voltage level to a non-hazardous value.
The converted signals of the right and left channels are output to the “Flower” type connectors. They can be supplied to the inputs of an additional low-frequency block. There may be a problem with the laying of cable lines to the amplifier. To do this, it is necessary to use high-quality shielded wires with central copper cores. It is not recommended to use copper-plated iron wires to connect the converter and the amplification unit.
The main differences between passive and active subwoofers
To answer the question about the distinctive aspects of active and passive subwoofers, you must first understand what each of the designs is individually.
What is a passive subwoofer
A passive sub is a design of one or more low-frequency (LF) dynamic drivers enclosed in a single housing, the material of which can be either plywood or wood. In order for such a device to reproduce sound vibrations, it is necessary to connect to an external audio amplifier through a low-pass filter, which passes only the signal band with low frequencies.
A passive subwoofer is a separate unit of speakers, filters and amplifier. Each of these blocks is purchased separately and connected to each other during installation.
What is active
An active sub is a single ready-made acoustic unit, consisting not only of a speaker and a filter, but also an amplification device. Such equipment is somewhat simpler to connect, and there is also an opinion that the sound quality is superior to the sound from a passive subwoofer. But if you look in more detail, the sound quality directly depends on how the settings are made.
Connecting a Grant subwoofer
The amplifier can be connected to the standard Grant Lux radio via a mini-ISO connector. This connector, located on the rear panel of the radio, carries four sound signals from the linear outputs of the built-in unit. An adapter with connected “Flower” type connectors is inserted into it. Connection of the Grant MMS subwoofer (multimedia system) is carried out through the linear inputs of the external LF (low frequencies)
block.
When connecting a low-frequency speaker, difficulties may arise with the configuration of the entire sound system. You can use standard car speakers that will work through the ISO connector. Linear outputs from the mini-ISO connector must be connected through an adder and a signal sent to the input of a single-channel block. It will only work on a bass speaker. In the adder, you can connect only the outputs to the front speakers, leaving the two rear channels free. You can use two rear channels for the LF (low frequencies)
system, and feed the two front channels to a separate low frequency unit, which is loaded onto massive broadband speakers.
Source: dinamikservis.ru
Removing the radio on Grant
The entire dismantling process will take no more than one minute if you have already removed the radio before. If this is the first time for you, then minor difficulties may arise only with finding the necessary elements by touch if the radio is not pulled out in the usual way.
Procedure:
1. Remove the plastic trim of the center console. To dismantle the MMC, it is not even necessary to remove the cover completely; it is enough to unclip only the upper latches using a screwdriver, a small knife or a spatula.
2. Slightly pulling back the upper part of the plastic trim of the center console, press out the MMC latches, which are located on the right and left. To prevent the latches from “settling” into place, you need to slightly pull the MMC towards you.
3. Having released the clamps, we remove the MMC from the niche.
What to do if the wires interfere with the removal of MMC?
If the cables going to the MMC block prevent you from pulling it out, then you need to disconnect them. To do this, just do the following:
1. Lower the glove compartment lid down and disengage the upper latches.
2. Stick your hand into the opening and disconnect the interfering cables
Please note that not all MMCs currently have a USB cable installed that goes into the glove compartment
The radio has been dismantled, now you can connect additional equipment to it, replace it with another one, or simply find out the model of your MMC by the sticker located on the rear panel.
How to install a subwoofer in Granta with your own hands
The sound that comes out of Grant's conventional multimedia system does not suit all car owners. And even if you like the radio screen visually and functionally, the sound quality usually leaves much to be desired.
Therefore, almost everyone is looking for different options on how to correctly install the main or additional subwoofer in the Grant in order to get the most exciting sound, in accordance with their musical preferences.
The most popular space for installing a subwoofer among Granta owners is the trunk or rear parcel shelf. This installation option is preferable because the distance from the listener to the subwoofer must be at least half a meter. Otherwise, the sound breaks and loses its acoustic properties.
Types of subwoofers
First, subwoofers are divided into active (with an integrated amplifier) and passive (with an external amplifier). There are subwoofers that can be purchased completely assembled with a box; you can only purchase speakers. Almost every box is made independently, especially since its production does not take much time and speakers are installed in it.
Standard size
The most important feature of a subwoofer is its size. The subwoofer's size is the diameter of its speaker, measured in inches.
Usually in car audio they use LF (low frequencies)
speakers for 10, 12, 15 inches:
- A 10-inch speaker is 25 cm in diameter;
- a 12-inch speaker is 30 cm in diameter;
- speaker 15 inches - diameter 37.5 cm.
Subwoofer box
There are several types of sub boxes:
- The most common one is a closed, sealed box, which is easiest to make with your own hands.
A case with a bass reflex is more difficult, but the sound is stronger.
- The bandpass housing can limit the frequency response of the subwoofer. It builds more power than a bass reflex cabinet.
- Free air is a method of installing a subwoofer speaker in the horizontal rear parcel shelf of a car. The efficiency of this installation for us is lower than that of a cabinet subwoofer and a special speaker is required for this type of installation.
- A stealth body is a self-fabricated body whose rear wall follows the curves of the trunk wall. This type of installation is convenient due to its compactness and freeing up more space in the trunk.
Choosing the right radio size
We carry out installation either independently or by contacting specialists at the service center. In the second case, the service is paid.
By default, all VAZ and Lada models are equipped with a 1-DIN radio. The opening dimensions correspond to: 180 x 50 mm. This is an old standardization that has been in force since the times of the USSR. Modern audio modules can be purchased complete with a pre-installed LCD display. The size of the opening must comply with the standard: 180 x 100 mm, that is, doubled in height. Size marking: 2-DIN.
Preparing MMC for connecting an amplifier for Lada Granta
Installation of acoustics for Lada Granta
Components of the future audio system:
Front: Morel Tempo 6 component. Before them there were coaxial Morel (Morel Tempo 6 Coax). I didn’t take the Dins, I had them installed on the seven. I just swapped them.
Amplifier: Blaupunkt GTA-470. This system has been tested by me and time - far and wide.
I found it specifically on the market, and specifically the newest one. It was hard to find it, because this model is no longer produced. But after a long search, I finally came across one copy. Here he is handsome:
Here it is, packed
Blaupunkt GTA 470
Blaupunkt GTA 470
Blaupunkt GTA 470 for installation on Granta
Wires: Mystery MAC 4.04. I ask you not to immediately throw tomatoes, I understand that the wires are not very good))) But I took them with a huge supply of cross-section (Naturally for my system).
Wires MYSTERY MAK 4.04
Power cable - 4 Ga (25 mm2).
Positive cable with a cross section of 25 mm2
Negative cable with a cross-section of 25 mm2 and control cable 0.75 mm2
Speaker cable - 12 Ga (3.5 mm2).
Speaker cable with a cross section of 3.5 mm2
I really liked the interconnects in this kit! They are made perfectly, unlike a similar set of MAC 8.04.
The 60 A fuse is normal. Well, the terminals.
60A fuse and terminals
I haven’t bought a sub yet, I’m still looking around and saving money. So far I've been stuck on the Audio System MX-15. There will be 25 liters in ZYa. The box drawings for it and the material are already there.
Subwoofer audio system mx-15 plus for Lada Granta
It won't be a candy bar literally. I'll power it with a sub bridge.
Well, now I would like to tell you about my unconventional method of connecting an amplifier to a standard MMC. Anyone who has already been interested in the topic of connecting an amplifier to an MMC understands that a mini-ISO connector is needed for connection. I couldn't find him. I didn’t want to wait a month from China. I decided to simply bring the flowers out with separate wires. I bought the wires at an electronics store. They look like this:
So, I immediately decided to output the video input for the rear view camera. I bought this wire for it:
The radio is easy to disassemble. I won’t describe it at length, because the disassembly process is quite common. After disassembly, we see the central board:
We need connector contacts:
To pin out the contacts, I used a diagram downloaded from the internet.
After soldering, I carefully laid the wires into a bundle. In addition to the flowers and video input, I also brought out a wire for turning on the amplifier, a wire for the reverse sensor, CAN-H and CAN-L for displaying additional functions. info.
In order to pass the wires through the body, I made a small recess in it.
After assembly it looked like this:
This way I didn't have to find a mini-ISO connector.
Amplifier connection.
Simply screwing the screws into the back (as for example on 08-09) will not work in the grant. The base at the backrest consists of welded wire (cage). I decided to secure the amplifier in the following way: I took an iron strip 40 x 4. I cut out two blanks slightly longer than the length of the amplifier. I marked 4 dots on these strips along the holes in the amplifier. According to the markings, I drilled holes and cut an M5 thread for mounting the amplifier.
Then there was a problem - how to attach these strips to the skeleton of the seat back?! The most perfect option is to weld them to the skeleton. But for this you need to completely disassemble the back. I made it a little easier. On the sides of the strips I made many holes along the entire length on both sides. Then I pushed these strips through the bars of the back frame (between the foam rubber and the net). Having previously attached the amplifier to the bolts, I secured the strips to the skeleton with plastic ties. Then I unscrewed the amplifier, threw on the fabric covering of the seat back (the back side has a zipper, very comfortable), made four holes in it with an awl, and screwed the amplifier to the fasteners I made. It turned out quite durable. The iron strips were firmly attached to the skeleton of the seat back.
How to install
Installation of the radio on the Grant should be done in the standard socket provided by the manufacturer. After this, the speakers and additional parts are installed. The presence of a factory communication harness ensures the fastest and easiest connection.
Car radio
If a standard-sized head unit is selected, the process of installing a radio in the Lada Granta consists of the following steps.
To remove the latches from the front frame, you need to hook the plug pocket by its edges. The electrical wiring plugs are carefully disconnected. The glove box housing needs to be folded down. The travel stops, mounted at the top of the rear wall, are disengaged from the instrument panel. The cover is dismantled - to do this, you need to carefully pull it towards you. To route the cable to the player, lift up the car's floor covering, which is located next to the passenger seat. The standard slides required for installing the head unit are installed using bendable elements.
Acoustics
After you have managed to install the radio in the standard connector, you need to install speakers. Lada Granta liftback cars with basic equipment are equipped with standard wiring for acoustics. It is laid under the decorative door trim.
The speakers should be placed in the doors. For this purpose, the metal frame of the doors on the Lada Granta already has holes with a diameter of 16 cm. However, there are no holes provided for this in the trim - the car owner will need to make them himself. In this case, the diameter of the hole in the casing must be equal to the size of the diffuser.
After installation, the speaker ring should be secured to the trim using screws. The top is covered with a decorative mesh.
Some difficulties may arise during installation. When the car owner decides to install speakers whose diameter does not exceed 13 cm, he will need to “build up” the missing plane. When choosing front speakers for the Lada granta liftback, experts advise giving preference to those models in which the metal grille and plastic frame have a minimal protrusion above the door surface. Otherwise, it may be difficult to open the glove compartment.
The car enthusiast can choose compact or enlarged rear speakers. In the latter case, they are built into the luggage compartment shelf. The diffusers in this arrangement are protected by original meshes - they are offered by the car plant.
How to connect an amplifier and subwoofer to a Granta radio
Once a year, the standard radio of the Lada Granta is supplemented with new features that have long been used in foreign cars. Now we will tell you how to connect an amplifier and subwoofer to the standard Granta radio with your own hands.
1. Pull a separate reddish thick wire from the battery to the amplifier. We install a pre-flask next to the battery.
2. Ground (black wire) to the body and to the amplifier.
3. Connect the amplifier to the subwoofer (speakers).
4. We stretch the speaker wires (separately from the other wiring of the car) from the amplifier to the radio.
5. Connect the laid wire of the external amplifier to the Granta radio.
Nowadays, the extreme point raises the most questions, so we will dwell on it most carefully. Let us recall that in the previous article we looked at connecting a rear view camera to the standard radio. The camera greatly helps when parking in reverse.
Connector information:
The back of the radio is as follows:
You can immediately see the familiar ISO connector (in the photo there is a brown and grayish pad):
Also the top row of mini connectors (blue, greenish and empty connector). This connector is called mini-ISO and has the following diagram:
Now about amplifiers. Typically, an amplifier has two groups of inputs: line and high-level input. You can use any of them, and here are the details of connecting the amplifier to the standard Granta radio with your own hands.
Connecting an amplifier (via the ISO connector of the radio)
To connect an amplifier using the highest level input, you should take the signal from the output to the radio speakers (regular ISO).
This is the simplest method that is suitable for unpretentious listeners. This is because the signal going from the radio to the external amplifier has many circuits (preparatory amplifier, radio amplifier, external amplifier voltage divider, power amplifier) that introduce their refractions.
Connecting an amplifier (via the mini-ISO connector of the radio)
The most difficult way to connect an amplifier. First, you will need to find a rare mini-ISO connector, which we plug into an empty connector on the back of the radio, and then high-quality shielded wires.
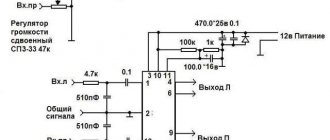
By making connections according to the indicated diagram, you will get the highest quality sound:
Connecting the amplifier and subwoofer to the Granta radio with your own hands has been successfully completed. Enjoy the music!
Source: vazgarage.ru
What is the functionality of the radio?
The fact that there is a standard radio in the domestic car Lada Granta Lux and in Kalina-2, and the devices are constantly being improved. A special feature of the radio is that it fits deep into the standard place, which is accompanied by minor difficulties when removing it. The large monochrome display displays a user-friendly interface.
Read also: Liquid moth dexos 2
Reviews from owners indicate that the software has an operating system based on the legendary Windows, the potential capabilities of which are increased by firmware. It is possible to create a desktop in the image of a household computer and connect to the Internet. To do this, you should use a 3g modem.
If you need to enter data, manipulation can be done using the on-screen keyboard. Own memory is not enough, so to meet the ever-growing demands of owners, it is recommended to use an SD card as a storage medium. This drawback is included in the list of reasons, due to the relevance of which, most motorists prefer choosing a foreign vehicle.
A convenient option for connecting with a mobile phone is available for the Lada Granta radio. This allows you to make calls without having to take your phone out of your pocket. You only need to activate a specific button on the device display. This is a kind of extended “hands-free” function.
The radio receiver is also not without pleasant features. If you program a news wave, the device will automatically switch to it from any other channel when a program on the designated topic begins broadcasting.
In the LADA Granta standard, the radio with an integrated LCD display is capable of supporting such file formats as:
- outdated "MP3";
- "WMA";
- "WAV";
- video files that support the “WMV” extension.
Connectors for the standard radio and MMC Lada
All devices have the same ISO and mini-ISO connectors on the back.
The amplifier can have two groups of inputs:
- linear
- highest level input
We carry out the connection according to any of the schemes proposed below.
Specifications
When purchasing a subwoofer, you should pay attention to the following characteristics:
- peak power (W). It is with the help of peak (maximum) power that buyers are attracted. After all, car owners first of all want to know whether the system can “rock” the car with bass in order to attract the attention of others. Peak loads indicate at what level the speaker can operate most efficiently. Most often, they are approximately 3 times higher than the indicators that are optimal for long-term operation, however, devices with such characteristics are often at the very top of the rating of subwoofers for cars;
Table showing the dependence of the peak powers of subwoofers on the volume of the premises - rated power (W). The manufacturer tries not to focus on the rated power - this indicator is not as impressive as the previous one. But it is this information that tells the buyer what level of sound the selected speaker can produce without distortion. At the same time, it can operate at higher powers in optimal mode. Most car enthusiasts who decide to purchase a subwoofer are not looking for high power. Therefore, the optimal devices are those for which this indicator ranges from 200 to 300 W;
By the way, for expensive high-quality speakers there is no significant difference between peak and nominal loads, which cannot be said about cheap models. This is explained by the fact that a high-quality speaker has the ability to reproduce high-quality bass even at very high powers. This means that its rated loads are close to peak values. At the same time, the peak power of inexpensive speakers can be even higher than that of higher quality speakers. However, the rated power will certainly be lower.
There are sizes that are recognized as optimal, that is, they allow you to produce a sound that suits the majority of car owners. So, 10” is the best option for those who like not very powerful bass, and 12” is for those who like it “hot”.
Connecting the amplifier to the radio via the ISO connector
We connect the amplifier through the highest level input to the radio (speaker output).
This connection method is suitable for the average user. Music lovers are not satisfied with this method because of the huge number of circuits between the radio and the amplifier (preparatory amplifier, radio amplifier, voltage divider of the external amplifier, power amplifier), which introduce their own refractions.
Location of the subwoofer in the cabin
For proper operation of the subwoofer, it must be installed taking into account the specific body type:
- In station wagon cars, the subwoofer should be directed with the bass reflex and speaker towards the rear of the car.
- If the body is a hatchback, it is best to position the device so that it is directed towards the roof of the car or the trunk door. If directed towards the back of the seat, loss of sound quality may occur.
- The sedan body assumes that the subwoofers are directed towards the rear seat. In this case, the gap between the subwoofer and the seat should be at least 8 cm.
Connecting the amplifier to the radio via the mini-ISO connector
To implement this amplifier connection diagram for us, you will need to find a mini-ISO connector, which should be connected to an empty connector on the back of the standard radio of Lada cars.
Further, it is recommended to use high-quality shielded wires.
The main advantage of this connection scheme for us is the highest sound quality.
Other features of standard multimedia
The general feelings of owners who have a standard radio in their car are positive. The display is informative and easy to read. The touch keyboard functions flawlessly. The standard radio itself is capable of high-quality reproduction of sound programs from micro-SD cards. However, using USB format media can be challenging.
The device also has some nice options:
- equalizer;
- activated replay mode;
- random sequence of playing tracks (“Random”).
Multimedia LADA Granta is capable of supporting images in 5 formats, which allows you to view photos without any problems. But not everyone can make the correct settings for the “phone” option on the first try. This function will be convenient for a busy owner who is forced to communicate by telephone even while on the road.
The standard speakers of the LADA Granta disappoint many, since even at a 45 percent volume level they emit wheezing, characteristic of bass overload. Some timid music lovers are alarmed by volume jumps when switching to “radio” mode.
Here is a list of shortcomings that provoked many Grantavods to purchase an alternative version of the radio. Today, the progressive version “2191” claims to replace the outdated standard device “2190”. The new device will please you:
- improved sound;
- interface for connecting with a rearview camera;
- navigation complex;
- integrated input for connecting a subwoofer.
Not every minimum configuration of a car today will please you with the presence of a standard radio. If, nevertheless, such a device is present in the database, it is far from a fact that it can please you with its informative interface and sound quality. If your version of the car has a push-button radio, then, as we found out from the article, installing a more modern radio, as well as the subsequent connection of the radio, is not a difficult matter, the main thing is to approach everything correctly.
The LADA Granta model also did not acquire the role of an exception in this list. After all, the trend of a modern car suggests the owner’s ability to carry out exciting measures to improve and tune his “iron horse,” and you shouldn’t be upset, because a push-button radio is easily replaced with a modern one.
Instead of a total
- If we install a simple radio, the size should be no more than 178 * 50 mm. Installation requires plastic spatulas or a screwdriver. Adapters and slides are included .
- To install 2 din, you need a new overlay on the console, a decorative frame on the GU itself, wire cutters and a metal blade to adjust the installation location.
- Are we replacing the standard speakers with another of the same size? Still need a new decorative frame . Otherwise, gaps in the panel will be visible.