When it is necessary to replace the rear axle axle seal of a Niva Chevrolet, the owner does not have to immediately contact a service station. This operation refers to work that does not require high qualifications and special equipment, and if desired, it can be done with your own hands. This also applies to motorists driving regular Nivas - VAZ 21214 and 21213.
When to replace
During the operation of the Chevrolet Niva, a problem often arises associated with the flow of lubricant through the crankshaft. The reason for this may be various malfunctions, including wear of the element itself that performs the gasket function. If during the diagnostic process it is determined that it will not be able to function normally in the future, then it needs to be replaced. After the dismantling process, a new product is installed.
This operation will make it possible to eliminate the lubricant leak. There are some peculiarities in replacing the front and rear oil seals, so motorists who want to do these operations themselves should study all the nuances.
Advice on how to remove drives without dismantling the Niva front gearbox
- To dismantle the drives, it is necessary to unscrew the fastenings of the gearbox (in this case, some kind of stop is placed under it).
- Then the steering knuckles are released. To do this, simply unscrew the shock absorber mount from the lower arm and the lower ball joint.
- To relieve the load, jack up the lower suspension arm.
- Unscrew the hub nut and remove the centering ring. The nut is too tight, so we use a wrench extension (for example, a metal pipe).
- We move the steering knuckle to the side. The drive can then move freely.
- To ensure free movement of the drive during removal, the gearbox must be moved back slightly.
- We remove the drive, being careful not to damage the anthers. If the boot is torn, it must be replaced.
- The procedure for removing the right and left CV joint drives is similar.
Before dismantling, it is necessary to mechanically remove dirt from the inside of the steering knuckles and from the bottom of the car above the work area. The best option is to wash the bottom with a high-pressure apparatus one day before carrying out work.
Front oil seal: replacement features
Oil leaking from under the crankshaft lip hits the crankshaft pulley and then splashes throughout the engine compartment. One of the reasons for this malfunction may be wear of the front oil seal. Before removing this part, you should make sure that the crankcase ventilation is in good condition, otherwise oil may leak even during normal operation of such an element.
Before replacing the front crankshaft oil seal, you should have the appropriate tools ready. This operation is carried out in a certain sequence:
The oil sump protection and engine splash guard are removed.
The belt responsible for operating the power steering pump is removed.
The nut securing the generator to the adjusting bar is unscrewed, after which this power unit moves towards the motor. This action is necessary to loosen the belt being removed.
Using a socket head, the nut is unscrewed, through which the crankshaft pulleys are secured, after which they are removed.
The worn front oil seal is carefully removed from its place using a flat-head screwdriver by applying slight pressure and displacement.
The nest is wiped with a clean rag, and the oiled new product is installed in place using a mandrel of suitable diameter. It should be borne in mind that this element must be placed inside the engine with the working edge forward.
Reassembling the dismantled components is performed in the reverse order.
Replacing the oil seal on the drive gear drive, main steps
- it is necessary to unscrew the bolts holding the flange, remove the cardan shaft from the gearbox
- disconnect the CV joint housing from the drive.
- you need to connect a dynamometer and determine at what moment the rotation begins. To do this, rotate the flange mount until the gears begin to move.
- bolts are screwed into adjacent holes
- Between the bolts there is a pry bar, with the help of which the flange is kept from turning.
- After this, you can remove the flange along with the washer using a universal puller.
- The oil seal from the bridge gear is replaced with a new original spare part. The sealing ring must be lubricated with grease or lithol.
- After this, it is necessary to press the ring using a pipe of a suitable diameter.
- The flange fits onto the spline connection.
- The cardan shaft is installed in place.
Replacing the rear oil seal
A characteristic sign of the need to replace the rear oil seal located on the crankshaft of a Niva Chevrolet car is oil leakage. But the danger of such a situation is that oil begins to fall on the clutch discs and provoke slipping of this unit, and therefore contribute to the occurrence of an emergency situation on the road. In addition, lubricant leaks into the joint between the engine block and the gearbox.
Replacing the rear crankshaft oil seal in the same way as the front part is carried out after checking the crankcase ventilation system. Carrying out repair work requires the use of special tools:
- socket wrench with 10mm head;
- flat screwdriver;
- hammer;
- torque wrench.
Consumables:
- crankshaft rear cover oil seal;
- sealant.
To carry out repair work, the vehicle must be placed in an inspection pit. The steps to replace this part are carried out by dismantling the component products one by one in the following sequence:
- Transmission;
- cardan;
- clutch;
- flywheel.
After completing the above steps, unscrew the two nuts that secure the front cover of the clutch housing and remove it.
A visual inspection examines the condition of the oil seal. In this case, traces of leaking oil are a signal to replace it.
Simultaneously with this check, the condition of the bearing is analyzed.
Using a small flat screwdriver, pry up and remove the faulty gasket from the seat.
The landing nest is thoroughly wiped with a clean rag.
A new copy is lubricated with engine oil.
A new copy is lubricated with engine oil and placed on the holder. During such an operation, it is necessary to control its position. The working edge of the element must be located inside the engine and tucked onto the crankshaft journal.
Using a mandrel that matches the diameter, the new part is completely pressed onto the holder.
Following the above rules will allow you to properly replace both the front and rear crankshaft seals, which, in turn, will prevent engine oil leaks and engine overheating.
Replacing the front crankshaft oil seal for Chevrolet Niva engines
Tools:
- Socket wrench
- Head for socket wrench 10
- Head for socket wrench 38
- Ratchet wrench
- Flat screwdriver
- Hammer
Parts and consumables:
- Engine front crankshaft oil seal
- Sealant
Notes: A sign that the front crankshaft oil seal needs to be replaced is oil leaking around its lip. In this case, oil is sprayed out by the rotating crankshaft pulley, as a result of which the entire front part of the engine and engine compartment becomes oily.
Helpful advice: Before replacing the crankshaft front oil seal if a leak occurs, check the cleanliness of the engine crankcase ventilation system, since if it is clogged, the increased gas pressure in the crankcase causes a leak even with a working oil seal.
1. Remove the oil pan guard and engine compartment splash guard as described here.
2. To avoid damage, remove the crankshaft position sensor as described here.
3. Remove the accessory drive belt as described here:
A. On a vehicle with air conditioning, use the A/C compressor drive belt as described here.
b. With the generator located at the bottom: Remove the power steering pump drive belt. Loosen the nut securing the generator to the tension bar and, moving the generator towards the engine, remove its drive belt as described here.
4. By engaging fifth gear in the gearbox and braking the car with the parking brake.
5. Using a 38 socket, unscrew the nut securing the crankshaft pulley.
Useful advice: It is not always convenient to place the knob, then we use a ratchet wrench.
6. On a car with air conditioning, unscrew the nut securing the drive pulleys of the air conditioning compressor and auxiliary units.
A. No air conditioning.
b. With air conditioning.
Helpful Hint: If the nut is tightened too tightly, use a pipe of a suitable diameter as a wrench extension or loosen the nut by hitting the wrench handle with a hammer.
7. Remove the pulleys.
A. No air conditioning.
b. With air conditioning.
8. Prying it with a screwdriver.
9. Remove the oil seal.
10. Lubricate the new oil seal with engine oil and install it into the timing cover, oriented with the working edge towards the inside of the engine.
Note: The working edge is distinguished by the presence of a spring.
11. Press the oil seal into the cover using the old oil seal as a mandrel or with a socket of a suitable size.
12. Reinstall the removed parts and adjust the tension of the power steering pump and generator drive belts.
Installing a New Seal
After removing the axle shaft, the metal shield where the brake pads are attached will remain hanging on the copper pipe with the fluid, so it should be fixed by inserting the 2 upper bolts back into the holes. Then follow the instructions:
- Remove the thick rubber gasket from the rear axle flange.
- Pull out the old oil seal by prying it with a screwdriver or pliers. Clean the seat and wipe with a rag.
- Lightly lubricate the new seal with transmission oil and insert it into the socket of the Niva rear axle as evenly as possible.
- Using a round pipe adapter, press the oil seal into the socket with light blows of a hammer. You can use an old seal as an additional attachment.
At the end of the procedure, you must thoroughly wipe all parts free of oil - the brake cylinder, pads, drum and metal shield. Before reassembling, it would be a good idea to check the axle bearing for wear and grease. Wear is indicated by difficulty turning, binding, or slight noise. If you discover a malfunction, take the axle shaft to the nearest car service center; you will not be able to replace the bearing without special equipment.
To check the grease inside the bearing, you need to pry the plastic covering the rollers with an awl and remove it. Then add thick Litol-type lubricant inside and put the plastic in place, and then begin assembly.
At the end, it is important to check the oil level in the rear axle gearbox of the Chevrolet Niva. The test is carried out on a fully assembled car, standing on a level area. The filler plug is unscrewed from the gearbox housing, after which the oil level is determined visually or using a thin wooden stick. If there is a shortage, you need to insert a hose of a suitable diameter into the filler neck with a watering can at the end, where the lubricant is poured. It is more convenient to top up with an assistant: you control the level, and the assistant gradually adds oil.
Most Chevrolet Niva owners, due to the simplicity of the design, can independently repair their car. This is especially true for a large number of consumables, including those in the chassis of the car. One of the parts that requires periodic replacement is the Chevrolet Niva front axle oil seal. The need for repairs arises when an oil leak occurs from the axle housing and a knocking noise occurs. The main cause of grease leakage is due to a clogged breather.
It is necessary to monitor at what stage the oil leak occurs. If, after intensive movement, while the gearbox is still hot, and after it cools down, it stops, then it is necessary to clean the breather. It may be clogged with dirt, which prevents the heated air from escaping outside. Therefore, it is possible to squeeze out fluid from the gearbox, even if the gaskets are in good condition.
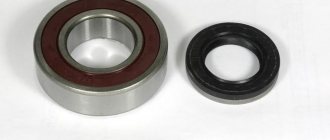
If the breather is working properly, but oil still comes out, then most likely you will need to replace the cover gaskets and o-rings. Typically, the design of the front axle provides for the presence of three rings: an oil seal located on the axis of the drive gear, axle bearings and oil seals for the right and left drive - the axle shaft hinge.
How to replace the rear axle axle seal on a Chevrolet Niva
Replacing the oil seal located on the axle shaft directly of the rear axle is a rather troublesome procedure on all VAZ vehicles, but not particularly complicated. A Chevrolet Niva whose seal has leaked can be easily repaired with its own hands - the car owner does not need any qualifications or extensive work experience. It is enough for him to follow the instructions below and have a basic set of tools on the farm. The situation is the same in the case of classic Niva models.
Search
14.3 Removing the axle shaft and replacing the oil seal
We send and remove the rear wheel. Remove the rear brake pads (see "Replacing the rear brake pads" )
Using a "14" socket with an extension through one of the two large holes in the axle flange, loosen the four bolts securing the plate axle and brake shield to the rear axle beam flange.
Remove the bolts along with spring washers.
Hold the brake shield so that it does not hang on the brake cylinder tube and lower it slightly.
. and use a Phillips screwdriver to remove the two screws that secure the brake shield to the axle (on the back of the shield).
If these screws cannot be removed, see Method Two. remove the axle shaft (bottom).
To prevent the brake shield from hanging on the brake line, we pass an M8 bolt through one of its top mounting holes and insert it into the corresponding hole on the beam flange.
In what situations is it necessary to replace the oil seal?
The sealing element mounted on a Chevrolet axle shaft does not have a service life determined by the mileage. For this reason, replacement is carried out only when certain signs of malfunction of this rubber band are detected. In particular, repairs are definitely necessary when it turns out that transmission oil begins to leak. This is evidenced by characteristic stains found either on the rear axle housing or on the Niva brake housing. Depending on where the leaky axle shaft seal is located, drips will appear on the right or left.
In addition, the seal in question often becomes unusable when the bearing located there is replaced. The elastic usually breaks when this element is pulled out. The problem is that to dismantle the named part it is often necessary to apply a lot of force or use not very delicate methods.
It is important to understand that in a Chevrolet, in the rear axle area, there can also be a leak from the gear shaft that holds the driveshaft. In the latter case, oil drips appear exactly in the middle.
Thus, anyone who intends to replace the bearing located on the Chevrolet Niva axle shaft is recommended to buy a fresh oil seal and, for preventive purposes, install it instead of the old one, regardless of the performance of the latter. The part will cost literally a few rubles, and it is not difficult to find it by article number. So, in the case of the right part of the bridge, take 2110-2301034, for the left - 2110-2301035.
The element dimensions are:
- outer diameter is 57 millimeters;
- internal – 35;
- height – 9.
If a Niva model 21214 requires repairs, then the axle shaft sealing ring is the same.
In addition to the oil seal, before replacement it is necessary to purchase a sufficient amount of transmission oil, because some of the lubricant in the gearbox will probably spill. If you don’t know which one is suitable, then buy what is poured at the Volzhsky Automobile Plant - its brand TAD-17I.
NIVA oil seals
1. NIVA gearbox seals:
-Oil seal for the input shaft of the gearbox (gearbox) NIVA-2121, -21213, -21214, -2131, -2123:
Catalogue number: 2101-1701043
oil seal dimensions: 28x47x8mm
- Seal of the secondary shaft of the gearbox (shank) VAZ-2121, -21213, -21214, -2131, -2123:
Catalogue number: 2101-1701210
oil seal dimensions: 32x56x11mm
2 . NIVA front axle oil seals:
-Oil seal for the front axle gearbox NIVA- 2121,-21213,-21214,- 2123,-2120
catalog number: 2121-2302052
-Drive seal -2121,-21213,-21214,-2131,-2123, universal (without direction)
Catalog number: 2123-2303120 / 121 2 pcs.
seal dimensions: 57.15 x 40 x 9mm
But it is better to install seals with a notch (left, right):
Left drive oil seal -2121,-21213,-21214,- 2123
Catalog number: 21213-2301035 1 piece.
Oil seal dimensions: 57.15 x 40 x 9mm
Right drive oil seal -2121,-21213,-21214,-2123
Catalog number: 21213-2301034 1 piece.
Oil seal dimensions: 57.15 x 40 x 9mm
3. Transfer Case Seals 3pcs:
2 identical oil seals are installed on the valve:
catalog number: 2101-2402052-01 (this is the rear axle gearbox seal on the VAZ-2101 and NIVA-2121 of right rotation),
one is installed on the drive shaft of the RK:
(in the lower diagram), the second is on the front shaft of the RK differential (see the upper diagram - highlighted in red)
Dimensions of these seals in mm: 35.8 x 68 x 10(12) 2 pcs.
An oil seal is installed on the rear shaft of the RK differential - this is the 3rd oil seal (highlighted in blue in the top diagram)
with catalog number: 2121-2302052 left rotation 1 pc.
Dimensions in mm: 35.8 x 68 x 11(12)
4. Rear axle gear oil seal :
catalog number: 2101-2402052-01 (rear axle gearbox VAZ-2101) 1 pc.
5. Axle shaft seals for Chevy NIVA-2123:
Seals for VAZ-2110 drives of right and left rotation are installed
catalog numbers of oil seals: 2110-2301034 right - 1 piece
gland dimensions in mm: 57 x 35 x 9
In the photo: VAZ-2123 axle seals (BRT) red-left, black-right.
The arrow on the oil seal indicates the direction of rotation of the shaft (when the vehicle is moving forward).
Source
Preparatory activities
Before proceeding with the replacement, the owner of a Niva Chevrolet car needs to prepare a number of tools. In the process you will need:
- box and socket wrenches in a set;
- flat screwdriver;
- wheel wrench;
- hammer;
- jack;
- additional wooden support;
- a piece of pipe equal to the diameter of the gland.
Be sure to wear work gloves - they will not only keep your hands clean, but also protect your fingers from injury.
The stand will need to be such that after removing the wheel and dismantling the shock absorber, the rear axle remains at approximately the same height. Otherwise, you risk losing too much transmission oil.
When to change bearings on Chevrolet Niva axle shafts
Since our car is often operated in very difficult conditions, the loads on the bearings are very high. In addition to loads, the bearing may be subject to moisture attack when the axle shaft seal fails . At the same time, oil may begin to leak from the rear axle housing. As a result, the bearing is poorly lubricated and the grease is washed out over time.
A crunching sound from the rear wheel indicates a wheel bearing failure.
The most obvious symptom of bearing failure will be increased noise at any speed. In more severe cases, both radial and axial play may be observed.
The factory allows axial clearance of the axle shaft of no more than 0.7 mm , but most often the axle shaft will indicate the destruction of the bearing with strong noise and crackling.
At the first symptoms of a bearing failure, you need to start replacing it.
Numbers and articles
Fortunately, the axle bearing is not the most scarce part. It is one of the most popular of the 500 series of single-row bearings and is produced by a huge number of factories in the CIS, as well as in many European countries. Its industrial index is 180508 , the index of its foreign analogues is 62208-2RS . Automobile factory article number - 2121-2403080 .
Disassembly
To get to the failed seal, you will need to remove from your Chevrolet Niva all the parts that make up the right or left rear hub assembly. Only then will it be possible to remove the axle shaft.
Disassembly is carried out in this order:
- park the car on a level place;
- secure the front wheels with stoppers;
- turn off the handbrake;
- slightly loosen the nuts securing the wheel;
- lift the car with a jack;
- remove the wheel;
- clean the end of the axle shaft, which protrudes slightly beyond the dimensions of the brake disc, from dirt and rust;
- spray it with WD-40;
- unscrew a couple of bolts holding the drum (you need a 12 mm wrench);
- Move the above brake element with light hammer blows.
Please note that there are two main methods used to remove the drum. In the first case, it is squeezed out of place by screwing the above-mentioned bolts into the free holes. In the second, they use the same hammer, but using a stump of a block as a protective pad. Without this preventative measure, it is easy to damage the edge of the brake disc.
After dismantling the drum, it is advisable to once again thoroughly clean its seat from dirt and corrosion - this will make it easier to install it back.
Next, you need to remove the axle shaft. On a Chevrolet it is held in place by four bolts - they also secure the shock absorber in parallel. When the fasteners are unscrewed, the rear axle falls down, as the spring simply squeezes it out. You need to put a support under it, otherwise all the oil will spill out.
Please note that in classic Niva models (21213 or 21214) the shock absorber is fixed to the spring cup, while in Chevrolet it is fixed directly to the hub. Accordingly, in older cars there is simply no need to remove it, which means there is no need for a stand.
To unscrew the bolts securing the axle shaft, a 17 mm wrench is required. Be careful not to drop the spring lock washers into the brake mechanism. If growers remain there, sooner or later they will end up in the space separating the block from the drum, and this leads to a potentially dangerous failure such as a jammed wheel.
Having pulled out the bolts, with a sharp jerk towards yourself, pull out the axle shaft along with the bearing. If the node does not give in, then:
- put the wheel back;
- screw 3 nuts onto the studs;
- wiggle it a little and try to pull it off again.
The surest way is to use an inertial puller, but the vast majority of car owners simply do not have this tool.
Preparation and disassembly
To independently remove a leaking rear axle oil seal on a Niva Chevrolet, you will need the following tools:
- standard set of wrenches;
- slotted screwdriver and wheel wrench;
- jack;
- hammer;
- wooden stand;
- cloth gloves.
Never neglect gloves when repairing a car: they will protect your hands from damage due to accidental impacts. The height of the wooden stand should be enough to support the rear axle with the wheel removed and the shock absorber unscrewed, otherwise oil will leak from it.
Before removing the old seal, you will have to disassemble the rear hub assembly and remove the axle shaft. Disassembly is carried out in the following sequence:
- Place the car on a level surface and secure it with wheel chocks. Make sure the handbrake is turned off.
- Loosen the wheel nuts, jack up the car and remove the wheel.
- Clean the rear axle flange that protrudes beyond the brake drum from rust. Additionally, you can treat this area with WD-40 lubricant.
- Unscrew the 2 bolts securing the drum with a 12 mm wrench, then gently tap with a hammer to move it out of place.
- The drum is removed in 2 ways: by squeezing it out with the same bolts, screwed into other holes, or by knocking it with a hammer through a piece of wood. The methods can be combined, just be careful not to damage the edge of the drum with the blows.
- After dismantling, clean the seat on the axle shaft again to make the drum easier to remove.
The next step is unscrewing and removing the axle shaft. In the VAZ 2131 Niva Chevrolet, 4 bolts securing it are held on the other side by a bracket holding the shock absorber.
After unscrewing the bolts, the shock absorber will no longer hold the rear axle, and the spring will push it down, causing oil to flow.
To avoid this, you need to first adjust the stand by jacking the car higher. The rear axle “stocking” must rest with a slope in the other direction so that the oil does not leak out.
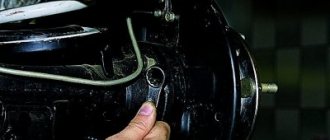
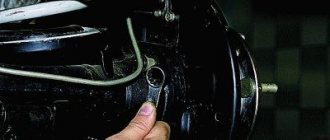
How to install a new oil seal
When the axle shaft is removed from the car, the nearby metal shield used to mount the pads will be essentially loose. It will only be held in place by a thin copper tube filled with brake fluid. To prevent the latter from breaking, the shield must be temporarily secured with a pair of previously unscrewed bolts.
Removing and installing the oil seal is done as follows:
- remove the gasket from the bridge flange (do not tear it, although it is thick, it is still rubber);
- remove the damaged oil seal - pick it up with a flat screwdriver;
- thoroughly clean the area where it previously stood with a cotton, lint-free cloth;
- Before installation, the new seal must be wiped with oil (necessarily with transmission oil);
- place the element in the socket and make sure there is no distortion;
- Press it in with a piece of pipe so that the rubber is not damaged - place the old oil seal on top of it.
Now it is important to thoroughly clean all removed elements from dirt and oil. It is absolutely unacceptable to leave traces of grease on brake parts:
- drum;
- cylinder;
- pads;
- shield
If only the oil seal was changed on the Chevrolet, then it is advisable to inspect the axle bearing as well. The part is checked for wear, lack of play and presence of grease on the rollers. If an element breaks soon, then it:
- rotates tightly;
- makes noise;
- rattles when shaken.
Please note that you cannot replace the bearing yourself. This operation will be performed for you at a car service center. You can only check if there is lubricant inside. To do this, carefully lift the plastic plug covering the rollers and look inside. In the absence or its obvious insufficiency, ordinary Litol is laid. The plastic ring is then placed in place.
Now you can assemble the knot. Follow all steps described in the instructions in reverse order.
Finally, be sure to check how much oil is left in the gearbox of your Chevrolet. To do this, lower the car onto its wheels and make sure it is level. Then:
- find the neck plug on the casing;
- turn it inside out;
- take a look inside.
If there is not enough lubricant, add it using a hose and funnel. It is better to do the work with a partner - one will add oil, and the other will monitor its level.
Replacing the rear oil seal
A characteristic sign of the need to replace the rear oil seal located on the crankshaft of a Niva Chevrolet car is oil leakage.
But the danger of such a situation is that oil begins to fall on the clutch discs and provoke slipping of this unit, and therefore contribute to the occurrence of an emergency situation on the road. In addition, lubricant leaks into the joint between the engine block and the gearbox. Replacing the rear crankshaft oil seal by analogy with the front part is carried out after checking the crankcase ventilation system. Carrying out repair work requires the use of special tools:
- socket wrench with 10mm head;
- flat screwdriver;
- hammer;
- torque wrench.
Consumables:
- crankshaft rear cover oil seal;
- sealant.
To carry out repair work, the vehicle must be placed in an inspection pit. The steps to replace this part are carried out by dismantling the component products one by one in the following sequence:
- Transmission;
- cardan;
- clutch;
- flywheel.
After completing the above steps, unscrew the two nuts that secure the front cover of the clutch housing and remove it.
A visual inspection examines the condition of the oil seal. In this case, traces of leaking oil are a signal to replace it.
Simultaneously with this check, the condition of the bearing is analyzed.
Using a small flat screwdriver, pry up and remove the faulty gasket from the seat.
The landing nest is thoroughly wiped with a clean rag.
A new copy is lubricated with engine oil.
A new copy is lubricated with engine oil and placed on the holder. During such an operation, it is necessary to control its position. The working edge of the element must be located inside the engine and tucked onto the crankshaft journal.
Using a mandrel that matches the diameter, the new part is completely pressed onto the holder.
Following the above rules will allow you to properly replace both the front and rear crankshaft seals, which, in turn, will prevent engine oil leaks and engine overheating.
Addition
Espra, Spain
There is a category of people who want spare parts to be imported, and I largely support them. This is not about patriotism, but about stability of quality. Many times the question has been asked, which imported Niva crankshaft oil seal do you recommend? According to the cuffs, I have one secret love. Very often a situation arises when a “small” company, by the standards of the world giants of spare parts and tools, has its own “know-how”.
In the field of cuffs and seals, there is the Spanish brand Espra, which has now turned into a “packer and repacker” of spare parts from other manufacturers, but they started with “rubber” production. It still operates under its own name. In my humble opinion, their cuffs are among the top three manufacturers in terms of quality and price-quality ratio.
Material: fluorine rubber. I don’t know the exact chemical composition of the mixture, but I’ll say it differently - they remain soft in the cold, when other famous ones are already tanning. Noticeable difference: they have a characteristic blue color. The disadvantage is that they fanatically continue to make cuffs in metal cases, without “elastics”, completely repeating the original. Therefore, during installation, it is better to coat the place where the outer part of the cuff will stand with a thin layer of high-quality sealant.
When to replace
During the operation of the Chevrolet Niva, a problem often arises associated with the flow of lubricant through the crankshaft. The reason for this may be various malfunctions, including wear of the element itself that performs the gasket function. If during the diagnostic process it is determined that it will not be able to function normally in the future, then it needs to be replaced. After the dismantling process, a new product is installed.
This operation will make it possible to eliminate the lubricant leak. There are some peculiarities in replacing the front and rear oil seals, so motorists who want to do these operations themselves should study all the nuances.
Axle shaft seal
Axle shaft seal
Post by plantain » 04 Jun 2011, 16:48
Re: Axle shaft seal
Post by rv3dll » 05 Jun 2011, 11:11
Re: Axle shaft seal
Post by plantain » 05 Jun 2011, 16:59
Re: Axle shaft seal
Post by Spiteful critic » 05 Jun 2011, 19:48
Re: Axle shaft seal
Post by plantain » Jun 06, 2011, 12:24 pm
Re: Axle shaft seal
Post by Spiteful critic » Jun 06, 2011, 2:01 p.m.
Re: Axle shaft seal
Post by smbmax » May 31, 2012, 08:13
Re: Axle shaft seal
Post by Anton » May 31, 2012, 08:38
Most likely your bridge stocking is bent. Or wear of the axle shaft in the part of contact with the oil seal.
Re: Axle shaft seal
Posted by doc Brown » 31 May 2012, 09:09
Re: Axle shaft seal
Post by Pavl0 » 02 Jul 2013, 17:08
Re: Axle shaft seal
Post by Vovchik » 02 Jul 2013, 17:23
Re: Axle shaft seal
Post by doc Brown » 02 Jul 2013, 17:58
Re: Axle shaft seal
Posted by ayax » Mar 12, 2014 2:03 pm
Re: Axle shaft seal
Post by Serg548 » Apr 06, 2014, 07:02
Good day everyone! I also changed the axle shaft seals on my NIVKA a week ago. On the right it was leaking, it was an infection, the disk was already covered in fuel oil. I changed both. The next day the right side started leaking again. I didn’t take it apart right away, I drove it for a couple of days and it calmed down. So far everything is dry.
Added after 13 minutes 57 seconds: Maxim, the breather is very easy to clean, you can press it, twist its cap, you can remove it (unscrew it) and blow it out with a pump. Or just buy and install a new one. I don't think it's worth much.
Cuffs victor reinz (germany)
cuff Victor Reinz (Germany)
Quite a well-known German manufacturer. Cuffs made of fluorine rubber. A hydrodynamic notch is applied. And everything seemed to be fine, but it wasn’t. It took from 20-40 thousand kilometers and the cuffs began to leak and “snotty”. Only later did I learn information from my colleague that the VR brand has long been a “packer” of spare parts made on various conveyors. And you need to know exactly which factory this or that article comes from.
Cuffs balakovorezinotekhnika (Russia)
crankshaft cuff BRT (Russia)
Cuffs Balakovorezinotekhnika (BRT). This is our company, as the name suggests. The nice thing is that people do not stand still, but move forward. Once upon a time they made cuffs from rubber, in metal cases, without elastic, and it was a sad, even heartbreaking sight. Now the crankshaft cuffs are made of fluorine rubber, a design with an additional boot and a hydrodynamic notch.
Need for replacement
A faulty front oil seal often leads to damage to the timing belt. And through a leaking rear crankshaft seal, lubricant can get onto the clutch disc, negatively affecting its friction properties. At the same time, fuel consumption also increases and vehicle performance decreases. It is recommended to change the oil seal on a Niva:
- after 100 thousand km of distance traveled by the car;
- if the car has not been used for a long time and the seal has hardened;
- when purchasing a low-quality oil seal that fails much earlier than expected.
And also interesting: Dynamic vibration damper @ Niva 4×4
It’s easy to change. In any case, timely replacement of the seal will be cheaper and easier than major car repairs.
Front oil seal: replacement features
Oil leaking from under the crankshaft lip hits the crankshaft pulley and then splashes throughout the engine compartment. One of the reasons for this malfunction may be wear of the front oil seal. Before removing this part, you should make sure that the crankcase ventilation is in good condition, otherwise oil may leak even during normal operation of such an element.
Before replacing the front crankshaft oil seal, you should have the appropriate tools ready. This operation is carried out in a certain sequence:
The oil sump protection and engine splash guard are removed.
The belt responsible for operating the power steering pump is removed.
The nut securing the generator to the adjusting bar is unscrewed, after which this power unit moves towards the motor. This action is necessary to loosen the belt being removed.
Using a socket head, the nut is unscrewed, through which the crankshaft pulleys are secured, after which they are removed.
The worn front oil seal is carefully removed from its place using a flat-head screwdriver by applying slight pressure and displacement.
The nest is wiped with a clean rag, and the oiled new product is installed in place using a mandrel of suitable diameter. It should be borne in mind that this element must be placed inside the engine with the working edge forward.
Reassembling the dismantled components is performed in the reverse order.
Useful tips
Many drivers combine oil seal replacement and transmission oil change. If you decide to do the same, then it makes sense to find out what type of lubricant is used in your case. It is not recommended to mix different types of oils. This will lead to performance problems. If it is necessary to change the type of lubricant, it is recommended to first flush the system.
When removing the axle shaft, oil will begin to flow out. Therefore, it is better to drain it in advance. If you do not want to change the lubricant, then you need to take measures against its leakage. To do this, simply raise the side of the car from which you are changing the oil seal higher. This way you will avoid lubricant leakage. But, in any case, there is a risk of lubricant leakage. Be sure to add a new portion of oil after all work has been completed.
When reinstalling the brake drum, pay attention to its condition. Often there is a development along the shoulder. It should be removed using a regular file. This simple action will significantly improve braking.
In some cases, oil seal wear can be caused by a bent axle shaft. In this case, knocking noises will be heard when moving, and the oil seal will be worn out on only one side. In many cases, you can even visually determine the damage. Such a defect can only be corrected in a workshop on a special stand. If this is not possible, then you will have to buy a new part.
Crankshaft oil seal Niva nqk sf (Taiwan)
crankshaft cuffs NQK SF (Taiwan)
Manufacturer NQK shan feng, trademark NQK SF. Taiwanese manufacturer. The point is this: at the beginning of 2000, all rubber production, as it was very harmful, was located in China, Taiwan, and Malaysia. 90% of cuffs, hoses, chemicals are done there. You just need to know the factory where cuffs for company items are made. NQK SF products can often be seen in boxes from famous spare parts manufacturers, but for completely different money.