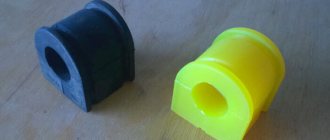
Stabilizers are responsible for the vehicle's stability on the road. To eliminate noise and vibration from the operation of the components of the stabilizers, special bushings are used - elastic elements that give smooth operation.
What is a bushing? An elastic part is created by casting from rubber or polyurethane. Its shape remains virtually unchanged for different car models, but sometimes has some features depending on the design of the stabilizer. To improve the performance of bushings, they sometimes have bosses and grooves. They strengthen the structure and allow parts to last longer, and also protect against mechanical stress that can damage them.
Stabilizer bushings - step-by-step replacement instructions
You can determine whether it is necessary to replace the stabilizer bushings by the knocking or creaking noises that appear in the suspension when braking and driving over potholes. And given that there are sometimes more potholes on our roads than asphalt pavement, the replacement process must be carried out regularly. The bushings themselves are not very expensive, their timely replacement will save the stabilizer struts from rapid wear, and the car owner from unnecessary expenses associated with their replacement. The replacement process is quite simple and you can easily do it yourself using the instructions provided.
Signs of malfunctioning stabilizer struts
X-Trail T31 stabilizer struts are the unit responsible for the lateral stability of the crossover. Timely replacement of struts is the key to safety on the road. If the part has exhausted its service life (partially or completely), the driver may notice:
- a characteristic knocking sound when driving through uneven sections of the roadway (for example, when driving over an artificial bump);
- car pulling to the right or left when driving on a flat road;
- increased roll when turning;
- excessive swaying of the X-Trail T31 body when accelerating and braking.
Other materials detailing the maintenance and repair of the X-Trail T31 in the appropriate section.
Need for replacement
Stabilizer bushings are among the parts that are subject to the greatest dynamic loads. They require regular replacement, depending on the maintenance regulations adopted by various car manufacturers and models. The maximum mileage before replacing the rear and front bushings is usually from 15,000 to 30,000 km. Considering the state of our roads, it is recommended to replace them based on wear and tear.
Untimely replacement can lead to the formation of a roll in the car's stabilizer, and this, in turn, increases the risk of the car tipping over at speed. The complete set must be replaced, regardless of the difference in external signs of wear. The cost of such a repair service at a service station is often overpriced, given the ease of replacement for most car models, so it is advisable to replace the front and rear bushings yourself.
Sequence of work
- The car is securely fixed when jacked up.
- The wheels are unscrewed and removed. There is an engine protection shield in the right wheel arch. Its fastenings are unscrewed and the shield is removed.
- Most of the fasteners under the bottom are pretty acidic, so to speed up the process of replacing stabilizer bushings, they need to be thoroughly treated with a WD 40 solution, which removes corrosion.
- Using an open-end wrench, we fix the finger on the left post. It is slightly hidden from direct access, so you need to find the grooves almost by touch.
- We throw a spanner, preferably a ratchet, onto the nut that secures the shock absorber. Unscrew both fasteners.
- Having freed the stabilizer struts from their fastenings, we disconnect them from the shock absorber strut.
- We install a jack under the left rear part of the subframe. With its help, the subframe is fixed so that when the fasteners are removed, it does not suddenly jump off the studs. A metal plate of considerable size must be placed under the supporting head of the jack so as not to deform the subframe.
- Smoothly lower the jack a few centimeters from the body. Thanks to this, the subframe also lowers slightly, opening access to the bushings.
- A pipe is inserted into the resulting gap, and the subframe is further pressed down. A stopper is inserted into the resulting gap. A 27mm head is suitable; when installing it between the body and the subframe washer, it is better to use pliers. This will save your hand from injury if the pipe slips off the subframe washer.
- We generously water the bracket fastenings with WD-40. We unscrew the bolts gradually, without pressing too much.
- Remove the freed bracket from the bushing, and then remove the bushing itself.
IMPORTANT! Before installation, all threaded parts of fasteners are coated with graphite lubricant to avoid sticking.
When performing the above work, you should be careful and pay attention to safety precautions. In general, such work can be done with your own hands.
Naturally, the design of different car brands differs significantly, so the replacement instructions are rather of a general recommendation nature. For more detailed information, a series of videos on carrying out this type of repair for various brands of cars is presented.
Video on replacing stabilizer bushings for Ford Explorer:
Video Chevrolet Aveo 3 - split bushings used in this model make the repair process quick and easy.
Nissan X-Trail Video:
Video explaining workflows for Renault Logan:
The vehicle suspension is one of the most important parts, subject to heavy loads and taking on all the impacts of a rough road. Thanks to its operation, the driver can feel comfortable and not be afraid that while driving the situation may get out of control. However, due to heavy loads, especially when driving on bad roads, which is not uncommon in the Russian Federation, its parts often fail. The most common problem is broken stabilizer bushings. Let's take a closer look at why this happens and how the stabilizer bushings are replaced.
Diagnostics
Knocking of the stabilizers is a guaranteed sign of the need to immediately replace the bushings. In addition, squeaks may appear, especially when it gets colder, when the rubber loses its elasticity.
To determine the need for replacement, it may be necessary to remove the crankcase protection. To check the source of vibration, place your hands on the stabilizer link and directly on the mounting bracket. The partner must press firmly on the hood of the car several times. If vibrations are felt on the brackets, which are transmitted to the rack, it is necessary to install a new set, even if no play was noticed when inspecting the seats on the stabilizer.
If the hole inside the bushing has taken the shape of an ellipse, cracks are visible on the surface, and the material has hardened, immediate replacement is necessary. Continued operation of the vehicle will significantly reduce the service life of the stabilizer struts.
Conclusion
Despite the simplicity of eliminating this type of malfunction, perform all actions with the utmost care. Especially in cases where a jack is involved in the process.
Any careless movement can end in disaster. If possible, contact a service center where your car will be repaired quickly and inexpensively, without endangering your health and the condition of the vehicle.
- Replacing stabilizer rubber bands
- 1. Where are the rubber bands or stabilizer bushings located?
- 2. What is needed to replace worn car stabilizer bushings?
- 3. How to change stabilizer rubber bands with your own hands?
For the connection and normal operation of various automotive mechanisms, a large number of different bushings and rubber gaskets are installed on them. However, these elements have a very short service life, since under conditions of intensive use they wear out very quickly and backlashes form in them. As a result, the operation of the car becomes unsafe; after wear of the bushings, very serious damage can occur. All this applies to the rubber bushings that are installed on the stabilizer. Therefore, if during operation of the car you hear an elastic knock in the front part of it, you should know that you are in danger of replacing the stabilizer rubber bands. How to do this - read our article.
Where are the rubber bands or stabilizer bushings located?
If the stabilizer rubber bands are worn out and play has formed in them, you will be notified of this by a clearly defined sound that appears during operation of the car engine (or, more precisely, with each revolution of the starter). It is especially noticeable when the car drives one wheel onto a small hill or accidentally falls into a hole. Then the driver can hear a very strong sound from the contact of metal parts, between which there is no rubber gasket.
A typical car stabilizer has four rubber bushings. Finding them on this mechanism is not difficult. Two of them can be found and removed very easily: they are located under the mounting brackets, which form something like a cover or “house” for them. Two more are worth looking for in metal holders.
As a result of wear of the rubber bushings, the stabilizer parts are able to move almost freely. If the body bends a little while driving and there is a lateral displacement, the stabilizer begins to knock. In this case, you will most likely have to replace the easily removable bushings, which are located under the cover of the mounting brackets. These rubber bands most often wear out, which is why there is a need to replace them.
What is needed to replace worn car stabilizer bushings?
You will need very few tools to carry out such work, but you need to prepare them in advance so that they are all at hand during the work. So, you will need:
1. Socket wrench (10 and 13).
2. Socket heads (useful for 13 and 14, but it is best if the 13 head is elongated).
5. Vernier calipers (you can use a regular ruler instead).
But it’s worth noting right away that not in all cases it is possible to get by with only such a simple set of tools. The fact is that in the process of replacing the rubber bushings you will definitely have to unscrew the fixing nuts of the stabilizer struts. Here you may encounter one very unpleasant discovery: the nuts are stuck to the body of the part and cannot be removed with a regular wrench. In such a situation, it may come to the point that you have to use a grinder or a hacksaw. After this, along with replacing the stabilizer rubber bands, you will also need new struts for this part.
And more about why you need a jack. With its help, you will need to lift the car to remove the wheels from it and gain free access to the stabilizer and its bushings. It may also be needed if, during work, the stabilizer bar suddenly moves to the side, and you are unable to return it to the desired position using a crowbar. In such a situation, using a jack, you will only need to lift the rear of the car, after which the bar should fall into place.
And, of course, to replace the stabilizer rubber bands you will need the rubber bands themselves. You can buy them at any car market or auto store. However, do not forget that almost every car model needs its own bushings, which will be ideal for its stabilizer. Therefore, before you go shopping for new bushings, it is best to crawl under the car and remove the old ones. They are also worth going to the store with. This way, you minimize the likelihood of buying bushings that are too large or too small.
Smooth road to everyone: how and why to change stabilizer bushings
The anti-roll bar is an interesting thing. Its main feature is that it is often underestimated by car enthusiasts, especially those who have recently driven or have never seen anything cooler than a “nine” with leaking shock absorbers. Indeed, you can completely remove it and throw it away - the car will still drive. It's really bad.
No need to heel!
If cars always drove in a straight line, without accelerating or braking, a stabilizer would not be needed at all. Its work begins every time the car tries to tilt. Whether it's lateral roll when turning or longitudinal roll when braking, the stabilizer tries to keep the body parallel to the road surface. And despite the elementary design, he does it well.
The stabilizer is just a rod connecting the subframe to the wheel mount (today we will talk about the MacPherson front suspension, so let’s put it more simply - with the suspension arm). It should be noted that MacPherson really, really needs the use of a stabilizer, mainly due to some compromise in the design. The camber angle there is static, but during roll it changes due to the peculiarities of the suspension design. Why is this bad? Because changing camber angles inevitably reduces the area of contact between the tire and the road. And the only way to avoid this phenomenon is to reduce the roll. This is where the stabilizer, which works like a torsion bar, helps: with a lateral roll, the opposite ends, fixed in the levers, begin to move in different directions, twisting the middle part. The resulting moment prevents further relative movement of the wheels, reducing roll. As you can see, it works very simply.
But in order not to become a fan of the cult of the stabilizer, it is necessary to say a few words about its shortcomings. Firstly, the stabilizer willy-nilly reduces the suspension travel. Of course, this is not critical for a passenger car, but for an SUV it can be harmful. Well, secondly, you shouldn’t get carried away with replacing the stabilizer with something more rigid, which some car owners sometimes like to do. In their opinion, a more durable stabilizer will help to almost completely avoid rolls and turn the Zhiguli into a Formula 1 car. This is a very dangerous misconception.
The first thing Kulibin will encounter with an arm-thick piece of iron in the front suspension is an unexpectedly easy drift due to an unhealthy imbalance of the grip of the front and rear wheels with the road (it will be insufficient for the rear wheels). It must be understood that the engineers who developed the suspensions carefully calculated not only each of the suspensions, but also their joint work. And if you incorrectly interfere with the operation of one of them, the overall controllability will decrease, although the roll, quite possibly, will become a little less.
So, what does the bushings have to do with it, and why change them? As I already said, the stabilizer must be able to twist from multidirectional forces on the right and left wheels. If it is welded or rigidly attached to the subframe in any other way, it will be deprived of this opportunity, which is why it is attached to it using bushings. Over time, they wear out, and the stabilizer begins to “walk” in them.
This play, like any other, increases the degrees of freedom of the part, which nullify all its ability to prevent roll. And then, when cornering, the car begins to lean on its side more than it should.
Not every car enthusiast will immediately notice this, so they change the bushings in other cases: if wear is detected during suspension diagnostics, or if it is already starting to knock. However, the second situation is usually more typical not due to physical wear, but due to a good impact or other mechanical impact.
So, we have come to understand that bushings must be replaced periodically, and this is completely normal. Let's see how to do this.
What will you need?
What's great about this renovation is that it's inexpensive. And I would even say that there is no point in doing it with your own hands, no matter how skillful they may be. Therefore, let's go to the service center and just watch how a specialist does it.
You will need a minimum of tools: an 18 mm socket and a 10 mm wrench (or socket). But look at the wrench: why has life crippled it so much? In fact, what we have in front of us is not just a key, but the Modernized Special Tool of Alexey Teleshov, we will call it that.
Since we will be changing the bushings on Logan, we will have to take into account some of its features, so such a tricky key may come in handy. In addition, you will have to look for a lift, and quite possibly a hydraulic strut (we used it, in any case) along with an angle grinder. So, despite the apparent simplicity, everything is not so simple.
Now about the cost of spare parts. There is no point in chasing the original, there are very worthy manufacturers, especially since the bushing is a piece of elastic, and it is not so difficult to do something there. Therefore, we pay attention to two popular models: the French Sasic for 160 rubles and the Belgian Sidem for 180. We will choose Sasic.
We go into the box and get on the lift.
As usually happens with threaded connections at the bottom of the machine, they have all long since become covered with a layer of dirt and have become sour. Therefore, before starting work, it makes sense to spray the bolts with WD 40. We wait a little and pull out the same key with a broken fate and try to unscrew the bolt ten from the top (seen in the photo).
Naturally, this is as useless as asking a cat to quickly walk through an open door (if you have a cat, you will understand the futility of the plan). But in this case, the design of the Logan suspension itself helps us: this bolt is usually simply cut off, because its purpose is unclear to anyone, even in the heavier and off-road Duster this unit is made simpler and a little more gentle (and the bolt has a smaller diameter). Therefore, the specialist draws a mark with a white marker at which it will be necessary to cut off the ear of the clamp. Now it’s up to the “grinder”: cut off this ear and move to the other side.
Advantages and disadvantages of SPU
Despite the apparent simplicity of the design of the mechanism we are interested in (for its fastening you only need a strong support, a high-quality rubber bushing, rods, bones), it easily copes with the tasks assigned to it. It is worth mentioning here, however, that LSS reduces the travel of the independent suspension and “takes away” several other important properties from it. For this reason, a stabilizer bar is not installed on SUVs.
When driving such all-terrain vehicles equipped with all-terrain tires on bad roads, there is a noticeable loss of contact between the wheel and the road and its suspension. This negative phenomenon is caused precisely by the use of SPU. It is obvious that car designers do not intend to abandon the use of a stabilizer in these cases either. Currently, several options for modernizing SPU designed for SUVs have been developed.
For example, TRW has developed a modern system consisting of hydraulic cylinders that act as struts, a lateral acceleration sensor, a hydraulic pump and a special control unit. This system, which does not require rubber bushings, has proven to be an effective replacement for traditional LSS.
Western automakers have begun installing adaptive suspensions on their cars. These mechanisms eliminate the need for SPU, guaranteeing ideal vehicle behavior (no roll) in all driving conditions (acceleration, cornering, hard braking, etc.).
Replacing stabilizer bushings
Stabilizers are responsible for the vehicle's stability on the road. To eliminate noise and vibration from the operation of the components of the stabilizers, special bushings are used - elastic elements that give smooth operation.
What is a bushing? An elastic part is created by casting from rubber or polyurethane. Its shape remains virtually unchanged for different car models, but sometimes has some features depending on the design of the stabilizer. To improve the performance of bushings, they sometimes have bosses and grooves. They strengthen the structure and allow parts to last longer, and also protect against mechanical stress that can damage them.
Stabilizer design features
In the field of mechanical engineering, the stabilizer appeared along with the first cars whose maximum speed exceeded 20 km/h. Due to the large rolls that occur when turning, there was a need to install this component. The main purpose of the stabilizer is to protect the vehicle from rollover, since during a turn the load on the outer wheels increases, and on the inside, on the contrary, decreases. This causes the car to rock. The stabilizer makes it more stable on the road, preventing it from turning over.
On a note! All car suspensions are equipped with a stabilizer, not only in the front, but also in the rear. A stabilizer is not needed only if a torsion beam is installed at the rear of the car: the functions of the stabilizer will be assigned to the suspension itself.
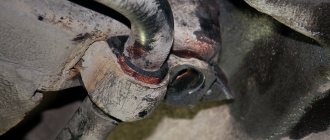
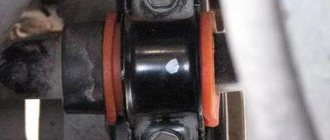
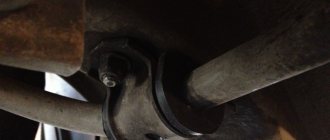
The design of the stabilizer of many cars is a U-shaped metal rod made of spring steel. To secure the device to the body, special clamps and bushings are used to allow the stabilizer to rotate. To make the car more stable and increase the elasticity of the stabilizer, bushings are used - all impacts from various suspension elements fall on them.
When is the transverse stabilizer bushing replaced?
The degree of wear of the bushing can be determined during a routine inspection. Cracks, changes in the properties of rubber, the appearance of abrasions - all this indicates that the part needs to be changed . Typically, bushings are replaced every 30,000 km . Experienced owners advise changing all bushings at once, regardless of their external condition.
Unscheduled replacement of bushings is necessary when the following symptoms occur:
- steering wheel play when the car turns;
- noticeable vibration of the steering wheel;
- body roll, accompanied by characteristic unusual sounds (clicks, squeaks);
- vibration in the car suspension, accompanied by extraneous noise;
- when driving in a straight line, the car pulls to the side;
- general instability.
Detection of such problems requires urgent diagnosis. Primary attention should be paid to the bushings. By replacing them, you can check the operation of the car, and if signs of malfunction remain, an additional inspection should be carried out.
Recommendations
- For replacement, either the original front or rear stabilizer bushing or an analogue can be used.
Taking into account the fact that the service life of even original parts is not long, it is not necessary to purchase expensive new stabilizer bushings. At the same time, you should not take the cheapest solutions either, since low quality rubber can cause squeaks. We also recommend reading the article on how to bleed shock absorbers before installing them on a car. From this article you will learn why pumping is needed, as well as how to perform this procedure correctly. - If the bolts securing the stabilizer cannot be unscrewed, they must be cut off with a grinder or the clamp ear cut off on both sides.
It is important not to damage the fuel pipes. In this case, the tubes will have to be removed, additionally protected, or moved to the side. Some manufacturers offer stabilizer bushings with boots. These anthers help protect the inner surface of the bushing from water, dirt and dust. If possible, purchasing and installing such bushings would be the best solution. - The inner surface of the bushing must be lubricated exclusively with lubricants that do not have a negative effect on the rubber. As a rule, these are universal silicone lubricants. In this case, it is better to purchase lubricant from a reputable manufacturer.
Replacing front stabilizer bushings
Regardless of the car model, the general procedure for replacing bushings remains the same. Only the instruments and some details of the procedure change. Even a novice driver can guess what exactly needs to be done as an additional action.
Front stabilizer bushing
To replace bushings, follow these steps:
- Place the car stationary on a pit or lift.
- Using tools, loosen the bolts of the front wheels.
- Remove the car wheels completely.
- Unscrew the nuts securing the struts to the stabilizer.
- Separate the struts and stabilizer.
- Loosen the rear bolts securing the bracket framing the bushing and unscrew the front ones.
- Using available tools, remove dirt from the area where the new bushings will be installed.
- Using silicone spray or soap solution, thoroughly lubricate the inside of the bushings.
- Install the bushings and perform a series of procedures inverse to those listed to return the car to working condition.
Replacement of the rear stabilizer bushings is carried out in the same way. The only thing is that removing the front bushings is sometimes more difficult due to the complexity of the car's front design. If the driver manages to change the front bushings, then he can probably cope with replacing the rear bushings.
Often the reason for replacing bushings is that they squeak. This factor, although not critical, still causes inconvenience to many drivers and passengers.
Features of the problem for popular models
Statistics show that owners of such car models as Renault Megane, Skoda Rapid, Volkswagen Polo, Lada Vesta (and other representatives of the domestic automobile industry) are faced with problems associated with stabilizer bushings. Let's look at the features of specific car models, as well as recommendations for replacement.
Table. Description of the problem for some models
| Model | Description of the problem |
| Lada Vesta | Often, it is the structure of the suspension of a given car that is the main cause of problems with bushings. Vesta is famous for its large travel of stabilizer struts, which can cause unpleasant sounds when moving. Many car owners lower the seating position of their car to solve this problem. You can also use a special silicone-based lubricant. |
| Volkswagen Polo | There is one proven method for eliminating squeaks - install a small piece of an old timing belt between the stabilizer bushing and the car body. The replacement of bushings itself is no different from that indicated in the instructions above. |
| Skoda Rapid | As practice shows, the best way to get rid of squeaks is to install original VAG rubber bands. Also, many motorists use repair bushings that differ from the usual sizes (repair bushings are 1 mm smaller). As an alternative, you can install rubber bands from other models of this manufacturer, for example, from the Skoda Fabia. |
| Renault Megane | The process of replacing the bushing is no different from other models, but before installing a new rubber band, it and the seat must be treated with a lubricant, which will not harm the parts later. You can use shampoo or soap for this purpose. Depending on the modification, Renault Megane can be equipped with reinforced or conventional suspension, therefore, the dimensions of the bushings and the stabilizer itself may differ. Please keep this in mind when purchasing replacement parts. |
| Mercedes Sprinter | Before purchasing bushings, you must first measure the diameter of the stabilizer, since their dimensions may vary depending on the modification. To do this, use a caliper. Many experts recommend buying special rubber bands for your car, equipped with anthers to protect against dust and water. To treat the surface of parts, it is necessary to use silicone-based products that will not corrode the rubber. Such products include “MOLYKOTE PG-54”, “Litol-24” and others. |
Stabilizer bushings creaking
Causes of squeaks
Often, owners of passenger cars complain about creaking stabilizer bushings. It often occurs during frost or dry weather. However, the conditions of occurrence manifest themselves individually. The main reasons for this problem are:
- low quality of the material from which the stabilizer bushings are made;
- rubber hardening in the cold, causing it to become inelastic and squeak;
- significant wear of the bushing or its failure;
- design features of the car (for example, Lada Vesta).
Methods for solving the problem
Some car owners try to lubricate the bushings with various lubricants (including silicone grease). However, as practice shows, this gives only a temporary effect (and in some cases it does not help at all). Any lubricant attracts dirt and debris, thus forming an abrasive. And this leads to a decrease in the life of the bushing and the stabilizer itself. Therefore, we do not recommend that you use any lubricants .
In addition, it is not recommended to lubricate the bushings due to the fact that this violates the principle of their operation. After all, they are designed to tightly hold the stabilizer. Being essentially a torsion bar, it works in torsion, creating resistance to the car's roll when cornering. Therefore, it must be securely fastened in the sleeve. And if there is lubrication, this becomes impossible, since it can still turn, making a creaking noise again.
The recommendation of most automakers regarding this defect is to replace the bushings . So, general advice for car owners who are faced with the problem of squeaking from the stabilizer is to drive with the squeaking for a certain time (one or two weeks is enough). If the bushings do not “grind in” (especially for new bushings), they will need to be replaced.
In some cases, replacing rubber bushings with polyurethane ones . However, this depends on the machine and the bushing manufacturer. Therefore, responsibility for the decision to install polyurethane bushings lies solely with the car owner.
To solve the problem, some car owners wrap the part of the stabilizer that is inserted into the bushing with electrical tape, thin rubber (for example, a piece of a bicycle tube) or cloth. Original bushings (for example, Mitsubishi) have a fabric insert inside. This solution will allow the stabilizer to be seated more tightly in the bushing and will relieve the car owner from unpleasant sounds.
Description of the problem for specific vehicles
According to statistics, owners of the following cars most often encounter the problem of creaking stabilizer bushings: Lada Vesta, Volkswagen Polo, Skoda Rapid, Renault Megane. Let us describe their features and the replacement process:
- Lada Vesta . The reason for the creaking of the stabilizer bushings on this car is a structural feature of the suspension . The fact is that Vesta’s stabilizer strut travel has become greater than that of previous VAZ models. Their struts were attached to the levers, while Vesta's were attached to the shock absorbers. Therefore, previously the stabilizer rotated less and did not cause unpleasant sounds. In addition, Vesta has large suspension travel, which causes the stabilizer to rotate more strongly. There are two ways out of this situation - shorten the suspension stroke (lower the landing of the car), or use a special lubricant (manufacturer's recommendation). It is better to use a washout-resistant silicone-based . Do not use lubricants that are aggressive towards rubber (also do not use WD-40).
Replacing stabilizer bushings on a Volkswagen Polo
- Volkswagen Polo . Replacing stabilizer bushings is not difficult. To do this, you need to remove the wheel and place the car on a support (for example, a wooden structure or a jack) to relieve stress on the stabilizer. To dismantle the bushing, unscrew the two 13mm bolts that secure the bushing mounting bracket, then remove it and take out the bushing itself. Assembly is carried out in reverse order.
Another common method that allows you to get rid of squeaks in the bushings of a Volkswagen Polo is to place a piece of an old timing belt between the body and the bushing. In this case, the belt teeth should be directed towards the bushing. In this case, it is necessary to make small reserves of area on all sides. This procedure is performed for all bushings. An original solution to the problem is to install bushings from Toyota Camry.
Skoda Rapid . According to numerous reviews from the owners of this car, it is best to install original VAG bushings . According to statistics, most owners of this car do not have problems with them. Many owners of the Skoda Rapid, like the Volkswagen Polo, simply put up with a slight creaking of the bushings, considering them “childhood diseases” of the VAG concern. A good solution to the problem would be to use so-called repair bushings, which have a diameter 1 mm smaller. Catalog numbers of bushings: 6Q0 411 314 R - internal diameter 18 mm (PR-0AS), 6Q0 411 314 Q - internal diameter 17 mm (PR-0AR). Sometimes car owners use bushings from similar Skoda models, for example from Fabia.
Renault Megane . Here the procedure for replacing bushings is similar to that described above.
Replacing stabilizer bushings on Renault Megane
Some automakers, for example, Mercedes, produce stabilizer bushings equipped with anthers . They protect the inner surface of the bushing from water and dust getting inside. Therefore, if you have the opportunity to buy such bushings, we recommend that you do so.
It is recommended to lubricate the inner surface of the bushings with lubricants that do not destroy the rubber . In particular, silicone based. For example, Litol-24, Molykote PTFE-N UV, MOLYKOTE CU-7439, MOLYKOTE PG-54 and others. These lubricants are multi-purpose and can also be used to lubricate brake calipers and guides.
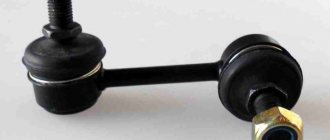
Changing stabilizer struts X-Trail T31
Replacement of the X-Trail T31 stabilizer rods is carried out when the service life is exhausted, when the need for intervention in the suspension is indicated by the characteristic signs mentioned above.
Stabilizer struts X-Trail T31
You can do the work yourself; you will need certain tools and a set of consumable spare parts .
Spare parts and tools
Left strut 54668-1AA0E and mounting nuts 01225-N2011 (link to photo source)
To replace the X-Trail t31 stabilizer struts you will need:
- a set of spare parts (the left rack goes under article 54668-1AA0E , the right - 54618-1AA0E , the fastening nut - article 01225-N2011 , the plug - 40039-JG00A );
- jack;
- boards for support;
- wrench “21” (adjustable is also suitable);
- head “18”;
- WD-40.
Changing the stabilizer links
The process of replacing the X-Trail T31 stub struts looks like this:
- The wheel fasteners are loosened using a bolt. The car is raised with a jack, the wheel is removed, and boards are placed for support. After which the jack can be loosened and removed.
- Using a 21" wrench and a 18" socket, the rod mount is unscrewed. Condensation accumulates under the cap, which can complicate the task.
- The old rod is removed, the threads on the new part can be lubricated with Loctite 262 thread locker (red tube 10 ml). The studs of the new racks have a hole for a hexagon, which greatly simplifies further replacement.
Hole for hexagon on studs (link to photo source) - The new rod is put in place. The caps can be filled with lubricant; a number of car enthusiasts consider their installation pointless.
Stub. Article number 40039-JG00A - Similar actions are performed with the second rack.
Parts must be replaced on both sides, even if only one fails. There is no need to take the X-Trail T31 crossover to a wheel alignment, since the replaced suspension elements do not affect the wheel alignment.
Material in which the X-Trail T 31 suspension is studied in detail is here.
When should I replace the front stabilizer bar bushings?
By carrying out a visual inspection of the stabilizer bushings from time to time, you can identify their wear. If there are cracks on the bushing, or the shape has changed (there are large abrasions), then the stabilizer bushings must be replaced.
The service life of stabilizer bushings for most brands and models of cars is 30 thousand km. If only one bushing is worn out, it is recommended to replace the complete set in order to increase the time between overhauls for replacing bushings.
If dirt is visible during visual inspection, it is better to clean them, thereby protecting them from accelerated wear.
Signs when it is necessary to change the stabilizer bushings in a car:
- if there is wheel play when turning;
- if the steering wheel shakes;
- if there are squeaks when the car tilts (roll);
- if the suspension vibrates (there is extraneous noise);
- if when driving straight the car pulls to the left or right;
- and, if at all, there is instability while driving.
These signs, first of all, indicate wear of the stabilizer bushings. The same signs may also be accompanied by wear of silent blocks. Such problems are eliminated by replacing the silent blocks of the front levers and subsequent work on wheel alignment. Therefore, you should check them and carry out repair work with your own or someone else’s hands to replace the stabilizer bushings. Play can also appear if the wheel is severely imbalanced. It disrupts the balancing when hitting a hole, or, for example, when pumping sealant into a tubeless wheel to close a puncture.
Signs of bushing wear
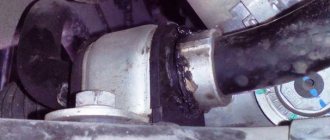
The design parameters of the bushing are a little similar to the parameters of a ball joint, only the bushing has one unpleasant feature - it wears out, as a result of which the part becomes faulty. It should also be noted that driving a car with damaged suspension elements is unsafe, so if you have identified a fault with the stabilizer bushing, try to replace it as soon as possible. Determining the unsuitability of the bushing for the driver will not be difficult, because when driving it will become difficult to control the vehicle.
How to bleed shock absorbers
Detailed information with step-by-step instructions can be found here. You may also be interested in an article about increasing vehicle clearance.
In most cases, wear of the stabilizer bushing is accompanied by characteristic sounds in the suspension area, which increase as the vehicle accelerates. Overcoming road irregularities (bumps, holes, pebbles on the road) makes drivers shudder from the resulting shocks in the lower part of the car. An attentive driver will immediately notice extraneous noises and minor deterioration in the car’s handling, and will also begin to find out the cause of this problem.
This is what a worn bushing looks like
To prevent the bushings and suspension from reaching such a state, it is recommended to carry out regular inspections of all structural elements. In this case, it is necessary to conduct a close diagnosis of the bushing.
How to change the front stabilizer bushings of a car
Although there are a huge number of brands and models of cars, the principle and procedure for replacing front bushings is practically the same. The main difference is in the tools used.
The correct procedure for replacing the front bushings is:
- Place the car on a lift (if available) or place it above an inspection hole.
- Loosen the front wheel bolts.
- Remove the wheels.
- Then the nuts securing the struts to the stabilizer should be unscrewed.
- Disconnect the struts from the stabilizer.
- Then the rear bracket mounting bolts should be loosened and the front bolts should be unscrewed.
- Clean the bushing installation areas from dirt.
- New bushings should be lubricated on the inside with soapy water or silicone grease.
- Install the bushings and perform the reverse steps to disassembly.
In some car designs, it will be more convenient to replace the front bushings if you first remove the engine crankcase protection.
The rear stabilizer bushings are changed in the same way as the front ones. Usually, the front ones are more difficult to remove than the rear ones. When the rear bushings wear out, a squeak appears.
Replacement sequence for VAZ 2107
- The car is installed on the inspection hole, after which the crankcase protection (if installed) is removed using open-end wrenches. Then wheel chocks are placed under the rear wheels of the car, and the front wheels are jacked up.
- Now, using a 12-mm open-end wrench, unscrew the nuts on the brackets, where they are attached to the lower suspension arm. This is done on both sides of the stabilizer bar. Under the nuts there are engraving washers. They are removed manually.
Nuts are shown by arrows - Now you can remove the staples. After removing them, you can remove the bushings. To remove them, the stabilizer bar is bent using a crowbar. The rod is held with a crowbar, the bushing is removed manually. The sleeve on the other side is removed in the same way.
A crowbar is used for this - In addition to the two outer bushings, the VAZ 2107 has a pair of central stabilizer bushings. If you need to replace them, you will have to completely remove the stabilizer bar, which is mounted on two brackets. The nuts on the brackets are unscrewed with a 14mm open-end wrench.
- After removing the rod, the bracket is clamped in a vice, and the rod is carefully removed from the bushing, then the central bushing itself is removed.
The bushing is located inside the bracket, clamped in a vice - Worn bushings are replaced with new ones, after which the stabilizer bar and crankcase protection are installed in their original places.
Videos on works
Important points
- When unscrewing the nuts on the brackets, you should be careful: the studs on which the brackets are attached become brittle over time and are easily broken with an open-end wrench.
- It should be remembered: the brackets holding the outer bushings are different, although it is not always possible to see this with the naked eye. The distance between the holes for the studs in the left and right brackets differs by 3 mm. Therefore, before removing it, it makes sense to mark the staples with a marker or chalk so as not to confuse them when reassembling them.
- Removing the stabilizer bar from the bracket can be difficult, especially if it is heavily rusted. To make the task easier, the rod and bracket should be generously lubricated with WD-40. If liquid is not available, liquid dishwashing detergent or plain soapy water will do.