If, when the car is moving, an unpleasant noise is heard in the area of the wheel, which may disappear when entering a sharp turn, then this indicates a malfunction of the VAZ 2110 wheel bearing.
Front wheel bearing
This is a fairly common malfunction; it occurs on every fourth car with high mileage. It’s not difficult to correct the situation; you just need to have a garage with a pit and detailed instructions for work.
Experienced technicians recommend not delaying the replacement of this component in order to avoid unnecessary troubles.
Tools and spare parts
The fact is that the VAZ 2110 wheel bearing is a small part, and in order to work with it, you need sufficient lighting and some convenience. Therefore, a car prepared for repair should be driven into an inspection hole and sufficient light access should be created to the repair unit.
Before going down into the pit, you need to prepare all the tools and materials. It should also be noted that replacing the front wheel bearings is much more difficult than doing the same work on the rear components.
Therefore, you need to start work from the front node.
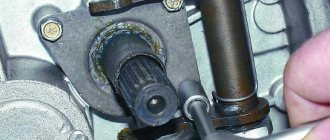
Front wheel hub diagram
A list of required tools should be provided:
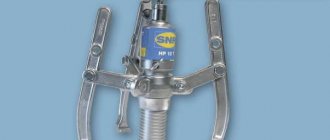
- A special puller to remove the bearing;
- The so-called mandrel, that is, a pipe cut of the required size. This device is used to knock out hubs;
- Head 30, equipped with a high-quality wrench;
- Socket wrenches 19 and 17 sizes.
In addition, you need to purchase new suitable bearings that will be needed for replacement. For a VAZ 2110 car, you should choose Russian-made bearing parts rather than giving preference to Chinese analogues. The difference in price for these products is small, so there is no need to experiment.
Stages of work
Work begins with the car being placed in a comfortable position and in first gear. To prevent it from rolling, it is better to install special wheel chocks under the wheels.
Now you can go down into the inspection hole and begin actions that are carried out in the following order:
- Using a wrench, unscrew the wheel bolts, followed by unscrewing the bearing nuts from the front wheel hubs with a 30mm wrench. It is worth noting here that if a VAZ 2110 car has alloy wheels, you will have to remove the wheels. In order to turn the front hub nuts, you must press the brake pedal at the moment of turning, so an assistant is needed here;
- Now you need to use a screwdriver and use it to press out the calipers;
- As soon as they are pressed out, you need to use the 17th key to unscrew the calipers from the steering knuckles. As a result of these manipulations, the caliper may hang on the brake hose; to prevent this from happening, you must carefully tie it up;
- Next, you need to carefully unscrew the brake discs directly from the hubs.
Remove the cap
Press the hub into the bearing
Unlock the nut on the hub
In addition to the listed types of work, you may also need to remove:
- Trunnion assembly;
- Hub cap;
- Retaining ring.
After this, the hub part is available to the master and can be replaced. There are several options for reinstalling a component, so a few words should be said about each.
Adjustment
Checking its functionality and adjusting it is carried out as follows:
- Raise the front wheel using a jack;
- Remove the wheel;
- Using a chisel, remove the protective cap on the front hub bearing;
- Remove the brake pads;
- The indicator holder should be secured to the steering knuckle;
- Place the leg of this indicator against the hub, as close as possible to the adjusting nut;
- Rings of spanners are placed on the studs and the nuts are tightened. While holding them, the hub rotates and moves in the axial direction;
- Using the indicator, the movement or gap indicator is determined. If it is more than 0.15 millimeters, the gap must be adjusted;
- Reinstall the wheel without using the protective cap. Secure it with two bolts screwed in diametrically;
- Using a chisel, straighten the flange on the bearing nut and remove the nut with a 27mm (socket) wrench;
- Using a torque of 2.0 kg-cm, tighten the new adjusting nut;
- Loosen the nut, then tighten it again, but now with a torque of 0.7;
- Slowly release the adjusting nut 25 degrees and turn the wheel in a vertical plane. There should be a slight play;
- Check the gap. Its indicators should be in the range from 0.08 to 0.02 millimeters;
- In this position, lock the nut with the collar caulked in special grooves. They are located on the steering knuckle at the end of its axle;
- Remove old grease from the protective cap and apply new one. About 25 grams. Experts recommend using Litol 24, although there are worthy alternatives;
- Install the protective cap on the bearing;
- The wheel is installed in its rightful place.
Replacement methods
First way
So:
- In the first case, it is necessary to use a puller to remove the bearing;
- Simply carefully remove the bearing and replace it with a new one;
- After installation, all the steps above should be carried out in reverse order.
The main advantage of this method is the fact that the technician will not need to touch the camber adjustment bolt, which is very difficult to put in place later.
Bearing puller from the hub
If we talk about the disadvantages, we can note the following: the master will have to take a very uncomfortable position to perform actions. That is why it is necessary to prepare a lift and climb into the inspection hole.
But it is still very inconvenient for a car enthusiast to knock out the hubs in this position and press in the bearing assembly.
Second way
Consists of the following steps:
- To remove the bearing using the second method, you must carefully dismantle the steering knuckle and completely remove the hub;
- After this, the master will need to go to the workbench;
- The VAZ 2110 wheel bearing is replaced directly on the workbench;
- After this, everything is installed back, just as it was removed before.
Remove the retaining ring
Press a new bearing into the cleaned and lubricated hub.
Relying on the inner ring of the bearing, use a piece of pipe to knock out the bearing
This method is undoubtedly much easier than the first, but since it affects the camber, problems with adjustment cannot be avoided. Before you begin to unscrew the knuckle mounting bolts from the strut, you need to mark their position with chalk or a marker.
The first mark in this case will indicate the location of the adjusting bolt on the rack. The second mark will indicate the previous position of the fists.
After the master begins assembly, he will focus precisely on these marks. Of course, it will be difficult to achieve great accuracy and it will not be possible to return the parts to their place. But with careful work, installation errors can be minimized.
There are some steps to follow:
- The master puts marks;
- Knocks out the knuckle bolts;
- Unscrews the mounting bolts from the lower ball joint;
- The bearing must be knocked out of the hub;
- The retaining rings are dismantled;
- Using a vice, the bearings are pressed out.
Before reassembly, the space in the fists must be thoroughly and thoroughly lubricated.
This method is often used when repairing not only one bearing component, but the entire chassis. As a result of this method, it will also be possible to safely replace ball joints, silent blocks of levers and steering tips.
Third way
It is carried out in the following order:
- In this case, you will need to remove the entire rack completely;
- After all the components have been removed, the technician will need a special vice;
- The wheel bearing will be replaced at the vise and all parts will be reinstalled.
This method is the most complex and difficult because it requires the technician to dismantle the entire rack. In addition, it will be necessary to unpress the steering tip, and you also need to unscrew the fastening nuts, they secure the upper support to the body base.
Direct removal of this VAZ 2110 unit is carried out only after the entire rack has been removed from the car. And this process takes a lot of time.
We start repairs - when there is no car service nearby
So, if you determine that your hub has failed, then you need to make repairs immediately. You can go to the nearest car service center, where you will have a complete diagnosis of the entire chassis of the car. However, an auto service center is not always nearby, and there is no point in postponing repairs. Therefore, repairing a hub with your own hands is an operation that every driver needs to master.
For repairs at home, you will need a regular set of tools, which consists of wrenches, screwdrivers, and a jack. Also, in the process of replacing the wheel bearing, you will need a hammer and chisel. And, of course, the hub itself or its bearing, depending on which of the parts heats up when driving and which has worn out more.
The availability of a hub in a car shop depends on the make of your car - the simpler the car, the higher the likelihood of having the part in stock.
If such a part is not available, then order it; for a large city there should not be a problem with delivery.
Replacing a hub bearing that gets hot should be done carefully and carefully, since the further operation of the vehicle's chassis depends on it. It is necessary to jack up the side you need for repairs; we also recommend using some kind of support for insurance. Set the gearbox to first gear and put the car on the handbrake. It is also recommended to place supports under the rear wheels of the car.
Nuances
In the process of reassembling the entire node, you must proceed as follows:
- Press in the bearings;
- Install retaining rings;
- Collect your fists;
- Mount new bearing components on them;
- Mount the assembly on the hub;
- Using a mandrel, you need to drive the hubs until they stop.
You can use a puller or press to press in bearing parts. But in no case should you use a hammer, since in this case cracking of the component will inevitably occur. The forces should be directed to the outer rings.
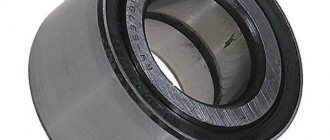
It should also be noted that double-row ball bearings are installed in the hubs, which do not require lubrication and adjustment measures.
Due to the lack of such care, the VAZ 2110 bearings will certainly be destroyed when removed from the hub, so this measure should only be resorted to for a complete replacement.
Part selection
Knowing the dimensions of the bearing, its selection is carried out. In addition to the VAZ 2110, it is used in brands 2108, 2109, 2111 and 2112.
Its parameters are as follows:
- internal diameter size – 34 mm;
- external – 64 mm;
- height - 37 mm.
You can select the product from domestic manufacturers:
- Saratov plant. Available with the “SPZ” marking. The products are considered one of the best in the country.
- Samara plant. Produces low quality products. Their mileage does not exceed 20 thousand km. Hub parts have a low price. Often purchased to save money.
- Vologda enterprise. The plant's products have a low price. At the same time, it is reliable. Details are difficult to fake.
If you want to buy a reliable product, you should pay attention to imported manufacturers. It will cost more, but with quality guarantees.
These include the following companies:
| German, which produces the LGR-4703 series | |
| Italian Marel: 2108-3103020M | |
| Sachs products | |
| Japan - SNR (R172.03) |
To identify a fake, you should use a needle file. The outer ring is highly hardened. The file does not leave scratches on its surface. If they appear, it means it is not a high-quality fake.
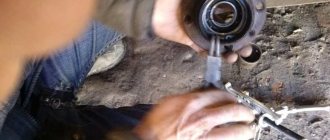
Working with the puller
If you still don’t want to damage the bearing, then you can replace it without knocking it out of the hub. In order to remove it from there, you can use a special puller. Removal is much easier with this device.
To do this, you need to carefully insert the puller's paws into the grooves on the hub and remove the ring. Sometimes this requires some effort; the ring must be pryed with a screwdriver and removed. Using the device, the part is removed and the nicks on the component are smoothed out.
Then, using a puller, you can also press the new part into the steering knuckle. This tool allows you to press the hub with high quality. Working with a tool of this type greatly simplifies the entire process, and the technician will need less time for all removal and installation. But operating the unit requires some skill and great care.
As you can see from this article, even such a simple repair job as replacing a wheel bearing can have many nuances.
What can a malfunction lead to?
The hub bearing is one of the most important elements of the chassis system, where all parts are interconnected. For example, you may not replace the oil seal in a timely manner, and in a month or two you will have to buy a new bearing.
If you ignore problems with the bearing, then after a while you will have to spend money on replacing the entire rack.
And every time the problems become more and more serious. Therefore, make timely repairs and avoid causing problems. Only in this case can you avoid more significant breakdowns or even accidents.
How to replace the front wheel bearing of a VAZ-2110 with your own hands
If the owner of a VAZ 2110 car notices that when the car moves, an incomprehensible knocking or sound is heard in the wheel area, which may simply disappear if the vehicle makes a sharp turn, then this means that an immediate replacement of the front wheel bearing is required.
The fact is that the bearing related to the front hub area cannot be repaired, so this part in the VAZ-2110 needs to be replaced as quickly as possible. Do-it-yourself replacement is quite simple if the car owner has the skills to repair automobiles and has a convenient garage space. This event should be carried out as quickly as possible in order to avoid unpleasant situations when driving a car.
Diagnostics
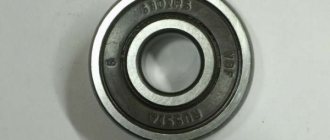
The wheel hub contains single row roller bearings . There are 2 of them. They require care while the vehicle is in use. This maintenance includes changing the lubricant and adjusting the gaps.
To check the clearance or play, you need to hang the wheel and rock it a little. A simple adjustment does not always get rid of the backlash. If noise occurs when the wheel rolls, most likely the front wheel bearing on your VAZ 2110 needs to be replaced because it has failed. It is not uncommon for two bearings to break at once.
Check whether the bearings rotate freely on the axle, whether there are any jams, and there should be no signs of wear or chipping on the rings. If this is available, you should definitely figure out how to change the bearing.
What tools do you need to prepare for work?
First of all, you should make good lighting in the garage, since the size of the front wheel bearing of the VAZ-2110 is small, and in order for the replacement of the faulty component to be carried out correctly and effectively, the car owner must see all the parts clearly.
It is best to place the car in a special pit for inspection and repair so that the operation goes faster and the work is more convenient. It is worth noting that replacing the rear wheel bearing is much easier than replacing the front one. But still, by following the recommendations and carrying out the repairs step by step, you can do all the work with your own hands, as they say, “perfectly.”
The following tools are prepared for it:
- Automotive puller for easy removal of an unusable bearing related to the front hub.
- A pre-prepared piece of durable metal pipe called a “mandrel.” It will be needed to knock out the hub in the car.
- Automotive head equipped with a 30-mm wrench.
- Socket wrenches for 19 and 17.
- New high quality bearings.
According to experienced specialists, replacing a bearing related to the front hub area for a VAZ-2110 vehicle will be of high quality if the car owner purchases a new part made by Russian manufacturers. The price of Russian material is not much different from its Chinese counterpart, so you should not try to save a few rubles and end up purchasing an unreliable component.
1.6.3 Fastener dimensions
Fastener dimensions
For many reasons, vehicle manufacturers are using metric fasteners more and more widely. However, it is important to know the difference between the sometimes used standard (also called American, or SAE standard) and the more universal metric fasteners in the system of measures, since, despite the external similarity, they are not interchangeable.
All bolts, both standard and metric, are classified by diameter, thread pitch and length. For example, a standard 1/2 - 13 x 1 bolt is one-half inch in diameter, 13 threads per inch, and 1 inch long. A metric bolt M12 - 1.75 x 25 has a diameter of 12 mm, a thread pitch of 1.75 mm (the distance between adjacent turns) and a length of 25 mm. Both bolts are almost identical in appearance, but are not interchangeable.
In addition to the characteristics listed, both metric and standard bolts can be identified by inspection of the head. For starters, the distance between the flats of a metric bolt head is measured in mm, while that of a standard bolt is measured in inches (the same is true for nuts). As a result, a standard wrench is not suitable for use with metric fasteners, and vice versa. In addition, the heads of most standard bolts usually have radial notches that determine the maximum permissible tightening force of the bolt (strength rating). The greater the number of notches, the higher the permissible force (on cars, bolts with a strength rating of 0 to 5 are usually used). The strength class of metric bolts is determined by a numerical code. The code numbers are usually cast, as for standard ones, on the head of the bolt (on cars, bolts of strength classes 8.8, 9.8, and 10.9 are usually used).
| Marking of bolt strength class (top - standard/SAE/SS, bottom - metric). |
Also, standard nuts can be distinguished from metric ones by strength class marks. To identify the strength of standard nuts, dot marks are used that are stamped on one of the end surfaces of the nut, while metric nuts are marked using numbers, again. The greater the number of points, or the higher the digital code value, the higher the permissible tightening force of the nut.
The ends of metric studs are also marked according to their strength class. Large studs are marked with a digital code, while smaller ones are marked in the form of a geometric figure.
It should be noted that a significant part of the fasteners, especially those with strength classes from 0 to 2, are not marked at all. In this case, the only way to distinguish a standard fastener from a metric one is to measure the thread pitch, or compare the thread with a uniquely identified one.
Standard fasteners are often also called, in contrast to metric, SAE standard fasteners, however, it should be remembered that only small fasteners fall under the SAE classification. Large fasteners with non-metric threads are American Standard (USS) fasteners.
Since fasteners of the same geometric size (both standard and metric) can have different strength classes, when replacing bolts, nuts and studs on a vehicle, attention should be paid to whether the strength class of the new fastener being installed matches the strength class of the old one.
Strength class markings for standard hex nuts
| Strength class | Class Identification |
| Hex nut - strength class 5 | |
| Hex nut - strength class 8 |
Strength class markings for metric hex nuts
| Strength class | Class Identification |
| Hex nut - strength class 9 | |
| Hex nut - strength class 10 |
Marking of strength class of metric studs
Standard (SAE and USS) bolt dimensions/markings
| G - Strength Marking L - Length (in inches) T - Thread Pitch (threads per inch) D - Nominal Diameter (in inches) |
Dimensions/markings of strength class of metric bolts
| P - Strength class L - Length (in mm) T - Thread pitch (distance between adjacent threads in mm) D - Nominal diameter (in mm) |
Metric thread sizes
| M-6 | 9 - 12 N•m |
| M-8 | 19 - 28 N•m |
| M-10 | 38 - 54 N•m |
| M-12 | 68 - 96 N•m |
| M-14 | 109 - 154 N•m |
Pipe thread sizes
| 1/8 | 7 - 10 N•m |
| 1/4 | 17 - 24 N•m |
| 3/8 | 30 - 44 N•m |
| 1/2 | 34 - 47 N•m |
American Standard Thread Sizes
| 1/4 — 20 | 9 - 12 N•m |
| 5/16 — 18 | 17 - 24 N•m |
| 5/16 — 24 | 19 - 27 N•m |
| 3/8 — 16 | 30 - 43 N•m |
| 3/8 — 24 | 37 - 51 N•m |
| 7/16 — 24 | 55 - 74 N•m |
| 7/16 — 20 | 55 - 81 N•m |
| 1/2 — 13 | 75 - 108 N•m |
Stage-by-stage work
Replacing the front wheel bearing, as mentioned earlier, should be carried out in stages:
- The VAZ-2110 needs to be put in 1st gear;
- stops are placed under the wheels of vehicles so that the car remains in a constant position;
- Use a wrench to unscrew the wheel fastenings in the form of bolts and nuts. If the VAZ-2110 has alloy wheels, then the wheels must be removed completely. It is recommended to use the help of an assistant when turning the nuts that act as a lock for the front car hub, since unscrewing the part is much easier if you hold the brake pedal;
- use a reliable screwdriver to press out the calipers;
- using a 17 key, unscrew the calipers, which are fixed to the steering knuckles. To avoid damaging the caliper when unscrewing, this element should be tied to the brake hose;
- By using the car key, the VAZ-2110 brake discs are unscrewed from the hub itself.
Stories from our readers
“Fucking basin. "
Hi all! My name is Mikhail, now I’ll tell you a story about how I managed to exchange my two-wheeler for a 2010 Camry. It all started with the fact that I began to be wildly irritated by the breakdowns of the two-wheeler, it seemed like nothing serious was broken, but damn it, there were so many little things that really started to irritate me. This is where the idea arose that it was time to change the car to a foreign car. The choice fell on the melting Camry of the tenth years.
Yes, I had matured morally, but financially I just couldn’t handle it. I’ll say right away that I am against loans and taking a car, especially not a new one, on credit is unreasonable. My salary is 24k a month, so collecting 600-700 thousand is almost impossible for me. I started looking for different ways to make money on the Internet. You can’t imagine how many scams there are, what I haven’t tried: sports betting, network marketing, and even the volcano casino, where I successfully lost about 10 thousand ((The only direction in which it seemed to me that I could make money was currency trading on the stock exchange, they call it Forex. But when I started delving into it, I realized that it was very difficult for me. I continued to dig further and came across binary options. The essence is the same as in Forex, but it’s much easier to understand. I started reading forums, studying trading strategies. I tried it on a demo account, then opened a real account. To be honest, I didn’t manage to start earning money right away, until I understood all the mechanics of options, I lost about 3,000 rubles, but as it turned out, it was a precious experience. Now I earn 5-7 thousand rubles a day. I managed to get the car buy after half a year, but in my opinion this is a good result, and it’s not about the car, my life has changed, I naturally quit my job, I have more free time for myself and my family. You’ll laugh, but I work directly on the phone)) If If you want to change your life like me, then here’s what I advise you to do right now: 1. Register on the site 2. Practice on a Demo account (it’s free). 3. As soon as you get something on the Demo account, top up your REAL ACCOUNT and go to REAL MONEY! I also advise you to download the application to your phone, it’s much more convenient to work from your phone. Download here.
- Remove the washer by unscrewing the wheel bearing nut all the way.
- Insert bolts (about 130mm long with M12x1.25mm thread) into the two holes of the brake disc. Screw the bolts into the hub holes to a depth equal to its thickness.
- We press out the hub by sharply hitting the bolt heads with the brake disc.
- Unscrew the fastening of the ball joint to the steering knuckle and remove the CV joint from the bearing hole.
What options are used for work
Replacing the front wheel bearing can be done in two ways.
In the first method, the following actions are carried out:
- a special device (puller) is used to remove an unsuitable bearing;
- the presence of an additional component makes it much easier to replace an unsuitable VAZ-2110 part and quickly install an updated element;
- Installation of a new bearing is carried out in the reverse order that was used during removal.
Replacement carried out in this way does not imply unscrewing the fastening bolt, the purpose of which is to adjust and balance the camber of the wheels. The fact is that if the fastener is removed, it is quite problematic to correctly put it back in its original place. However, with this option, the car owner must carry out work in an awkward body position, so it is best to install the vehicle in a special pit intended for inspecting the car and repairing it.
Another way is to replace the front wheel bearing and remove the steering knuckle. The operation with the VAZ-2110 is carried out according to the following logarithm:
- the hub and steering knuckle are removed;
- on a special workbench, the removed part is replaced with a new one;
- All removed parts are installed in the reverse order.
This option is simple in execution, but it necessarily affects the adjustment mounting bolt, so further adjustment must be carried out without fail. To simplify the process of adjusting the camber, it is recommended that before unscrewing the fasteners, put small lines with a special marker or chalk, which will indicate to the car enthusiast their previous, correct location. When starting to assemble all the components of the VAZ-2110, you need to focus on the marks provided in order to reduce all errors to the minimum mark.
Replacing the VAZ 2110 hub
Replacing the hub is not a regulated procedure; it is required only after checking its condition. More often it is necessary to change the bearing itself, the service life of which can reach 100,000 km. The original bearings are replaced every 60,000 km. Replacing the front wheel bearing involves removing the hub according to the instructions. The complexity of this procedure lies in the fact that to replace a bearing or the entire hub, you have to completely dismantle the steering knuckle in order to press out the part. However, knowing a couple of nuances, there is an easier way to replace the VAZ 2110-12 hub and its bearing. Detailed information about these methods is in this article.
Causes and signs of VAZ 2110 hub failure
On a VAZ 2110, the front hub may be replaced due to the appearance of strong noise or knocking while driving. Also, in many cases, a hub malfunction is characterized by the wheel unscrewing, which is why the car on the road can “jump,” move unevenly, or pull to the side.
When the first symptoms of a malfunction appear, the VAZ 2110 front hub must be replaced either completely or its bearing, and immediately.
The hub can also be damaged if the wheel is replaced incorrectly or during chassis repair. An example of a breakdown is a thread breaking due to excessive tightening force of the bolts. Before replacing the front wheel bearing of a VAZ 2110, you need to pay attention to the hub itself. If, after removing the old bearing, the new sample is pressed in very easily, then such a hub must be replaced with a new one. If you leave it with a lot of wear, there will be play in the bearing, which can lead to its failure. As a result, due to hub wear, the wheel will dangle even on a new VAZ 2110 wheel bearing. It is better not to delay replacement.
Chemical
Now we will consider methods for those who do not rely on the help of physics, but want to solve the problem with the help of chemistry. Your laboratory should have: kerosene, white spirit, acidified sulfuric acid, zinc, plasticine, hammer, water, sandpaper, wrench, chisel.
Attributes of the chemical method for unscrewing the nut
We moisten the nut and bolt with kerosene (experienced people recommend making a mixture of White Spirit and kerosene), applying a swab to them, it doesn’t matter whether it’s cotton or gauze. After some time - from an hour to a day, and with repeated attempts, you may find that the hub nut can be easily unscrewed. But even here you cannot do without force: at a minimum, you will probably have to work with sandpaper to clean the parts from rust. If even after this things don’t work, you should help with a hammer: tap it on the edges of the hub nut.
If in this case you are not successful, make a small container out of plasticine, secure the hub nut on top, pour water with sulfuric acid into it, and put zinc in the container. A chemical reaction begins that does a very good job of removing rust. Usually a day is enough for even advanced corrosion to go away from a part. Finish the job with a wrench. But this method is valid only in the case when the reason is that the nut is tightly stuck and/or rusted, and if it was simply tightened, neglecting the required tightening torque (to “be sure”), then you just need to tighten it.
What is the result..
As you can see, unscrewing the hub nut is not an easy task, but it can be solved
Please note that the first step is to try to preserve the hub nut by using penetrating fluids such as Vedeshka. Physical efforts to twist the hub should be moderate
And, of course, you should refrain from strong blows and heating with a torch, as methods that can render not only the nut, but also the bearing unusable.
How much does it cost to replace a wheel bearing on a VAZ 2110?
At a service station, services for replacing a wheel bearing will cost from 1000 to 1500 rubles. On average, such work will be completed by engineers in 40-50 minutes. If you need to replace the hub, the service will charge about 3,500 rubles for it.
Price of hub and bearing for VAZ 2110
A factory hub produced by AvtoVAZ (21100-3104014-00) costs from 1300 to 1600 rubles. This is the most reliable option. Analogues:
- Riginal (RG21083103012) — 950 rub.
- VolgaAvtoProm (21080-310301200) — 650 rub.
A proven version of the front wheel bearing is the original AvtoVAZ element (21083103020). Its cost is about 470 rubles.
There are several options for bearing analogues:
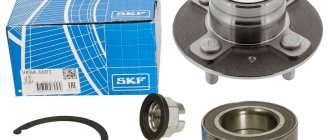
- FAG (713691010) - 1330-1500 rub.
- SKF (VKBA 1306) - 1640-2000 rub.
- HOLA (NB721) - 545-680 rub.
- HOFER (HF301046) — 380 rub.
- KRAFT (KT100505) — 590 rub.
- FEBEST (DAC34640037) — 680 rub.
The German company “FAG” and the Swedish “SKF” offer the most reliable front hub bearings for the VAZ 2110. These bearings differ from others in high quality and extend the life of the hub itself. But the worst option, according to car owners, is HOFER.
How to replace the front wheel bearing of a VAZ 2110 without dismantling the steering knuckle
In order to quickly remove the wheel bearing without removing the hub itself and the entire steering knuckle, you need to secure it well, put the car on the handbrake, remove the wheel (after unscrewing the hub nut with a “30” wrench).
After this, you need to perform all the same steps as when replacing a brake disc: remove the caliper and the brake disc itself. To dismantle the hub you will need 2 head bolts and a brake disc. We screw the studs (bolts) evenly into the hub through the holes of the brake disc. Next, you should gradually pull off the hub with sharp jerks. Or use a hammer to knock it out through the disk.
As a result, the hub will come out of the steering knuckle, leaving the inner part of the bearing on it, and the outer part in the steering knuckle (trunnion).
To press out the bearing, perform the following steps:
Pressing out the bearing with a puller
- Remove the retaining ring (it’s most convenient to use a ring puller).
- Using the socket “17” we unscrew the ball joint.
- We move the rod and lever down, move the steering knuckle and pull out the grenade.
- To press out the bearing, you need to use a special puller (article 77722), which consists of a bolt, a support washer, a cup, large, medium, small washers and a nut.
- Before installing the puller, it is necessary to remove the second retaining ring from the inside of the steering knuckle.
- On the same side we install the puller cup, and on the outer side we install a washer and screw the nut onto the bolt.
- By gradually tightening the nut, you will be able to press out the bearing.
- After removing the old bearing, you need to replace the retaining ring from the inside of the knuckle (it will support the new bearing).
- Then we press in the new product using the same puller, turning it in the opposite direction.
Finally, install the hub, brake disc and caliper in reverse order.
A few tips for removing a stuck wheel
- A few tips for removing a stuck wheel
- The wheel is stuck - what does this mean?
- Several ways to remove a wheel
- Tap the inflated tire with your foot
- WD-40
- Tap the disc on a wooden block
- Turn the wheels when the car is stationary
- Riding in place
- How to prevent wheel sticking
- Cleaning the surfaces of the hub and disc
- Graphite grease
- Copper grease
- Plastic instep support
Replacing a car wheel is not a difficult task, but only if the disc is not stuck to the hub, and all wheel bolts can be easily unscrewed. Otherwise, you will have to tinker a little with removing this element. So how do you remove a wheel from a car if it’s stuck?
The wheel is stuck - what does this mean?
Probably, many drivers have already encountered the problem of a “stuck” wheel, but for those who are hearing about it for the first time, we will explain the essence of this concept. There are cases when, when dismantling a wheel, the driver unscrews all the fastening bolts, but the disk still refuses to move away from the hub. In such a situation, they talk about sticking or sticking of the disk.
Checking the condition of the hub
The condition of the hub is checked for mechanical damage, cracks and wear. If defects are found, the hub will have to be replaced.
There are 2 main ways to check the hub, after which you should decide whether it needs to be changed or whether it is enough to change the bearing itself:
- Checking planes . We install the VAZ 2110 on a flat section of the road, grab the top of the wheel and swing it with strong jerks. If you hear metallic clicks, then the problem is in the bearing.
- Runout check . You need to remove the wheel, take a screwdriver and a wrench with a head. We rest the tip of the screwdriver on the caliper bracket, and use the wrench to turn the hub. If the sting leaves 2 arc scratches on the brake disc, then the hub needs to be replaced.
In VAZ 2110 cars with an anti-lock braking system, the condition of the sensor gear rotor is checked.
Installation procedure for a new VAZ 2110 hub
When replacing the front wheel hub of a VAZ 2110, the product is cleaned of grease and dirt with sandpaper, and burrs are sanded off. Installation process:
- First, a thin layer of lubricant is applied to the rear of the hub O-ring and the hub is installed onto the steering knuckle axle.
- A thrust washer is installed and a nut is screwed on to secure the hub.
- The hub fixing nut is tightened and the inner ring of the bearing is pressed onto the steering knuckle axle.
- Once the hub is installed, the hub bearing end play is adjusted.
- After the adjustment is completed, the clamping bolt is tightened, which secures the fastening nut from unscrewing.
- Then the brake disc is installed and, if equipped with anti-lock braking system, the sensor is installed.
The following is a step-by-step photo instruction on how to independently replace the front hub on a VAZ 2110.