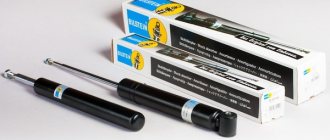
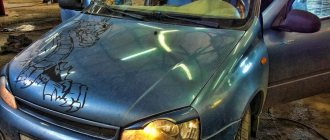
On the Kalina hatchback version, the rear light bulbs can only be changed by removing the headlight completely. You will need a 10mm socket or tube to remove the 2 nuts.
First of all, we open the trunk, the first nut is located under the plastic plug where the seat belt comes out.
The second nut is located at the bottom, near the seat belt reel.
Unscrew both nuts and lift out the taillight. Important: when unscrewing the nuts, it is advisable to do it with your fingers at the end so that they do not fall in, making it difficult to remove.
Now all the light bulbs are in sight.
The lampshades are removed by turning them counterclockwise 45 degrees.
We replace the light bulb with a new one and assemble everything in the reverse order.
Anything can happen in life, then the light went out, then the power to the rear view camera needs to be switched off, then the flashlight was damaged, in general, you need to remove the rear light on the Kalina-2 hatch. We take an 8mm socket, an extension, a wrench and unscrew the two bolts that are visible on the lamp when the rear door is open.
We unscrewed it, after which we pry the lantern with something, like a knife in a scarf, so as not to scrape the dirt. We take it away from the body.
We remove the lantern strictly parallel to the ground, otherwise there is a chance of breaking the sticky guides that are on the back side of the lantern and enter with their heads into the holes in the body.
Having removed the flashlight, you can remove the lamp sockets without thinking, they all have their own seats and it is simply impossible to confuse them later.
The green wire is the power supply for the reversing lights (for those interested). All that is needed is in front of your eyes, we push the additional wire through the plug, but there is mastic there, so you can make a neat puncture nearby and everything will be fine.
We assemble in the reverse order.
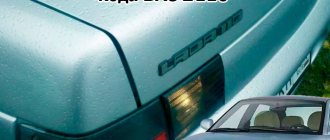
How to remove the tail light of a Lada Kalina hatchback
On the Kalina hatchback version, the rear light bulbs can only be changed by removing the headlight completely. You will need a 10mm socket or tube to remove the 2 nuts.
First of all, we open the trunk, the first nut is located under the plastic plug where the seat belt comes out.
The second nut is located at the bottom, near the seat belt reel.
Unscrew both nuts and pull out the taillight towards you
Important: when unscrewing the nuts, it is advisable to do it with your fingers at the end so that they do not fall in, making it difficult to remove
Now all the light bulbs are in sight.
The lampshades are removed by turning them counterclockwise 45 degrees.
We replace the light bulb with a new one and assemble everything in the reverse order.
Replacing the High Beam Bulb Kalina
How to replace a low beam lamp on a Lada Kalina
During the daytime, every car owner relies on daylight, vision and reaction. But with the coming of darkness everything changes
Particular care should be taken at this time, as tragedies often occur due to negligence when visibility is poor. To prevent this, the headlights must be in good working order
If they don't work, no movement can be made. Even if you want, it won't work as the visibility will be zero
So, it is very important to make sure that the light is flawless and shines brightly
How to replace the low beam lamp Kalina hatchback, sedan, truck
Change is not easy. You do not need to have special knowledge or abilities. Even an inexperienced motorist can cope with this task. The only thing is to act one by one and correctly. So, replacing a lamp consists of the following steps:
- First you need to open the hood.
- Then turn off the power by disconnecting the battery terminal.
- The washer reservoir should also be removed for convenience.
- Then the rubber cover is removed.
- Later, the light bulb must be removed by squeezing the retainer with your fingers.
- Then he pulled out the bulb and the terminal turned off.
This ends the procedure
It is very important to understand how the lamp was installed and what wires were connected to it
Abstract of replacing light bulbs High beam
Right H1 headlights on viburnum
2, on the left farcolb far away.
Replacing the H1 high beam lamp from VAZ. Lada Kalina 2
replacement
lamp closed World
H7.
Lada Kalina
.
Otherwise, you will not be able to connect the new headlight correctly, which will require you to contact a specialist. If you feel that you cannot do this job, it is best to immediately take the machine to a technical service where all the procedures will be carried out for you. Of course, you have to pay for this, but the result will be maximum.
Install new: sequential instruction
The procedure for removing and installing a headlight on the right or left side is not much different from each other
It is only important to strictly follow the instructions. When installing a new light bulb, you should only hold it as a base; You can't touch it with your hands
Once removed, it can be removed completely.
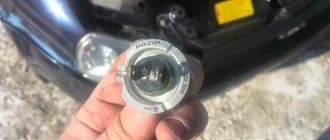
Please note that the Lada Kalina (16-valve engine) requires a bulb with an H7 socket. Install the new one as follows:
- Adjust the seat so that the protrusion on the base aligns with the groove on the headlight. This needs to be firmly fixed. Only then will it become clear that the protrusion has fallen into the groove;
- press the clamp onto the lamp so that the center of the base is between the antenna antennas;
- lock the latch in place;
- Attach both wires to the latch and close the lid tightly.
After completing this procedure, you need to turn on the headlights from a close distance and check their operation. If everything is fine, then the installation was completed correctly. Otherwise, you will have to take your car to a service center and pay money for it. Lamps should only be purchased in specialized stores. It is advisable to give preference to well-known manufacturers and models with a guarantee. Osram H7 12V 55W headlights for Lada Kalina Cross are very popular today.
Poor quality headlights should not be stored or purchased as they will not work for long and will require frequent adjustments or replacement
It is important to understand that not only your safety, but also the safety of the pedestrian depends on these light bulbs. It is especially important that the lighting is of good quality at night to avoid tragic consequences
There is a special offer on our website. You can get a free consultation with our corporate lawyer by simply submitting your question in the form below.
Headlight design features
In 2004, Lada-Kalina cars received new headlights, the design of which is called a block. Unlike the previous, standard ones, they combine lamps that provide low and high beam; lighting (side lights), turn signal lamps.
Another feature is that the new headlights have an electric remote light control. It allows the driver, while driving, to adjust the light output in height and direction. It should be emphasized that such a function was a relative rarity at the beginning of the 2000s.
Like any component, mechanism, part of a vehicle, headlights, including Lada-Kalinas, sometimes require preventive maintenance or repair. To do this, they need to be removed from the car. The purpose of such an operation may be the need for adjustment, improvement of decorative properties, or replacement of old equipment.
Those who often perform many works on the car themselves, before removing the headlights, are recommended to find out which company manufactured them. This is not difficult to do, you just need to look at the glass. The AL symbols indicate that the lighting unit is manufactured by Bosch.
During the production of Lada-1118 (Kalina), basic lights are mounted on the products: Kirzhach JSC Avtosvet and Bosch. It's hard to make a mistake. You can determine the manufacturer by the characteristics of some elements. So, if there is a cap on the low beam lamp, then it is made.
To begin the operation of “removing a headlight on a Kalina,” it is advisable to at least become familiar with how this unit works. It has three sections. As already mentioned - low and high beams, side lights, turn signal.
The road is illuminated with 55-watt incandescent lamps. To prevent dazzling of drivers of oncoming cars, special lenses are mounted on the front of the vehicle. The turn signal lamps, like the side lights, have a power of 20 watts. At the same time, the turn signals provide orange light.
There is a special corrector for adjusting the headlights. It has an electromechanical drive. Control is carried out from the cabin, where there is a special device on the dashboard. To adjust the corrector if it is not working correctly, you need to completely disassemble the headlight. But such disassembly may be required in other cases. This is, for example, tuning or installing new lighting elements.
Heading optics contains 4 lamps
Let's look at how the directional optics, that is, the front headlight, is designed. The block contains four compartments, each of which contains one element:
- High beam lamp (H1);
- Low beam lamp (H7);
- Combined lamp for running lights and “dimensions” (W21/5W);
- Turn signal lamp (P21W yellow - PY21W).
The standard size of the element is indicated in parentheses.
If we talk about low and high beams, standard power lamps (55 watts) are installed from the factory. It is not recommended to greatly exceed this value. Lighting fixtures of sizes H1-H7 look like this:
Replacement process
The process of replacing lights on the Lada Kalina 2 differs depending on its type. There are “Kalina 2” hatchback and station wagon. For a hatchback, the replacement sequence is as follows:
- open the 5th door of the car;
- Remove the 2 bolts securing the rear lighting component to the luggage compartment side. Use the key on 8;
- pull the light from the back of the car towards you, using little force;
- remove the fastener studs from the headlight fixing fasteners at the rear;
- move the lighting component away from the car body;
- if you need to replace the lamp, remove the socket with the broken product;
- After installing a new lamp in the lighting system, perform the entire process in reverse order.
Removing the rear light on a Lada Kalina hatchback
The principle of removing a headlight on a Kalina (station wagon) and replacing the block lighting differs depending on the shape and structure of the car itself. For the process of replacing the rear light unit you will need:
- open the 5th car door;
- open the hatch located in the trunk trim;
- disconnect the block with the light cables at the rear of the car from the harnesses and wires;
- Unscrew the 3 nuts securing the product to the car body;
- disconnect the device lock;
- remove the lamp retainer from the car body.
If you are interested in replacing the lamp, then after the above steps you need to remove the broken socket by turning it counterclockwise. This way you can remove it from the headlight housing. The new lamp is inserted into the socket by pressing and turning it clockwise. If you need to completely replace the lighting, simply insert the new product into place and perform the reverse steps of disassembly.
Which fogs to choose for Kalina?
Before installing fog lights on Kalina 2 or 1, you need to decide on the type of optics and its manufacturer. Every car enthusiast who has ever connected a PTF knows that a lot depends on the manufacturer and type of optics. For Lada Kalina cars of the first and second generation, you can find many types of headlights on sale. Moreover, they differ from each other not only in type and manufacturer, but also in the efficiency of the glow, as well as in the configuration.
It will be useful What can replace cuticle oil
Connection diagram of optics with relay and button
The most common manufacturers of PTF for Kalina:
- the domestic company Kirzhach is one of the most trusted manufacturers, which boasts decent quality fogs;
- Luch is another domestic brand that has earned the trust of our compatriots;
- Bosch is a world-famous company that produces not only PTF, but also many other types of parts and components for cars;
- Prosport is a Chinese brand that entered the domestic market not so long ago.
As for the varieties, the optics may differ in appearance:
- headlights can be double;
- round shape;
- in the shape of a square;
- oval lanterns.
It is best to select optics that match the design of the plugs installed in the bumper (the author of the video is the Lada1119 channel).
How to remove the tail light of a Lada Kalina station wagon? Replacing bulbs in the taillights of Kalina 1
Hello everyone, dear motorists! Today in the “Repair” section I’ll tell you how to remove the taillight and replace the bulbs in the taillights on a Lada Kalina. The work is not difficult, but it does require certain skills.
Light bulbs can be called consumables; they don’t burn very often, but unfortunately, this still happens to almost everyone from time to time. However, there are cases when the lights come on very often, almost every week or more often, in which case you should check the on-board network and some other points, which are discussed below.
Why do the car lights light up?
The first thing you should pay attention to is the increased voltage in the car’s on-board network; if it exceeds 14.5 Volts, replacing the headlight bulbs will be frequent. In addition, other energy-dependent nodes will also suffer
If the headlight glass is leaky or poorly ventilated, condensation may accumulate inside the headlight, causing the bulbs to burn out. The frequent failure of lamps can also be explained by the poor quality of the product itself. If the light bulbs are cheap, of low quality, you can hardly expect long service from them. Cheap non-original lamps do not have special gas and the correct pressure; as a result, after some time, tungsten evaporates and the lamp burns out. Poor contact. If the bulb is loose or has poor contact, it will most likely cause the bulb to burn out prematurely.
Connection diagram for PTF on Kalina
Installation instructions included:
And also a diagram (photo on the left). The circuit can be modified (photo on the right) by adding another relay, which will not allow the fog lights to light up after the ignition is turned off.
Connection diagram for the fog light button:
For owners of Lada Kalina with MUS, the fog light connection diagram is as follows:
Pinout of contacts of MUS Lada Kalina:
- Contact 1 – to the AFCP
- Contact 2 – control button of the AFCP
- Contact 3 – indicator (LED) of PTF status (on or off);
- Contact 4 – output for turning on the PTF relay
- Contact 30 – 12V (constant + coming from the battery)
- Contact 31 – Common minus (ground).
- Pin 56 – To low and high beam headlights.
- Pin 58 – To side lights.
- Contact 58b is an output (regulated voltage) for the illumination of knobs, buttons and instrument panel.
- Contact XZ – (+) from ignition switch
It will be useful: How does the motion sensor work in a DVR?
Let us remind you that you can find other photo reports in the Tuning Lada Kalina section.
How to replace the lamps yourself
Changing a light bulb in Kalina yourself is not difficult. The time spent on the work depends on the skill of the driver and the size of the hands. Some owners change light fixtures in 15-20 minutes without removing the headlight, while others suffer for more than an hour and ultimately dismantle the optics.
When replacing, cloth gloves are used. This helps protect the skin on your hands and also prevents contact with the bulb. When touched, fingerprints remain, which heat up when the light is turned on and after a while burn through the thin glass.
Far module
Replacing the high beam lamp is easier than in the low beam module, since the cover is located closer to the radiator grille.
To perform the operation you will need:
- Turn off the Kalina engine.
- Open the hood lid.
- Remove the protective boot on the back of the flashlight.
- Carefully disconnect the plastic chip.
- Open the latch.
- Pull out the lamp.
Assembly is carried out in reverse order. When installing the terminal, you need to check the contacts and, if necessary, clean them using a flat-head screwdriver, sandpaper or a special chemical spray.
Low beam
Replacing a low beam lamp on a Lada Kalina depends on the experience of the owner and is divided into two types:
- Without removing the headlight.
- With module dismantling.
To change lamps on installed optics:
- Unscrew the filter housing near the left headlight and move it towards the engine.
- Disconnect the washer motor terminal, remove the screws and move the reservoir to the side.
- Open the light module seals.
- Remove the block with wires.
- Remove the spring clip.
- Remove the part.
Assembling the headlight with a new spare part is carried out in the reverse order.
To dismantle the headlights, you need to unscrew the grille, fasten the modules and disconnect the contact chip. Place the removed optics on a convenient surface and replace the light elements.
Dimensions and DRLs
In the first generation Kalina, the dimensions are installed under the cover of the near reflector.
Replacement is no different from work in the near headlight compartment, however, to disconnect the lamp, it is turned counterclockwise. Drivers often install a diode instead of the original light source, which has a bright glow and can work for more hours.
Replacing DRL lamps on second generation Kalina:
- Open the hood.
- Find the plastic retainer at the bottom of the lamp near the radiator grille.
- Turn left 90°.
- Pull towards yourself.
Daytime running lamps do not contain halogen in the bulb, so they can be handled by hand when installing. Parts without gas include reverse elements, which are changed by bending the trim in the luggage compartment. To replace the Kalina station wagon's brake light bulb, you will have to unscrew the plastic plug on the fifth door, disconnect the chip and pull out the old spare part.
Turn signal
If the marker light on Kalina is freely accessible, then it is more difficult to get to the turn signal module.
To install a new lamp, you need:
- Unscrew the screws holding the air intake barrel and washer fluid reservoir.
- Move the parts towards the engine.
- Feel for the plastic cartridge and turn it to the left.
- The lamp is removed from its seat by slightly pressing and turning it 90° to the left.
To install a new part, you need:
- Install it into the cartridge.
- Press and turn to the right until it stops.
Fog lights
When replacing the fog lights, partial dismantling of the locker will be required. To do this you need:
- Turn the wheel towards the engine compartment.
- Unscrew the screws and unclip the clips where they are attached to the bumper.
- Bend the fender liner.
- Turn the light bulb to the left until it stops.
- Pull towards yourself.
- Disconnect the plug.
To install a new light source in the PTF, you must first snap the connector, insert the part into the lamp and turn it to the right.
After carrying out the work, you need to check the correct functioning of the light and adjust the angle of the reflector. A properly functioning car light ensures good visibility in all conditions and safety on the road.
Installing a new one: sequential instructions
The procedure for removing and installing a headlight that is located on the right or left side is not particularly different from each other.
It is only important to act strictly according to the instructions. When installing a new light bulb, you must hold it only by the base, do not touch it with your hands
When removed, you can completely hold it in your hands.
Note that for the Lada Kalina (16-valve engine) a lamp with an H7 socket is required. Install the new one as follows:
- Determine the seat so that the protrusion in the base coincides with the groove on the headlight. It must be firmly fixed. Only then will it be clear that the protrusion has fallen into the groove;
- press the latch against the lamp so that the center of the base is between the antennae of the latch;
- snap the latch into place;
- connect both wires to the clamp and close the lid tightly.
After completing this procedure, you need to turn on the headlights at close range and check their operation. If everything is fine, then the installation was completed correctly. Otherwise, you will have to take the car to a car service center and pay money for it. Lamps should only be purchased in special stores. It is advisable to give preference to well-known manufacturers and models with a guarantee. Osram H7 12V 55W headlights for the Lada Kalina Cross are very popular today.
You should not save money and purchase low-quality headlights, as they will not last long and will require frequent adjustment or replacement.
It is important to understand that not only your safety, but also that of pedestrians depends on these light bulbs. It is especially important that the lighting is of high quality at night in order to avoid tragic consequences
Lighting devices are a guarantee of safety
Today, there is probably no driver who is not aware of the regulatory requirements for operating a car. These standards also apply to external lighting devices; the brake light lamp also falls under the standard, since the use of a car with these components that do not comply with the factory regulations in terms of design is prohibited. This approach is dictated by safety requirements, which involve ensuring sufficient illumination and visibility of the car on the roadway, but at the same time eliminating the risk of blinding not only pedestrians, but also oncoming drivers by the light beam. In addition to headlights, the indicated requirements also apply to stern lighting fixtures.
The main element in any headlight is the lamp. The efficiency of illumination of the road surface depends on its quality conditions. Many people are interested in the question of what kind of light bulbs are in Kalina.
Replacing rear lights – Lada Kalina Blog
To independently replace the rear light assembly, one 8-mm wrench will be enough, preferably a socket with a ratchet and a Phillips screwdriver. This procedure will not take more than half an hour and will not cause much trouble. Everything is described in order below.
Guide to removing and installing rear lights on Lada Kalina
The first step is to open the Velcro windows in the trunk trim, which give access to the headlight mounting bolts. Although, I would recommend bending the corner of the trim completely in the right place. To do this, you need to unscrew two screws. The first one is located on the threshold of the trunk, closest to the corner:
- The second bolt is on the plastic panel at the top, unscrew it completely, since the casing is located under this fastener, and below we take out the piston, which also secures the upholstery. In the photo below these elements are marked with arrows:
This is what it should look like after the work has been done, as shown in the picture below:
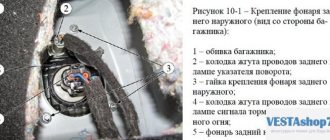
Now that we have free access to all fasteners and electrical wiring, we can begin removal. To do this, take a head with a ratchet size 8 and unscrew the three nuts securing the rear light, which are marked with yellow arrows, and immediately insert the rubber seal of the wiring harness inside, marked with an orange arrow in the picture:
Now disconnect the rear light wiring plug by pressing the latches on both sides:
After which you can safely begin to remove the rear light of our Kalina, simply by pulling it from the outside, since nothing else holds it.
We install the rear lights in the reverse order of removal. This manual is suitable for all owners of Kalina in a Station Wagon or Sedan, although for the Hatchback there are no fundamental differences in dismantling, all work is done by analogy - the only difference is in the mounting locations of the headlights themselves.
List of materials on the same topic
Replacing the brake light bulb on a Hatchback
The rear lights on the Lada Kalina Hatchback are designed in such a way that to replace the bulbs it is necessary to almost completely remove it. To do this you will need a minimum of tools, namely:
- 10 mm head
- extension
- ratchet or wrench
So, first of all, we open the tailgate (trunk lid), and from the inside you need to find those places where the nuts securing the rear light to the car body are located. One of them is shown in the photo below, made in the form of a special technological window in the casing:
And the second is located on top under a plastic plug, which must be removed by pressing two latches on the edges and pulling it towards you:
And now unscrew two nuts, one on top:
And the second one at the bottom through the same hole in the trunk upholstery:
Now you can move the rear light a little to the side by pulling it from the outside with a little force:
And from the back of it, you can without any problems remove the lamp that needs to be replaced, be it a hundred-signal, reverse, turn signal or marker. The cartridge itself is quite easy to remove; just turn it slightly counterclockwise.
To remove the light bulb itself, you need to press it lightly and also turn it counterclockwise.
Operating principle of the display system
There is a special ring on the gear shift lever. You can't shift into reverse without it. When this ring is lifted, a current pulse is produced (it is transmitted to the coil), which retracts the coil core, and the space for engaging reverse gear is freed up. The same impulse creates a signal to turn on the reverse indicators.
In the reverse process, on the contrary, the core falls into place, this creates a pulse in the coil, which is transmitted to the rear light control system, and they turn off.
Lada Kalina is a wonderful car. Maybe not the best, but definitely excellent for the money they ask for. Moreover, compared to many analogues in its price range, it is significantly superior to them. But there is one thing: unfortunately, it cannot be done without unpleasant “little things”.
A lot has been thought through in this car: the chassis, the engine, the air conditioning system, etc. But the reverse sensor is located at the bottom of the car, in the gearbox, and the wires stick out from it like needles on a Christmas tree, thin and defenseless. They are the ones who constantly break.
According to many motorists, problems with reverse due to broken sensor wires are one of the most common problems with the Lada Kalina.
The procedure for dismantling the lights
You should know that the Lada Kalina 1118 flashlight system consists of:
- housings;
- glass (polycarbonate);
- lamps;
- reflector;
- wiring;
- lamp plugs;
- decorative inserts (masks).
As for the ease of removal and subsequent replacement of the lamp on the 1118 model, the process usually involves removing the front bumper. After this, the screws on the top and bottom of the lighting fasteners become accessible. After dismantling them, you can immediately remove the headlight unit, not forgetting to first remove the blocks with wires.
Removing the front opticsTo do this you will need to use:
- key for 8 and 10;
- a set of screwdrivers (flat and Phillips);
- new lighting system component.
Set of tools
In order to adjust the block lighting on the Lada. You will need to complete the following steps:
- Remove the air filter housing, as well as the coolant unit.
- Remove the PTF plug using a screwdriver.
- Unscrew the bolt on the lower fastener of the lighting component using a 10mm wrench. Insert your hand into the PTF hole.
- Remove the bolts located on the upper fastener of the light block component. They are located closer to the radiator. Use the key at 8.
- Unscrew the screw securing the product to the car fender using a large Phillips screwdriver.
- Expand the Lada Kalina headlamp so as to move the part closest to the radiator closer to the car engine. This measure will allow you to remove the lower fasteners from the seat.
- Remove the lower iron fasteners of the headlight. To do this, you will need to remove a couple of bolts with a short head.
Removing the headlight on Kalina
Remove the car light by moving towards you. At the same time, try not to damage the paint layer, since during dismantling the lamp will be located as close as possible to the bumper and fender.
After this, you can install a similar device in reverse order.
Dismantling and repair of optics
One of the most common malfunctions in the operation of optics, if you do not take into account the failure of lighting sources, is damage to the headlight glass. If the lamp itself is damaged, it will have to be removed and disassembled to change the glass.
How to disassemble the headlight and how to replace the brake light bulb:
First you need to open the trunk and move the brake light source to the left. The Kalina brake light lamp must be pressed and turned to the left, so that the device can be removed from the installation location. The installation procedure is performed in reverse order. If you need to replace the glass, you will have to remove the bumper to do this. To do this, you need to unscrew the corresponding fasteners. After dismantling the bumper, it is necessary to disconnect all the wiring connectors that are connected to the optics. After completing these steps, you can unscrew the lower fasteners of the flashlight; to do this, use a wrench. After this, similar actions are performed with the upper bolts securing the optics. When all the screws are removed, the optics themselves can be removed. The next stage will be the glass repair itself.
You need to pull the headlight towards you and carefully remove the rubberized seal. It is usually attached to the lantern quite tightly, so most likely you will have to use a utility knife to cut the elastic. After the headlight housing and glass are separated from each other, all remaining adhesive and sealant should be removed from the perimeter of the housing.
To do this, you will also need to use a utility knife, and if the residues are small, then use sandpaper. Make sure that the surface on the housing is clean and free of sealants and dirt. Before installing new glass, the housing around the perimeter of the installation will need to be treated with a solvent. This will allow the surface to be degreased, so that the fit of the new glass will be maximum. Next, apply glue to the new seal and connect the glass itself to the body. The tightness of the structure must be optimal, otherwise the problem of fogging of the optical glasses from the inside may arise. Press the headlight on both sides so that the lens is connected to the housing as firmly as possible. At this stage, the repair can be considered complete; assembly is carried out in the reverse order. When installing the lights, they will need to be readjusted.
Headlights
Replacing a headlight yourself will require preparation of the car and tools. To work you will need:
- set of wrenches;
- screwdrivers;
- rag;
- gloves to protect hands.
For ease of work, you need to wash Kalina in advance and clean the space in the garage. To replace the headlights, you need to remove the bumper and unscrew several mounting bolts.
Dismantling
Steps required to remove headlights:
- Open the hood lid.
- Disconnect the battery terminal.
- Pull out the clips from the front of the fender liner.
- Unscrew the radiator grille fasteners and remove it.
- Unclip all the clips along the contour of the bumper and unscrew the screws.
- Remove the bumper without scratching the corners of the fenders and headlights.
- Disconnect the optical power plug.
- Remove the two screws holding the light on top.
- Remove the lower headlight bolts.
- Carefully remove the part.
Repair
To disassemble the Kalina headlights, they will need to be dismantled. You can repair the Kalina headlight by polishing the glass, replacing it, washing the internal parts, or restoring the reflector.
To remove the glass you will need:
- Dismantle the part.
- Heat the headlights in the box using a hair dryer.
- Tear off the glass.
- Carry out all the required work and assemble the lantern using a special sealant.
To disassemble the headlight, it will take several hours, depending on the experience of the car owner. Replacing Kalina's headlight glasses will improve the exterior and increase light transmittance.
While working, it is important to follow safety precautions, do not leave the hair dryer unattended and use gloves
Installation
Before installing the lights, you should wash the mounting points and mounting space. Installation is carried out in the following order:
- The power plug is connected.
- The Kalina headlight mounts are aligned and secured with standard bolts.
- The bumper is hung from the front and screwed onto self-tapping screws.
- The radiator grille is installed.
- The left and right fender liner clips are being returned.
In versions with fog lights, you will have to additionally connect the connectors to the lamps when installing the bumper and disconnect them during removal.
Reviews
Delivery of goods is carried out throughout Russia and the CIS:
1. Russian Post (from 350 rubles and above)
Delivery to all regions of the Russian Federation and CIS countries
2. Transport Companies (from 350 rubles and above)
Delivery throughout Russia and the Republic of Kazakhstan
- TK Energy (nrg-tk.ru)
- TC Business Lines (dellin.ru)
- TC SDEK (www.cdek.ru)
- TK PEK (pecom.ru)
- TK KIT (tk-kit.ru)
3. Pickup
The order can be picked up at the office at Tolyatti, 40 Let Pobedy 38, TD “Malachite”, 1st floor.
The waiting time for sending an order in our online store is approximately 2-7 working days, large orders 7-14 working days. days; color of bumpers, mirrors, body parts, spoilers, etc. 7-14 work. days; sewing covers, upholstery, steering wheels, gear knobs, EVA mats, etc. 7-14 work. days.
During this period, we will send you a tracking number by email. email to track the parcel en route.
Payment can be made in the following ways:
1. Payment to a Sberbank card
You can pay using the SBERBANK-Online application and other Bank applications.
After placing an order, making payment, do not indicate comments , we ourselves will understand by the amount of the order and the name of the sender. After receiving the funds, the status of your order will be changed to paid until 17.00 of the current day, or from 9.00 of the next Moscow time.
2. By bank card
Automatic acceptance of payments using MIR Bank cards, VISA International, Mastercard.
You can also pay with credit cards with a grace period.
To select payment for goods using a bank card, on the corresponding page you must click the “Pay for order by bank card” button.
2. Payment to QIWI wallet 89272115207
Replacement process
The process of replacing lights on the Lada Kalina 2 differs depending on its type. There are “Kalina 2” hatchback and station wagon. For a hatchback, the replacement sequence is as follows:
- open the 5th door of the car;
- Remove the 2 bolts securing the rear lighting component to the luggage compartment side. Use the key on 8;
- pull the light from the back of the car towards you, using little force;
- remove the fastener studs from the headlight fixing fasteners at the rear;
- move the lighting component away from the car body;
- if you need to replace the lamp, remove the socket with the broken product;
- After installing a new lamp in the lighting system, perform the entire process in reverse order.
Removing the rear light on Lada Kalina hatchback
The principle of removing the headlight on a Kalina (station wagon) and replacing the lighting unit differs depending on the shape and structure of the car itself. For the process of replacing the rear light unit you will need:
- open the 5th car door;
- open the hatch located in the trunk trim;
- disconnect the block with the light cables at the rear of the car from the harnesses and wires;
- Unscrew the 3 nuts securing the product to the car body;
- disconnect the device lock;
- remove the lamp retainer from the car body.
If you are interested in replacing the lamp, then after the above steps you need to remove the broken socket by turning it counterclockwise. This way you can remove it from the headlight housing. The new lamp is inserted into the socket by pressing and turning it clockwise. If you need to completely replace the lighting, simply insert the new product into place and perform the reverse steps of disassembly.
adjustment, configuration and replacement of the low beam lamp + video
Author admin Reading time 4 min. .7k. Published 12/21/2014
In head optics, low beam lamps most often have to be replaced. For a Lada Kalina car, the low beam lamp is a halogen lamp with an “H7” socket, the power of which is 55 watts (no more). Osram bulbs may come from the factory, but others will do. After replacement, the filament will occupy a new position, and the headlight adjustment may be lost. So, checking the settings, and, if necessary, adjusting the headlights is carried out immediately after replacing the lamps, which on the Lada Kalina is done without dismantling the headlight unit.
Step-by-step replacement instructions
Each H7 standard bulb has an iron base, which is pressed to the headlamp with a wire clamp. To bend this bracket, just get close to the plane of the headlight from behind. Let's open the hood and see what exactly will bother us.
Behind the headlight on the right is a washer reservoir. It is dismantled like this: disconnect the electric motor terminals, tighten the plug harder, find one nut and one fastening bolt. The fastening elements are unscrewed with a 10mm wrench, then the tank is placed on the engine. Next we could look at how to remove the headlight on Kalina-2, but in this case this is not required.
Replacement sequence:
- Remove the rubber cover covering the low beam lamp compartment;
- Disconnect both terminals from the lamp contacts;
- The fastening bracket is removed from the grooves by first pressing on it, then the bracket is moved to the side;
- They take out the lamp, install a new one in its place, and return the bracket to its place.
Next, perform steps “2” and “1” in reverse order. The connection diagram is not important - there are only two contacts, and both go to the filament. Now, if we connected LEDs, then everything would look more complicated.
Adjusting the headlight beam
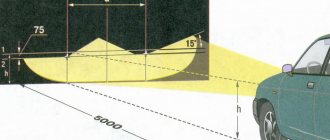
Correctly adjusting headlights can only be done in a service station. However, let's look at how this operation is performed by experienced craftsmen.
There are two adjustment screws on the back wall of the unit called the headlight unit. The first of them, located closer to the radiator, allows you to deflect the light beam “up and down”, and the “horizontal” direction is adjusted with the second screw. Ideally, this should happen: when the car is 5 meters from the screen, the border of the light spot touches line “2” (see figure). Line “1” is spaced from the ground at a distance equal to the height of the centers of the headlights. The second line is drawn 65 mm lower.
Here are a couple more tips that will be useful:
- The centers of the beams should be on lines AE, BE;
- Line “0” has the following meaning: it intersects with line “1” at one point, so the border of the spot should pass exactly through this point;
- The caps of the plastic adjustment screws are compatible with a hex screwdriver. However, a Phillips screwdriver will also work.
So, we have fully examined how to adjust the headlights on Kalina-2. Of course, replacing lamps with subsequent adjustment is a less labor-intensive operation than connecting a radio. However, accuracy is important here. And the special equipment used to perform the settings is only available at service stations.
Question and answer: what should not be allowed under any circumstances
Q: What happens if you buy lamps with a base other than “H7”?
A: It will not be possible to install lamps in a standard headlight.
Q: If I use more than 55 watts of power, will this cause overheating?
A: Excessive power leads to the fact that the fuse in the low beam lamp circuit burns out. A separate fuse is used for each of the lamps, so it will not be possible to “deceive” the automation.
Q: Are halogens afraid of power surges?
A: For incandescent lamps, excess voltage is a harmful factor. In the case of using halogen lamps, there will be two harmful factors: overheating, underheating. Actually, this is why MTBF can be considered a relative rather than an absolute value. This value depends, and depends strongly, on the stability of the voltage.
Removing and installing Kalina taillight lamps
- Remove the socket with the parking and fog light bulb by turning it counterclockwise.
- Remove the lamp from the socket by pressing it and turning it counterclockwise until it stops.
Installing a new lamp in the Kalina's rear light is done in the reverse order.
- The combined parking and fog light lamp has 2 protrusions located at different levels. When installing it, the protrusions must fit into the proper grooves of the cartridge.
- The grooves on the flashlight body have different widths; this should be taken into account when installing the lamp socket.
Replacing brake light bulbs on Lada Kalina
Replacing lamps
brake lights
Lada Kalina
. Both burned out at once. We are looking for reasons.
Replacing the brake light bulb Lada Kalina hatchback VAZ 1119
For replacement
required: wrench, tube size 8 and wrench, magnet or magnetic grip.
The operations for replacing the remaining taillight lamps are performed in the same way.
Step-by-step instruction
1. Open the trunk and see that there are pockets in the trim near the lights.
2. Turn the lock counterclockwise and open the pocket.
3. The lamps come together and are removed in one unit. Only the size light bulb stands separately.
Disconnect the power connector from the lamp block. We squeeze the clamps and tighten them.
We squeeze the clamps of the lamp block on the sides and remove it.
4. To remove the lamp, press it, turn it counterclockwise and remove it.
Installation in reverse order: insert, press and turn clockwise.
The lamp unit is installed in the reverse order. Place the unit into place until it clicks and connect the power connector.
5. Now about replacing the marker light bulb . We grab the body and pull towards ourselves.
6. We grab the lamp and pull it out of the socket.
7. Insert the new lamp into the socket and mount the socket with the lamp in place.
Video lesson
How to remove the tail light of a Lada Kalina station wagon? Replacing bulbs in the taillights of Kalina 1
Hello everyone, dear motorists! Today in the “Repair” section I’ll tell you how to remove the taillight and replace the bulbs in the taillights on a Lada Kalina. The work is not difficult, but it does require certain skills.
Light bulbs can be called consumables; they don’t burn very often, but unfortunately, this still happens to almost everyone from time to time. However, there are cases when the lights come on very often, almost every week or more often, in which case you should check the on-board network and some other points, which are discussed below.
Why do the car lights light up?
The first thing you should pay attention to is the increased voltage in the car’s on-board network; if it exceeds 14.5 Volts, replacing the headlight bulbs will be frequent. In addition, other energy-dependent nodes will suffer. If the headlight glass is leaky or poorly ventilated, condensation may accumulate inside the headlight, causing the bulbs to burn out. Frequent failure of lamps can also be explained by the poor quality of the product itself
If the light bulbs are cheap, of low quality, you can hardly expect long service from them. Cheap non-original lamps do not have special gas and the correct pressure; as a result, after some time, tungsten evaporates and the lamp burns out. Poor contact. If the bulb is loose or has poor contact, it will most likely cause the bulb to burn out prematurely.
Reasons for replacing lighting fixtures
The most obvious reason to replace the low beam is when the headlight bulbs burn out. The reasons for the failure of these parts may be different. On Lada Kalina cars of the 1st and 2nd generations, H7 type lamps are installed.
Imperfection and budget are the causes of the following malfunctions.
- Clogging due to depressurization of the flask. Due to dust ingress, overheating occurs and the lighting element fails.
- Voltage surges in the on-board network, namely an increase in permissible values. To identify this malfunction, it is necessary to diagnose the generated voltage; the generator should not produce more than 14.4 Volts.
- Blown fuse.
- Violation of the integrity of the electrical circuit.
- The output contacts are oxidized.
These are the most common factors causing low beam lamp failure. There are others, but they are extremely rare.
First of all, the integrity of fuses F12, F13 in the mounting block is checked. If in the dialing mode touching the terminals is accompanied by a sound signal, it means the fuses are working. If there is no signal, the fuses need to be replaced and the cause of their failure must be found out. You should also ring all sections of the circuit, especially if voltage is not supplied to the terminals.
Driving on public roads without working low beams is unacceptable. Especially in the dark, as it can cause a serious accident. For good lighting, it is also recommended to adjust the light at a car service center or do it yourself.