Removing and installing a rear light on a Priora
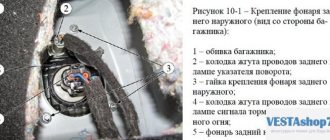
So, first of all, we open the trunk lid, and on the inside we find a special technological window with Velcro that needs to be opened. It is through this that you can get to the flashlight mounts.
It is worth noting that from the inside it is not mounted with bolts, but with special plastic screws that secure the lamp to the car body. There are three of them in total, of course, each of them must be unscrewed. After this, we move the lantern to the side from the outside, as is clearly shown in the photo below.
If it is necessary to replace the rear light, then each of the lamps should be pulled out of the light housing from its rear part. More on this below.
Low or high beam does not work on the Gazelle
Burnt out lamp filament is the simplest reason. Provided that there is a new lamp of appropriate power in stock, every driver can eliminate the cause. Some, wanting to achieve greater brightness, install lighting fixtures of 55 or 60 watts, instead of the standard ones, as expected. What causes breakdowns of Gazelle
", released before 2003. This occurs due to an increase in current in the circuit. The light switch connectors are melting. In newer cars of this brand, the problem is in the relay. The part is not designed for such a load.
Malfunctions in the head lighting may occur as a result of a blown fuse. The problem may also be in the central key-type light switch. Failure to operate may occur if the contacts become dirty or corroded.
Replacing the brake light, tail light, turn signal lamp on a Priora
To remove one of the lamps, you need to grab its “socket” with your hand and turn it slightly counterclockwise. After which the lamp is removed from the base of the lantern.
Now, in the same way, we take the lamp itself, and turning it counterclockwise relative to the socket, we remove it.
Replacing the lamp is carried out in the reverse order. It is worth keeping in mind that when installing new bulbs in the Priora's taillight, you must adhere to the same rules as with the front headlights. That is, you should not touch the glass of the lamp with bare or dirty hands, otherwise this will lead to a decrease in its service life.
After all the necessary work has been completed, you can begin installing the flashlight in its place by tightening all the retaining screws and closing the special technological pocket with Velcro. The price of each such lamp is no more than 50 rubles, and if you replace the lamp, you will have to fork out for it, since you can buy it no cheaper than 1400 rubles for a standard factory-made DAAZ.
Repair and replacement of individual elements
Wear of headlight elements, physical damage or short circuit are only a small part of the reasons why the luminous flux is lost or noticeably weaker.
In this case, you need a “10” key and a Phillips screwdriver. To begin, carefully remove the negative terminal from the battery and the front bumper. Only after this Lada Priora is ready for work:
- release the lock;
- disconnect the bundle of wires;
- Unscrew the screw for the side mounting of the headlight on the Priora;
- remove 4 clips;
- Unscrew the housing fastening bolts.
Installation of new lighting elements is carried out in the reverse order. If problems arise with the rear lights, then their dismantling on the Priora is carried out in a similar way. In some cases, the functionality of the lighting element can be restored by replacing one of the parts. For example, if the headlight burns dimly, then the bulb needs to be replaced.
To complete this task you will need an industrial hair dryer. It works at a distance of 2-4 cm from the surface of the headlight. The duration of thermal exposure is 30 seconds. After the industrial hair dryer is turned on, it is necessary to act in a circumferential manner on the entire surface of the top cover. The result of the work done will be melted sealant. It does not cause technical malfunctions, while allowing you to carefully remove the lighting element on the Priora.
Installing LED tail lights on Priora
As for LED tail lights for Lada Priora cars, their prices are of course a little higher. Namely, a set of such lighting equipment can be purchased for around 3,200 rubles. As for installing a flashlight instead of a standard one, there is absolutely nothing unusual here.
It is necessary to disconnect the power connector for the flashlight, which is standard for all types of Priora, and then, after removing the old flashlight, install a new one with LED lights in its place. There is no need to perform any additional actions or manipulations. And the result of the work done can be seen in the photo below:
The Priora has three brake lights: two in the rear lights and an additional one installed in the spoiler. Their purpose is to warn drivers of cars moving behind about braking. Operating a vehicle with non-functioning brake lights is prohibited. If the lights on the Priora do not light up, you need to contact an auto electrician or fix the problem yourself. In the latter case, the driver needs to have a minimum set of tools to find and eliminate the causes of the malfunction.
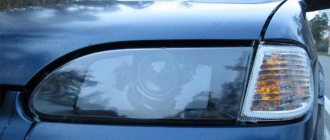
Headlight differences
The headlights received differences with the release of the second restyled Priora, which received both front and rear updated optics.
Headlight Priora 1 until 2013
1-Cover covering the low beam lamp, 2-Horizontal headlight adjustment bolt, 3-Ventilation valve, 4-Turn indicator lamp with socket, 5-Vertical headlight adjustment bolt, 6-Cover covering the high beam lamp, 7-Power connector block - headlights.
Headlight Priora 2 after 2013
1-Power connector for the headlight unit, 2-Vertical headlight adjustment bolt, 3-Cover covering the low and high beam lamps, 4-Turn indicator lamp with socket, 5-Horizontal headlight adjustment bolt.
As you can see from the pictures, the headlights showed virtually no visual difference. The only exception is the protective covers; there are two of them on the old model, and one on the new one.
Why do the brake lights on the Priora not light up?
There are several options for the malfunction:
- three brake lights do not light;
- one or two stops do not work;
- brake lights flash.
One brake light usually won't light because the bulb is burned out. In other cases, the problem lies in the wiring, fuses or in the limit switch that is responsible for turning on the brake lights when braking. A faulty switch can also cause another type of malfunction, when the brake lights do not go out and are constantly on.
A faulty switch, such as a lamp or fuse, is not repairable and must be replaced. Also, if the brake lights on a Priora do not light up, the reason may lie in oxidized contacts of the rear lights.
To solve the problem yourself, you need to have the minimum tools necessary to find a solution to the problem:
Reasons for the breakdown of the ICC
As it would seem, the failure of the light control module on a Priora depends on the number of times the headlights are turned on and off, but this is not the case. Most breakdowns occur not due to the physical impact of a person on a given electrical appliance, but precisely due to the load from constantly switched on headlights. How is this explained?! Driving for a long time with the headlights on provokes heating of the tracks in the MUS board, thereby, when the electrical wiring heats up, its resistance increases and these tracks break.
Priora with daytime running lights
This problem occurs quite often and most prior managers run to the store and buy a new module at a very expensive price. Never rush into buying an ICC as it can be repaired without spending a penny.
If the light control module fails on the road, then you can read how to turn on the lights when the MUS is not working on a Priora here.
How to check the operation of brake lights
Checking the functionality of the brake lights does not take much time. This requires two people. One should press the brake light, the other should make sure that all three brake light bulbs come on.
It is also possible to check the functionality of the “stops” alone. For example, you can press a brick onto the pedal or insert a stick between the seat and the pedal. But it’s easier or easier to invite an assistant, with the words: “Hey, you, come here”)
Troubleshooting
- If all the brake lights do not light up, the first thing to check is the power fuse. It is located in the main mounting block under the dashboard, at the driver’s feet. The fuse number is F10. In addition to the brake lights, it protects the power supply circuit for the interior lighting and instrument panel lights. The fuse condition can be determined visually. If the conductor is burnt out, the fuse must be replaced. If it burns out again, the short circuit must be found and repaired.
- Next you should check the lamps. To do this, you need to remove the non-working lamp from the headlamp and replace it with a known working one. Alternatively, you can check the resistance of the llama, but this option is much less reliable.
Advice: it is quite possible for two brake light lamps to burn out at the same time, so if the Priora brake lights, in addition to the additional one, do not light up, first you need to check the lamps, then the wiring.
- Another reason is oxidized contacts in the headlight unit. Oxides can be detected visually by simply removing the lamp from the socket. To clean the contacts, you should use sandpaper; if you don’t have it, you can try to scrape off the oxides with a screwdriver or knife, or simply twist the lamp in the socket to remove the oxidized layer.
- The contacts in the wire blocks that fit the headlight may also oxidize. You should inspect the contacts and, if necessary, clean them with a thin screwdriver. It is necessary to clean the contacts on the board and on the block. In the field, you can try to put on and remove the connector from the headlamp several times to clean out the oxides.
- Next, you need to check the condition of the tracks of the headlight unit on which the brake light does not light up. It’s better to do this with a multimeter, but damage is often visible “by eye.”
- If the track is burnt, it can be restored by soldering a thin copper wire.
- If all the lights do not light up when you press the brake pedal, you should check the sensor (switch) located near the brake pedal. This is easy to do: you need to remove the wires from it and short-circuit them. If the brake lights come on, the sensor must be replaced with a new one. Otherwise, you need to check the electrical circuits.
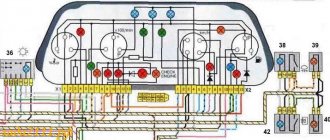
VAZ 2170 ECM harness connection diagram
This part is organized to supply power to the main instruments and engine control system of the Lada Priora. From here, voltage is supplied to the main components, units of the vehicle’s power plant, as well as control sensors and ECUs. The standard electrical circuit connection system (pinout) looks like this:
- 1 – ECU power supply;
- 2 – main block of the electronic system to the dashboard;
- 3 – distribution board;
- 4 – speedometer;
- 5 – road surface roughness sensor;
- 6 – indication of pressure in the engine crankcase;
- 7 – TPS;
- 8 – DTOZH;
- 9 – indication of antifreeze temperature sensor;
- 10 – mass air flow sensor;
- 11 – control XX;
- 12 – main relay of the fuel pump;
- 13 – VT circuit fuse;
- 14 – relay BZ;
- 15 – fuse of the above circuit;
- 16 – ECU fusible link;
- 17 – DPKV;
- 18 – power supply for mass air flow sensor;
- 19 – phase distribution;
- 20 – mixture detonation sensor;
- 21 – EMC for purging the adsorber;
- 22 – diagnostics of the air flow sensor;
- 23 – power supply to the ignition coil;
- 24 – supply voltage to spark plugs;
- 25 – power supply to fuel injectors;
- 26 – terminal from the ignition coils to the ECM;
- 27 – feedback from 26;
- 28 – ECM connector to the injection system;
- 29 – response to the previous output;
- A – phase on the battery;
- B1/2 – ignition mass;
- C1 – mass from short circuit.
How to choose a good kit
Today, there are a huge variety of xenon lamps on the automotive market. This variety makes the choice a little more complicated, and we will try to figure out which xenon is best for a particular car.
Most xenon kits consist of:
- xenon lamps;
- ignition blocks;
- wiring and fastening parts.
Xenon lamps have special markings - 6000K, 5000K, etc. It denotes color temperature - the brightness and color of the light that the lamp shines. Xenon marked 4300K shines white with a slight yellow tint. They are often installed in fog lights and in the main headlights of a car. They are best suited for driving on wet asphalt.
5000K lamps produce a shade that is closest to white. Their light output power is the highest, and the light is normally perceived by the human eye. The light of a 6000K lamp has a slightly bluish tint, and is inferior in power to the two previous types, since it has the lowest light output. However, in the Russian and Ukrainian markets this type is the most popular.
The ignition unit is a device that supplies the required voltage to the xenon lamps necessary to ignite them. The more complex and “smarter” this block is designed, the more processes it controls. A high-quality ignition unit will ensure long-term and high-quality operation of the lamps, since during their ignition and glow the lamp parameters are within acceptable limits.
READ Replacing low beam bulb Peugeot 206
It will be useful for every driver to know what the fine is for driving without insurance or with a expired MTPL policy.
Airbrushing is an original way to decorate your car. We have prepared an article for those who want to make their car stand out from the gray mass.
Colorful temperature
The most common are lamps emitting light at 4300, 5000 and 6000 Kelvin. Installing xenon on Priora is most optimal with devices with a temperature of 4300 Kelvin. Their light is as close as possible to daylight and will ensure visibility in all weather conditions. Samples with 6000K give a beautiful, spectacular, but unnatural bluish glow, which is of little help in rainy or snowy weather.
Manufacturer
Each car owner must decide for himself which company to give preference to, based on the available budget. Products from Chinese manufacturers are not worth it. Very often it does not correspond to the declared characteristics and quickly fails.
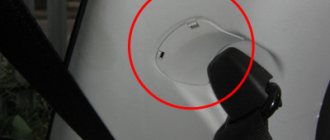
The purpose of the reverse light switch on a car
Many people know that when you put the car in reverse gear, the white lights in the taillights are activated. However, few people know why this is necessary. To understand the responsibility of operating a vehicle with a faulty 3D sensor, you need to understand its purpose.
Turning on the rear lights is the main purpose of the product. This need arises for a number of the following reasons:
- Warning drivers of vehicles driving behind, or pedestrians, about performing the appropriate maneuver. In this case, the driver (behind the moving vehicle) can react in a timely manner by reducing speed or avoiding the obstacle.
- The 3X sensor on the car is also needed so that when reversing, the driver sees obstacles on the way and has time to react in a timely manner.
Typically, a malfunction of the car's auxiliary control gear is detected when the driver engages reverse gear at night and notices the lack of lighting. In this case, it is necessary to determine the cause of the malfunction and be sure to promptly eliminate it.
This is interesting! Operating a vehicle with a faulty reverse sensor is unsafe. If the driver is aware of the malfunction of the product, then reversing should be carried out with the emergency lights on.
Bi-xenon installation
Bi-xenon is the same lamp filled with an inert gas, only equipped with a special electromagnet. It controls the Focus lamp, which allows you to create “low” and “ high ” beam. A conventional xenon lamp constantly shines at full power, and the power of bi-xenon lenses is regulated using a solenoid (electromagnet).
Lada Priora. High and low beam headlights do not work.
The principle of installing bi-xenon with your own hands is approximately the same. It differs only in the presence of a voltage controller, which is connected to the lamp, battery and ignition unit. Its main function is to control and stabilize the voltage in the wiring.
We wrote above how to install xenon yourself. Now let’s just look at the connection diagram for bi-xenon lenses and look at some of the nuances.
- The high-voltage wires from the bi-xenon lamps are connected to the corresponding wires from the ignition unit.
- The controller is connected to the power connector of the ignition unit.
- The third wire on the lamp is the electromagnet connector, which controls the intensity of the light. It also connects to the controller.
- The connector from the controller is connected to the standard lamp power connector. It has 3 contacts.
- We connect the controller to the battery power, “” and “-”, respectively.
After installation, do not forget to adjust the headlights so as not to dazzle oncoming drivers. Remember that well-adjusted headlights will ensure the safety of all road users.
Statistically, heavily tinted cars are more likely to be involved in accidents. You can find out what standards for tinting the front glass according to GOST on our website.
A good battery will last much longer. Useful tips on choosing a battery for beginners and experts.
Today, there are many different radar detectors available on the automotive gadget market. On this page you can find out /tuning/elektronika/radar-detektor-kak-vybrat.html what parameters you should pay attention to when choosing a radar detector.
LADA PRIORA for the project, we install FSO flashes!
Ignition unit (ballast)
On the Internet there are sometimes advertisements for the sale of headlights at a low price without an ignition unit. You should not try to save money by buying such lighting fixtures. Without ballast, the lighting will not work.
This type of device has several generations. The latest is the fifth, characterized by the most compact dimensions, ease of installation, the lowest percentage of defects, low heat generation and, unfortunately, the highest price. People who are short on funds should pay attention to the fourth generation, which has a lower price and is slightly inferior in quality.