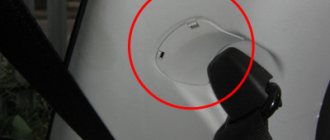
Replacing tail light bulbs (external)
_x000D_
Disconnect the ground wire terminal from the battery. To access the rear side of the canopy, open the window in the trunk trim.
_x000D_
_x000D_
Replacing lamps in the turn signal (direction indicators):
_x000D_
- _x000D_
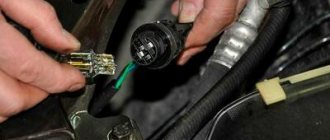
- disconnect the block with wires from the socket (No. 2).
- remove the socket (No. 2) together with the lamp by turning it counterclockwise.
- remove the lamp by pulling it towards you.
_x000D_
_x000D_
_x000D_
_x000D_
Replacing the brake light and side light lamp :
_x000D_
- _x000D_
- disconnect the block with wires from the socket (No. 4).
- remove the socket (No. 4) together with the bulb by turning it counterclockwise.
- remove the lamp by turning it counterclockwise.
_x000D_
_x000D_
_x000D_
_x000D_
We install the lamps in the reverse order. The process is also shown in the video:
_x000D_
_x000D_
Preparing seats for the installation of PTF
By placing the bumper on the soft canvas with its front side, you gain access to the fastenings of the niche plugs in which the fog lights are installed.
In this case, it is necessary to purchase brackets for installing fog lights (2 pieces included - right and left).
If fasteners are present, they must be removed to get to the plugs.
After dismantling the PTF mounting brackets, remove the plugs held in the grooves by latches and self-tapping screws.
In the removed plastic plugs, using a drill with a core drill, holes are cut out with a diameter corresponding to the existing contour or selected headlights, after which the cut edge is processed with fine sandpaper and the parts are installed in their standard places.
Replacing lamps in the lamp (on the trunk lid)
_x000D_
_x000D_
Disconnect the ground wire terminal from the battery. Remove the trunk lid trim by releasing the 10 clips.
_x000D_
_x000D_
To replace the side light bulb :
_x000D_
- _x000D_
- disconnect the block with wires from the socket (No. 1).
- remove the socket (No. 1) together with the lamp by turning it counterclockwise.
- remove the lamp from the socket by pulling it towards you.
_x000D_
_x000D_
_x000D_
_x000D_
Replacing the reverse lamp :
_x000D_
- _x000D_
- disconnect the block with wires from the socket (No. 2).
- remove the socket (No. 2) together with the lamp by turning it counterclockwise.
- remove the lamp from the socket by pulling it towards you.
_x000D_
_x000D_
_x000D_
_x000D_
We install the lamps in the reverse order.
_x000D_
How to make backlighting for the back row of Vesta
You can install a rear light on the Lada Vesta:
- native, which comes in the “Lux” package (article number 8450030708/8450031513);
- any analogue for Kalina and Granta models.
Installing additional lighting for rear passengers on Vesta and Vesta Cross begins with determining the location where the lamp will be located. It is best to do this approximately at the level of the backs of the front seats, so that the light is directed towards the feet:
- Using a pre-prepared stencil (put the lampshade on cardboard and outline its back), transfer the outline to the ceiling upholstery.
- Using a sharp blade, carefully cut along the line.
- Wrap the soldered wires from the rear lamp with a tight seal so that “crickets” do not form during the operation of the car.
- Wrap their end to the wire, push it into the cut hole to the place where the front lighting unit is located.
Now remove this block and find the necessary wires in the block:
- White and pink is a plus. It loses power a few minutes after the ignition is turned off (for your safety, turn off the car).
- Blue-black is a constant minus.
- White is a minus for door switches.
There is a standard diagram that clearly shows the connection.
Photo source: https://www.drive2.com/l/494120526596276644/
All that remains is to use self-tapping screws to secure the rear lamp to the upholstery and insert the front lighting unit into place.
You can add lighting to the back row of Vesta and Granta Sport by connecting the lampshade to the trunk lighting:
- ground - black wire;
- the second +12V.
In order not to confuse the purpose, it is better to ring the wires first.
Rear fog light
_x000D_
The rear fog light is installed at the bottom of the rear bumper of the car. It uses LEDs as light sources. The design of the lantern is non-demountable. If 2 or more light sources fail, the fog lamp assembly is replaced.
_x000D_
_x000D_
Description and characteristics:
The LED rear fog light is of very high quality and is not difficult to install in its original location.
Use the fog light only for its intended purpose and remember to turn it off when not needed so as not to disturb other road users.
Suitable for the following car models:
- Lada Vesta
- Lada Granta liftback
The manufacturer reserves the right to change the characteristics of the product, its appearance and completeness without prior notice to the seller.
| Automobile model | Lada Granta, Lada Vesta |
| Automobile model | VAZ 2191 Granta Liftback, Lada Vesta |
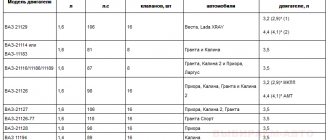
What kind of lamps are installed in the rear lights of Vesta
_x000D_
_x000D__x000D__x000D__x000D__x000D__x000D__x000D__x000D__x000D__x000D__x000D__x000D__x000D__x000D__x000D__x000D__x000D__x000D__x000D__x000D__x0 00D__x000D__x000D__x000D__x000D__x000D__x000D__x000D__x000D_
| Brake/side light lamp | P21/5W |
| Rear lamp internal | |
| reverse lamp | W16W |
| side light lamp | W5W |
_x000D_
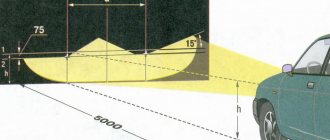
By the way, do you know how Vesta’s headlights shine compared to foreign cars of a similar class?
Categories of products that may be of interest to you based on the article “Replacing lamps in the rear lights of Lada Vesta”:
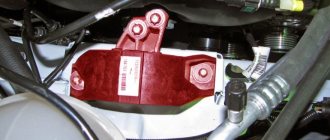
Where is the oversize fuse located?
The fuse mounting block is located in the engine compartment, just above the battery. When opening this unit, you must be careful not to damage the latches. They are fragile and need to be bent with smooth movements. In this block, if the reverse light does not work, fuse F74 (5 A) must be replaced.
Replacing fuses. Photo source: https://carpedia.club/Zamena-predokhranitelei-i-rele-Lada-Granta
Replacement of size fuses on Vesta is carried out in the interior mounting block. It’s not difficult to find: it’s located to the left of the driver’s feet. To open the fuses, you can use the following instructions:
- Turn the three plastic handles that hold the lid.
- Remove the fastener on the right.
- Carefully separate the upper parts and pull down lightly. Thus remove the cover.
- Replace fuse F39 if the daytime running lights do not light.
- Replace F42 and F44 if the low beam does not turn on.
- Replace the F8 when the Vesta rear fog light does not work.
- The number plate light has burned out - change fuse F6.
- Replace F16 if the brake signal sensor does not respond.
Each fuse is responsible for a specific function: if they are all in satisfactory condition, the car will operate without interruption.
Lada Vesta lamps
Products from the Dustershop77 range on the topic of the article:
| Image | vendor code | Name | Manufacturer | Price | Availability | Add to cart |
| DC348-64210-01B | Lamp for low beam headlights OSRAM H7 55 W 64210-01B | Original | 500 / 400 rub. Discount: 350 rub. | 6 | ||
| DC347-1987302201 | Lamp for side lights, rear brake lights, reversing light - BOSCH P21/5W | Original | 100 / 50 rub. Discount: 40 rub. | 6 | ||
| DC1860 | Button illumination lamp Logan, Largus, Sandero (1 pc.) | Original | 100 / 60 rub. Discount: 40 rub. | >10 | ||
| DC1574 | Instrument and heater illumination lamp w1.2w baseless with socket | Analogue | 90 / 60 rub. Discount: 50 rub. | 4 | ||
| DC349-64150-01B | Main beam lamp OSRAM H1 55 W 64150-01B | Original | 500 / 400 rub. Discount: 250 rub. | 6 | ||
| DC1463 | Instrument panel and heater illumination lamp (W1.2W original) | Original | 80 / 50 rub. Discount: 40 rub. | 9 | ||
| DC1571 | Double-filament lamp (dimensions-DRL or dimensions-brake) 21W5W | Analogue | 130 / 70 rub. Discount: 60 rub. | >10 | ||
| DC1283-FORTLUFT2825 | W5W Fortluft lamp for front side lights, license plate lights (Duster, Captur, Logan, Sandero, Largus, Terrano) | Analogue | 50 / 30 rub. Discount: 15 rub. | 1 | ||
| DC1929-6025370411 | Illumination lamp for the control unit Largus, Logan, Duster, etc. 6025370411 original | Original | 200 / 150 rub. Discount: 120 rub. | 6 | ||
| DC1573-P21W | Lamp P21W 12V (for foot, fog, reverse, etc.) | Analogue | 100 / 70 rub. Discount: 50 rub. | 3 | ||
| DC1575 | PTF lamp socket H11 (Duster 2011-2015 and analogues) | Analogue | 290 / 250 rub. Discount: 200 rub. | 2 | ||
| DC1577 | Additional brake light bulb w16w 12v | Analogue | 90 / 60 rub. Discount: 50 rub. | >10 | ||
| DC1576 | PTF lamp socket H16 (Duster 2015- and analogues) | Analogue | 900 / 700 rub. Discount: 500 rub. | 2 | ||
| DC1572-921NA | Lamp WY16W 12V 16W Osram 921NA | Analogue | 160 / 120 rub. Discount: 100 rub. | 6 | ||
| DC1528 | BOSCH turn signal lamp WY5W 12V-5W orange glow | Analogue | 200 / 150 rub. Discount: 100 rub. | 5 | ||
| DC2055-7701040849 | Lamp for low beam headlights Duster, etc. H7 55 W halogen original 7701040849 | Original | 900 / 700 rub. Discount: 500 rub. | 1 | ||
| DC2056-7703097176 | Lamp for high beam headlights Duster, etc. H1 55 W halogen 7703097176 | Original | 500 / 400 rub. Discount: 250 rub. | 5 | ||
| DC2057-262923820R | PTF lamp socket H16 (Duster 2015-, 2021-, etc.) original 262923820R | Original | 1900 / 1600 rub. Discount: 1400 rub. | 1 | ||
| DC346-OSRAM2825 | W5W OSRAM lamp for front side lights, license plate lights (Duster, Captur, Logan, Sandero, Largus, Terrano) | Original | 100 / 60 rub. Discount: 50 rub. | 0 | ||
| DC299 | Set of LED lamps | 1700 / 1000 rub. Discount: 700 rub. | 0 | |||
| DC1570 | Turn signal lamp front=rear PY21W orange | Analogue | 130 / 70 rub. Discount: 50 rub. | 0 | ||
| DC671 | LED board in a lampshade with three lamps (cold light 5500K) | 1300 / 1000 rub. Discount: 800 rub. | 0 | |||
| DC666 | LED board in a lampshade with one lamp (warm light 4000K) | 1200 / 800 rub. Discount: 700 rub. | 0 | |||
| DC668 | LED board in a lampshade with two lamps (warm light 4000K) | 1300 / 850 rub. Discount: 750 rub. | 0 | |||
| DC669 | LED board in a lampshade with two lamps (cold light 5500K) | 1300 / 850 rub. Discount: 750 rub. | 0 | |||
| DC667 | LED board in a lampshade with one lamp (cold light 5500K) | 1200 / 800 rub. Discount: 700 rub. | 0 | |||
| DC670 | LED board in a lampshade with three lamps (warm light 4000K) | 1300 / 1000 rub. Discount: 800 rub. | 0 |
DIY crafts for car enthusiasts
In this article I want to tell you why the LEDs in a car blink and what needs to be done to prevent this from happening. There are many LEDs in the car, everywhere, such as side lights, DRLs, etc.
In ordinary LED light bulbs (car) instead of a driver, only 1 resistor is used, which, firstly, is set to 12 volts, and secondly, it cannot protect the LED from surges in the car's on-board network, so they do not serve us as long as we do I would like to.
In a car's car network, the voltage fluctuates from 12 to 14.4 volts, and sometimes it is higher. So we need to sharpen our LED, or rather, make a driver or stabilizer specifically for this voltage, which will power our LED.
The Internet is full of stabilizer circuits for LEDs, but I want to offer the simplest and most proven one. Of course, you can buy a stabilizer in an online store like Aliexpress, but I assure you that making it yourself is much more pleasant, especially since this circuit consists of only 3 parts, does not require any adjustment and works properly for years. And another important point is that this circuit, unlike the Chinese ones, does not create high-frequency interference that affects the reception of radio stations and listening to music in the car, because it is not a high-frequency pulse device, but a linear stabilizer.
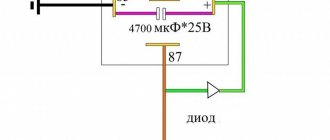
Actually, here is the diagram itself.
Our circuit is designed for a current of 1.5 amperes. That is, simple light bulbs, which, for example, are shown in the figure, will work without any heating of the stabilizer.
But if you connect running lights, you will have to install a heat sink, so to speak, a radiator; you will just need to screw some piece of hardware to our stabilizer so that it heats up less.
The circuit is very simple, designed just for a simple car enthusiast, assembled on such simple stabilizers as L7812 or Krenki, you can take this KR142EN8B. The input voltage can range from 12 to 30 volts, and at the output we will always have a stabilized and constant voltage of 12 volts .
Capacitors can be used from 100 n to 1 uF, they are filters, but if you have never soldered or simply don’t have them, then you don’t have to install them.
This is what I ended up with...
I placed the board in a thermal shrinkwrap and soldered the terminal blocks for ease of connection.
Don’t be lazy and solder such a stabilizer for each of your light bulbs and you will forget about replacing them. Moreover, there is nothing simpler.
Wishing you all the best and peaceful skies above your head.
Popular;
- Linear stabilizer for LED lamps on cars
- Simple voltage regulator on LM317, circuit
- Current stabilizer for LEDs
- The simplest voltage stabilizer for DRLs based on L7812
- How to easily make car lamps brighter.
- Making an LED lamp with your own hands
- Scheme of a simple battery charger with auto shutdown
- DVR in addition to car alarm
Causes and solutions
| Cause | Remedy |
| Damage to the insulating layer of the wiring, short to ground | Replace damaged wiring section |
| Loose contact at terminals, end switches | Crimp the terminals, replace with new ones, if necessary, update the lampshade |
| The lamp has burned out. Number plate light does not light up | Replace with new(es), install LED analogue |
| Formation of condensation and moisture inside the lampshade | Wipe dry, replace seal |
Reviews
| № | Positive |
| 1. | Nikolay Dmitrievich (drive2.ru): the car is three years old, the original license plate lamp is installed, there are no comments on the work. |
| 2. | Semyon (prom.ua): on the advice of his comrades, I replaced the stock NZ lighting lamps with LED ones. |
| 3. | Sergey (drom.ru): the NC backlight is installed as standard, no comments. Maybe in the future I will install LED backlighting. |
| 4. | Konstantin (rozetka.ua): in three years of operation of the car, I replaced the NC light once; it burned out on the left side. I didn’t contact the service, I managed it on my own. |
| 5. | Vladimir (Auto.ru): after the winter, the glass on the NC backlight began to fog up. Disassembled, cleaned, wiped, installed back. Since then the glass has not sweated. |
| 6. | Nikolay (Auto.Mail.Ru): the current backlight works flawlessly; in four years I replaced the lamp on the right side once. |
| 7. | Kirill (drive2.ru): lighting is just lighting, I can’t say anything special. Maybe I'll install diodes, they are brighter than their stock counterparts. |
| 8. | Sergey (drive2.ru): lighting is similar to Lada Kalina, Granta, Priora. The technology has been copied, even the lamps are identical. |
| Negative | |
| 9. | Vladimirovich (prom.ua): the rear license plate light on the left side systematically burned out. Changed it three times. After carrying out a comprehensive diagnostic at the service station, it turned out that the reason was in the fuse for the license plate illumination. |
| 10. | Alexander (Bibika.ru): loose fixation of the lamp in the base leads to the lighting flickering. I contacted the service for a replacement under warranty - they refused because it was not a warranty issue. Managed it on my own. |
| 11. | Valentin (drive2.ru): the backlight is dim, the light is yellow, in a word, it’s not good. |
| 12. | Semyon (Avtodispatcher.ru): I recently replaced the NC lighting, now the license plate is visible from a distance of at least 50 meters. |
Replacing the fuse
In one of the tables, find a device that has stopped working - next to it there will be a designation of a supposedly burnt-out element. At the same time, you will understand where the fuse box is located.
Open the block cover, find and remove the problematic fuse, following the diagrams. The same algorithm applies to a failed relay.
If the contact inside is broken, it means it has burned out. However, this is not always noticeable, so it is better to do a continuity test with a tester.