Author: zaMKADpride
09 September 2015 08:15
Tags: headlight optics
16031
20
For any car, the headlight is a very important design and safety element. After all, “facial expression” largely depends on the shape and size of the optics, and the quality of road lighting is directly related to design features.
0
See all photos in the gallery
Over the nearly 50-year history of cars with a boat on the hood, their optics have come a long way from a classic round headlight with a conventional incandescent lamp to modern-design products with separate BS/DS units, daytime running lights and an electric corrector.
2103/2106
0
The four-headlight headlight system, which appeared on the VAZ-2103 (and then inherited the VAZ-2106), was not easy for the plant, since it required high precision in observing the geometric parameters of the reflector and lens.
0
The city of Kirzhach, Vladimir Region, was not very ready for this, so the whole world had to master the new optics. Thus, the assembled optical element was purchased from) in the GDR, and in Kirzhach only the so-called “pot” was made, that is, the body itself. Then the already mentioned Czech company from the city of N. Jicin began producing such headlights. Above are optics from the German company FER. Below is a Czech PAL headlight.
Completely domestic headlights of type 2103 began to be supplied to VAZ only in 1976 - apparently, this coincided with the start of production of model 2106, which used exactly these optics, for a reason.
Side lights VAZ 2101, 2106, 2107 CLASSIC
American dimensions in the VAZ 2107
Operating principle: The turn signals light up when the side lights are turned on (they work with low and high beam headlights, respectively). When you turn on one of the turn signals, one lights up, and the second begins to blink; when you turn off the turn signal, both light up again. The same story with the emergency lights, both turn signals go out completely and light up in time with the rest of the repeaters.
Here is an image of the diagram on which the work was carried out.
We will need:
2 capacitors 4700uF 25volt 2 diodes IN5819 2 5-pin relays and 2 connectors for them (can be bought at any auto parts store, I personally only found them there) mother/father terminals - I only needed 4 terminals. Straight hands and at least basic skills in using a soldering iron.
And so at home I figured out how everything should be! IMPORTANT! Install the diode correctly, otherwise the circuit will not work.
According to the diagram, someone wired the capacitor to separate wires, but I soldered the capacitor and diode directly into the connector under the relay (it seemed to me more compact and easier), and I went to try it.
Approximately threw some wires to check functionality
It turned out that all the turn signals light up along with the dimensions (on the left side because that’s where the work was actually done). I thought about what could be there, and turned to a guy who was already putting together such a circuit for himself. It turned out that the main thing is to disconnect the + that goes to the turn signal from the turn signal itself and run it through the relay (according to the diagram).
Dimensions in the turn signals of the VAZ 2104
I decided it wouldn’t be a bad idea to add some dimensions to the turn signals.
I will need:
1. Holder for a baseless light bulb from a VAZ 2107 turn signal repeater (which is on the wing). 2. TWO baseless light bulbs (with antennae), each 5W - you can supply more power. 3. Wires and females.
Don't be afraid to drill, nothing bad will happen - I checked. There is only one “but” - when you start drilling a hole for the light bulb holder, be sure to remove the 21-watt turn signal bulb with a socket from the headlight unit, otherwise you may hit it with the drill and then you will have glass in the headlight unit. As for the wiring, I think you’ll figure it out - there’s nothing complicated... Be sure to insulate the mothers that are plugged into the light bulb holder - just in case. Sorry that I can’t post a photo with the dimensions turned on, I can’t set up the camera so that it shows how the turn signals are shining normally, I just took a photo from my phone (there’s a terrible glare and the colors are smeared), the other day I’ll take a photo with a normal camera and post the photo, no no doubt, it looks very nice, such a soft light in an orange block, it looks nice. Some people also do it with a two-pin light bulb, but I abandoned this idea - there you have to saw the CARTRIDGE, drill it, stretch some wires there, solder the contacts. Then this whole structure is not easily accessible, and if the light bulb burns out, it is difficult to change. There is one contact that needs to be unsoldered, in short, it’s difficult!
Transfer of side lights from standard sidelights to standard VAZ 2106 headlights
The purpose of the transfer is to improve the appearance of the car and increase safety. It’s not news that the side lights in the sidelights of the six are barely noticeable on a dry summer night, not to mention the slushy autumn and dark snowy winter, when a snowdrift accumulates on the bumper, covering the sidelights. The side lights in the headlights are perfectly visible in any weather.
For the modification you will need: Tools: — Drill — Mandrel — Pliers for mounting terminals — Phillips screwdriver — Side cutters — Drills, with a diameter from 2mm to 13mm*
Details: — Bulb socket socket. We buy old, dead headlights from a VAZ-2101 at a flea market and rip them out. The issue price is 5 rubles/piece. — Cartridges of VAZ-2101 dimensions. We buy new ones at the store. 3 rubles/pcs. — Headlights VAZ-2106. We buy new ones in the store for 100 rubles/piece. — Wire 2m. — Terminals, “mother” type 10 pcs. — Philips BlueVision 12V 4W light bulbs 4 pcs. those. two packs. (shines white)
First, we measure the diameter of the hole in the VAZ-2101 headlight, I no longer remember the exact number. And having marked a point on the new VAZ-2106 headlight, we drill a hole, gradually increasing the diameter of the drill. You must have at least 10 drills so as not to damage the headlight reflector, because... it itself is very thin.
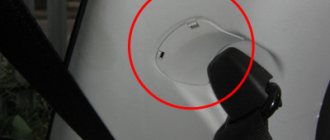
We mark the place for drilling the hole according to the headlight pot, there is a small recess in it, so we drill opposite it. Otherwise, the socket with the light bulb will rest against the pot.
After the hole is drilled, we squeeze the cartridge socket a little and insert it into the hole. Then, using a mandrel inserted into the center of the socket, we crush the socket so that it sits tightly and securely on the headlight reflector. The technology is simple, implemented in the VAZ-2101 headlight, all that remains is to repeat it.
Next, insert the light bulb into the socket, and the socket into the socket. The headlight is ready. We repeat the same thing with three more headlights. All lights are ready.
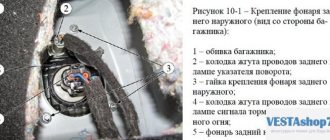
Next, you need to connect the wires to the size bulb. We open the contact pad to which the wires from the standard dimensions fit. We remove the yellow wire from the block and insulate it. In place of the yellow wire, insert a terminal to which we connect two blue wires (if there are no blue ones, you can take wires of a different color). We thread the other ends of the blue wires into tubes that go to the headlight pots. Having threaded the wire, we attach a terminal to the end. This will be a “+” size that clings to the contact of the newly installed cartridge. We connect the block. “-” we take from the fastening of the headlight pot, screw a wire to the screw at the end of which we install a terminal. On the other side we do the same. The wiring is ready.
We connect the terminals of the new wires to the headlight bulb. We bend the protruding tip of the cartridge so that it does not rest against the headlight pot. We install the headlights in place.
When installing, be sure to properly insulate the terminals and the housing of the side light socket so as not to damage the ground.
As a result, we get side lights in the headlights that shine bright white. I've been using it for 2 years now.
https://www.drive2.ru/l/3201918/, https://www.drive2.ru/l/288230376152109355/, https://www.drive2.ru/l/288230376151790549/
next article:
LEDs for headlights of VAZ 2101, 2106, 2107 CLASSICS
Contents of the article: Making LED lights for the VAZ 2101 with your own hands Installing LEDs in the lights
Rating 3.50 [1 Vote]
2105/2107
0
At the VAZ-2105, the plant was able to apply several progressive solutions at once for the first time. Firstly, domestic halogen light in head lighting. Secondly, the type is a block headlight instead of a separate arrangement of the head light and sidelights. Thirdly, the optics received a hydraulic corrector, which made it possible to adjust the tilt of the light beam depending on the vehicle load. In addition, as an option, the headlight could be equipped with a brush cleaner. The windshield wipers on the headlights of the 5 weren't even on the pre-production prototype!
0
Already traditional for VAZ cars, block headlights for the “fifth” and “seventh” models began to be produced at the Czech Autopal. Headlights VAZ-2105/2107 of different periods and manufacturers. On the left is the early one.
In order to master production in Kirzhach, it was necessary to purchase licenses for both the headlight and the corrector from the French company Cibie. In addition to the license, technological and measuring equipment was also purchased from this company. Its presence, together with the experience gained during the development of the “fifth” headlight, made it possible to master the headlight unit of the next model, the VAZ-2108, without additional costs.
Tuning the head optics of the "seven"
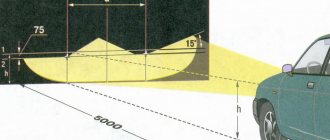
With a fairly simple operation, you can significantly improve the quality of lighting at night with your own hands by slightly changing the headlights of the “seven”.
The process of tuning the headlights of VAZ 2107 cars looks quite simple:
- We remove the headlight and open it with a knife, thoroughly heating the sealant at the joints.
- We take the lens from the reversing light of the Oka car and install it in our headlight.
- We put the headlight glass in place, using sealant and making sure that there are no air channels.
After this simple operation, the headlights of your car will provide better quality light, which will significantly improve your visibility of the road at night.
Samara/Samara-2
0
The “eight” headlight featured an interesting solution - a turn signal in a separate housing. Like on the “five,” the headlights could optionally be equipped with a brush cleaner, but they were practically never found on cars for the domestic market.
0
During the renovation of Samara, a new headlight was required that would fit into the modified front end design. Due to the low height of the headlights, the designers had to use a plastic homofocal reflector with an H4 lamp, and the representatives (formerly “Red October”) wanted to use thermoplastic for the reflector, but the problem of heat resistance and compliance of light characteristics with “GOST” standards was solved only by using thermorectoplast type DMC , as VAZ designers originally proposed. However, it is precisely because of the “cheap” solution with a small plastic reflector with a traditional glass diffuser that the Samara-2 headlight, compared to the optics of other models, has low lighting characteristics - in other words, it shines worse than ever. Alas, with such small dimensions of the reflector it was necessary to switch to a new type of optics - a lens. Plant specialists during the fine-tuning of Samara-2 optics.
0
Headlights for Samara-2 were produced by two factories - in Kirzhach and in Ryazan (the so-called “Boshevskie”). They differed slightly in design, and products from Ryazan can be recognized by the shiny body of the headlight near the lens. On the left is a headlight from the Automotive Lighting plant (Ryazan), on the right is Avtosvet (Kirzhach).
Installation of xenon headlights
The disadvantage of xenon is a strong stream of light rays directed at the oncoming driver. As a result of blinding, an accident may occur. Therefore, the installation of these lamps in the headlights is prohibited by traffic regulations. Xenon lamps have better characteristics than halogen and LED lamps.
Original xenon designs have a high price. They come with a special unit that regulates the angle and flow of light waves, cleans the surface of dust and dirt, otherwise the lamp will simply burst due to overheating.
Car repair specialists do not recommend buying non-original xenon designs. They can be unreliable and dangerous.
Kalina
0
For Kalina, Bosch was chosen as the headlight supplier. The headlight glass no longer functions as a lens, which makes it possible to get rid of the characteristic “notches.” Thanks to a competent design and a serious approach to fine-tuning, the Kalina headlight with H7/H1 lamps turned out to be noticeably better than its predecessors in terms of lighting characteristics.
In addition to the plant in Ryazan, Kirzhach also mastered the production of headlights for Kalina with the direct participation of the Czech company NAT (Nellaautotehnika). In addition, the lenses on headlights from Kirzhach began to be made of plastic, which made it possible to reduce the weight of each headlight by about 1 kg. However, compared to glass, this material is less durable due to the abrasive effect during operation. Another useful innovation is an electric light beam tilt corrector instead of the traditional hydraulic one. The electric corrector is much more reliable and durable than the hydraulic corrector, and there is no need to install fragile hydraulic pipes under the hood.
DIY headlight tinting
You can use tint to help improve the exterior of your car. It is applied to both front and rear light sources on cars. However, the rear ones are tinted much more often.
This is a job that is very easy to do with your own hands. As materials you can use:
- tinting varnish;
- tint film.
The varnish is sold in cans - one is enough for you. The container should indicate that this is a varnish for tinting car lights. Next you do the following:
- wash and dry the headlights of your car, you can remove them or leave them in place;
- cover them in a circle with masking tape to protect them from getting varnish where it is not needed;
- degrease the surface;
- apply varnish from a can from a distance of 30 cm, make sure that it applies without drips and evenly;
- take breaks between layers, let the varnish dry a little;
- After the last layer has completely dried, polish to achieve a matte effect.
To remove varnish, use a cloth and acetone. This will help you get rid of the tint without any problems.
Tinting taillights with varnish
Film is more convenient in this regard - you can get rid of it at any time when it becomes necessary. Pasting is carried out according to the following scheme :
- the headlights of your car are washed and dried;
- the surface is degreased;
- the film is tried on and cut;
- spray the surface of the headlight with a soap solution;
- the backing is removed from the film and applied to the headlight;
- Using a rubber spatula, the film is smoothed with pressure, water and air are removed.
When applying tint to your car's lighting sources, be careful. Otherwise, you may have problems with the traffic police. This may lead to an emergency on the road.