Price issue
If you decide to replace the rocker seal at the same time as installing the rocker itself, this can be considered absolutely the right thing to do. Additionally, replacing the driveshaft will not cost much, but the efficiency of such a comprehensive repair will be much higher.
Actions on your own, you only have to purchase the necessary parts and ordinary consumables. If you contact a car service, the minimum cost of the service will be 800-1000 rubles. That is, the savings are obvious.
The curtain itself costs about 400 rubles. From here it becomes clear why we did not advise buying a repair kit, but rather completely replacing the part. There will be no savings as such, but the difference as a result of the repair will be significant.
Short-throw rocker for VAZ 2114, do-it-yourself adjustment
Print this article Font size 16
Over time, almost everywhere possible, backlash begins to appear on cars produced by AvtoVAZ. The gearbox is no exception. It is not surprising that replacing the rocker on a VAZ 2114 has become a routine procedure familiar to all owners of this model.
Set
Determining the malfunction is quite easy:
- Gear shifts with problems, indistinctly;
- The gearbox is loose.
If such a malfunction occurs, a complete replacement of the element may be required. Moreover, many are switching to a short-throw rocker, which gives the car a more sporty character. This technology was borrowed from motorsports. By the way, a simple adjustment can turn it into a short-stroke one.
Some masters argue that it is not always wise to completely change. It is more profitable from a financial point of view to purchase a repair kit. But in fact, such repairs do not give the desired result, and after a while the link will still have to be changed.
Pros and cons of a short-throw rocker
The motorist should understand that replacing the VAZ 2114 backstage will bring not only positive aspects to his life, but also some difficulties, which is worth knowing in advance.
So, the clear advantages of such modernization include:
- reducing the travel of the gearshift lever by two or more times;
- eradication of backlashes present in the standard scenes of cars;
- high switching accuracy;
- minimal use of the driver's shoulder to change gears (the load is transferred to the hand).
Short-stroke kit
There is only one downside: reducing the force lever leads to an increase in the load on the synchronizers, which increases the rate of their depreciation by two or more times.
Removing the gearshift lever
Before you begin dismantling the handle, you need to carefully examine the entire space next to it and understand how it comes apart. There is nothing complicated about this, the main thing is to follow our instructions exactly:
- If there are additional armrests and other elements installed independently, we dismantle them so as not to damage them during the work.
- Carefully remove the casing (plastic or leather - approx.) so as not to tear or break it.
Dismantling should be carried out carefully so as not to break anything. - Now that all the interior decoration is visible, let's move directly to the backstage.
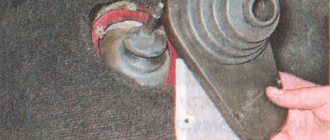
To do this, using a key set to “13”, unscrew the nut securing the lever. If the lever does not budge, you can treat the surface with WD-40. - After this, you can dismantle the lever with the same bushing, and carry out work to eliminate rattling and vibration.
The old bushing is marked with a red marker.
Vibration Elimination Process
After you have the bushing with the lever in your hands, carefully inspect it visually for visible damage and signs of wear. Because if they are available, you may have to buy the same spare element, so that a little later you won’t have to do the work of dismantling, repairing and adjusting it.
The new bushing looks much better
The procedure for repair work with the bushing
- First of all, we dismantle the plastic cover on the bushing in such a way as to free its metal base.
Disassembled gear lever bushing - We inspect it for traces of friction, which will indicate a discrepancy in its size (when the bushing is several millimeters longer, usually 2-3 mm - approx.).
We went to the store and measured the new bushing there and compared it with ours! - If the above facts are confirmed, then this reason can be corrected by simply grinding off the excess by hand using a file.
- Next, we move on to repairing the lever itself, and if there is any damage, friction, etc. on its body, we simply wrap this area with ordinary electrical tape in order to fix it more tightly in place and provide it with the tightest contact.
The VAZ 2109 gearshift lever is loose, what needs to be changed? | Topic Author: Taichi
In general, the problem is this... the fact that the gearbox lever dangles, I can’t control the speed... at any speed the lever dangles like in neutral... but I can’t catch 5 at all... I only drive in 4 all the time... what do I even need to change?? clip? backstage? cardan, or does something need to be changed there in this rubber band at the bottom (where is the cardan)? What needs to be changed..so that the gearbox and speed are turned on normally? ! help me please
Roman (Dhruv) is also loose on my tweeter (I changed the ball joint of the lever, it didn’t help!!!). On the new ones it’s also loose!! it's a disease!! I read an article, a guy from the inside under the lever casing stretched the usual rubber bands from his underpants, the lever stopped hanging!!! Nikita (Borys) had the same problem. I changed the backstage. and everything seems to be fine now Tima (Husam) installed a driveshaft from the viburnum, half an hour of work and everything is fine) but before it was also loose, the rear from first and fifth were generally difficult gears. Vladimir (Philipi) change the rocker Evgeny (Hawa) you need to change the choice Viktor (Aldonza) Nikolay, Exactly the same for me on 9. I installed a Kalino cardan, nothing has changed. Most likely the linkage needs to be changed. Danil (Oceanus) First, check it, put it on the lift and see, maybe the nut that secures the rocker is just loose, I had this happen, take the key to 13 and tighten it, judging by the symptoms, it is, but you need someone to hold the gearshift lever Oleg (Ebrilla) +1 The bolt on the driveshaft often comes loose, the symptoms are exactly the same, I had it on both the Pyatakh and Kalina, you pull the cover off the driveshaft and turn it to 13 with the key. For 2 minutes. Stanislav (Eris) Change the gearbox hinge and install from the viburnum Pavel (Melisenda) the linkage needs to be changed! ) Dimka (Kadin) my drawstring is the same crap Nikolay (Gavriella) should I change the assembled drawstring and everything will be fine? Vyacheslav (Maurizia) change the link, there is a bolt on the crosspiece that is constantly unscrewed and the shaft on the box may come loose Alesha (Dashratha) Nikolay, the link is assembled =) the price of the issue is less than a thousand... )) Danil (Oceanus) So, first check what you mean I wrote to you, why don’t you immediately throw away the money? Nikolay (Gavriella) the nut on the rocker is normal... I already looked at Mikhail (Setara) I just tightened the bolt on the cardan and everything stopped Stanislav (Eris) My bolt securing the gear shift mechanism and the rod inside the box has come loose. It was also dangling until it completely unscrewed :) Vladimir (Philipi) I have the same problem ((in any gear like in neutral, replacing the rocker didn’t solve the problem!!!! I just started catching gears a little better, but I feel like I’ll tear the hell out of everything there soon because that you shift from 3rd gear to 1st, and the same 3rd gear gets stuck, you panic, get nervous, and there is such a crunching sound, in short, it’s scary, what should I do????? Thanks in advance, I’m a newbie with the pelvis)
What is a gearbox rocker?
Many drivers mistakenly believe that the rocker refers to the gear shift lever, but this is not entirely true. If we are talking about a gearbox rocker, we mean a composite mechanism whose task is to connect the gearshift lever and the rod. That is, the driver cannot see the backstage, much less touch it. This element is located between the lever and the gearbox itself, and it is located under the bottom of the car, near the driveshaft, and in some cases under the gearshift lever itself.
As can be understood from the description, the rocker regularly has to deal with serious loads, so this element must have good strength. Despite this, the slide is susceptible to damage. If it does not contain enough lubricating components, drops of water, dust or other “debris” have entered it, there is a high risk of part failure.
Please note: On some cars, the rocker can last 200-300 or even more than thousands of kilometers without replacement. But, if we take the average result, the gearbox usually fails after 100 thousand kilometers of operation.
What is a short-stroke link?
Let's dive a little into the history of the creation of the node in question. It all started with auto racing. If you study the history of the origin of many working units that today are attributes of a modern car, you will notice that all of them, or almost all of them, came to us from motorsport. This is where the constant search for new products, upgrades, improvements, and driving comfort takes place. The same thing happened with the backstage.
Racing drivers once came to the conclusion that when they have to save every second, they waste time changing gears. It’s distracting, disruptive, inconvenient, and ill-conceived. Auto mechanics took care of the problem, and as a result, a short-stroke rocker was created.
At first, KK was used exclusively on sports cars and was their calling card, as it significantly reduced the time for changing gears. It became an excellent novelty, which was quickly adopted by all the world's manufacturers of sports models. Over time, the device migrated to ordinary cars.
An undeniable advantage of the system is the reduction of strokes during gearbox shifting. The short-stroke rocker ensures that the gearbox operates without backlash. Thanks to the CC, gear fixation becomes clearer and easier. And now about the minuses, or rather about the minus, in this case there is only one. This is a possibility of synchronizer failure. This happens due to increased load during gear shifting.
Why change the backstage
There are situations when it is necessary to intervene in the gear shift mechanism due to the failure of a component. But there are cases when an extreme measure is required - replacing the VAZ-2109, 2114 rocker.
In these cases, replacement is required:
- An oil leak appeared due to damage to the oil seal. Only the oil seal can be replaced.
- Complete failure of the scenes.
- You have realized the advantages of a short-stroke design and you have the funds for this kind of tuning.
Symptoms of gear shift mechanism failure:
- Increased gearshift lever play. Please note that this behavior may also be caused by a loose cardan. Sometimes the bolt securing it gets screwed out, so to reduce the backlash it is enough to tighten it, and first apply a drop of thread locker.
- Difficult to shift into gear. Sometimes extraneous sounds are heard.
- Gear shifting is not possible.
- Inconsistency between the position of the lever and the selected speed. For example, the back one disappears, and the first one is in its place.
If a slight play appears, it is advisable to carry out diagnostics and identify the breakdown of the unit. Make repairs immediately, otherwise one or more speeds will disappear at the most inopportune moment.
Repair or replacement
Before deciding whether repair, adjustment or replacement of the link is necessary, it will have to be disassembled.
- Remove the cover on the gear shift knob;
- The machine must be installed on a jack or on an overpass (pit);
- Remove the front console, which is bolted on;
- Remove the rocker by unscrewing 6 bolts.
During this procedure, carefully inspect all parts. You definitely need to bend the boot and inspect the condition of the support, cardan shaft, and oil seal.
It may be necessary to use a rem. kit, and perhaps a more complex repair is needed.
If the bushing is deformed, it needs replacement. If the cardan has play, as well as if the hole in the lever axis is worn, a complete replacement of the link and repair belt is necessary. the kit clearly won't help.
It happens that the rocker pad is to blame for the rattling noise when changing gears. Replacing a pillow is a simple operation, but can be beneficial.
How to adjust the rocker on a VAZ 2110 with your own hands
Before adjusting the gearbox linkage, it is necessary to perform a number of preparatory work:
- Drive the car into the pit.
- Tighten the handbrake and install the wheel chocks.
Method No. 1 - adjusting the rocker according to the rear speed.
- Loosen the clamp.
- Engage reverse gear and position the lever as you would like it to be in this position.
- Then tighten the clamp and check how the rocker works, whether you are satisfied with the current position of the lever and the operation of the rocker.
Method No. 2 - adjusting the rocker at first speed.
This method is used, as a rule, when the first method did not produce results.
- Turn on first speed.
- Loosen the rocker clamp.
- Turn the rocker drive counterclockwise until the gearshift lever begins to rest against the plastic reverse speed stop.
- Tighten the clamp and check how everything works.
Method No. 3 - adjusting the scenes in neutral.
If you do not have a plastic stopper, the adjustment is made in neutral gear.
To adjust the neutral position of the gearshift lever, you need to accurately calculate the depth of the shift of your gearbox to the driveshaft of the VAZ 2110. Sometimes such manipulations result in the appearance of annoying rattling of the lever.
If adjusting the rocker does not lead to anything and there is still a problem with switching, replace the rocker completely or ask for help from specialists.
Sometimes cases arise when fifth suddenly disappears, reverse gear does not engage, or reverse gear is engaged instead of first. Don’t rush to remove the box, just try to adjust the bushing on the heel of the gearbox. Adjusting the rocker of a VAZ 2110 (or VAZ 2112) is quite a difficult task, as it might seem at first glance. But this is only at first glance. Somehow the reverse gear disappeared at ten, and I thought that now I would have to change the box. I decided to look on the Internet with the hope that maybe not everything was so bad, I went to a couple of auto forums, and decided to check the gearbox mount and the bushing on the heel. I started with the less difficult one. To check the pillow, I took a jack and lifted the box, I tried it - everything worked. I bought a new pillow, changed it, but the speed does not turn on again. And here it began... from the pit to the car showroom, from the car showroom to the pit, trying to re-adjust the bushing on the heel and so on for an hour, when I wasn’t tired of everything, I sat down to rest and think carefully about how to adjust the rocker on a VAZ 2110 (or VAZ 2112). During a smoke break, one bright thought came to me, which ultimately helped me tame this unit.
Varieties of backstage
All existing models can be divided into two large groups: long-stroke and short-stroke. Within these groups, various designs with their own characteristic features are allowed.
- Long-stroke scenes are usually called standard. These are the parts that the manufacturer installs on various VAZ models (from 2109 onwards).
- Short-travel rockers are more common in Kalina cars. However, the design of both parts is very similar.
What then is the difference between these devices? It's their size. The short-stroke rocker is smaller, so its big advantage is the convenient lever travel. Gear shifts with higher precision. Perhaps the most serious drawback of this device is its price. As a rule, a short-stroke link costs much more than a long-stroke one. In addition, some car owners note that after replacing a standard part with a short-stroke one, they have to use more force to change gear. So, how to adjust the rocker on a VAZ 2115?
This procedure can be carried out using the following simple steps:
- The nut located on the clamp needs to be loosened.
- Adjust the position of the lever - move it to the reverse speed position, and then tighten the nut on the clamp.
- Check how the gears are engaged: if the reverse gear has moved too far to the left, you need to loosen the clamp a little and smoothly turn the cardan counterclockwise. If the speed goes to the right, the cardan must be rotated clockwise.
How to check whether the adjustment was carried out correctly? To do this, the lever must be installed in the center. If the transmission is in neutral, then everything was done correctly.
Important reminder: The lever must be positioned so that it can move freely without impacting the passenger seat (in fifth gear) or the driver seat (in reverse). Otherwise, the lever must be readjusted.
The cardan installed by the manufacturer on the VAZ 2115 is characterized by small backlashes. To get rid of the associated vagueness in switching, you simply need to replace the “native” part with a cardan from Kalina. The experience of many motorists shows that it is more reliable and can last much longer than the standard one. It is worth considering that the Kalinovsky cardan is slightly longer than the standard one. For this reason, it must be shortened before installation. For this procedure you will need the following equipment: a grinder, a clamp, tape and a grinding tool. And, of course, it is important not to forget to first remove the “native” cardan. How to make the driveshaft from Kalina shorter:
- Compare the sizes of the standard and Kalinovsky universal joints, and wrap the part that needs to be cut with tape.
- Install the cardan into the clamp and get rid of the excess length using a grinder.
- Go over the finished part with a sanding tool. This will make it easier to install.
The following are the steps on how to install a prepared cardan on a VAZ 2115:
- Check how accurately the cutting was done - to do this, the part must be inserted into the hole allocated for it. If the cardan fits in without problems, then the trimming was completed successfully.
- Install the backstage boot.
- Place the newly shortened cardan and secure it with a wrench.
- Pull the previously installed boot completely onto the cardan.
It is important to remember that the oil seal may also need to be replaced. So during the process of replacing the cardan, it is worth inspecting the oil seal for damage.
Features and purpose of the scenes on the VAZ-2110
The easiest way to get acquainted with the principle of operation of the backstage is to study the photo drawing of the product. This functional unit is directly connected to the operation of the gearbox and, through a lever transmission, allows you to switch the gears of the driven shaft. Thus, the driver can change the gear ratio of the drive and driven shafts of the gearbox. It's no secret that thanks to this you can change the speed of the car and accordingly adjust the torque that creates traction force on the drive shaft of the wheels. Thanks to the rocker, reverse gear is also engaged and the movement of the vehicle can be completely blocked.
VAZ 2110 backdrop
Naturally, the rocker plays one of the key roles in the car control system. If the gearshift lever is faulty, full-fledged driving in real road conditions becomes difficult, and sometimes even becomes impossible. Unfortunately, this functional unit can break down quite often. Surely, you will be interested to know why this happens and how to prevent the malfunction of the link in time. The next section of our article is devoted to these issues.
Self-adjustment of the rocker on a VAZ 2110. Adjustment of the gearbox rocker with your own hands
The gearbox linkage, like everything else in a car, requires care and timely adjustment. A misadjusted gearbox linkage can cause discomfort while driving. For example, the gear knob may rattle, the gear shift may become inaccurate, the speeds may “knock out” from time to time, and the lever itself may begin to “play.”
To get rid of all this, you need to carry out a simple procedure for adjusting the gearbox rocker, especially since adjusting the rocker will take you no more than half an hour.
The gearbox slide is necessary to prevent random switching of gears due to the simultaneous movement of the sliders. Often, the entire transmission suffers from an incorrectly adjusted rocker, and as a result, you are at risk of malfunctioning the entire gearbox. In our previous articles, we have already talked about this detail several times, for example, in the article: About how to install a short-throw rocker on a Lada Priora. and also in the article: Installing a short-throw rocker on a VAZ 2109. In addition, the issue of engaging gears and gearboxes is addressed in this article.
Adjusting the gearbox slide requires the presence of an assistant, in which case the result, and the work itself, will be of better quality. It is fashionable to adjust the slide in several ways; below we will talk about each of them in more detail.
Replacing the universal joint
Most often, faults occur in the cardan, and not in the rocker itself, so it is this that needs to be replaced. Even the slightest displacement of the cardan can cause failures in the entire gear shift mechanism.
- Step 1. Release the clamp on the drive rod and pull it off the rod.
- Step 2. Remove the boot and knock down the cardan. This must be done carefully, with light blows of a hammer. If cuts or other damage is found on the boot, it is best to replace it with a new one.
- Step 3. Install the new universal joint. In this case, you need to do all the steps in reverse order, but do not tighten the clamp. After this, you need to adjust the system (the sequence of actions is described in the corresponding subtitle of the article).
In this guide, we talked in detail about adjusting the shift link on the VAZ 2115, listed the types of this part, suggested how it can be modified, and also described the process of replacing the gear shift link.
Content
Replacing the rocker rod oil seal
The normal condition of the oil seal determines whether the oil “disappears” from the gearbox, so if you notice oil stains on the asphalt after parking, you should think about whether it is the oil seal or the oil filter.
Therefore, after checking the filter, it’s the seal’s turn. A malfunction of the VAZ 2110 oil seal can also be suspected if a crunching sound is heard when changing gears.
The oil seal can only be replaced in a hole, overpass or other device that allows you to get under the car:
First of all, we pay attention to the rubber boot. If oil escapes from the VAZ 2110 gearbox through the oil seal, then the entire boot will be in its drops; We bend the boot and disconnect the cardan, gaining access to the cuff; We remove the cardan from the lever, and then from the rocker; Having removed the cardan, we get to the oil seal; Using an awl and a hook, remove the cuff on the gearbox; Now you need to press in a new oil seal
Traditional craftsmen usually install it using a plastic bottle cap; If the replacement was successful, we return everything to its place, install the boot, and we can consider this minor repair complete.
Remember that any rocker repair will not be successful if it is not adjusted correctly. It is best if the setup is done with an assistant, since it is problematic to do this on a VAZ 2110 yourself.
How to replace the oil seal
If you detect an oil leak from the gearbox, carefully inspect the crankcase. The leak will reveal itself. Lubricant usually leaks out through the CV joint seals and rocker panels.
In the latter case, to replace you will need to perform a number of actions:
- Purchase a new gearbox seal for VAZ-2109, 2114. Its price is about 100 -200 rubles.
- Drain the oil completely from the gearbox by unscrewing the plug from the bottom using the key “17”. If necessary, you can replace the lubricant later. It is recommended to pull out the upper dipstick to facilitate oil drainage.
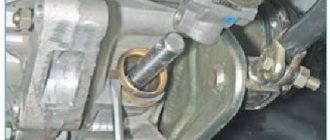
- Disconnect the cardan from the rocker arm.
- Remove the boot, use a 10mm wrench to unscrew the bolt securing it to the gearbox rod.
- Using an awl or a thin screwdriver, remove the old oil seal. Inspect it for damage.
- Install the new oil seal using a pipe or large washer to press in.
After replacement, install the boot. Assess the condition of the cardan: if it has too much play, it will need replacement. After carrying out all the work, be sure to check that the speeds are turned on correctly.
Replacing a short-stroke rocker on a VAZ 2114
VAZ models received one unpleasant feature: with age, backlashes appear in some parts of the car. We are talking about the transmission, engine, and gearbox. There is no need to wait until all the parts of the unit wear out, since a complete replacement will cost more than modernization. In this article we will talk about tuning the gearbox, or more precisely, about installing a short-stroke shifter (SC) instead of the standard one. Here, VAZ 2114 owners have three options: installing a freelance rocker, making the part with their own hands, and also adjusting the standard unit.
Important! Defects in the operation of the gearbox may appear due to the oil seal, the “symptoms” of which are similar to the rocker. A visual inspection is enough to determine whether the seal is working or not.
The analysis can be performed according to the scheme from this article.
The short-throw rocker reduces gear shifting time, which is why this part was originally only found in sports cars. Subsequently, almost all automakers included a short-throw rocker in the design of their cars. AvtoVAZ lagged behind foreign cars a little, so the first model of the company with this part was the Lada Kalina, so if you install a freelance element, then it’s from the Kalina.
Is it difficult to change the slide yourself?
In order for the short-stroke rocker to feel the beauty of the absence of play and vibration in the lever, it must be installed correctly. If the installation is carried out in a car service center, you don’t have to worry, but if you replace it yourself, you should take this with full responsibility. The whole procedure is reminiscent of replacing the rocker seal - almost half of car owners face this operation. The need to replace the oil seal is very eloquently indicated by the characteristic crunch that is constantly present when switching gears.
If we analyze the process of self-installation of a short-stroke rocker in more detail, we can highlight the following main stages of work.
- The interior cover of the lever along with the handle is removed with a simple sharp jerk upward.
- Using a 13 key, the clamp is loosened and the lever rod is removed from the propeller shaft.
- The reverse speed locking ball is released, for which you will need to remove the ring blocking it.
- The retaining ring and lever are removed along with the ball and spring, located in a separate housing.
- Now it will be possible to remove the lever along with the rod through the interior. If necessary, they can be previously disconnected.
- Next, the cardan is removed, from which the boot is first pulled off and the bolt located on the left side is unscrewed.
- The new cardan is lubricated with lithol; when tightening the fastening, you should not be too zealous.
- The rod is also mounted from the interior. It will be much more convenient to carry out this work together.
Further assembly is also not difficult. The rod is put on the cardan rod, after which it will be necessary to assemble the reverse gear locking mechanism. It is better to lubricate its ball first. After this, before the final tightening of the mounting clamp, the final adjustment of the lever and the reverse gear locking system is carried out - in some cases the mechanism often does not coincide with the plate, then it will have to be removed and the existing hook adjusted. The process of installing a short-throw rocker on a Priora can be seen in the video:
Most car owners who, for one reason or another, decide to replace the standard linkage with a short-throw one, remain satisfied with the speed and clarity of gear shifting
If we take into account the very low cost of such an upgrade, which can also be done with your own hands, the advantages of a short-stroke rocker increase
Even if the driver does not particularly care how long it takes to engage the gear, the almost complete absence of extraneous noise and play is inevitably noted by every driver
Instructions for making a CC with your own hands
It’s worth making the rocker yourself if you have experience in repairing and upgrading car parts. A high-quality short-stroke rocker will work no worse than the unit from the Lada Kalina. For manufacturing you will need the following elements:
- RPP from VAZ 2114.
- Axle and bushings from 2114 (included in the gearbox repair kit).
- Tube with a diameter of 15 millimeters.
- Ball nut.
- Cardan from Lada Kalina.
The first step is to cut off the ball from the RPP, the lower edge of which should be cleaned under the pipe. Next you need to weld a 15mm pipe. A regular nut should be welded to its lower edge, and a ball nut should be welded to it. The cardan from Kalina must be attached to the gearshift lever. Parts such as bushings and axles are simply replaced with new ones from the VAZ 2114 (preferably they should be new).
How to eliminate the rattling of the VAZ 2114 gearbox handle
Often, the VAZ 2114 gear knob resonates with the operation of the engine and makes an unpleasant rattling sound due to the following problems with the bushing:
- wear of plastic bushing inserts;
- discrepancy between the length of the sleeve and the dimensions of the fork.
In the first case, you will have to change the plastic inserts or the bushing assembly. In the second, you will have to bring the dimensions into line. To do this you will need a file, electrical tape and a vice. Often the manufacturer installs a bushing, which with its edges touches the traction fork (stage) and knocks on it when it vibrates. To get rid of noise, you need to do the following:
- unscrew the bushing fastening;
- remove the bushing;
- clean (wash with kerosene) the bushing from any remaining lubricant;
- make preliminary markings by drawing a line 1-3 millimeters from the edge of the sleeve;
- wrap the sleeve with electrical tape along the marking line, leaving the edge open;
- Clamp the bushing in a vice and use a file to file off the edge protruding from the electrical tape.
After such an operation, all that remains is to put on the plastic inserts and put the gearshift knob in place. The edges of the bushing will no longer touch the metal fork and the VAZ 2114 gear knob will stop rattling.
Replacement instructions
Before starting work, we advise you not only to purchase a new spare part, but also to watch training videos on replacing the slide. The procedure is not very complicated, but a visual aid will never be superfluous. Especially if you do not have much experience in repairing a car and transmission in particular.
Replacement procedure
The process involves performing several sequential steps.
- Remove the housing from your gear shift knob.
- Raise the car using a jack. In some cases, an inspection hole will do, if you have one in your garage.
- Now you should dismantle the console, which will give you access to the backstage.
- The element is held in place by six bolts, which can be removed using a regular 13 mm wrench.
- But it's not that simple. You won’t be able to unscrew the top two bolts with a wrench, so don’t even try. They are specially planted as tightly as possible, so to dismantle them you simply need to cut them down with a grinder.
- Now you can safely remove the remaining two bolts in the lower fastening of the rocker, for which your effort and a 13 key will definitely be enough.
- The next step is to remove the clamp and move the boot. You will need to remove the hinge. At the same time as replacing the link, we recommend changing the hinge. It would be a good idea to replace the oil seal and cardan shaft. These elements have a limited service life, and since you decide to change the slide itself, there are objective reasons to do everything as efficiently as possible.
- After this, install the new unit in place of the old one. Act carefully so that the rubber bands of the slides fall on the welded bolts, which you previously sawed off using a grinder.
- The assembly is now reassembled, operating in the opposite sequence to disassembly. It is not necessary to seat the top mounting bolts tightly, but try to tighten them firmly.
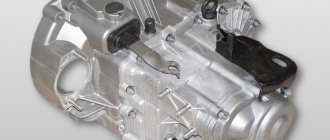
What gearbox is installed on the VAZ-2114?
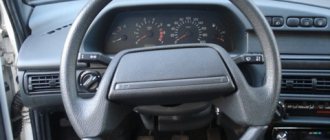
Since the VAZ-2114 is equipped with a mechanical gearbox, the driver personally selects which gear to engage at what point in time (by changing the position of the driven gear relative to the driving gear - approx.), thereby ensuring the correct position of the lever in the cabin. However, during operation it happens that the handle begins to rattle, causing only discomfort to the car owner.
Below, in our article, we will look at the main causes of this problem, as well as ways to fix them.
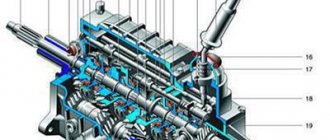
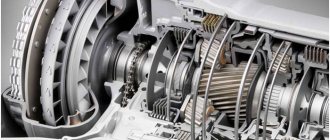
Gearbox device
Diagram of the gear selection mechanism with decoding
First of all, before we undertake the repair or alteration of the gearshift knob, we need to learn more about its design (to figure out where the vibration comes from and how dangerous it is for the operation of the car as a whole - approx.), and also become familiar with its main elements.
It’s no secret that the VAZ-2114 is a front-wheel drive car, with front drive wheels; accordingly, the gearbox itself is perpendicular to the direction of movement of the car (this means that the “box” lever does not enter the cabin directly from its body, but through the rocker – approx.) . The same cannot be said about representatives of the “classic” AvtoVAZ family, where the rattling of the gearbox lever may indicate problems with the transmission itself.
The handle on the VAZ-2114 works somewhat differently, using special rods that help the car enthusiast change gears with the greatest comfort. However, among this lie small shortcomings of the creators, which over time lead to the rattling of the handle.
Causes of gearbox bouncing
- The connection bushing is the wrong size.
- The handle gasket is missing.
- Inconsistency of parts that border each other.
All of the above problems can be caused by one small metal bushing that connects the rods under the lever. Therefore, the rattling of the handle may appear due to the appearance of a gap in it, or poor contact between two connections. All this leads to impacts of the bushing against the metal of the body, which contributes to the appearance of noise and rattling of the handle.
This is what the old bushing looks like.
On some VAZ-2114 models, such connections were wrapped with a rubber gasket to avoid such malfunctions.
Sports
We noted that for the VAZ 2114 you can install a sports short-throw rocker. Outwardly they are quite similar, but the difference in work is felt immediately. On a sports unit, gears shift faster and smoother. It's all about the design of the backstage itself. Unfortunately, it is precisely because of this that the process of independent replacement becomes almost impossible.
If you decide to install a short-throw rocker on your VAZ 2114, contact trusted car services, or even better, a studio that specializes in tuning. Such events are classified as technical improvement, which is why no one understands this better than tuning specialists. Even official AvtoVAZ car services.
- Electrical equipment
- Engine
- Brake system
- Other
- Steering
- Transmission
- Suspension
- Tuning
- VAZ 2110 Other
- Engine
- Steering
- Electrical equipment
- Transmission
- Brake system
- Suspension
- Tuning
- Electrical equipment
- Steering
- Video publications
- VAZ tuning photo stream
- Operation and repair manuals
How to adjust the correct operation of the scenes on a VAZ 2110 - 2112
On VAZ 2112 cars, the rocker is configured in the same way as for the tenth model (see schematic photo of the unit). The work is easy and simple for one person to do independently in their own garage. If you're lucky, the setup can be completed in literally minutes. You'll soon find out why.
By the way, the VAZ 2110 rocker also needs to be adjusted after replacing the gearbox and repairing it, as well as simply over time due to loosening of the fastening connections or after replacing the driveshaft.
The procedure for setting up the scenes using the “ten” as an example will be as follows:
- 1. Drive the car into a viewing hole, overpass, or raise the bottom with a jack. In the latter case, do not forget about reinsurance.
- 2. The first gear at the gearbox must be engaged. Make every effort possible to achieve this.
- 3. Next, we slow down the car using the handbrake. To ensure that it does not work, we place safety anti-roll bars under the rear wheels of the car.
- 4. Go down under the bottom of the car and find a fastening clamp there that holds the tip of the cardan. You loosen it up.
- 5. Now you need to push the gearshift lever knob to the extreme left position (any other displacements are not allowed). Hold the scenes in this position.
- 6. Having gone down under the bottom of the car, fix the clamp back on the tip of the hinge.
- 7. If everything is done correctly, congratulations, the setup is complete. You can check the operation of the gearbox.