In this article I will tell you how to paint camouflage correctly. Let's consider what paints and colors should be used, how to use stencils to create patterns or spots with a clear or blurred border. We will analyze in detail the process of painting camouflage, as well as the correct use of spray cans for painting.
The content of the article:
- What is camouflage? Real camouflage and camouflage stylization
- Stencils for painting camouflage
- What paint should I use for camouflage?
- What colors to use for camouflage?
- Preparing the surface for painting
- Painting in camouflage
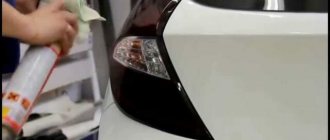
- How to paint with a spray can?
What is camouflage? Real camouflage and camouflage stylization
Camouflage (from the French camouflage) is a camouflage concept that is part of modern military tactics. Simply put, camouflage helps objects painted in it be less noticeable. For the first time, camouflage in a simple form was used in the mid-18th century. Camouflage for weapons and equipment was used by the French in 1915, then began to be used by other armies in the First World War. Camouflage then became popular in fashion and art. Many designers past and present use camouflage in their clothing lines.
Effectiveness depends on the contrast of colors. A strong contrast with the base color, which breaks up the contours of the vehicle, is better suited for forests where the play of light and shadow is important. While low contrast is better suited for open areas with little shadow structure.
The so-called digital camouflage provides a camouflage effect due to the pixel print.
It helps to reduce the visibility of an object at different distances. When painting camouflage, visual destruction of the shape is achieved by adding uneven lines to objects with an even shape. The object is painted using 2 or 3 contrasting colors. The colors of the actual camouflage must match the colors prevailing in the area where the object is used. Objects appear darker in the upper layers and lighter in the lower layers as the upper part receives and reflects more light. This principle is especially important when painting vehicles. There are no special rules for the size of camouflage patches. They depend on the size of the object being painted and the size and type of objects in the environment. If you look at an object from a distance, small spots merge into one common color and do not visually destroy the shape of an object painted in camouflage. Thus, small spots in true camouflage are ineffective.
Real camouflage can be easily distinguished from imitation. True military camouflage is designed to camouflage the shape of a vehicle so that it blends in with the surrounding area. If you look at military equipment, you can see how camouflage spots of different colors seem to envelop and pass over the lines of the body, making it shapeless from afar. Therefore, it is important for what purpose you paint camouflage. If this is just an imitation and creation of a military style, then it does not matter how the spots will be located and what color they will be.
How to Draw Camo on Vehicles
The camo paint job on vehicles really makes a bike stand out from the crowd. This type of painting can be honored during military service, as a gift for a friend in the military, or simply as a great way to spice up your vehicle. Creating camouflage on a bicycle is not as difficult as it might seem. This is especially true if you use a hand-painting technique. While it may not look as smooth as airbrush painting, you will find that you have much more control over the paint. Another advantage is that this style of painting costs less and is easier and faster to clean.
Under the hood:
- How to draw camouflage on a motorcycle
- How do I paint camouflage on an ATV?
- How to paint camouflage on a car
How to draw camouflage on a motorcycle
Tie trash bags around all the chrome and any part of the bike that you don't want painted on. Sand the areas you want to paint. You don't have to remove all the paint, just rub it off enough so you can apply a new coat of paint. Spray the areas you want to paint with primer. Let it dry quickly. Spray the bike with auto green enamel paint. Let the forest green paint dry for 2 hours.
Paint small ovals of light brown enamel over the forest green. Space them at least 2 to 3 inches apart. Make them look like camouflage by adding rounded semicircles and teardrop shapes along the sides of the ovals. Let this dry for 2 hours.
Mix 2 cups dark blue enamel with 2 cups forest green for a very dark green. Add this to a pattern similar to light brown enamel. However, these camouflage uniforms should be about half the size of the light brown ones. Let the paint dry for 2 hours.
Spray all areas painted with enamel sealant to ensure the paint stays in place. Let this dry overnight, then carefully remove the tape and trash bags. You can use a solvent such as "Goo Gone" on the chrome film, leaving behind any residue.
Items you will need
- Garbage bags
- skin
- Artist Ribbon
- Enamel spray primer
- Enamel auto spray paint
- Enamel auto paint
- Enamel sealant
- Paint brushes
- turpentine
- solvent
How do I paint camouflage on an ATV?
Clean the plastic surface of the ATV using mild soap and hot water. Allow the ATV to air dry.
Sand the plastic surface with 180-grit sandpaper. This helps remove old paint and rust.
Clean your ATV plastic with a pad and Scuff Magic solution. Give your ATV another round of sanding with 180-grit sandpaper to remove any remaining paint, rust, or crust.
Clean sanded plastic using plastic cleaner. Spray the plastic cleaner onto the plastic of your ATV and let the cleaner sit for about one minute. Wipe the plastic cleaner with a clean towel to remove dust and oil from the plastic.
Apply a coat of Plastic Magic to the surface of the ATV. Let the first coat dry completely and apply the second coat.
Apply the primer solution to the entire surface of the ATV. Allow the primer to completely catalyze the ATV surface.
Draw the camouflage pattern onto the surface of the ATV using a light pencil. Draw any desired shapes or sizes. Camouflage print can be made in large or small shapes. Typically, most camouflage prints feature a variety of rounded shapes.
Open a can of your lightest paint color and apply paint to the ATV using a medium sized brush. Apply paint to about one-third of the shapes you drew in step 7. Don't worry about painting perfectly or choosing the right shapes. The camouflage should look a little random. Let the paint dry and add a second coat.
Apply medium color camouflage paint to the ATV. Color about half of the remaining shapes. Don't worry if you paint over the edges of the light camo. Let this paint dry and add a second coat.
Apply the darkest color of camouflage paint and fill in all the remaining shapes. Make sure there are no stains where the primer shows through. Add a second coat of paint after the first coat of paint has dried.
After the camouflage has completely dried, apply two coats of clear paint to the plastic.
Items you will need
- 3 colors ATV paint
- Brush
- primer
- 180 grit sandpaper
- Pillow
- Magic solution
- Warm water
- Mild soap
- Plastic cleaner
- Pencil
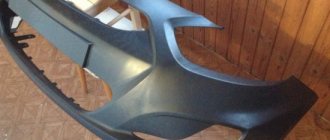
How to paint camouflage on a car
Mask parts of the car that will not be painted. Paper tape over the windshield, rear window and other windows and tires. Wrap headlights, taillights, grill and other trim pieces.
Sand the entire car to prepare for painting. To sand the roof, open the car doors and stand on the sills to get to the center. Use a ladder to spray the top of the vehicle, making sure the ladder does not touch the sides of the vehicle. Spray the tops of the roof, hood and trunk first, then move to the rest of the car.
Apply two coats of medium gray paint to the entire car before using any stencils. This should cover the whole tutorial and give you a base layer to start with. Make sure the entire primed surface is covered.
Spray black and brown paint onto the lower half of the car, holding the can at least 10 to 12 inches from the surface for a soft effect. Spray paint in areas about 1 foot apart so that the stencils on top have a slightly secondary color than the gray base coat.
Place thin stencils on the car and paint them black. This stencil makes short black lines for the background underneath the grass stencils. Use these stencils starting from the bottom of the car and working up halfway up the car. This pattern will extend further than the grass stencils.
Using the grass stencil, start at the bottom of the car with brown paint. Keep the stencil about an inch away from the surface of the car so that when you spray the paint there are no hard lines defining the grass. Use this technique every 3 feet on the car from the base to the middle. Start at the front of the car and work your way to the rear bumper.
Apply the light brown color again using the grass stencil, but this time place the stencil directly on the car to get a crisp, crisp image. Use this stencil in the same area as the last step, placing it slightly away from the last design but still partially covering the other color.
Apply two or three coats of paint to the car and let it dry. This protects the paint and helps the camo last longer without fading or peeling.
Items you will need
- Set of stencils for masking
- Insulation tape
- Masking paper
- Sandpaper (80 and 120 grit)
- Sandblasting block
- ladder
- Automotive primer
- Car paint
- Automotive clear coat
Related articles:
- How to draw a truck in camouflage
- How to draw a license plate
- DIY truck lettering with paint
- How to Paint Coil Springs
- How to Create a Rust Rod Paint Job
- How to draw a motorcycle rim
Stencils for painting camouflage
- Make your own stencils or choose ready-made stencils. On the Internet there are quite a few free, ready-made drawings, after printing which you can cut out stencils from them.
- Make several stencils. While one dries, after spraying the paint, you can use the other one in another place.
To make a stencil with your own hands, you can draw a design of any shape and cut it out.
- You can also use leaves, twigs and grass to create their shape on the surface to be painted. We will consider this option in detail in this article below.
- There is a classic camouflage, and you can also use almost any shape to create stencils, including skulls, logos, emoticons, and more. You can also use different types of grids that will create a cellular background.
- Transparent film, which is used in airbrushing, is also suitable. This is a film with a slightly sticky layer that sticks, but peels off easily without leaving marks. You can use a sharp blade to cut any shape out of it, or a template onto the edges of which you can spray paint.
Vinyl film
Before you start painting your car, you need to prepare all the related substances and equipment. This process is done using the following:
- Vinyl film;
- Aerosol paint;
- Polish and sponges;
- Varnish that creates a matte effect;
- Solvent;
- Gasoline 200 ml;
- Painting spatula, 7 cm wide;
- Flannel rags;
- Halogen lamp 1 thousand Watt;
- Old newspapers;
- Paper masking tape.
What paint should I use for camouflage?
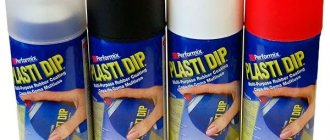
There are paints from some companies (for example, Krylon Camouflage) in cans that are specifically designed for painting surfaces in camouflage. These are matte paints that adhere well to various types of surfaces, including plastic.
You can also use regular paint (when painting a car, automotive paint) by selecting the desired colors. It is better to paint with matte paint to create a real camouflage. If you want to make a camouflage stylization, you can cover the surface painted with camouflage with varnish.
What colors to use for camouflage?
Krylon offers 6 basic colors for painting camouflage:
- black,
- khaki,
- brown,
- olive,
- sand,
- light green.
In addition to the standard colors used when painting camouflage, you can use other brighter colors (pink, orange, blue, white and others). In this case, the meaning of camouflage is lost, and style comes to the fore.
Usually you need to choose three different colors, but you can have more if you wish.
Correct installation of camouflage film
Pasting a car with camouflage film should be carried out taking into account the peculiarities of using this material. Failure to comply with the basic requirements for installing the coating can lead to a significant reduction in service life.
The stages of installation of vinyl film are carried out in the following sequence:
- Thoroughly wash and dry the car body. If there are oily stains on the surface of the body, they must be removed using a solvent.
- Mark the material for each body part.
- Cut the material according to the markings.
- Glue the film to the surface of the car body.
For beginners, the first method is more suitable, which consists of pre-wetting the surface of the car body. When using the wet method, it is easier to eliminate defects that arise during installation, due to the longer drying time of the adhesive. The disadvantages of this method are the use of a hairdryer and a lot of time.
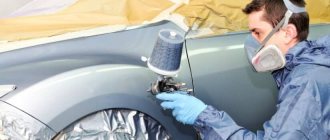
Preparing the surface for painting
You need to prepare the surface in the same way as for any painting. If there is any damage, dents or rust, they need to be repaired. The primer or old paintwork must be prepared by sanding so that the surface is matte and the new paint adheres well. You can read more about preparing the surface for painting in the article “preparing a car for painting.”
After preparing the surface of a car (or other object) for painting, you need to seal the body parts that will not be painted with masking tape and covering material.
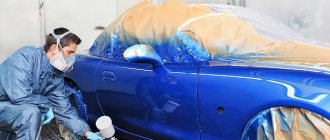
Painting in camouflage
- Paint in a well-ventilated area. Use a respirator and gloves. Do not spray paint near open flames.
- Start with a base color that covers the entire piece, and then work your way down to individual pieces.
- The main color that paints the entire surface is usually the lightest. This way, other colors will be more visible on this base. In most cases, two thin coats are enough to cover the surface with the base color.
- Next, you need to let the paint dry. Then the stencil is glued and another paint is applied.
- Start with a light color and work your way to a darker color. Decide in what order you will paint the subsequent colors. Paint each color in stages, one color at a time. Thus, if the base color is yellow-brown, then the spots will be dark brown, then black. Yellowish-brown spots never appear on top of brown or black. Brown never goes over black. It is important to follow the order (sequence) of applying and overlapping colors to get a good result.
- Secure the stencil with masking tape to ensure it stays in place after spraying while the spray paint dries. They don't have to be glued straight. They can be located in different ways. This will create a personalized look to your work.
- Place the second spot or pattern in a free area where there is no spot or pattern yet. You can slightly overlap the previous stencil print with a new print.
- You can make 4-5 designs in one color (or more, depending on the size of the part), then move on to another color.
- You can make sure that spots or patterns of different colors do not have clear boundaries between each other. One color will transition smoothly into another. To do this, you need to hold the template or stencil with your hand and not lean it completely against the surface. This will make the edges look a little blurry, and there won't be a clear contrast between the edges and the rest of the surface.
- When painting with a spray gun, adjust the torch to a narrower spray pattern. Paint the edges of the stencil first, then fill in the middle.
- Different distances will give different degrees of smoothness to the edges. A farther distance provides a blurred edge, like a shadow, while a closer distance provides a sharper color change.
- Unpainting and minor unevenness are not critical. The main thing is that there are no leaks.
- When using natural objects (leaves, branches, grass), you need to lean them against the surface and spray paint on top. It is better to collect a variety of specimens. It will be more convenient to use flatter leaves so that they fit well on the surface. You can spray paint only on their edges. This way the outline of leaves and branches will be imprinted on the surface. After the paint has dried, the process must be repeated, using paints of other colors and leaning other leaves, positioning them differently. You can also overlap already painted leaves with subsequent ones.
- There is no need to do too many designs or spots so that the base color does not disappear and remains the main one.
- If you want to paint a car or other object in a camouflage pattern consisting of several large segments of different colors, as in the photo below, then each, before painting each segment, you need to cover the adjacent surface with masking tape and covering material. After one color has dried, you need to move on to masking the already painted surface and painting a new one.
Camouflage consisting of two colors.
- If the surface was not painted with special matte paints, then the resulting “camouflage” can be varnished. The varnish serves as protection for the base paint. Special matte paints do not require varnish.
- You can use the painted car the next day.
Adviсe
Some useful tips:
- to give an original look, it is worth using large spots of different sizes in the design, which move from one body element to another;
- A special protective surface is formed along the contour to prevent paint from crawling beyond the contour;
- You cannot start painting a spot until the previous layer has completely hardened;
- for the integrity of the picture, the drawings need to be drawn overlapping;
- each spot must be applied 2 times to prevent color transparency;
- When drawing, you need to move with the spray can only in a clockwise direction.