The gearbox of any car is a rather complex unit, which is not so easy to repair independently and without proper training. The slightest violation in the work process can lead to damage to the mechanism while moving, which can lead to an emergency. However, having minimal skills and having studied the operating instructions, disassembling the box (Gazelle) with your own hands does not look like something supernatural.
Gearbox device
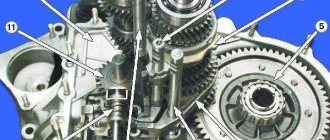
The gear shift unit of the mechanical type in question has five stages. To carry out an operation such as disassembling a box (Gazelle), you need to know the structure of the element. Its package includes:
- a pair of aluminum crankcases that are connected by bolts;
- primary and secondary shaft, aggregating with the cardan and crankshaft;
- there is also an intermediate mechanism equipped with threaded teeth for first and reverse gears, as well as a block with gears and a speedometer drive;
- inertial synchronizers;
- ball elements for fastening speeds of the sub-spring type;
- simultaneous gear activation blocker;
- lever damper.
It is advisable to carry out the operation with a partner. Disassembling/assembling a gearbox (Gazelle) will require knowledge of the vehicle's hardware, the ability to dismantle and correctly reassemble the unit after repair. When performing work, it is necessary to observe patience, accuracy and safety precautions.
Possible malfunctions and repairs
Design and principle of operation of the multitronic gearbox
Repair of the GAZelle Next gearbox may be required in the following cases:
- Noise, extraneous sounds near the node. If they occur when the clutch is fully depressed, the cause must be sought in the bearings. Noise while driving indicates gear failures. Wear of the primary and secondary shaft or its gears is the cause of extraneous sounds when driving in fourth gear. Regardless of the mode, the transmission is noisy when there is no oil.
- Inability to turn off or change gear. First you should check the clutch and check the functionality of the pedal. Malfunctions of the clutches and synchronizer cause failures in starting 3.4 speeds.
- Departure of speed.
In all cases, you will need to remove the box for diagnostics and inspect the parts and mechanisms. Having a diagram will allow you to carry out simple repairs yourself. Otherwise, it is better to contact a service center.
Removing the gearbox: step-by-step instructions
The Gazelle Next box is disassembled in the following sequence:
- The car is placed on the inspection hole.
- The crankcase is completely free of oil.
- The cardan is removed.
- The location of the hinge and the box extension in relation to each other, including the rear axle flanges, is marked (the marks are made with a needle file).
- The intermediate support clamp is dismantled (use keys 12 and 13).
- The fastening of the cardan with the drive gear flange is unscrewed (keys 14 and 17).
- The gearbox shank is removed by moving it back and pulling it out.
- The resulting hole is temporarily blocked with a rag.
- Next, you should take out the lever and remove the cover inside the cabin.
- At the next stage, we open the spacer sleeve, remove the rubber cushion and the locking element.
- All that remains is to unscrew the cap, remove the lever, turn off the speedometer and the reverse light switch.
Then the gearbox is removed, the clamping pipes and fixing brackets are disconnected, as well as the cross member securing the unit by rocking and pushing back the gearbox itself. It is advisable to protect the block head by placing a wooden beam.
Dismantling the box
Gearbox design
The gearbox is one of those parts of the car whose repair begins with complete removal. For newcomers to the automotive business, the task may seem titanically difficult, but this is not entirely true. It is enough to thoroughly study the diagram of the box itself (in this case, the gazelle gearbox, consisting of 5 steps) and its connections with the rest of the vehicle in order to understand how to remove it. So, let's begin.
Stages of removing the gearbox from a Gazelle:
- First of all, you need to drain the oil from the crankcase.
- Next comes the dismantling of the driveshaft. There is one nuance here: before starting removal, you MUST mark with a file or other tool the locations and directions of the location of the hinge and the box extension. And in general all commutations (rear axle and flanges). Then, we proceed to removing the intermediate support fasteners. You can purchase the set of tools required for this yourself, or they can be included in the standard gearbox repair kit. Next you need to separate the shaft from the main gear flange. Left a little. You need to remove the shank of the box. To do this, you need to slightly pull it back and carefully pull it out. The resulting hole needs to be plugged with some rags or unnecessary old clothes.
- We take out the gear shift lever. Everything is simple here - remove the cover and the top of the lever from the cab, unlock the bushing and remove the rubber cushion along with the second bushing. All that remains is to remove the seal with the cover and, turning out the cap, remove the lever itself
- It remains to disconnect the remaining elements from the gearbox - the speedometer and the light switch (reverse). Now you can remove the box itself. To do this, you need to unscrew the receiving pipes and the bracket to the box using the appropriate fasteners. Then we separate our gearbox from the clutch housing by removing the necessary fasteners. But now we will need a medium block of wood, or a small log - this is needed to protect the block head. Now, having removed the transverse fastening, we remove the box itself. Given the significant weight, it is advisable to prepare in advance.
Disassembling the gearbox (“Gazelle Business and Next”)
This action is also performed in several stages. When performing work, remember that the gearbox weighs more than thirty kilograms, which requires taking additional precautions.
- The bearing cover is removed and the sealing collar is changed.
- The rear axle bushing fasteners are dismantled.
- The retaining ring on the input shaft bearing is removed, as well as the breather.
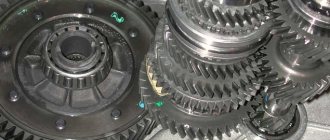
- Using a hammer and a soft metal mandrel, the crankcases are separated.
- By turning the input shaft, reverse gear is engaged.
- The lever housings, the plate with the gasket, and the fastening of the front travel forks are dismantled.
- The springs and retainer balls are removed.
- The rods are removed in a certain order (first 1, 2, 5 reverse, then the rest).
Using a key, unscrew the fastening of the reverse axle, remove the locking ring, take out the shafts, which are then disassembled if necessary, not forgetting to first mark their relative positions. Disassembly of the box (Gazelle Business) is completed, you can begin repair and assembly.
How the box works
GAZelles are equipped with 4- or 5-speed manual transmissions. Components of the device:
- 2 aluminum crankcases connected by 100 bolts;
- speedometer drive gear;
- primary and secondary shafts connected to the cardan and crankshaft;
- an intermediate shaft on which the cut reverse and 1st stage teeth are located;
- pressed gear block;
- inertial synchronizers;
- reverse gear is provided by a gear block;
- clutch for engaging 3rd and 4th gears;
- system for blocking simultaneous launch of several speeds;
- spring-loaded balls for fastening different levels of the box;
- mechanism of the damper device of the lever and control elements.
The design of the unit allows for timely diagnosis of the first signs of malfunction to prevent more dangerous failures.
Specifications
Key characteristics of the gearbox of GAZelle cars:
- 4- or 5-speed transmission;
- 5 speeds - 1 reverse and 4 forward.
For the transmission, the following parameters can be noted:
- three-way lever located in the assembly;
- the mass of the part is 56 kg;
- oil tank capacity - 3 l;
- gear ratios for five stages - 6.55; 3.09; 1.71; 1; 7.77.
- The fourth stage in the gearbox is direct.
Basic models of the device assume the presence of synchronizers in the mechanism to ensure reliable operation.
Gear shift diagram
The gear scheme on the GAZelle is distinguished by the presence of a synchronizer. Moving the lever from the neutral position to the left side causes its lower part to move the shift rod and fork. This causes the first stage gear to move backward and come into contact with the first gear element located on the intermediate shaft. When the clutch is running, torque is transmitted through gears and intermediate elements to the secondary shaft.
The inclusion of the third speed is due to the movement of the lever from the neutral position, first to the right side, and then forward. Under the influence of the fork, the clutch begins to move backwards and the structure impacts the synchronizer. The torque follows in the direction of: the input shaft, the permanently meshed gears, the intermediate and secondary shaft of the gearbox.
To start the fourth speed, you will need to move the selector to the right and back relative to neutral. The forward movement of the clutch helps to engage the synchronizer locking ring with the input shaft. After balancing the speeds, gears are engaged. Reverse speed is started by moving the lever to the right after overcoming the resistance of the safety system.
The synchronizer is a mechanism in the form of a hub mounted on the secondary shaft of the box. The coupling moves along the splines located outside under the influence of the fork. Other key elements of the synchronizer:
- retaining springs;
- "blocking" parts;
- side bronze rings for locking the mechanism;
The work of the synchronizer is involved in engaging 3rd and 4th gears and is expressed in ensuring a smooth transition from one level to another.
How much oil to fill
Before changing the oil in the 5th mortar, it is necessary to check the current level. It is recommended to carry out such an action every 20,000 km. If there is enough oil in the gearbox, fluid is added to the crankcase.
The technical documentation does not contain data on the required amount of oil in the GAZelle box. The figure varies depending on the modification of the equipment, ranging from 1.2-1.6 liters. During work, the mixture is poured into the hole with a syringe until oil flows out of it.
GAZelle Next, GAZelle Business and other modifications of the car cannot be started with a low level of oil fluid. Small volume is the cause of air pockets, which have a negative impact on bearings and other elements of the gearbox.
Assembly of the unit
This manipulation is performed in reverse order. After the necessary elements have been repaired or replaced, the shafts are simultaneously installed. To do this, it is advisable to connect them together with twine. Before starting assembly, you need to carefully inspect the crankcase for cracks, rust or other deformations.
First, all parts should be soaked in kerosene, any cracks and nicks should be sanded, all defective elements should be replaced, and lubricated with special oil. The crankcase fasteners must be treated with sealant, and the existing gaskets must be replaced. Experts recommend replacing bearings every 80-100 thousand kilometers.
Disassembling the Gazelle box and installing it requires attention and accuracy. The unit is mounted on the car by installing the assembled gearbox in the reverse order of removal. It is first necessary to lubricate the splines, and when installing the cardan, make sure that the marks match. After installation, you need to pour the required amount of oil into the crankcase and check the operation of the repaired unit.
Transmission bulkhead
To make repairs and replace parts, you need to know how to disassemble the Gazelle box itself. Yes, you will have to disassemble it anyway.
There is a chain of actions here:
bearing cover – rear input axis (bushing) – breather – crankcase separation – fastening the gear shift fork (after putting the car in reverse mode) – lever body and gasket – clamp fittings – switch rods (order – 1, 2, 5, rear, 3, 4) – reverse axle and remove the rear shaft bearing retainer ring – remove the shafts themselves.
The diagram may seem complicated, but if you look at the box in person, everything will become clear. This is what self-removal or replacement of the Gazelle gearbox looks like.
Installation of the entire system is carried out in reverse order. The main thing is to remember to carefully lay out the removed parts so that you don’t get confused during the reverse process.
Tools
Disassembling the box (“Gazelle”), photo shown above, requires certain tools and equipment. Among them:
- set of keys (for 10/12/13/14/17/19);
- several screwdrivers;
- brass beard and bumper;
- wooden blocks;
- pliers (pliers);
- mount;
- hammer, pullers;
- emery, needle file;
- soft metal lining;
- rags, mandrel, waste drain tank, GOI paste, CV joint gear oil.
In addition, you must first take care of the presence of an inspection hole or overpass.
Disassembling the box (“Gazelle”): when you may need it
A number of factors may serve as a reason for urgent repair of the gear shift unit, namely:
- Inability to engage the gear or significant difficulties in performing this action.
- Extraneous sounds and crackling noises when changing gears.
- Uncontrolled gear shifting (very dangerous, especially in heavy traffic or at high speed).
- Any extraneous or unusual sounds in the area of the node in question.
- A signal for urgent repair of the Gazelle gearbox is also smoke and an unpleasant odor.
The main causes of gearbox failure
Disassembling the box (Gazelle/406 engine), as with other power units, may be required immediately. The most common causes of malfunction are the following:
- deformation and destruction of worn parts or loosening of fasteners (causes a humming noise during system operation);
- destruction of bearings (a characteristic crunching sound is heard in the gearbox);
- wear of the synchronizer rings (crackling noise appears when changing gears);
- the presence of burrs, wear of gears, jamming in the drive causes difficulties in engaging the gear;
- the speeds themselves can be turned on or off when gear teeth are misaligned, fasteners or the driven shaft are loosened;
- Due to oil loss due to holes in the crankcase or loosening of bolts, interruptions occur not only in the gearbox, but also in the aggregating units.
Automatic transmission for GAZelle Next
Recently, many GAZelle Next car holders are installing imported parts on their car, as they show their best side, functionality and performance are much better than factory parts. With the installation of the Toyota power unit, an automatic gearbox is also installed. A lot of drivers, complaining about traffic jams in the city, dream of such an opportunity. Automatic transmission offers many advantages.
Interior view of Gazelle Next automatic transmission
- Safe management.
- There is no need to work with your right hand (shifting gears) and left foot (clutch) every time.
- Traffic safety.
- Smooth and soft control.
- Reduced engine wear.
- Good cross-country ability of the car on dirt roads, as well as on snowy or muddy roads.
Despite such bright positive aspects of automatic transmission, there are disadvantages:
- Fuel consumption increases.
- The maximum speed will be reduced.
- In case of emergency driving (skidding in winter), the automatic transmission will not help.
- The oil needs to be changed more often than with a manual transmission.
- Expensive repairs.
- Low load capacity.
And one more drawback. According to car enthusiasts, if a loaded Gazelle Next travels long distances, the service of the automatic transmission will be limited to a year of operation.
Manual transmission mechanism
A 5-speed gearbox is a gear reducer that transmits torque from the engine to the wheels. The new gearbox has:
- 2 craters connected by bolts;
- primary, intermediate, secondary shaft. The first and second mechanisms are connected to the cardan and crankshaft.
Appearance of manual transmission on Gazelle NEXT
The intermediate shaft has teeth for first and reverse gears, as well as a gear block and a speedometer drive:
- synchronizers;
- speed fastening components;
- single gear activation blocker;
- device for damping vibrations.
Watch the video: Repairing the gearbox on Gazelle Next.
In 2016, when improving the Gazelle Next, the developers slightly changed the gearbox design:
- changing the width of the gear rims;
- installed the intermediate plate of the second and intermediate shaft;
- bearings were supplied of improved quality for increased load capacity;
- flange contact of cardan transmission.
- Synchronizers from Hoerbiger.
- Joystick handle.
This is what the Gazelle Next gearbox looks like
The designer also strengthened the rear axle for load capacity, and with all this there is a Chinese diesel power unit.
This modernization gave a positive result - high reliability, increased service life, torque transmission of 330 Nm.
External view of the Gazelle Next power plant
During the first inspection of the car, experts give recommendations on how best to run the car and at what speed the speed should be changed. Many car enthusiasts do not pay attention to this fact, since everyone considers themselves professionals. As a result, a problem occurs with the box - it makes noise, knocks, and behaves incorrectly.
Other gearboxes for GAZelle NEXT
Some Gazelle owners don’t want to bother with the “native” gearbox. Then the search for an alternative begins. If you take gearboxes like those from Ford, then you need to work hard with them to “fit” the box to Gazelle standards.
Manual gearbox from Getrag, made in Germany. This box is made for cars with a load capacity of 2400 kg, so it can easily work on the Gazelle Next. Torque 345 Nm. for a 150 l/s engine. The Gazelle's factory gearbox is made of aluminum, the Getrag gearbox is cast iron. It also has some characteristics that make the engine easier to operate during acceleration, and also reduces engine speed on the highway.
This is what the Getrag checkpoint looks like
The table provides comparative data.
Breaking
If the manual transmission is noisy, there are reasons for this:
- the bearings performed their functions to the end;
- lack of oil.
The second problem is much easier to solve than the first. Check the amount of oil and “add” it.
We advise you to watch: how to repair a manual transmission on Gezali.
The first option requires replacement of spare parts. This is done either in a service center by specialists (if the car is under warranty, this is a big plus for the owner), or manually (but not by yourself). Only a person who knows the business can disassemble and assemble the checkpoint. This procedure requires knowledge, patience and perseverance.
So, the first thing to do is drain the oil. After this, remove the cardan. Mark the hinge points and the box extension, remove the clamp. Unscrew the cardan mount and remove the shank (move it back and pull it out). The result will be a niche. Next, remove all the necessary parts in the cabin, turn off the speedometer and light elements. After these steps, the box is removed and disconnected.
Gearbox design for Gazelle Next
In order to begin disassembling the gearbox, it needs to be made clean (washed thoroughly). Disassembly is carried out step by step only by a knowledgeable person. At the slightest mistake, the gearbox may not work correctly on the Gazelle Next or, in general, show no signs of life. After disassembling the box into parts, they should also be washed from traces of oil.
The cause of the strange sound is being found. It could be:
- wear of the secondary shaft bearing.
- Bearing play.
- Bearing idling.
Bulkhead of the five-speed Gazelle/Volga gearbox. Part 1 - Disassembly and troubleshooting.
All screws can be easily unscrewed with a ratchet after breaking. Halve strictly with blows to the body. If you hit the input shaft, the impact energy will be transmitted exactly through the 4th gear synchronizer. Place all the parts in piles. If you have symptoms of hand-wringing, it would be a good idea to take pictures of the parts before disassembling. So, let's start troubleshooting. When examining the rear oil seals, a bald spot on the second oil seal was revealed. I installed them 5 years ago:
The bushing will be discussed in more detail in the next part:
From my findings, to check wear, you can use the gearbox flange on which the release bearing runs - its diameter is exactly 38 mm, like that of the cardan fork. In my mind there should be no backlash:
Next, remove the bearings from the shaft. They are pryed off with screwdrivers and removed without problems:
By the way, I ended up with a box with tapered bearings, bronze nuts and new type synchronizers. Formally, there was no fatal wear on the tapered bearing races (also known as the hub bearings of the front wheels), meaning shells, but the rollers were polished on the inside of the bearing:
Thus, they were worn out so much and went deep that their ends rested against the inner race. It clearly shouldn't be this way. Interestingly, the rollers themselves are also conical (10-9.3 mm).
The crackers had fairly little wear:
Due to the use of high-quality semi-synthetic Rosneft GL-4, the inside of the box was washed perfectly with dishwashing detergent:
The breather channel was clean:
There were no signs of rotation in the bearing seats. The bearings themselves are easy to remove and insert with a slight rotation:
I removed the barrels for blocking the engagement of two gears at the same time with a magnet, since I washed the body with water and otherwise they could rust:
An overflow hole was found in the rear half of the gearbox. Thanks to it, the trick of filling the gearbox oil through the handle from the passenger compartment is possible:
I think its purpose is to equalize air pressure, since the cardan shank works like a piston pump and without damping fluctuations in air pressure by the main volume of the gearbox, the box would suck in dirt from the street:
It was not possible to knock down the main shaft bearings with a screwdriver and hammer. I used a regular two-legged puller, lengthening its legs with thick steel plates. There are special pullers for these purposes, but I didn’t use them; it’s a very rare task and can be completely solved with a two-legged puller. On the input shaft I was pleased with the oil channel going under the bearing. What's so funny, I don't understand:
I did not find any wear on the shaft articulation unit, but the rollers had barrel-shaped wear - they were down by one hundred square meters in the center, and by 5 at the edges. The clips themselves were without damage, and measurements with a caliper showed the tolerance:
The part of the shaft entering the crankshaft also had no noticeable wear:
The shift clutches were worn out by several tenths of a mm: The outer splines of the clutch hubs, although they were polished to a shine, did not have any noticeable play:
But the clutch hub of the 1st and 2nd gears had a slight play on the secondary shaft and was replaced:
Visually there were noticeable dents on it:
Gearbox assembly
The manual transmission is assembled in the reverse order. Carefully, slowly, concentrated. If you make the slightest mistake you will have to do everything again.
Securing the rear of the transmission housing. It is better to attach this component with self-tapping screws to a wooden block. In this position it is most convenient to insert the shafts. The back will be fixed. Next, drill a hole with a diameter of 18 mm on the second wooden block. The secondary shaft is inserted into this niche and the bearing is pressed into place.
Gazelle NEXT gearbox repair buy | installation | replacement | GAZELLE NEXT gearbox of all modifications, clutch replacement, Moscow
Artem Vadim 8 925 675 78 75
Your gearbox will be overhauled within 2 hours, in your presence. The cost of the bulkhead is 4000 rubles. + spare parts due to wear. Removal and installation on a car – 2000 rubles.
ATTENTION: for your convenience, there is a service - express replacement of the NEXT Gazelle manual transmission. When there is no time to wait for your gearbox to be overhauled, or repair is impractical - the cost of spare parts exceeds the cost of the unit itself, we will offer to replace it with a similar one restored by our mechanics and fully prepared for operation. Prices for replacing NEKST gearboxes are fixed and are indicated for the entire housing, shafts and gear unit. In the event of a defect in one of the parts of the housing, drive shaft or gear unit, the cost of this part is added to the cost of exchange - 4,000 rubles. The work takes 1.5 - 2.5 hours.
gearbox /refurbished/ for sale:
Gazelle NEXT standard:
dv. ZMZ 402-405-406,
Chrysler / Chrysler 2.4 L
Cummins / Cummins ISF 2.8
Gazelle NEKST A21R22 /new model, reinforced/
Warranty 3 months or 60,000 km. mileage for Gazelle Next gearboxes
| Phone number of the repairman: | Artem 8 /965/ 126 13 83 Vadim 8 /925/ 675 78 75 |
| Tow truck assistance /24/7/, dispatcher: | 8 /926/ 167 15 40 8 /985/ 888 68 14 |
New gearbox car Gazelle NEXT
new sample A21R22
Prices for additional work when repairing a GAZELLE NEXT manual gearbox:
Comprehensive troubleshooting / disassembly /
Replacing the clutch /as a separate job/
Removing and installing a manual gearbox as a separate job - without repair
Replacing the clutch with the gearbox removed
A similar Gazelle Next a21r22 gearbox of a new model, the owner complained about the characteristic noise - replacement of the carrier bearings and gearbox seals.
An example of work on an old-style Gazelle Next gearbox. Replacing four bearing bearings on the shafts and gearbox seals:
Possible problems with the Gazelle gearbox
Design and principle of operation of an automatic transmission
Disassembling and repairing a gearbox (5-speed), regardless of the make and model of a Gazelle car, is always a crucial moment, anticipating serious work. Owners of commercial vehicles encounter this problem most often, so they have replaced it more than once. But is it worth it, having seen an advertisement on the Internet for repair of a Gazelle gearbox, to run there, jingling your wallet? Not necessary. It is quite possible to get by with an assistant, diagrams of the gearbox design and instructions for the necessary work. This is enough to repair or replace worn parts yourself.
The presence of a huge experience base on problems with the Gazelle box allows you to almost accurately draw up a “problem-cause” diagram.
Most often, the problem list looks like this:
- If during operation you hear a dull hum from the side of the box, this is a sure symptom of loosening of the fixing fasteners. Also, such a sound can signal the death of the most worn parts;
- The characteristic “crunching” sound is most often produced by worn-out bearings. In general, to avoid such a problem, it is recommended to replace bearings after 90 - 100 thousand km. On your own, or as planned at a service – it’s up to you to decide what’s convenient for you
- If gear shifting is accompanied by an unpleasant crackling noise, then it makes sense to think about replacing the synchronizer rings;
- There can be many reasons for difficult gear shifting. Perhaps the box drive itself is jammed or jammed. But there may also be wear of a certain group of parts (gears, burrs, etc.). Only a bulkhead will tell you the exact reason.
- Oil leak. According to statistics, this is the most common problem that is addressed to workshops. As in the case of oil loss in the engine, the main culprit here is hardened or, on the contrary, worn out gaskets and seals. But it may turn out that much more serious cracks in the crankcases are to blame.
It may turn out that the indirect cause of the problems described above is incorrect clutch adjustment. Or simply working with it incorrectly. For example, a constant change of minibus drivers and their different qualifications can damage the gearbox up to the “fifth gear”.