Entering programming mode for remote start functions
To enter the Tomahawk auto-start alarm programming menu, the following algorithm is performed:
- The ignition system in the car is turned on; for this, the key is set to the “ACC” position. The power unit does not start.
- The emergency service mode entry button is pressed six times in a row. If you did not install the anti-theft system yourself, the location of the key should be checked with the installer.
- Then the ignition is turned off by setting the key to “Off” mode.
- Using the button to enter the emergency service mode, you select the line with the required option in accordance with the programming table. Each time you press a key, the system moves to the next function.
- Using the communicator and its buttons, the desired parameter is selected in accordance with the table.
- To exit the settings menu, the user must take no action for ten seconds.
| Number of presses on the emergency button | Option Description | Key fob buttons | |||
| 1 time | Turbo timer | 1 min | 2 minutes | 3 min | 6 min |
| 2 times | Operating time of the power unit after remote start | 5 minutes | 10 min | 15 minutes | 20 minutes |
| 3 times | Interval for hourly car engine start | 1 hour | 2 hours | 4 hours | 24 hours |
| 4 times | Air temperature at which the engine will start | -5 degrees | -10 degrees | -20 degrees | -30 degrees |
| 5 times | Enabling the security mode with closing the door locks when the engine is started remotely | Disabled | Included | ||
| 6 times | Activation of external lighting devices when starting the engine remotely | Flashing | Works continuously without blinking | Disabled | |
| 7 times | Closing door locks when the protection is turned on after a remote stop of the power unit | Disabled | Included | ||
| 8 times | Mode for preparing the vehicle for remote start | Auto | Safe | ||
| 9 times | Turning on the ACC ignition conductor when starting the engine remotely | ACC. Activated simultaneously with the IGN1 contact and turns off when the starter mechanism is turned on | IGN. Activated simultaneously with the IGN1 contact and does not turn off when the starter is cranked | Starter 2, turns on when the mechanism is cranked | Starter 3, turns on before the starter device is activated |
| 10 times | Monitoring the functioning of the power unit by impulse / operating time of the starter mechanism at startup | Engine fluid pressure controller/0.8s | Engine Oil Pressure Controller/1.2s | Engine fluid pressure controller/2s | Tachometer, starter operating time - less than 3.6 s |
| 11 times | Power unit type | Petrol | Diesel | ||
| 12 times | Temperature units for autostarting the engine | Celsius | Fahrenheit | ||
| Number of presses on the emergency button | Option Description | Key fob buttons | |||
| 4 times | Monitoring the operation of the power unit according to indications | Voltage in the vehicle's on-board network | Based on signals from the engine fluid pressure controller | By tachometer | — |
| 7 times | Locking the door locks when starting the engine remotely | IGN2 contact is activated, but door locks do not lock when autostarting | IGN2 contact is disabled, but door locks do not lock during remote start | IGN2 contact is activated and door locks are locked during auto start | IGN2 contact is disabled and door locks are locked during remote start |
| 8 times | Delay in activation of the starter mechanism before remote start of the power unit for diesel and gasoline engines | 2 seconds - recommended for gasoline engine | 10 seconds – recommended for diesel power units | ||
| 15 times | Units for measuring the temperature level in the car interior for auto start/engine blocking type | Celsius, additional interlock normally open | Fahrenheit, additional interlock normally closed | Celsius, additional blocking normally closed | Fahrenheit, additional interlock normally open |
| 16 times | Turbo timer | Disabled | 1 minute | 3 minutes | 6 minutes |
| Number of presses on the emergency button | Option Description | Key fob buttons | |||
| 1 time | Activation of contact IGN3 during remote start of the power unit | ACC. Turns off when activated and cranked by the starter mechanism of the crankshaft | IGN. The contact element does not turn off when the starter device is turned on. | Starter 2. Activated when the starter mechanism is activated. | Starter 3. Turns on until the starter cranks the crankshaft. |
| 3 times | Selecting the transmission type/preparing mode for remote engine start | Automatic transmission | Mechanical transmission with automatic preparation for remote start | Manual transmission with safe preparation for remote engine start |
Main functions of the Tomahawk 9010 key fob
List of functions that the car security system key fob has:
- Displays the current time.
- Auto start sign. Carrying out automatic start of the power unit based on the temperature sensor indicators.
- Immobilizer. This function is performed by the main key fob, providing additional protection to the vehicle by blocking engine operation in the event of unauthorized starting. The lock is not removed even if there is mechanical intervention in the electrical system and the anti-theft system is turned off.
- Display of temperature sensor indicators on the main key fob.
- Display backlight, activated by pressing any button on the remote control.
- Remote adjustment of shock sensor sensitivity.
- Turning on the security mode when the engine is running. This option is useful for a driver who is forced to leave the car for a short period of time.
- Comfort function. Allows you to delay activation of the security mode for 30 seconds.
- "Jack" function. Switches the security system into service mode, temporarily disabling all alarm options. The option can be used before servicing the vehicle to eliminate the need to hand over the control panel to unauthorized persons.
- Anti-Hijack mode. Blocks the engine in case of robbery and car theft.
- Panic mode. Used to attract the attention of others to the car and scare away potential intruders from it. Upon command from the key fob, the lighting devices connected to the alarm system, as well as the alarm siren, are activated.
- Silent security mode. It can turn off the car's siren and lights, but continues to transmit burglary alerts to the main alarm panel.
- Automatic door locking after the vehicle starts moving.
- Vibration mode. The function allows you to turn off the sound alerts of the key fob and turn on the vibration mode.
- Lock keys from accidental pressing.
Main functionality
When each mode is turned on, a sound signal is heard. This option allows the vehicle owner to verify that the selected function is correct. When the protective unit is activated, the alarm responds with a short-term siren and flashing lights. If the option is connected correctly, the light sensor will start blinking. The system responds to the execution of the reverse procedure by sending identical signals.
The kit switches to immobilizer mode automatically thirty seconds after the ignition is turned off. The corresponding indicator lights up to confirm the selected option. To turn off this mode, you need to press the button with the image of a closed lock once.
The “Tomahawk 9010” series, with the help of which autostart is carried out remotely using a button with a key emblem, indicates the start of the mode by parking lights flashing three times, and the necessary indicators are displayed on the remote control monitor. After starting the power unit, the pager will signal with a specific melody sound.
Equipment
The system is supplied as a set in a blue cardboard box and consists of the following components:
- main electronic unit;
- antenna module;
- shock sensor;
- temperature sensor in the engine compartment;
- main and additional key fob;
- wiring harnesses;
- buttons for settings and Anti-hijack;
- instructions and warranty card.
Installation kit TW-9010
Key Features
The Tomahawk security system model TW-9010 provides the owner with the following capabilities:
- turning on silent accompaniment;
- protection against opening doors and lids of the engine compartment and trunk;
- the ability to start or stop the engine from a distance;
- remote start operation on vehicles with automatic or manual transmission;
- the system is compatible with gasoline and diesel engines, including turbochargers;
- turbo timer for cooling the charging system;
- the ability to measure temperature in the passenger compartment;
- an additional temperature meter allows you to start the engine depending on the sensor settings;
- possibility of daily autostart of the engine with repetition throughout the day (intervals of 1, 2, 4 and 12 hours);
- Carrying out self-diagnosis and automatic bypass of a damaged security circuit with an information signal;
- dual-zone shock sensor;
- the ability to deactivate the shock sensor at a distance;
- detection of false positives;
- the ability to control additional devices via three channels;
- additional anti-robbery and panic modes;
- setting using a hidden button (Override);
- the ability to call the owner to the car;
- car search mode in the parking lot;
- the key fob is equipped with additional functions (clock, timer, alarm);
- two-stage shutdown and unlocking of doors;
- relay built into the unit to control the door locking system;
- the main key fob is equipped with five buttons, screen backlight and an information system with a buzzer or vibration;
- protection of the control channel from scanning and signal interception;
- possibility of using additional key fobs (up to four pieces).
Specifications
Security system characteristics:
- dual-zone shock sensor;
- 5 security zones;
- passive immobilizer programming;
- PIN code for emergency disarming;
- “Car service” mode;
- activation of the siren from the key fob;
- separate door opening;
- protection when the engine is running;
- remote activation and blocking of the engine;
- system self-diagnosis;
- silent security mode;
- protection against false positives;
- audio confirmation of task completion;
- security of doors, hood and trunk;
- alarm clock built into the keychain;
- battery saving mode on the key fob;
- driver protection function from attack;
- Anti-grabber function;
- two-step opening of the central lock and disarming.
Below is a video review of the Tomahawk car alarm. Filmed by Ivan Vasilyevich channel.
Advantages
Reviews from car owners who have installed a Tomahawk alarm are mostly positive. Among the main advantages are remote engine starting. This is especially true in areas with harsh climates or in winter.
An additional plus is the ability to keep the engine running for up to 2 hours after turning off the ignition. Or its activation every two hours. Owners of cars with a turbocharged engine appreciated the option of gradual cooling of the turbine, which increases the service life of the bearings.
Even basic Tomahawk models with a minimum number of functions have an undoubted advantage over other security systems. It consists in immobilizing the engine relay and the range.
Flaws
Based on reviews from car owners, the following disadvantages can be identified:
- within the city there may be a delay when activating the security mode;
- an unpleasant squeak when pressing the start button;
- After a year of operation, the key fob begins to freeze.
INSTALLATION INSTRUCTIONS
Installation Basics
The TOMAHAWK TW-9010 security system has a classic connection diagram. First of all, before starting the installation, turn off the on-board power supply to the vehicle (disconnect the “-” battery terminal). To select installation locations for security system units, be guided by the following principles:
- Installation secrecy
- Absence of heat and moisture sources near the blocks
- Provide for minimal influence on each other of the vehicle’s standard electronics and alarm units
ATTENTION!
The radiating antenna must be installed away from the alarm and vehicle control units. When installing, try to minimize the length of the wires.
Selecting the location of the main blocks
- The electronic alarm control unit is installed inside the vehicle's interior. To obtain maximum range, the transmitting and receiving “RF” antenna of the system unit must be positioned as high as possible and not come into contact with metal objects or electrical wiring harnesses.
- The siren is installed in the engine compartment, in an inaccessible place. If you are using a stand-alone siren, provide access to the service key hole. The siren should be installed with the horn facing down, this will prevent moisture from entering. It is better to plan the wire connections inside the cabin for less oxidation.
- All high current circuits (power supply, parking lights, central locking, etc.) must be protected by fuses of the appropriate rating.
- The hood and trunk triggers cut into places protected from moisture that are inaccessible when the hood and trunk are closed. Triggers need to be lubricated periodically to prevent seizing and corrosion.
- The shock sensor is installed in the passenger compartment, the center of the car can be considered ideal, it is attached to the metal of the body with self-tapping screws or glued.
- Contacts in places where ignition, starter, etc. circuits are broken. It is recommended to solder.
……..
Connecting wires
6 PIN remote start power connector
1. Black and yellow wire - starter activation wire (+12V). +12V output signal to the starter solenoid relay.
It is connected to the wire on the ignition switch, where +12V appears in the “Starter” ignition key position. This signal is intended 4 to start the engine. Connect this wire after the locking relay.
2. Blue wire - +12V ACC output signal - auxiliary equipment.
It is connected to the wire on the ignition switch, where +12V appears in the “ACC” and “Ignition on” ignition key positions.
3. Thin red wire - system power wire (+12V).
Connects via a 10A fuse to the “+” of the battery.
4. The thick red wire is the power supply wire for the remote start power circuits (+12V).
Connects via a 40A fuse to the “+” of the battery.
5. Yellow wire - IGN 1 wire, +12V output signal.
It is connected to the wire on the ignition switch, where +12V appears in the “Ignition on” ignition key position, and does not disappear in the “Starter” ignition key position.
6. Green wire - IGN 2 wire, +12V output signal.
It is connected to the wire on the ignition switch, where +12V appears in the “Ignition On” ignition key position, and disappears in the “Starter” ignition key position, if this wire is present in the vehicle on which the system is installed.
Central locking connector 6 PIN
1. Blue wire - central contact of the central locking opening relay
2. Blue-gray wire - normally open contact of the central locking opening relay
3. Blue-black wire - normally closed contact of the central locking opening relay
4. Green wire - central contact of the central locking relay
5. Green-gray wire - normally open contact of the central locking relay
6. Green-black wire - normally closed contact of the central locking relay
Main connector 18 PIN
1. Black wire - “-” system.
(Ensure strong, confident contact)
2. Blue wire - wire for turning on interior lighting
-300mA when disarming the system (duration is programmable)
3. Black-red - IGN3 output.
-300mA during the remote start procedure, to organize additional ignition circuits. This wire may be needed if the ignition switch of a vehicle on which a system of more than two ignition circuits is installed or to activate immobilizer bypass modules.
4. Black and yellow wire - starter interlock relay wire.
-300mA after setting the system to security mode and/or remote start procedure and/or in “Anti-hijack” mode.
ATTENTION!
The blocking relay should only be used to block the starter, which will prevent the engine from stopping while driving.
5. Yellow-red wire - wire of the 2nd additional channel. (-300mA)
6. Gray-black wire - tachometer wire input.
Connect to the “-” wire of the ignition coil or tachometer signal wire.
7. Blue-red wire - “+” door sensor input.
8. Orange-white wire - “-” trunk sensor input.
9. Purple wire – wire for enabling the “Anti-hijack” function.
When “-” appears on this wire, the “Anti-hijack” function is activated.
10. Green-black wire - power wire for parking lights. Connects via a 7.5A fuse.
11. Green-yellow wire - power wire for parking lights. Connects via a 7.5A fuse.
12. Black and white wire - bypass wire for the standard immobilizer. -300mA for 1.5 sec during the remote start procedure.
13. Gray wire - siren output. (1.5A)
14. Yellow-blue wire - wire of the 3rd additional channel or two-step door opening (programmable).
- 3rd additional channel - “-” 300mA, pulse duration is programmable.
- Two-step door opening - “-” 300mA.
15. Yellow-black wire - wire for remote trunk opening. (-300mA, 1 sec)
16. Orange-violet wire - handbrake wire.
It is connected to the “-” handbrake switch (for a manual transmission) or to the brake lights (for an automatic transmission) (see diagrams 8, 9) depending on the vehicle’s configuration.
17. Blue-black wire - “-” door sensor input.
18. Orange-gray wire - “-” hood sensor input.
Shock sensor connector 4 PIN
Override button connector 2 PIN
LED Indicator Connector 2 PIN
5 PIN transmit/receive antenna connector
Selecting a manual or automatic transmission
The choice of manual or automatic transmission on the TOMAHAWK TW-9010 is carried out using jumper 1 (see connection diagram).
Jumper closed - automatic transmission. Jumper open - manual transmission.
Connecting the central lock
TOMAHAWK TW-9010 has built-in power relays for central locking control. The wiring for connecting the central locking is routed to a separate six-PIN connector. Wire colors and connection diagrams are shown in diagrams 1-4.
ATTENTION!
Remember that the pulse duration of the central locking control is a programmable function.
Setting up the shock sensor
The last stage of installation of the TOMAHAWK TW-9010 security complex is to set the sensitivity of the shock sensor to a minimum. Smoothly increase the sensitivity of the sensor, checking the response threshold with periodic impacts, and tap the body with your palm.
ATTENTION!
Excessive sensitivity can lead to a large number of false alarms, and you will be forced to coarse the sensor settings.
Ignition switch wire designations
Look at the diagram shown in the figure.
Terminal block with two starter contacts
The above does not mean that both cords can be connected together and connected using the circuits discussed here. The diagrams indicate one wire (ST1) that makes up the starter power circuit. This option is suitable:
- For all domestic cars without exception;
- For new foreign cars;
- For foreign cars up to 90-91 years of manufacture.
This is the paradox - the “ST2” cord is not provided in the new, as well as in the oldest models.
Diagram for TZ-9030
Here's how to connect the Tomahawk TZ-9030 main unit to the ignition switch to use autostart. Of course, after installation, you need to do programming, which is discussed below. If the use of a lineman is required, connect it to the terminal of the main alarm connector (black and red cord). The power connector, in turn, has the following wiring.
Instructions for equipment TZ-9030
If we talk about the Tomahawk TW-9010 model, the purpose of the IGN3 pin will be different from what is being considered here.
In "Chapter 1" the designations were listed: IGN1, IGN2, ACC, starter wire (ST). The “IGN3” cord has been added here, but it replaces the ACC wire. The “blue” cord coming out of the alarm terminal block must be connected to the ACC contact, otherwise the autostart will not work. At the same time, if you make changes to the settings, the IGN3 pin can be connected to the ST2 pin. True, it is not clear how to “emulate” the ACC wire then.
A “T” connection is used when connecting to all wires except the starter. And the “ST” cord needs to be cut to connect the resulting ends with the black and yellow wires. The cable that goes to the alarm from the lock is a signal cable (thin).
Diagram for TW-9010
A non-standard method of switching starter current is typical for the following alarm model: Tomahawk TW-9010. Voltage is supplied here from the 6-pin power terminal block when autostart is performed. The rest of the time, the starter wire conducts current, even if the car alarm does not work or does not work correctly. A blocking relay is included in the gap in the standard wiring. Whether it can be removed from the scheme is unknown. It is better, therefore, to stick to the recommended option.
Current loop without blocking
Note that the Tomahawk TW-9010 and TZ-9030 alarms can control the immobilizer bypass. The lineman’s “negative” cord is connected to the black-red cable (figure at the beginning of the chapter). The latter is designed to be connected to the “IGN3” pin, but in most cars this option is not used.
The ground potential on the black-red cord appears before the starter starts, which is exactly what is required for the lineman to work. In general, everything looks strange: in alarms with auto-start, they often provide a separate output intended only for connecting a lineman.
Connection diagrams
………
Technical data.
| Rated supply voltage | +12V |
| Current consumption when switched off ignition | 15mA |
| Allowable current: | |
| 6 PIN remote start power connector | |
| There is a red thick wire in the power circuit (limited by a fuse) | 30A |
| There is a red thin wire in the power circuit (limited by a fuse) | 10A |
| Output IGN 1, "+" (yellow wire) | 30A |
| Output IGN 2, "+" (green wire) | 30A |
| Output IGN 3, “-” (black-red wire) | 300mA |
| Starter wire, "+" (black and yellow wire) | 30A |
| Central locking connector 6 PIN | |
| In the contact circuit of the central locking control relay (limit with a fuse) | 20A |
| Main connector 18 PIN | |
| Interlock relay contacts | 40A |
| Service output of blocking relay, “-” (Black-yellow wire) | 300mA |
| Siren power output, “+” (gray wire) | 2A |
| Additional channel output 1, “-” (yellow-black wire) | 300mA |
| Additional channel output 2, “-” (yellow-red wire) | 300mA |
| Additional channel output 3, “-” (yellow-blue wire) | 300mA |
| Power outputs for parking lights, “+” (green-black and green-yellow wires, limited by fuses) | 7.5A |
| Output to interior lighting, “-” (blue wire) | 300mA |
| Temporary exposures: | |
| Service output, “-” (black and yellow wire) | always in security mode |
| Additional channel output 1, "-" (yellow-black wire) | 1 sec. |
| Additional channel output 2, “-” (programmable) (yellow-red wire) | 0.8 sec. 10 sec. 30 sec. fast. |
| Additional channel output 3, “-” (programmable) (yellow-blue wire) | 0.8 sec. 10 sec. 30 sec. fast. |
| Central locking control pulse duration (programmable) | 0.8 sec. 3.6 sec. 30 sec. |
How to install an alarm?
When installing an alarm, you must follow the following rules:
- all installation work is carried out with the car de-energized (with the wires removed from the battery terminals);
- alarm units must be located discreetly;
- the Override button is installed hidden, but must be accessible;
- alarm units should not overheat or become damp;
- It is recommended to avoid installing the head unit near sources of interference, which may be car electrical systems.
The Tomahawk TW-9010 alarm antenna should be located away from the electronic components. The length of the system connecting harnesses should be minimal.
Installation steps
The step-by-step installation procedure is as follows:
- The electronic alarm unit is located inside the car. Due to its size, the optimal location is the instrument panel.
- The antenna should be installed at the highest possible height inside the vehicle. It should not touch the body. Typically, users install the antenna along the top edge of the windshield. If the glass has a sun strip, it is not recommended to place the device on it. This is due to the shielding effect of the protective coating.
- Install the siren in the engine compartment. The installation location must be inaccessible through the holes at the bottom. When using a stand-alone device, ensure clear access to the keyhole. It is recommended to immediately install the siren wiring into the cabin, which will provide protection against oxidation.
- Circuits with high current values connected to the electronic unit (power supply, control of external lighting or door locks) must be protected by fuse links with the appropriate rating.
- Install the limit switches of the engine compartment and trunk lids. It is recommended to periodically clean the devices from dirt and lubricate them. This is especially true for wiring that becomes covered with oxides and ceases to provide signal transmission.
- The shock sensor should be installed inside the car. The sensor is attached to a metal body element using self-tapping screws or tape. Installation on plastic panels is not recommended, as it does not ensure correct operation of the device.
- After installing the main modules, they should be connected with wiring harnesses. To supply positive power, wires going to the ignition switch are used. As an alternative, it is possible to use a separate conductor going directly to the battery terminal. With this type of installation, an additional 3 Ampere fuse is installed in the conductor. The negative signal is taken from the car body from the standard ground nut. It is not recommended to screw the negative wire with a self-tapping screw, since such a connection does not provide contact. All “signaling” wiring connections into the standard electrical network must be soldered and insulated. In this case, it is prohibited to use acid-based fluxes, as they lead to destruction of the wiring.
- Connect the power supply to the on-board network after installing all the harnesses and test the operation of the alarm.
- Configure the shock sensor. To do this, its sensitivity is set to a minimum level and the response threshold is checked by lightly striking the body with the palm of the hand.
- Configure system parameters using the key fob and service button.
The Tomahawk TW-9010 main unit is shown in a video shot by paladinMgn.
Wiring connection
A detailed description of the wire connections is available in the instruction manual.
When installing Tomahawk TW-9010, the wiring is connected to the connectors of the unit:
- power connector with six remote start pins;
- block with six contacts for connecting the central locking;
- main connector of the electronic unit (18 pins);
- shock sensor block (four pins);
- five-pin antenna connector;
- two connectors for a setting button and an operating mode indicator (two pins each).
Harness connection diagram
When installing the electronic unit on it, you must use a jumper to select the type of gearbox. If the jumper is installed, the system can work with an automatic transmission; if removed, it can work with a manual transmission.
Below are photos of diagrams for connecting the system harnesses to the on-board network.
Alarm test poll
If the car owner with the key is within the range of the alarm, he has the opportunity to test the system. To perform this task, the third key on the communicator is pressed. The remote control display will display information about the temperature in the vehicle interior, as well as data about activated security zones. When conducting a test survey, the machine will blink three times.
How to open the trunk
To open the tailgate, use the third key on the communicator, only now you need to hold it down. This will cause the lock to open. An indicator with the tailgate open will appear on the communicator display.
How to search for a car in a parking lot?
To complete the task, you need to hold down the third and fourth keys of the communicator. When the command is sent to the microprocessor module, the vehicle's headlights will blink six times. A siren will also sound.
Anti-hijack
To activate this function, keys numbered 1 and 3 are clicked and held. When the option is enabled, the light alarm should work for 30 seconds. Then the siren will be activated and the electrical circuits of the engine and starter will be blocked. Thanks to this, starting the power unit and further using the car will be impossible, and if the engine was started, the alarm will stop it. The corresponding indicator will appear on the communicator display.
Panic mode
To enable this option, keys 1 and 3 are also pressed, but they do not need to be held down, just click. If the power unit is running, the function cannot be activated. When the mode is turned on, the car will blink three times and the siren will emit a sound signal.
Calling the driver from the salon
To perform this task, a special key is used, which is equipped with the antenna adapter. When the remote control receives a signal, it will play a melodic pulse. An indicator with the inscription Call will appear on the communicator display.
How to start or disable the alarm when the key fob is lost?
If the remote control is faulty or lost, the procedure for disabling and enabling the protection mode can be performed using the service key. It is important that the car owner has access to it when he is in the driver's seat.
Activation is done like this:
- The key is inserted into the lock and the ignition is activated.
- The service button is clicked 8 times.
- Then the ignition is turned off, the car owner leaves the cabin. The light alarm should work and the siren will be activated. After 20 seconds, the anti-theft system will operate normally.
To turn off the system, follow these steps:
- The car door opens with a key. The key is installed in the lock and the ignition is activated.
- The service button is clicked four times.
- The ignition is turned off. As confirmation, two flashes and a double siren will sound.
Application Guide
To configure the basic functions of the Tomahawk 9010 security system, a communicator with a display is used.
Replacing the key fob pager battery
It is important to know
It is necessary to change the battery if the battery charge indicator shows one bar.
To install the battery in a new key fob you need to do this:
- The back cover of the communicator opens.
- The battery is removed from the device.
- The third button with the image of an open luggage compartment is pressed.
- A new power supply is being installed.
- The back cover of the device closes. Button 3 on the communicator is pressed once.
Starting and disabling the security mode
| Buttons used | Executed Options | Description |
| Short term | Activating the protection function | The hazard alarm will sound once, the siren will also be activated and all door locks will be locked. The icons should appear on the communicator screen. If one of the security zones did not turn on and the car could not be armed, the siren will sound a triple signal. |
| Short term | Turning off the function | The external lights will blink twice and the siren will sound twice. The key fob display will display an icon. If it was not possible to connect the silent security mode, the siren will not work. |
Starting security mode without sound
| Buttons used | Executed Options | Description |
| Short term | Enabling silent security mode | If activated successfully, the alarm will blink once, and the icons will appear on the remote control screen. The light alarm should turn on, and the remote control will respond with a sound pulse. |
Immobilizer mode
Activation is carried out automatically thirty seconds after the ignition system is turned off. To disable the immobilizer, you need to press the first button once or turn off the ignition and “click” on the service button.
Remote engine start and stop
| Buttons used | Executed Options | Description |
| Launching a remote motor start | The hazard warning lights should sound three times and the system siren will sound three times. The communicator display will display an icon and indicators They mean:
| |
| Increased engine operating time | After starting, the engine should run for several minutes in accordance with the programmed time. Each time you press the keys, the engine operating time increases by five minutes (20 minutes maximum). | |
| Motor shutdown | The external lights should blink twice and the siren will sound twice. The indicator will disappear from the remote control screen |
Turbo timer
To program and configure the turbo timer, perform the following steps:
- Enters the settings and programming menu.
- The service mode button is pressed 16 times (since this is the Turbo Timer function number according to the programming table).
- When you press the first button, the option is disabled, when you press the second button, the operating time will be 1 minute, when you press the 3rd button, two minutes, and when you press the 4th button, 3 minutes.
Warming up the engine at a given temperature in the cabin
| Buttons used | Executed Options | Description |
| Press and hold simultaneously | Inclusion | The external lights will blink once, and the siren will sound a signal. The icon will appear on the communicator screen, as well as the set temperature value for warming up. |
| Simultaneously | Deactivating the option | The alarm will sound twice and the siren will sound twice. The icon will disappear. |
It is important to know
Automatic engine start based on temperature is possible no more than six times in two hours.
Video: setting up engine autostart based on temperature
The “Olzhas Anuarbek” channel made a video that shows the process of setting up a remote engine start based on air temperature readings in accordance with the instructions for the Tomahawk 9010 key fob.
Daily autostart
| Buttons used | Executed Options | Description |
| Simultaneously | Enabling the feature | If enabled successfully, the hazard warning light will blink once and an icon will appear on the remote control screen. After enabling the option, starting from the next day, the alarm will start the engine every day at the time the function was activated. |
| Simultaneously | Deactivation | External lighting devices will blink twice, and the icon will disappear from the remote control screen. The device should also play a melodic signal. |
Remote status polling
| Buttons used | Executed Options | Description |
| Activating the function | External lighting devices will emit three light signals. Information about the temperature inside the car, security status, etc. should be sent to the communicator. |
Remote trunk release
| Buttons used | Executed Options | Description |
| Press and hold | Remote opening of the tailgate | The hazard warning system will sound three times. The icon will appear on the communicator screen |
Vehicle search
| Buttons used | Executed Options | Description |
| Simultaneously | Turning on the search function | External lighting devices should emit six light signals, and the siren will also sound |
Remote shutdown of shock sensor
| Buttons used | Executed Options | Description |
| Simultaneously | Activating the remote kick controller shutdown feature | If the protection is successfully triggered, the lighting fixtures will blink once and the siren will emit a short beep. |
| Simultaneously | Deactivating the remote kick controller shutdown feature | An icon will appear on the key fob pager |
Alarm Modes
Alarm Mode Features:
- If the sensitivity controller warning zone is activated, the headlights will flash six times and the siren will beep three times. An icon in the form of a hammer hitting the car body will appear on the communicator screen, and the device will also emit a melodic signal.
- When the main zone of the regulator is turned on, the alarm activates an alarm mode lasting 25 seconds. The communicator will sound an alarm tone, and a symbol in the form of a hammer will appear on its screen.
- If another sensor zone is triggered, the alarm mode is activated for 30 seconds. An indicator indicating the specific zone will appear on the communicator screen. The key fob should also sound an alarm.
- To turn off the alarm mode, press the second button on the key fob.
Panic Mode
| Buttons used | Executed Options | Description |
| Simultaneously | Activating the Panic function | The machine's engine must be turned off at this moment. The vehicle's headlights will blink three times and the siren will sound. |
Anti-hijack mode
| Buttons used | Executed Options | Description |
| Simultaneously | Activating the function | The alarm mode should turn on for thirty seconds, after which the starter mechanism will be blocked. The communicator will emit a short alarm tone. The icon will appear on the screen |
| Disabling mode | — |
Valet mode
| Buttons used | Executed Options | Description |
| Simultaneously | Activating the function | The car's headlights will flash four lights and the siren will sound. An icon should appear on the communicator screen. When using this mode, no option is available except for controlling the central locking. |
| Simultaneously | Disabling the option | — |
Remote engine start
To remotely start the engine, you need to press button No. 4 (key) - the car will respond with a triple flash of parking lights and three siren signals. One of the messages will appear on the display:
- 5t – an attempt was made to start the engine;
- 5P – attempt to start the engine failed;
- image of a car with clouds of exhaust gases - the engine is running.
The car engine will run for a pre-programmed time (5/10/15/20 minutes) and then turn off. To extend the operating time, you need to simultaneously press buttons No. 4 (key) and No. 5 (lock). Each subsequent press of these buttons increases the engine warm-up time by 5 minutes. The key fob display will show the value of the programmed engine operating time.
The car engine cannot be started remotely if:
- ignition on;
- the hood is open;
- The gear lever is not set to neutral;
- the car's handbrake is not on;
- Valet mode activated;
- On a car with a manual transmission, preparation for remote engine start has not been completed.
In any of the listed cases (except for Valet), when you try to remotely start the car, 4 alarm sounds will sound.
Designations of buttons and icons
Location of buttons on the main and spare remote control:
- K1. It is located on the main and additional communicators, with an image of a key printed on it.
- K2. It is located on both remote controls, on the main one it has an icon in the form of a closed lock, on the additional one - an open and closed lock.
- K3. Placed on the main and additional key fobs, equipped with an open trunk icon.
- K4. Located on both remote controls, there is an image on it that means “silent mode”.
- K5. Found only on the main key fob, it is marked with the letter “F” in a circle.
Diagram of controls on the Tomahawk 9010 communicator
Description of icons and pictograms on the X5 9010 key fob:
- Two-way communication channel is active.
- The automatic start of the internal combustion engine (internal combustion engine) is enabled based on the temperature sensor readings.
- Driver call signal.
- Anti-robbery mode is enabled.
- Indication of strong physical impact on the car body.
- The engine compartment of the car is open.
- The parking brake is released.
- The vehicle's silent security is turned on or the siren is turned off.
- The central lock is closed or open.
- The car doors are not locked.
- The vibration mode to notify the car owner is turned on.
- Valet mode is enabled.
- Indication of the charge of the battery installed in the key fob.
- The engine is running.
- The luggage compartment of the car is not locked.
- Indication of degrees Celsius or Fahrenheit.
- Board with the current time.
- Timer for remote engine start is enabled.
- The alarm function is activated.
- Designation of the daily automatic start of the power plant.
- Symbol for saving battery power in the remote control.
- Designation of the location within the visibility range of the remote control.
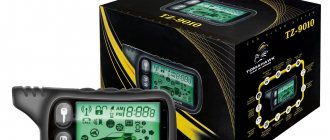
Photo of the tomahawk 9010 key fob display
Setting the sensitivity of the shock sensor
Adjustment is required if the shock sensor is not configured correctly and the alarm reacts to thunderstorms, passing cars, or does not even respond to strong impacts on the car.
We configure the sensor as follows:
- tighten its adjusting screws (to increase sensitivity, turn it clockwise; to decrease it, turn it counterclockwise);
- we lock the car and put it in security mode;
- We try to lightly hit the body.
If the sensitivity is too low or too high, open the car and adjust the sensitivity again using the adjusting screws. Thus, we adapt the alarm to our requirements.
ATTENTION! You can find out where the shock sensor is located from the specialist who installed the alarm on your car.
Software neutral
If the car has a manual gearbox, the handbrake limit switch is connected to the alarm system. The type of box is also customizable, as are other parameters of the anti-theft system. When using a manual transmission, cut the transmission type selection loop. After these steps, the engine will not start without activating the neutral position. How to connect program neutral?
- Stop the car and apply the handbrake.
- Press the engine start button on the remote control.
- Remove the ignition key and exit the vehicle.
- Close all doors.
- The time interval between steps 2 and 4 should not exceed thirty seconds.
Reset to factory settings
A factory reset can be performed using the built-in button. To do this proceed as follows:
- turn on the ignition;
- Press the Override button 10 times in a row;
- turn off the ignition - the alarm sounds 10 trills;
- press the Override button once – the alarm emits one trill;
- press button “5” (lock);
- turn on the ignition - the side lights flash 5 times.
When resetting the alarm to factory settings, all manipulations must be performed promptly and without delay.
How to program important options
To program the Tomahawk tw-9010 block you will need:
- At least one key fob perceived by the system;
- Functional Override button;
- Before performing any operations, disarm the vehicle.
Take the main key fob, press the “Lock” button. If the screen displays “locked”, press the key again.
A set of software-defined options is given in any manual for the Tomahawk signaling system. The key fobs are equipped with four buttons, and the value is set by pressing one:
Let's program the system for control “by tachometer”:
- When the alarm is disarmed and the doors are closed, turn on the ignition without starting the engine;
- Press Override 6 times;
- Turn off the ignition (a chirp signal will sound).
Now, press Override 4 times in a row. Then, select “value 3” by taking the key fob and pressing the “Trunk” button.
You won't need keychains anymore. Follow steps 1-3 by pressing Override 9 times. If an LED is connected, wait until it turns on. Start the engine, and at 1000-1500 rpm, press and hold Override. A single “chirp” will sound, indicating that the Tomahawk system has been “successfully trained.” If you hear 4 “chirps”, do the training again.
If everything is done without errors, the main key fob will correctly display the engine operating mode.
Emergency activation and deactivation of the alarm system
If the car does not respond to the key fob, you can use the emergency activation and alarm disabling function.
Emergency alarm activation
To activate an emergency alarm, you must:
- turn on the ignition, but do not start the engine;
- press the Override button eight times;
- turn off the ignition.
The car will react with a single flash of the parking lights and a single sound of the siren. After 20 seconds, the system will automatically turn on the security mode.
If, 20 seconds after the emergency activation of the alarm, any of the security zones are triggered, the car will notify the user of this by flashing the parking lights four times and sounding the siren four times. After this, the user will have 20 seconds to disarm it. If this is not done, the system will activate the alarm mode.
Emergency alarm shutdown
To make an emergency shutdown of the alarm without a key fob, you must:
- turn on the ignition (do not start the engine);
- press the Override button four times;
- turn off the ignition.
The parking lights will flash twice and the siren will sound twice.
REFERENCE. The key fob pager will continue to function even after the user has made an emergency activation or emergency shutdown of the alarm system
What to do if the key fob doesn't work?
Reasons why the alarm does not respond to button presses, as well as ways to eliminate them:
- Incorrectly installed battery in the rear compartment. If the polarity is reversed, then the device will not need to be repaired - you just need to change the location of the battery.
- The power supply in the communicator has run out. With this problem, the quality of the transmitted signal decreases and commands may be executed only once. Troubleshooting involves replacing the battery.
- The internal components of the remote control are oxidized or clogged. The case of the communicator on the Tomahawk 9010 is water-permeable and not sealed, so moisture or dust can get inside. To fix the problem, you need to disassemble the remote control and clean it using cotton swabs or napkins. If this does not help, then you will need to test all contacts and connections on the circuit with a tester; all damaged elements must be re-soldered.
- If the remote control is unstable after being dropped, you need to make sure that its case and internal parts are intact. As a result of an impact on Tomahawk 9010 key fobs, quartz is most often damaged. You will need to disassemble the device, visually verify the integrity of the board and test the communicator contacts with a multimeter. If the quartz is disconnected, then its contact joints must be re-soldered and glued to the circuit using thermal paste.
- The remote control keys began to stick. If, after pressing the button, it does not return to its original position, then the “click” can be regarded by the control unit as prolonged. The problem is that the keys become dirty, so they need to be wiped externally with an alcohol solution or a toothbrush. In case of serious contamination, the housing is disassembled, and it would also be useful to ring the chain. If the button is damaged, it must be replaced with a new one.
- A malfunction of the remote control may be due to electromagnetic interference in the area where the vehicle is located. This often happens near large industrial enterprises, security and military facilities, transformer substations, airports, etc.
The LED built into the antenna unit does not light up
If the antenna light diode does not work on the Tomahawk TZ 9010 alarm system, the reasons may be problems in the element itself or in auxiliary devices.
- The diode itself or its resistance has burned out. In this case, it is enough to re-solder the part.
- The driver responsible for the display is damaged. Repairs are carried out similarly, with a more complex replacement process.
- Internal failure of the control unit.
Video
User Olzhas Zhailaubay showed in his video how the automatic engine start option works on a car with a Tomahawk 9010 alarm system installed.
Do you have any questions? Specialists and readers of the AUTODVIG website will help you ask a question
Was this article helpful?
Thank you for your opinion!
The article was useful. Please share the information with your friends.
Yes (100.00%)
No
X
Please write what is wrong and leave recommendations on the article
Cancel reply
Rate this article: ( 1 vote(s), average: 5.00 out of 5)
Discuss the article:
Warming up at a given temperature
The tomahawk system includes an under-hood temperature sensor that is used to activate automatic warm-up. Activation of the engine warm-up function based on the temperature value is performed by simultaneously pressing buttons 2 and 3 of the key fob.
When the function is turned on, the headlights will blink and the siren will emit a sound signal, the corresponding icon and the temperature of the automation will be displayed on the remote control display. Auto heating is turned off by pressing the same buttons on the remote control again.
The deactivation of the function is confirmed by double flashing of the headlights and double beeping of the siren, and a melody will play on the pager and the auto warm-up icon will disappear.
Standard connection tw 9010
The Tomahawk equipment manufacturer suggests connecting the alarm as follows:
Reviews tell us that the standard connection option in VAZ cars is easy to implement. You don’t have to connect the hood switch, the Anti-Hijack button, and the “blue-red” wire coming from the connector is definitely not needed. You can connect a blocking relay connected to the “black-yellow” cable if autostart is needed. In general, connecting the Tomahawk tw 9010 signaling system is a pleasure if we are talking about a VAZ-2110.
There are two connectors under the dashboard of the VAZ 10s. They are painted white and red. When making T-shaped connections, the following wires are pulled from the connectors:
- Tachometer cord connected to pin “3” of the white connector;
- Parking brake sensor wire (white connector);
- Two cords from the turn signal lamps (terminals 5 and 6 of the red connector).
Linking an additional key fob
If it was not possible to bind an additional device using a similar method, perform the following actions:
- The ignition system in the car turns on, but the power unit does not start. When turning the key in the lock, the user must simultaneously hold down the button to enter the service mode.
- The siren will play four sound pulses.
- The service mode button is released.
- On the communicator, you simultaneously press controls with indicators in the form of an open trunk and silent car protection. In confirmation, the siren will play several sound signals, their appearance indicates successful programming.
- To exit the binding menu, you must take no action for 6 seconds.
To find out how many remote controls are registered in the Tomahawk memory, you need to press the button in the form of an open trunk with the ignition off. The remote control will blink its LED indicator several times. The number of flashes corresponds to the number of recorded key fobs.
Car alarm system Tomahawk 9010
The anti-theft system kit consists of:
- remote control with liquid crystal display;
- one-sided keychain;
- shock sensor;
- one relay;
- receiving and transmitting module;
- Anti-Hi-Jack buttons;
- mode switching keys;
- LED indicator;
- ten wires;
- one limit switch;
- car stickers;
- installation tools;
- temperature sensor;
- instructions for installing a car alarm;
- central control unit.
An important component of the kit is the connection manual, without which it is impossible to correctly connect and configure the anti-theft system.
Key fob programming
Up to four key fobs can be registered in the Tomahawk 9010 system.
When programming new key fobs, the data on the old key fobs will be erased. Therefore, within each programming session, the user will have to register all valid key fobs. To register a new key fob in the system, you must:
- turn on the ignition, but do not start the engine;
- press and hold the Override button;
- after four siren sounds, release the Override button;
- press and hold buttons No. 1 “Trunk” and No. 2 “Silent security” on the pager until one beep is heard;
- repeat the last action with the remaining key fobs (after registering the first key fob, one beep will sound, after registering the second – two beeps, after the third – three, after the fourth – four).
New key fobs are registered. 6 seconds after registration is completed, the system will exit the programming mode.
ATTENTION! The interval between registration of key fobs should not exceed 6 s. Otherwise, the alarm will exit the programming mode.
About the included software options
There are several options that are responsible for autorun. Only one of them requires precise decoding; the rest are described in detail in a special table that the manufacturer attaches to its devices.
- You can control the motor with your own hands depending on the indicators on the tachometer.
- The oil pressure lamp must be connected to the control cord.
- The engine is easily controlled by voltage indicators. Only the gray cord, which is related to connector X3, should remain unconnected.
The connection method determines which settings a particular buyer will choose. Some advise using the first option and say that then there will definitely be no problems with autostart.
Setting up the Tomahawk alarm: new key fobs in the system
The Tomahawk 9010 security system allows you to register up to four key fobs. Since when programming new key fobs, the programmed data of previous key fobs will be erased, it is recommended to programmatically register all working key fobs at once.
Algorithm for programming a new key fob:
- without starting the car engine, turn on the ignition, then press the “Override” button located in the car’s interior, hold it until the siren sounds, repeating four times;
- releasing the “Override” button, after the sound of the siren stops, press the button with the designation “silhouette of a car with an open trunk lid” and the button with the designation “speaker crossed out with two lines” until a single sound signal appears;
Note: when programming the second key fob, two beeps will sound, when programming the third key fob, three beeps will sound, etc. The interval between programming key fobs should not exceed six seconds.
Setting the clock, alarm and timer
To set the clock, alarm clock or timer, use button No. 3 (functions).
Setting the clock, alarm and timer
| Modes | Number of presses on button No. 3 (functions) |
| Setting the minutes on the watch | 1 |
| Setting the alarm clock | 2 |
| Setting the minutes on the alarm clock | 3 |
| Turning the alarm on (off) | 4 |
| Setting the clock on the timer | 5 |
| Setting the minutes on the timer | 6 |
| Turning on (off) the timer | 7 |
To set the time, hold down button No. 3 (functions) until the field with an electronic clock flashes on the pager screen.
- To set the current clock value:
- button No. 1 (trunk) increases the time, button No. 2 (quiet security) decreases it;
- To quickly scroll through time, hold buttons No. 1 or No. 2 in the clamped position.
- To set the current minutes:
- briefly press button No. 3 (functions) and the cursor moves to the field with minutes;
- button No. 1 (trunk) adds minutes, button No. 2 (quiet security) decreases them;
- To quickly scroll through the minutes, hold buttons No. 1 or No. 2 in the clamped position.
If, after setting the minutes, you press the F button, the alarm setting mode is activated, but if you do nothing, the key fob will save the current time and exit the setting mode.
The alarm clock is set according to the same principle as the clock. If, after setting the alarm, you press the F button, the timer setting mode will turn on; if you do nothing for a few seconds, the current alarm value will be saved and the key fob will exit the setting mode.
To immediately begin setting the timer from standby mode, press buttons No. 2 (silent security) and No. 3 (functions).
Setting the timer in standby mode
| Timer, min. | Number of clicks: | |
| On button No. 2 (silent security) | To button No. 3 (functions) | |
| 10 | 1 | 1 |
| 20 | 1 | 2 |
| 30 | 1 | 3 |
| 60 | 1 | 4 |
| 90 | 1 | 5 |
To go directly from the standby mode to setting the alarm clock, bypassing the clock setting mode, press buttons No. 1 (trunk) and No. 3 (functions). Then they proceed according to the standard pattern.
Possible problems and their solutions
Frequency modulation is used to encode control signals for the Tomahawk 9010 complex. The transmission of signals is affected by electromagnetic interference from transformer stations or relay installations. If it is impossible to control the remote control, an emergency shutdown or arming is performed. The instructions for use recommend re-entering the remote control codes into the complex’s memory.
When the battery is low, a warning icon appears on the screen. After removing the old battery and installing a new source, it is recommended to briefly press the key marked with the silhouette of a car. The procedure allows you to discharge and charge the capacitors of the signal transmitter.
If “floating” defects appear, it is recommended to inspect the blocks and connecting cables. If insulation breaks are detected, it is necessary to replace sections of the wiring or protect the metal conductors with insulating tape. If damaged electronic elements are found, it is necessary to replace parts or install a new unit. Since production of equipment has been discontinued, purchasing new components is difficult. In this case, it is necessary to install a new security system on the car.
Connection in vehicles with "ST2"
Let’s say that voltage appears simultaneously at the starter contacts “ST1” and “ST2”. Then the alarm installation diagram can be modified.
Modified circuit for TW-9010
The break in the “ST2” wire coming from the lock contains normally closed relay contacts. In theory, the standard wiring of the “ST2” circuit is not broken here. But when a positive potential appears on contact “ST1”, such potential will also appear on “ST2”.
If the voltage should appear at contact “ST2” later than at “ST1”, you need to install a relay with a delay. But this option is not recommended. But the IGN3 output, provided in the TZ-9030 car alarm, can “emulate” the “ST2” contact in any car. You need to be able to configure the option correctly, and then the following connection option will become possible:
- IGN1 signaling –> IGN1 auto;
- IGN2 –> ACC (if IGN2 is not present in the car itself);
- IGN3 –> relay winding connected to the ST2 gap.
We hope everything is clear here.
Two starter wires and TZ-9030
There are models of devices with auto-start, where connection to two starter lines is provided initially. However, it turns out that there is no such alarm in the Tomahawk equipment line.
Description and characteristics of the keychain
The security system is supplied with two key fobs designed to control the system, which differ in appearance and number of buttons:
- main, equipped with five buttons and a liquid crystal display;
- auxiliary, having four buttons and an additional indicator diode.
The main and additional Tomahawk 9010 key fobs have different body shapes.
Under ideal conditions (open area, no interference), the distance of stable two-way communication is 1200 m. In dense urban areas, the distance is reduced to 50-100 m.
The key fobs are equipped with a transmitter or transceiver operating at a frequency of 434 Mhz. The transmitter power does not exceed 7-10 mW, so permission to use the frequency range is not required. FM frequency modulation is used to encrypt data, so the signal is easily intercepted by special code grabbers.
Photo gallery
The photo below shows keychains for Tomahawk 9010.
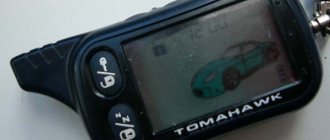
Main keychain
Main and additional key fobs
Disabling the system when the key fob is lost
If the control panel breaks down or the battery runs out on the road, the system can be turned on and off with the emergency button and key.
Using the Valet key
To emergency deactivate the system:
- Open the driver's door lock with the standard key, and the alarm will be activated.
- Insert the key into the lock and turn it to the ignition switch position.
- Find the service button and press it three times.
- Turn off the ignition. The system should give a double light and sound signal. After this, the security mode will turn off.
- Check that the engine can start.
Using code
When installing the “alarm”, an emergency shutdown can be programmed using the code:
- After opening the door with the key, you need to activate the ignition.
- Enter the first digit of the code by pressing the button (the number of presses is equal to the value).
- Turn off and turn on the ignition again.
- Enter the second number.
- Deactivate the ignition, the system will turn off in the same way as the normal procedure described above.
- Start the engine.
What do car enthusiasts say about the alarm?
Vasily, 35 years old:
Normal alarm for your money. I have been using it successfully and without any complaints for 5 years. During this time, the only inconvenience was changing the batteries. At the very beginning of the purchase, out of ignorance, I pressed the wrong buttons and launched functions I didn’t need. The service center helped me and set the average sensitivity so that I wouldn’t have to run to the key fob for every cat. I liked the function - turning on the car signal by pressing a button on the remote control. You can scare animals and curious people near the car.
Konstantin, 50 years old:
I like that all the buttons on the remote control are clear without instructions. Managing the entire system is simple. The key fob failed a couple of times for unknown reasons, you can stand there for 20-30 minutes and press the buttons and it won’t do any good. The alarm let me down when I hit the license plate at night in a parking lot. It just didn’t work, of course, it was largely my fault, I should have checked and adjusted the sensitivity more carefully.
Vladimir, 25 years old:
I installed the Sinhala according to all the rules, nothing complicated, everything is clear. But the signal only worked for shocks 5 times! I don’t recommend it, it’s better to pay a little more and buy a reliable alarm system.
Ivan, 34 years old:
This alarm suits me quite well. It’s nice that for such money there are such functions as warming up and feedback.
Valery, 61 years old:
An alarm system will not save you from professional car thieves. But for that kind of money it’s not worth expecting something supernatural. For my inexpensive and budget car, which is not in demand among thieves, such a security system will do just fine.