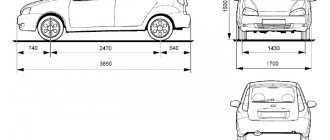
Dimensions of wheel bearings for Lada Granta
Bearings Lada Granta (VAZ-2190, 2191)
In the list, numbers are indicated only with significant additional designations (for example, A - reinforced, Ш - noise requirements, etc.), if there are other modifications that are less suitable, numbers for VAZ are indicated fully.
Topic: Differences between VAZ 2108 and 2190 Grant. Replacing the rear wheel bearing. Catalog number 2108-3104020 or 256706 There are a lot of manufacturers CRAFT FENOX RTBB12313O7 HOLA NB722 took this TRIALLI CS 256 WEBER BR 2108—4020 VPZ-15 CHINA SPZ-4
To the heap, change the oil with flushing, and small things! candles, filters, lamps. In stock: VAZ 2191 Lada Granta liftback
But her rear lights and bulbs are different. In the first part, a small mistake was made, the rear light bulbs are not dual-mode, but there is one bulb for the stop and one for the marker.
Text without photos because we are watching a video
The rear bearings are the same as 2108 (all front-wheel drive), the hubs are the same, the pads are 1118 2170 with ABS, and we have grants with ABS like this
ABS rotor VAZ 1118-2170 rear wheel 1118-3538400 + ABS sensor
The rear brake cylinder is like a figure eight. There are also small differences in the fastening of the rear wheel hub axle 2108-31104055 (hexagon), as well as in the front suspension; different bolts are used for the balls and for fastening the caliper bracket with an E-12 head, which require a slightly different tool. We disassemble/assemble like a figure eight/nine
The rest is the same, the same “nine” Have a nice weekend! Feel free to visit me in PM aka garage (advice/repair), Blog (personal opinion), Matiz on 16 discs Motya
Other items Cabin filter GB-9831/C Fuel filter GB320 (2123-1117010) fit according to book 2190-1117010
It all started when I noticed a hum at a speed of >130 km/h. Then this hum began to appear at 100 km/h. It ended up that the car began to hum already at 60 km/h.
As a replacement, I decided to take something proven, namely SKF. I found three models suitable for Kalina/Granta: ● VKBA 1414; ● VKBA 1315; ● VKBA 3441.
The first two options cost more than 2 thousand rubles per piece, and the last one costs only 950:
Source
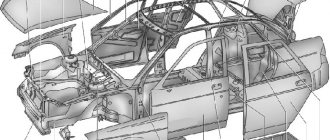
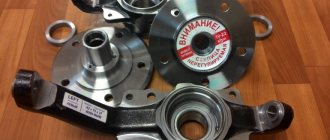
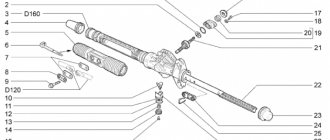
Rear wheel bearing on Grant - unit design
The design of the rear hub is no different from the LADA series cars, the parts are identical, as well as the ball bearing itself. The diagram is presented below.
- HUB AXLE
- HUB WITH BALL BEARING
- DIRT RING
- RETAINING RING
- REAR HUB BEARING LADA GRANT (NUMBER 21080-3104020)
- THRUST WASHER
- HUB NUT
- SEALING RING
- PROTECTIVE CAP
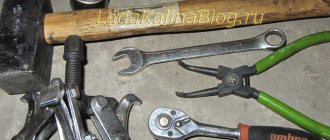
To replace the rear hub bearing, you will need to unscrew the nut, remove the assembly - 2, and then press out the ball bearing in a vice. Or use a cup puller. To do this you will need a list of tools:
- Set of sockets with ratchet;
- Extended ratchet or pipe;
- Jack;
- Screwdriver, chisel;
- Vise, hammer;
- Two-grip and cup puller;
- WD-40 lubricant;
- Round nose pliers;
- New ball bearing (read below for information on selection).
Below are detailed instructions in three parts:
- Removing the old part;
- Installing a new one.
- Reassembly.
Replacing the front wheel hub bearing
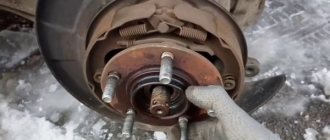
If the bearing fails, replace it. There are two ways to replace a bearing. The first is by removing the steering knuckle assembly, the second is without removing it from the car. The work is shown on the right wheel bearing. The wheel bearing of the left wheel is replaced in the same way. We carry out work on an inspection ditch or overpass. We remove the wheel.
Using a screwdriver as a lever, remove the hub protective cap. We install the wheel and tighten the two bolts that secure it. We lower the car onto its wheels.
With a beard, we straighten the collar of the hub bearing nut, which is dented in two places. Apply the parking brake, engage first gear and replace the wheel chocks.
Use the “30” socket to loosen the hub bearing nut. The nut is tightened with a lot of torque, so the socket and screwdriver must be strong enough to transmit the necessary force. We rest against the front of the car (exactly both front wheels, because otherwise the anti-roll bar will interfere with disassembly, pressing the suspension elements upward). We remove the wheel. Unscrew the wheel bearing nut completely...
. and remove the washer. Remove the front wheel brake disc (see “Removing the front wheel brake disc”). Disconnect the right wheel drive from the hub (see “Removing the front wheels”). In order not to disturb the wheel angles, the bearing can be replaced without removing the steering knuckle. To do this, we connect the ball joint to the fist...
... And compress the hub by hitting it through a soft metal drift. The hub can also be compressed using the front brake disc.
We pass M12 × 1.25 mm bolts, about 130 mm long, through two diametrically opposite holes in the disk and screw them into the holes of the hub to a depth equal to its thickness. By sharply hitting the bolt heads with a disk, we press the hub. If it was not possible to remove the hub in this way, remove the steering knuckle. To do this, unscrew the nuts of the bolts securing the shock absorber strut to the steering knuckle, remove the bolts (see “Removing and disassembling the shock absorber strut”). Disconnect the ball joint and remove the steering knuckle.
Replacing the rear wheel hub bearing of Lada Granta
Tool:
- Wheel key
- 7 mm straight box spanner
- Mounting blade (if necessary)
- Medium flat screwdriver
- Narrow chisel
- Ratchet wrench
- 30 mm head
- Three-jaw puller
- Double jaw puller
- Thin wire
- Large hammer
- Needle file
- Circlip Pliers
- Bench vice
- Torque wrench
Parts and consumables:
- Wooden block - 2 pcs.
- Grease (Litol-24)
- New hub nut
- Rear wheel bearing
Removing the hub
1. Remove the brake drum as described in this article.
2. Use a screwdriver to pry off the wheel hub protective cap.
Note:
The rubber O-ring remains on the cap.
3. Use a narrow chisel or screwdriver to straighten the jammed nut collar.
4. Using a 30 mm socket, unscrew and remove the hub nut.
5. Using a magnet or a thin wire with a bent end, remove the thrust washer from the hub axle.
6. The bearing is mounted on the axle with a transitional fit, so the hub can be removed by hand. If there is difficulty, compress the hub using a universal three-jaw puller.
7. Remove the hub and bearing assembly from the axle, in most cases one of the inner races of the bearing will remain on the axle (shown by the arrow).
8. To remove the inner ring of the bearing, two flats are made on the axle for installing a two-jaw puller.
9. Hook the arms of the two-jaw puller onto the inner race of the bearing and press the inner race of the bearing off the axle.
Note:
In practice, there are cases when a two-jaw puller fails to move the inner ring of a bearing. In this case, it is recommended to remove the brake pads and use a chisel to slightly move the ring from the axle.
After this, you can press the inner race of the bearing using a two-jaw puller. After working with a chisel, nicks appear on the hub axis, which are removed with a needle file.
Removing and installing a new wheel bearing
1. Squeeze the retaining ring with pliers and remove it from the hub groove.
2. With the hub resting on wooden blocks (their height should allow the bearing to come out of the hub), knock out the bearing using a suitable socket or piece of pipe, striking the inner race of the bearing.
3. Apply grease (Litol-24) to the mating surfaces of the bearing and hub.
4. Press the new bearing in a vice, with the pressing force applied to the outer ring of the bearing. This can be done by installing a ring from the old bearing between the new bearing and the vise jaw.
Note:
The new double row ball bearing must be the same size as the old one.
5. Using pliers, install the retaining ring into the hub groove.
6. Carefully, with light blows on the inner ring of the bearing, press the hub with the bearing onto the axle to a depth that allows you to install the nut.
7. After installing the thrust washer, install a new nut.
8. Finally press in the hub by tightening the nut to the specified torque.
9. Place the collar of the nut into the groove of the hub axle.
10. Perform final assembly in reverse order.
The article is missing:
- Photo of the instrument
- High-quality photos of repairs
Source: carpedia.club
Replacing the front wheel bearing of a Lada Granta - detailed instructions with photos and
- ➡️ Replacing the wheel bearing with a new one
- ➡️Diagnostics of the front wheel bearing
- ➡️ Preparatory activities before renovation
- ➡️ Tips and advice from experts
- ➡️ Removing the old Granta wheel bearing
- ➡️ Features of choosing bearings
Wheel bearing failure is a common occurrence in the operation of domestic cars. For example. Let's consider the Lada Granta car (Lada Granta, 2190, 2191, Sport, Liftback, Sedan) produced by VAZ, created on the basis of the Lada Kalina; in terms of dimensions, the car belongs to the “C” class.
The front suspension is borrowed from Kalina, but modernized. In terms of reliability, these models are not much different.
Wheel bearing replacement continues. Grants without special tools, experience or knowledge.
Replacing the front bearing and CV joint of a VAZ
Removing a faulty bearing Grants and disassembling the front hub
How to change a bearing without wasting time and money? Follow the instructions!
- We jack up the car and immediately rotate the wheel holders that we remove.
- Park the car on a level surface with sufficient lighting.
- Loosen the boots on the steering wheel you are replacing.
- Then we find and loosen the fasteners on the brake caliper.
- Unlock the hub nut, then loosen it with a socket wrench.
- Having gained access to the brake disc, unscrew the mounting bolts.
- Then remove the previously loosened hub nut.
- We remove the caliper, place it on the steering rod or hang it on a cable.
- We disassemble the brake disc, then unscrew the protective casing.
- Let's move on to unscrewing the two bolted connections on the rack. Use WD-40 for easy disassembly.
- After unscrewing the steering knuckle fasteners, remove it from the CV joint.
- Having disconnected the strut from the steering knuckle, unscrew the bolts of the Grant ball joint.
- We secure the structure in a vice, then select the head to remove the hub.
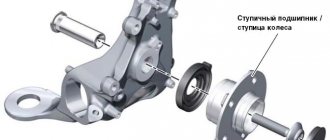
- The steering knuckle housing contains the front wheel bearing hub and ball bearing, which must be removed.
- We hit the spindle and disassemble the hub. As a result, the inner ring of the hub bearing will remain on the support pin, and the outer ring with the cage and balls will remain in the steering knuckle.
- To remove the outer part of the hub ball bearing, first remove the snap ring. We use screwdrivers or pliers.
- To remove the outer part of the hub ball bearing, first remove the snap ring. We use screwdrivers or pliers.
- Then we use an extractor and carefully press the product from the drive shaft to the end. This completes the disassembly.
- Let's start removing the inner race from the hub. To do this, first carefully move the element with a chisel a couple of millimeters.
READ McLaren Saber hypercar revealed; A total of 15 units will be produced
How to change the rear wheel bearing of a Lada Granta
Work related to the removal and installation of the element will require special tools, namely: - a special hub puller; - chisel; — retaining ring remover (or pliers with round ends); — a “30” head, or a key of the same size; - vice; — a puller for pressing and pressing out bearings; - a flat-tipped screwdriver.
So, let's get started, below are 14 detailed stages of the work:
- Remove the plastic protective cap from the rear wheel.
- We move the gearbox lever to the “1st gear” position. To prevent the car from rolling away under the front wheels, we place supports.
- We loosen the tightening torque for the hub nut (it is most convenient to use a long lever). Unscrew it a little and loosen the bolts holding the wheel.
- Using a reliable jack, we lift the rear side of the car, where the bearing is actually changed.
- Unscrew the nuts and remove the rear wheel from the studs. We dismantle the brake drum.
- Unscrew and remove the hub nut, take out the thrust washer.
- We take the previously prepared puller in our hands and carefully press the hub from the axle.
- Now we take the hub, install it and clamp it with a vice. Remove the retaining ring (use a puller).
- Press the bearing out of the rear hub. Then, using a brush with metal bristles, we clean the inside of the hub from dirt. We press the new product back in. Don't forget to install the special retaining ring correctly.
- Taking advantage of this opportunity, we clean the brake system elements from rust and contaminants.
- We put the hub back on the axle element. We return the brake drum to its place and put the wheel back on.
- Tighten the wheel bolts. Let go of the raised part of the car until the wheel is firmly in contact with the ground.
- Tighten the hub nut securely using a long-lever wrench (or a special hub wrench). We return the protective plastic cap to its place.
- In order to check the results of the work performed, we start the car engine and start driving.
This completes the replacement of the rear wheel bearing (Lada Granta). As you can see, the process is not too complicated. All you need is a good specialized tool and some free time.
Where are the front and rear hubs on the Lada Grant? Description, purpose
The front hub joint is located on the front left (right) side of the drive shaft. The rear pin is located in the left (right) rear suspension block.
The main purpose of a bearing is to hold the hub securely so that the wheel can rotate. Structurally, the front (rear) hubs consist of:
- insulating rings;
- external and internal metal clamps;
- a separator in which metal balls and rollers are located;
- special filler – graphite-based lubricants.
Diagnosis of wheel bearing failure Grants
The front wheel bearing on a Grant is not the most vulnerable part of the suspension, but failure is possible after eighty thousand km or due to external and internal factors.
A front hub malfunction is determined by the following symptoms:
- Vibrations, wheel runout, friction noise (typical of a failed ball bearing);
- Noise from the wheel when driving (damaged ball bearing parts: rolling elements, raceways or cage);
- Front wheel play (faulty ball bearing or insufficiently tightened hub nut).
The same signs of malfunction are characteristic of the rear wheel bearing on the Grant.
Observe the characteristic noise when the hub assembly breaks:
Diagnostics of the front wheel bearing is as follows:
- Check the axial play (play) according to the instructions.
- The front of the car is raised;
- Manually turn the wheel and check the noise;
- Be sure to check the diagnostics.
- If you hear a noise or notice other signs, replacing your Granta front wheel bearing is imminent.
Diagnostics of the VAZ front wheel bearing
How to choose a rear wheel bearing for Granta 2190 - price, number and manufacturers
The Lada Granta rear wheel bearing, the price of which is indicated in the table below, has an AVTOVAZ catalog number:
21080-3104020.
If you are guided by GOST markings, then look for:
256706AKE12
Before buying a wheel bearing, you should familiarize yourself with the list of recommended and trusted manufacturers. Such a list is compiled in the table below. It contains prices, exact articles, equipment, and manufacturers.
Study the table and decide for yourself which is better; the companies presented are approximately equivalent to each other in terms of workmanship and service life.
Table of recommended manufacturers
| No. | Manufacturer | Catalog number | Price 2022, rub. | Equipment | |||
| Retaining ring | Dirt cap | Lock-nut | Instructions | ||||
| 1 | VBF Russia | 2108-3104020 | 500 | — | — | — | — |
| 2 | SPZ Russia | 2108-3104020 | 520 | — | — | — | — |
| 3 | SKF Sweden | VKBA1307 | 1900 | 2 | — | + | + |
| 4 | FAG Germany | 545312A | 600 | — | — | — | — |
Bearing size table 256706AKE12
| Parameter | Unit | Value according to GOST (TU) |
| Hole diameter | mm | 30 |
| Outside diameter | mm | 60 |
| Width | mm | 37 |
| Dynamic load capacity | kH | 30,1 |
| Static load capacity | kH | 25,9 |
| Speed | rpm | 6500 |
| Axial clearance | mm | 0,06-0,09 |
| Steel type | — | SHH-15 |
| Hardness of rings and balls | H.R.C. | 61-65 |
| Type of lubricant | — | Litol-24 (S17) |
| Torque | H*M | 220 |
| Ring roughness | Ra | 0.32 |
| Weight | G. | 435 |
Preparatory stage before replacing the hub mechanism
Required materials and tools:
- chisel;
- wooden stand;
- wheel wrench;
- new wheel bearings;
- hydraulic jack (mechanical;
- English keys;
- pliers;
- crank, injectors;
- stationary vice;
- hammer;
- two handles and a glass stripper. The exact dimensions of the extractors are indicated in the operating instructions;
- rags;
- Phillips flat-blade screwdriver;
- caliper for measuring diameter;
- additional lighting if work is carried out at night.
- type of fat “CV joint – 4”;
- wire brush;
Review of manufacturer prices for front and rear hinges
How to choose and buy quality parts
Service center specialists strongly advise purchasing consumables and components exclusively from specialized stores, representative offices, and official dealers.
To a lesser extent, it is necessary to use the services of unverified suppliers who sell spare parts at unusually low prices.
When purchasing, check the catalog numbers with the current data specified in the operating instructions for the technical device. If you do not have such a brochure, contact a specialist.
Replacing the rear wheel hub of a Lada Granta
- We park the car around the perimeter of the repair site and secure the first row of wheels with wedges.
- Using a wheel wrench, we break the nuts, jack up the car, and remove the wheel.
- Unscrew the screws securing the brake drum to the structure.
- Remove the hub cap and remove it from the axle grooves.
- We fix the structure in a stationary vice. Gently tap the outer edge with a chisel.
- If necessary, use WD-40 fluid to remove deposits and rust.
- We disassemble the loop, use a vice, although some craftsmen use special pullers. In general, whoever is more comfortable with it.
- Using a metal mandrel, remove the inner ring.
- To finally squeeze out the loop, use a hammer and chisel, gently tapping along the outer perimeter of the frame.
Replacing the rear wheel bearing of a Lada Granta with your own hands
Note to the driver. Before starting installation work, clean the surface of debris and dirt. Apply a thin layer of oil and evenly lubricate the outer joint race.
- We install the new hinge and press it lightly into the cavity.
- Pull the loop evenly until it touches the outer edge.
- We fix the retaining ring and set the hub to its original position.
Installation in a regular place. Assembly of the structure
- Apply a thin layer of graphite grease, put the unit on the shaft and secure it with a nut.
- Complete the tightening with a torque wrench (tightening torque 30 Nm).
- We contrast the nut with a chisel and put on the cap.
Replacing the front wheel bearing of Lada Granta
Sooner or later, any car owner will be faced with the problem of failure of the front wheel bearing on a Grant. It's okay if the product is replaced on time when the first signs are detected.
worse, if the driver ignores signs indicating a faulty element, which can lead to a serious accident. The main purpose of wheel bearings is to support and ensure proper rotation of the wheels.
Structurally, the product consists of two metal rings, between which there are rollers or spheres, an insulating material that prevents debris from entering and lubricant leaking out of the product.
Symptoms of a problem
Front hub problems are identified by the following:
- sounds of scraping metal;
- extraneous and unnatural noise from the wheel during rotation;
- wheel eccentricity, vibrations of varying intensity;
- the resulting play of the front wheel.
Causes of breakdowns
The service life of the product is quite long and amounts to about one hundred thousand kilometers in difficult operating conditions. However, in real “combat” conditions, the elements fail long before the due date. Here are 3 important factors that can significantly reduce bearing life:
- Aggressive environment. Due to the fact that the element is located in the center of the wheel, it is constantly in contact with moisture, water, dust, and dirt. In winter it is exposed to cold temperatures, in summer it is exposed to warm temperatures.
- Bad road conditions. The fact is that when driving on an uneven surface, wheel bearings take on a large load, sudden impacts, and exposure to high and low temperatures. Over time, the metal components of the product become brittle and begin to deteriorate.
- High operating temperatures. The rotation process is accompanied by the natural release of heat; constant heating and cooling occurs (especially in winter conditions), which has a detrimental effect on strength and durability.
Lada Granta vLada granta › Logbook › Wheel bearings
I am already observing the third generation of hub assemblies: the first is tapered bearings (roller), two per hub, with an oil seal (s), lubricant and gap adjustment (although there are designs with guaranteed interference when stacked spacer washers are inserted between the inner races).
The second generation is double-row ball (roller) bearings with guaranteed interference (with unregulated clearance, tightened with a large torque). The third generation - non-separable bearing units. On Russian roads (potholes and potholes), it is preferable to use roller bearings, which provide greater resistance to shock loads due to the linear contact patch (roller - cage). Today I changed the rear wheel bearing on a Renault Megane - 2 (the same on Logan) - a roller bearing, second generation (ran 150 tkm). For VAZ PP, at the Vologda Gas Processing Plant (if I’m not mistaken) at one time they produced such (roller) bearings, but they did something wrong - backlash developed during operation. Impacts are contraindicated for ball bearings. Under any shock load (potholes, curbs, accidents, blows to the hub with a heavy hammer when replacing a brake disc and knocking out a stuck CV joint from the hub), pinpoint punctures (scratches) occur on the mirror surface of the treadmill, which then roll out into shells (pitting), when Rolling the balls over the shells creates a vibration with noise, which is sharply transmitted to the body. Ball bearings are more technologically advanced and have lower rolling friction losses compared to roller bearings. The fact that they are not suitable for bad roads does not concern foreign manufacturers. We will have to put up with this in the future. Therefore, it is necessary to protect the hub bearings from shock loads and flooding with water (this includes tire pressure and non-standard wheels and the speed of movement in pits and puddles with fords and hard shock absorbers and repair manipulations). Also, you need to change the bearings only when they become unusable - to protect your loved ones (most likely you will no longer come across bearings of the same quality). No paired or prophylactic replacements. Many car enthusiasts noticed that previously, on old cars, bearings lasted almost forever. Yes, this is a fact, I think there are several reasons - firstly, in my opinion, modern cars have much more stringent wheel rolling conditions - hard rolling radial tires, reducing the height of the tire profile, increasing the diameter of the wheels, increasing the width of the wheels, rigid suspensions (gas-filled struts with a ratio forces 1/1), ABS vibration. Secondly, spare parts (I think that the “original” bearings are now no worse than before), but what’s in the spare parts is a dark forest. A very murky topic, I know for sure that the inscriptions “made there” can quite legally appear on parts made in China for pennies. The main thing is that the legal address (office) of the manufacturer is located in the desired country. Replacing double-row bearings with guaranteed interference is a responsible undertaking. For VAZ - 2108 -18 I have a screw puller, I change the bearing on the spot (without disturbing the camber angles). For larger bearings, pressing the bearing out of the knuckle with a screw puller is a dubious thing, because the friction of the interference fit exceeds the capabilities of the puller thread (a 20-ton hydraulic press is needed). In addition, for each fist, its own equipment is necessary due to the different shape of the supporting surface (not only the diameter) ... In order not to harm the car, when replacing a bearing of this type, you must strictly follow the rules: - If the bearing is changed on a car, then the hub from The inner race can be pressed out with a puller or a reverse hammer, and the outer race can be pressed out of the fist and pressed in only with a puller. — From a knuckle removed from a car, you can press out the outer race with a press or a puller; the main thing is to have a variety of equipment that prevents damage and deformation of the knuckle. - When pressing the outer race into the fist, ensure that the pressure of the press or puller is applied only to the end of the ring of the outer race (no pressure on the inner race is allowed) - for this you need to use dies with recesses on the inside (I always use the race of the old bearing) - When pressing the hub into the pack of internal races of the bearing, the emphasis on the back side of the bearing should be placed only on the inner race (during the entire pressing process, free rotation in the bearing must be ensured) - Tighten the hub nut with the torque recommended by the manufacturer. The seals of a double row bearing must not be opened. Do not add lubricant under the boot (at high rolling speeds of the balls, excess lubricant will be squeezed out and break the seal of the boots). You cannot disassemble a double-row bearing (remove the inner races from it). I began to notice that more and more often double-row bearings of modern budget cars began to fail due to water penetrating inside them... I think this is because modern automakers do not bother at all with the complexity of bearing seals (previously there were water-repellent “labyrinths”, like on the VAZ PP, and now the bearing seal is freely allowed for splashes from under the wheels)… In addition, high-pressure car washers have become widespread (you shouldn’t get carried away with washing wheels and chassis with such intense water pressure that a high-pressure washer produces)… And there is also an idea that Manufacturers who have calculated the seal capacity of modern bearings have calculated it for the properties of ordinary water. And water with detergents or with our road reagents has much greater penetrating power than plain water. This is why wheel bearings have such a short lifespan in our conditions today. Checking the hub bearing for noise Wheel bearings are checked for noise in a room where it is relatively quiet. Each of the four wheels (or the entire car on a lift) is sequentially suspended from the gearbox in neutral gear. Stand on the side of the center of the wheel. Grab the wheel with your right hand (carefully so that your fingers do not get under the caliper or rub against anything when turning the wheel with your hand). You can rotate the wheel on the bearing with your right hand half a turn to the right or left, you can spin the wheel many turns with acceleration clockwise, for example. The free hand (left) should rest on one of the suspension parts (on the strut, strut spring, lever...). ———————— If there is noise in the bearing, then “hard rolling of the bearing” will be observed. This will be felt by your left hand in the form of vibration on the suspension parts. This will be audibly felt in the form of low-frequency noise (the rustle of the pads, the noise of the satellites in the gearbox do not count). The sensation of vibration is as if you put a small bearing on your finger and rolled it over a smooth oiled sheet of metal (no vibration), and then rolled it over a large rasp (there is vibration). ————————- A slight play in the hub (without noise) is not a sign of a defective bearing, although wear on treadmills is often accompanied by play. About the fact that if the noise intensifies when turning left, change the right wheel hub bearing. Many drivers have experienced noise and vibration while driving from the hard rolling of faulty wheel bearings. There is an opinion that by the nature of changes in this noise when cornering, you can find out on which side of the car the wheel with a faulty wheel bearing is located. It is believed that increased hub bearing noise when turning a corner indicates that the bearing of one of the wheels moving along the outer radius of the turn is humming. It is also believed that when a wheel moves along the inner turning radius, the noise of a faulty bearing in the hub of that wheel should subside. In practice, this rule does not always work. Most modern cars have double-row ball (or roller) bearings in their wheel hubs. The wheel of a car moving around a turn perceives a weak lateral reaction from the road, applied in the contact patch of the wheel with the road. This reaction is directed towards the center of rotation. At the same time, the same magnitude of force acts on the wheel axle from the side of the car, directed from the center of rotation. These two differently directed forces acting on the arm of the wheel's rolling radius create a strong moment that tends to tip the wheel outward from the center of rotation. Similar moments, identical in direction, act on all four wheels of a car moving around a turn. This “tipping” moment acting on the wheel selects play in the double-row wheel bearing and loads the raceways on the outer bearing race differently. The wheel bearings of the right and left sides of the car are loaded when turning in the same way. A malfunction of the wheel bearing, which causes noise with vibration when the car is driven, is caused by the formation of cavities on the raceways of the bearing races. If the shells are located in the upper part of one of the raceways of the outer race of the wheel bearing (this is usually the case), then the increase or decrease in bearing noise during turns will be determined only by the direction of the turn, regardless of whether this wheel is moving along the outer or inner radius of the turn. Therefore, the method of identifying a faulty bearing by changes in noise when cornering should be used only for preliminary diagnostics. original "hodovik-razval"