FRONT HUB AND ITS PURPOSE
The front hub on the VAZ 2107 is a massive steel disc with a hole in the middle. This hole contains a large bushing in which the wheel bearing is mounted. Along the perimeter of the hub disk there are holes for fastening the wheel. And on the reverse side the hub is connected to the steering knuckle.
The front hub of the “seven” is a massive steel disc with a bushing and bearing in the middle
That is, the hub is an intermediate link between the moving wheel and the stationary part of the suspension. It ensures not only normal rotation of the front wheel, but also its normal turning. Therefore, any malfunction of the hub can have very sad consequences for the driver and his passengers. For example, if the wheel bearing becomes completely unusable, the wheel may jam or simply come off while driving, if the speed is high. It's not hard to guess where this will lead. That is why experienced drivers check the condition of the front hub at least once a month by grasping the top of the wheel and slightly rocking it away from and towards themselves. If even a slight play is felt when rocking, you should not drive such a car.
ROUNDED FIST
The steering knuckle, mentioned above, is another important element of the VAZ 2107 suspension. Its purpose is easy to guess from the name. This part ensures smooth turning of the car's front wheels. The knuckle has two eyes with which it is attached to the paired suspension arms. On the reverse side of the knuckle there is a kingpin onto which the hub is placed along with the wheel bearing.
The steering knuckles on the "sevens" have a long kingpin for attaching the hub
The hub, placed on the knuckle pin, is secured with a nut. It should be said here that turning the wheels is not the only thing the fist is responsible for. It also has an additional function: it limits wheel rotation. For this purpose, special protrusions are provided on the fists of the “seven”. When turning too sharply, the suspension arms hit these ridges and the driver can no longer turn the steering wheel. The knuckle must have a huge margin of safety, since it bears most of the shock loads that occur when the car is moving, especially on uneven roads. However, sometimes the fist becomes deformed (as a rule, this happens after the front wheels fall into a very deep hole or after an accident). Here are the main signs that something is wrong with your fist:
- when driving, the car pulls strongly to the side, and this becomes more pronounced with increasing speed;
- the driver suddenly notices that the turning radius has become smaller, and it has become more difficult to “fit” into very sharp turns. This indicates a decrease in the angle of rotation of the wheels. And this phenomenon occurs after a serious deformation of one fist;
- turning the wheel out. There are situations when one of the knuckle eyes breaks. This is very rare, but it cannot be ignored. So, when the eye breaks, the wheel turns out almost at a right angle to the body of the “seven”. If this happens while driving, the car instantly loses control.
Increased wheel turnout
Sometimes drivers want to increase the handling of their car. The standard turning angle of the VAZ “classic” has always raised many questions among car enthusiasts. So drivers increase this angle themselves with a few simple operations. Fans of the so-called drift do this especially often: increased wheel turn allows the car to more easily enter a controlled drift, and this can be done at maximum speed.
- The machine is installed on the pit. One of the wheels is jacked up and removed. After this, the steering bipods, which are located behind the hub, are unscrewed from the suspension. There are two of these bipods.
It should also be noted that some car owners prefer not to do their own welding and installation of bipods. Instead, they buy ready-made tuning kits for VAZ “classics”, which allow them to increase the wheel alignment without unnecessary labor costs. Unfortunately, finding such a set on sale is not so easy. Therefore, the above technology for increasing wheel inversion will be popular among “Seven” owners for a very long time.
FRONT WHEEL BEARING
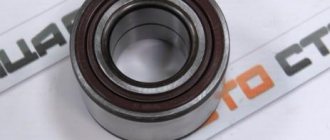
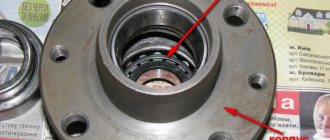
To ensure uniform rotation of the front wheels, special bearings are installed in their hubs. These are double-row roller bearings that do not require regular maintenance or lubrication.
The front hubs of the “seven” are equipped with tapered roller bearings
The reason is simple: they are pressed into the hub, so they can be destroyed when you try to remove them. Therefore, the driver removes the wheel bearings only when he decides to change them. Here are the main signs of wheel bearing failure:
- the front wheels rotate with a characteristic low hum. This indicates wear of one or more rollers in the wheel bearing. Worn rollers dangle inside the separator, and when the hub rotates, a characteristic hum occurs, which becomes louder with increasing wheel speed;
- a crackling or squeaking sound coming from behind the wheel. The driver usually hears this sound when turning. He says that one of the wheel bearing rings has collapsed. As a rule, the inner ring of the bearing breaks, and it usually breaks in two places at once. When turning, the hub carries a huge load, as does the bearing in it. At such moments, the fragments of the inner ring begin to rub against each other at the fracture points, resulting in a characteristic cracking or squeaking sound.
In all of the above cases, there is only one solution: replacing the wheel bearing.
CHECKING THE WHEEL BEARING
At the slightest suspicion of a bearing malfunction, the driver is obliged to check it, especially since there is nothing complicated about it.
- The wheel, from which characteristic sounds are heard, is jacked up. Then the driver manually spins the wheel so that it rotates as quickly as possible and listens. If the bearing is worn out, a characteristic hum will be clearly audible to anyone who does not have hearing problems. In some cases, bearing noise cannot be detected when the wheel is spinning too quickly. Then you need to spin the wheel as slowly as possible. If at least one roller in the bearing is worn out, the wheel will definitely hum.
- If manual rotation of the wheel does not reveal the problem, then you should pull the wheel without removing the car from the jack. To do this, the driver grabs the top and bottom of the tire and pulls the wheel several times, first away from himself, then toward himself. If the bearing rings are broken, then a slight play will be clearly felt on the wheel.
- If the play was not detected by pulling the wheel, then the wheel should be rocked. The driver grabs the top of the tire and begins to swing it away from him and towards him. Then he does the same with the bottom of the tire. Backlash, if any, is almost always detected. Either when the bottom of the tire rocks, or when the top rocks.
To identify play, the wheel must be rocked away from you and towards you.
ADJUSTING THE WHEEL BEARING
Once play is identified, the wheel bearing is carefully inspected. If the play is insignificant, and no signs of wear or damage were found on the bearing, then this indicates a weakening of the bearing fasteners. In this case, the driver will not have to change the bearing; it will be enough to simply adjust it.
- Using a screwdriver, remove the protective plug from the wheel bearing.
- After this, the adjusting nut located above the bearing is tightened so that the wheel cannot be turned by hand.
Sometimes, to eliminate wheel play, it is enough to adjust the hub nut - This nut is then gradually loosened two to three turns. After each loosening, the wheel is turned and checked for play. It is necessary to achieve a situation where the wheel rotates freely, but no play is observed.
- When the desired position is found, the adjusting nut should be locked in this position. Drivers usually do this with a simple chisel: hitting the side of the nut with a chisel slightly bends it, and it no longer unscrews.
What tools will you need?
To carry out this repair in the “seven” you will need:
- a jack to raise the car;
- a system for fixing wheels so that the vehicle does not move during repairs;
- wrench with heads of the required size;
- hammer;
- chisel;
- vice;
- screwdriver.
In addition to tools, you will need kerosene for washing the bearings and hub, as well as lubricant and rags.
If there is a need to replace parts, they must be purchased in advance in accordance with the article number before repairs are carried out.
REAR HUB
The rear hub of the VAZ 2107 differs from the front hub both in design and purpose. There are no steering knuckles or additional suspension arms attached to the rear hub.
The rear hub of the "seven" is not as massive as the front
Because the main task of this hub is to ensure uniform rotation of the wheel, and that’s all. It does not require a huge margin of strength and resistance to mechanical loads, since it does not participate in turning the wheels, like the front hub.
The rear hub is simpler than the front, as it does not experience huge loads
The rear hub is equipped with a rolling bearing, which is covered with a special cap. On the other hand, a dirt-proof inner ring is installed in the hub to prevent clogging of the bearing. This entire structure is put on the rear axle shaft of the “seven” and secured with a 30 wheel nut.
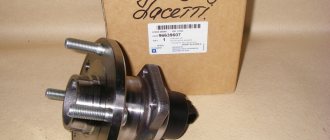
Front hub VAZ 2107
Hi all!
One day I tightened the wheel bolts so much that one bolt decided never to be tightened again.
Nothing to do at all - there are exactly four ways out: 1) leave it on three bolts and pray; 2) tap the thread and hope; 3) weld cylinder head studs instead of bolts and be proud; 4) change the hub and calm down.
I chose the fourth option. I bought a hub assembly with bearings and boot. I decided to leave the old nut and support washer.
So let's get started. In fact, the task is not a tricky one. Let's jack it up, prop it up, remove the wheel and see what we have there. And there we have a brake disc, which is held by a caliper. Then we unscrew it by loosening the cotter washers. We don’t confuse anything and put the bolts aside with these washers.
Replacing the VAZ 2107 hub
We put the caliper on top or somewhere else so that it does not fall and the brake hose is relaxed.
Then I saw how the disk was knocked off the hub, but it was somehow inconvenient. Personally, I removed the hub from the axle, unscrewed the soldiers and knocked it out of the disk by placing two planks. In my opinion, it couldn't be simpler. The main thing is not to stain the disc.
Ready. We clean the whole thing and start assembling it, wearing cleaner gloves.
The secret to the long service life of such units is cleanliness during assembly and plenty of lubrication.
Therefore, we add as much lubricant as possible at each stage. A new boot is also needed. Don't skimp on such little things.
Once the hub with generously lubricated bearings is in place, install the support washer and tighten the nut. Personally, I tighten the nut like this: I tighten it until there is a noticeable heaviness of rotation, and then I release the nut to a sector equal to one edge. Then there remains a barely noticeable rolling resistance, and after a few meters the wheel will rotate without resistance at all, but also without the slightest play. Maybe the technology is not correct, but personally, I adjust the tapered bearings once every 30 thousand and I have never had any play or hum in any car.
That's it. We put on the brake disc. He dresses very hard. It would be nice not to skew it. To do this I use the wheel bolts as guides. I tighten the disc with bolts and lightly tap it with a hammer.
That's all. We install the caliper. We cotter its bolts. We check everything. We put the wheel on and off we go. Finally a repair without welding, chisels and grinders. I wish it would be like this more often.
Thanks everyone for your attention! I wish you limitless good luck and good health! See you on the track!
VAZ 2107
Spare parts sizes
List of suitable spare parts with nominal size:
| Manufacturer | Cat. number | Dimensions | price, rub. | |
| 1 | OberKraft | 103504 | 80*90*70 | 660 rub. |
| 2 | AVTOVAZ OJSC | 21010-3101800-86 | 700 rub. | |
| 3 | TD EPK LLC | 2101-185 | 720 rub. | |
| 4 | RUMELIA APS GROUP | ES737630 | 660 rub. | |
| 5 | PKF Niagara LLC | RG2101-3101800 | 330 rub. |
Installation of parts of other configurations is unacceptable by design.
Do-it-yourself adjustment of the clearance in the VAZ-2107 wheel bearing
Spring has arrived, and with it it’s time to change to summer tires. At the same time, it is necessary to check the clearance in the tapered bearings of the front wheel hubs and adjust it. Since a large gap leads to a decrease in the service life of both the bearings themselves and the tire tread, vibration may occur and deterioration of vehicle controllability at speeds.
So, we need:
- new hub nuts - left and right
- torque wrench (you can do without it)
- wheel wrench
- 27mm socket or open-end wrench
- hammer, flat screwdriver
- some new bearing grease
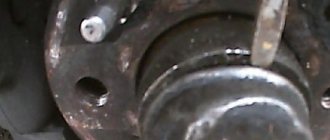
To begin, remove the wheel, decorative cap and hub cap to provide access to the nut.
Checking the presence of grease in the cap
We put the wheel back, but without the caps, fasten it with at least two bolts diagonally and hang it on a jack. Don't forget to put chocks under the wheels and put the car in gear.
Now, sharply shaking the wheel by the rim in a vertical plane with one hand (to eliminate play in the steering linkage), we apply a finger to the washer and hub with the other finger and determine the presence of noticeable axial play.
If this is inconvenient, then you can simply pump the wheel with both hands by the upper and lower rims with sharp movements, visually by the nut and by ear determining the play. It should be no more than 0.02-0.08 mm. In my case, it felt like it was about half a millimeter.
To exclude the influence of other gaps, for example, in the silent blocks of the levers, ball joints and steering linkage, you can ask an assistant to press the brake pedal. In this way we will fix the bearing and the hub - and the play should disappear. If it does not disappear, then its source is not in the bearing.
Once you are convinced of the opposite, you can begin adjusting the gap: use a socket or a 27 wrench to unlock and remove the old nut and put on a new one. But, for prevention, before tightening the new nut, let's inspect the outer bearing, to which we have free access - carefully remove the washer and take it out. We wipe off the old grease and carefully inspect - pitting, visible wear of the separators, cavities and chips on the rollers and rings are not allowed. In our case everything is fine.
Now we fill the hub cavity with new grease, lubricate the bearing and put it back, then the washer and tighten the new nut by hand. The nuts on the left and right sides of the car are different - the nut on the right side has marks on the edge, the one on the left does not.
We take a torque wrench and tighten the nut with a torque of 19.6 N m (2 kgf m), while simultaneously rotating the wheel in both directions so that the bearings self-align.
Then we loosen the nut back and tighten it with a torque of 6.8 N m (0.7 kgf m). And after that we once again finally weaken it by 25°. We check for any play - it should be almost unnoticeable.
If this method did not help us and the play is still significant, then we can use the old “old-fashioned” method - we tighten the nut until the gap completely disappears and gradually unscrew it until a very slight one appears, accordingly also rotating the wheel so that the bearings fit into their places.
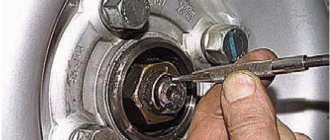
We make sure that the adjustment is correct - the wheel should rotate freely, without “biting”; for a more accurate determination, you can press it with a screwdriver or remove the brake pads. That's it, lock the nut, jamming its shoulder into 2 grooves on the trunnion, using a handy tool (screwdriver, bit).
We fill the hub cap with fresh grease and hammer it into place, tighten the remaining wheel bolts. We do the same on the other side.
We carry out the final check of the correctness of the adjustment on the road, driving about 1-2 km and trying not to use the brakes. We check the heating of the hub bearings by hand - it should tolerate it. If the heating is significant and the hand can no longer tolerate it, then it is necessary to carry out the adjustment again or replace the bearings.
AUTOFIZIK.RU / auto repair
We take out the brake pads and remove the caliper (see Replacing the front wheel brake caliper).
We hang the caliper in the wheel well so that the brake fluid supply hose is not strained.
If necessary, if the outer bearing cage is damaged along the way, we do not press out the outer ring of the bearing, but replace only its inner part. However, at the first opportunity we install a new bearing assembly.
Carefully, trying not to damage the cuff, remove the hub together with the brake disc from the steering knuckle axis. In order not to disturb the mutual balancing of the disk and the hub, it is better not to disconnect the disk unnecessarily, and when removing it, mark its original position on the hub
In order not to disturb the mutual balancing of the disk and the hub, it is better not to disconnect the disk unnecessarily, and when removing it, mark its original position on the hub.
Using a 12mm wrench, unscrew the two guide pins and...
...remove the brake disc and spacer from the hub.
We clean the inner cavity of the hub from old lubricant, wash all parts with kerosene and add fresh lubricant.
To remove the outer race of the outer bearing, secure the hub in a vice. Using a beard, trying not to damage the hub, we apply light blows along the perimeter of the outer ring of the bearing and...
...knock it out of the hub.
We take out the hub cuff by prying it off with a screwdriver.
A spacer bushing is installed under the cuff.
We remove the inner bearing from the hub in the same way as the outer one.
We press the outer rings of the bearings in a vice, using the corresponding rings from old bearings.
The old rings should be oriented with a smaller cone diameter inside the hub to facilitate their removal after pressing in the new rings.
Using caution, the outer rings of the bearings can be pressed in with light hammer blows through the spacer.
We put about 40 g of Litol-24 lubricant into the inner bearing separator and the inner cavity of the hub. Cover the new cuff with the same lubricant.
Install the inner bearing into the hub. Install the spacer bushing.Carefully press in the new cuff using a hammer and a suitable tool (installation blade). Trying not to damage the cuff, install the hub on the steering knuckle axle
Trying not to damage the cuff, install the hub on the steering knuckle axle.
Lubricate and install the inner ring of the outer bearing, the washer and tighten the hub nut.
We adjust the clearance in the hub bearings (see Adjusting the clearance in the front wheel hub bearings) and install the protective cap. Before installing it, put Litol-24 lubricant in the hub cap.
Self-replacement of front bearings on VAZ cars
Hubs are an important element of a car's front suspension. When the wheel bearings malfunction, the first thing that appears is a hum, and sometimes a grinding sound, in the front wheels of the car. The hub begins to heat up, which can cause problems with the brakes. Play in the front suspension hubs leads to damage to the brake discs. There is an imbalance in the suspension, resulting in increased tire wear.
In order not to bring the suspension components to such a state, it is necessary to periodically carry out technical inspection of the front hubs. If such symptoms appear, it is necessary to replace the wheel bearings on the VAZ-2107 as soon as possible.
Repair
If there is a need for repairs, it is recommended that replacing the front wheel hub bearing on a VAZ-2107 is carried out simultaneously for the front wheels.
Before disassembling, you need to check the amount of play by rocking the wheel, and it is recommended to do this in two planes:
- to turn left or right;
- swinging in a vertical plane.
It must be taken into account that the cause of the backlash may be:
- bearings;
- silent blocks or ball blocks.
To clarify, you need to make sure that the wheel does not swing with the steering cams, but independently of them.
Another important sign is that this fault causes the wheel to heat up excessively. If one of them is much warmer than the others, there is a need for repairs.
To carry out repair work you need to do the following:
- Disconnect the hub. This is done in accordance with the instructions above.
- Then remove the bearings.
- They are cleaned of old grease and inspected for damage and wear.
- If necessary, replace the front wheel bearings on the VAZ-2107.
- The bearings are lubricated and pressed into the hub.
After this, assembly is carried out. Then they are installed in place.
Checking the hub
Set the car to the handbrake and lift it with a jack, grab the top and bottom of the wheel, and rock it in different directions. There should be no backlash or knocking.
Spin the wheel; no extraneous sounds should be heard during free rotation. The wheel should rotate smoothly without difficulty. If play, knocking or irregular rotation accompanied by a crunching sound is detected, it is necessary to replace the bearings.
Before proceeding with the replacement, you need to purchase in advance the spare parts that will be needed during the repair:
- bearings, internal and external;
- stuffing box;
- new lubricant;
Important Notes
A few points:
- When seating the clips using the impact method, it is necessary to carefully orient the plane of the spacer, avoiding accidental slipping;
- excessive application of the lubricant promises squeezing out the oil seal;
- Old bearing housings are suitable as a mandrel.
After adjusting the gap, you need to drive the car and listen to the bearing. If noise is noticeable or the wheel gets hot, you need to unscrew the nut, correct the play and tighten a new one.
Instructions for replacing the wheel bearing on a VAZ-2107 with your own hands
Removal
Put the car on the handbrake. Place a shoe under the wheel to prevent the machine from rolling away. Loosen the front wheel nuts.
Raise the car and place a support under the body. Remove the wheel. Unscrew the caliper mounting bolts located on the inside and remove the caliper. To avoid damaging the brake hose, it is better to tie up the caliper.
Using a screwdriver, pry up and remove the hub cap. Unscrew the hub nut. After removing the nut and washer, pull out the outer separator. Pull the brake disc towards you and remove it together with the hub. After unscrewing the two guide pins, remove the brake disc from the hub.
Using a screwdriver, pull out the oil seal and separator, and then the spacer ring. Now you need to knock out the clips. Using a mandrel of the required diameter or a drift, knock out both clips with a hammer.
Assembly
After the hub has been disconnected and disassembled, it should be freed of old grease, washed, inspected, and then reassembled and reinstalled.
This procedure is performed in the following sequence:
- Press a serviceable and lubricated inner bearing into the hub. There are several ways to do this: hold the hub in a vice and carefully hammer the bearings inward with careful blows, or use a special mandrel for this, or use a piece of pipe of a suitable diameter.
- After installation, replace the spacer ring and oil seal.
- Reinstall the brake disc and screw the hub onto the steering knuckle axle.
- Install the outer bearing, place the lock washer and fastening nut there.
- Install the caliper, tighten the mounting bolts and put the wheel in place.
Finally, all that remains is to check that the wheel is installed correctly. To do this, swing it with your hands, checking the play. It should be there, but barely noticeable. In this case, the thermal gap is set correctly.
You also need to check how freely the wheel rotates. When it is clear that the nut is installed correctly, it is cottered. Then put the protective cap in place.
If worn and faulty bearings are not replaced in time, this can lead to emergency situations. If you have the necessary tools, you can perform this procedure yourself. It is necessary to carefully monitor the period of use of bearings and monitor the possible appearance of signs indicating malfunctions in order to replace them on time.
Source