Recently, many motorists who are actively involved in equipping their “iron horse” have become more often interested in elements of automotive lighting technology. They create blogs on the Internet, shoot videos, and write informational articles on replacing electrical equipment. This excitement is associated not only with the desire to make your car safer on the road, but also with modern fashion trends.
Today, LED lighting is popular when it comes to installing lighting fixtures. LEDs are small semiconductor elements that convert current into light. They are placed inside the low beam headlights, on the taillights and even in the turn signals on the side mirrors.
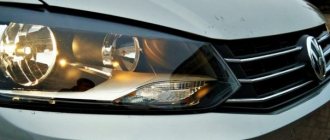
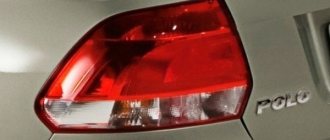
The German manufacturer from Wolfsburg did not deprive its new invention, the Volkswagen Polo sedan, of LED “decorations”. Beautiful light bulbs are mounted both in the head optics and in the side lights.
In general, all automobile lamps are divided into two categories:
- Halogen samples inserted into the headlights are the main source of light illuminating the road surface.
- The remaining sources, which include parking and side lamps, brake lights, reversing lights, turn signals and interior lighting, play a secondary role.
Manufacturers are a dime a dozen. Just go to any car store and find a huge assortment of products of various brands and sizes. In some cities, they even open entire retail outlets specializing in the sale of lighting equipment for cars.
The most famous brands include Osram, Bosch and Phillips. These companies create truly high-quality designs that are in great demand around the world.
2276-6-13-9-06
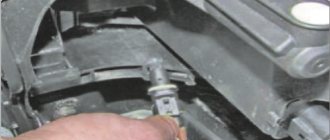
Remove the headlight bulb from the headlight housing.
Attention! The headlight lamp is halogen. You should not touch its glass bulb with your fingers, as traces from them will lead to darkening of the lamp when heated. You can remove dirt from the flask with a clean rag soaked in alcohol.
We install the new H4 lamp in the reverse order.
Replacing the turn signal lamp
What lamps are installed
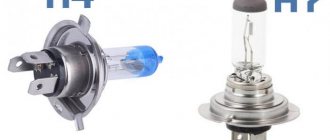
On the fifth generation Volkswagen Polo, before restyling, type H4
.
These are the most common low beam lamps used in two-headlight systems. H4 has two filaments.
Standard power ranges from 55 to 60 watts. The use of higher power products is not recommended as it excessively loads the electrical wiring of the vehicle, and can also create a dangerous situation on the road by blinding oncoming drivers.
| Name | EEC designation | Power, W |
| high/low beam lamp | H4 | 55/60 |
In the restyled Volkswagen Polo model, produced after 2015, type H7
.
Only one filament is used here. Type H7 is installed in four-headlight headlight systems for vehicles, with separate sources for long and short range. Here the power standard is 55 W.
| Name | EEC designation | Power, W |
| low beam lamp | H7 | 55 |
There are several varieties:
- LED bulbs.
- Halogen.
- Xenon.
The cheapest and most popular are halogen. They do not require additional equipment like LED and xenon lamps. Xenon ones require an ignition unit, while LED ones use special optics.
The main disadvantage of the halogen type is that they heat up to high temperatures during operation. This negatively affects the service life and reduces the reliability of the lamp. But any of them fail sooner or later, so everyone will need knowledge of how to update low beam lamps. Choosing the right lamp will help avoid frequent repetition of this procedure.
2276-6-13-9-13
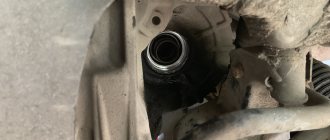
Remove the lamp from the socket.
We install the new W5W side light lamp in the reverse order.
[How to reduce maintenance costs for Volkswagen Polo sedan] [Maintenance of Volkswagen Polo sedan for 15 thousand km] [Maintenance of Volkswagen Polo sedan for 30 thousand km] [Tools required for maintenance of Volkswagen Polo sedan] [ Carrying out maintenance yourself - general recommendations] [Safety rules when carrying out car maintenance yourself] [Lamps used in the Volkswagen Polo sedan]
Replacing lamps in a Volkswagen Polo sedan headlight
Replacing lamps on a Volkswagen Polo sedan
| What kind of lamps are on the Volkswagen Polo sedan? | ||
| Name | Power, W | Lamp type |
| Low/high beam headlight | 55/60 | H4 |
| parking lights | 5 | W5W |
| Front turn signals | 21 | PY21W |
| Rear turn signals | 21 | PY21W |
| Side turn signal light | 5 | W5W |
| Anti-fog headlight | 51 | HB4 |
| Stop signal | 21 | P21W |
| License plate light | 5 | W5W |
| Fog light | 21 | P21W |
| Additional brake light | 21 | Led |
| Reversing light | 21 | P21W |
| Interior lighting | 10 | K10W |
| Trunk light | 5 | W5W |
To remove and install new light bulbs you need: a 10mm wrench, a T25 TORX wrench, a flat blade screwdriver, and a hook from the car tool kit.
Replacement of left headlight bulbs is shown. The lamps in the right headlight are replaced in the same way.
To replace the low/high beam bulb, do the following. 1. Open the hood and place it on the stop.
2. Pry the headlight low/high beam lamp wiring harness connector and disconnect the connector from the lamp.,
3. Pry up the lamp seal and remove it.
4. Remove the spring clip loop from the groove on the reflector and lower the clip.
5. Remove the lamp from the reflector. 6. Install the new lamp into the reflector and secure it with the spring clip.
Do not touch the lamp bulb with your fingers, as the lamp becomes very hot and grease stains will cause the bulb to darken.
To replace the front turn signal lamp, follow these steps.
1. Turn the turn signal bulb socket counterclockwise 45°...
2. ...and remove the lamp socket from the headlight unit. 3. Press the bulb, turn it counterclockwise and remove it from the socket (for clarity, shown on the removed turn signal lamp socket). 4. Install the new lamp into the socket and the socket into the headlight unit. If necessary, replace the rubber sealing gasket A. To replace the side light bulb, do the following.
1. Turn the side light bulb socket counterclockwise...
2. ...remove the lamp socket with the lamp from the headlight unit.. 3. ...and the baseless lamp from the socket. 4. Install the new lamp into the socket and the socket into the headlight unit. If necessary, replace rubber sealing gasket A.
To replace the fog lamp bulb, follow these steps.
1. Remove the fog light (see here). 2. Turn the fog light bulb counterclockwise... 3. ...and remove it from the fog light. 4. Install the new lamp and all parts in the reverse order of removal.
To replace the side turn signal lamp, follow these steps. 1. Move the turn signal light forward in the direction of travel of the car... 2. ...pry up the light and remove it from the opening in the wing. 3. Rotate the socket and remove it from the turn signal lamp. 4. Remove the baseless lamp from the socket. 5. Insert the new bulb into the socket and the socket into the turn signal housing. 6. Install the side turn signal light in the reverse order of removal.
To replace the rear brake light bulb (turn signal, reverse light, fog light), perform the following steps. Replacement of left rear light bulbs is shown. The lamps in the right rear light are replaced in the same way. 1. Open the trunk lid. 2. Remove the rear light (see here).
3. Press the clamps of the rear lamp holder... 4. ...and remove the holder from the lamp. 5. Press the brake light bulb, turn it counterclockwise... 6. ...and remove it from the holder. Lamps for direction indicators, reversing lights, and fog lights are replaced in the same way. 7. Install new lamps and all parts in the reverse order of removal.
To replace the side light bulb, do the following. 1. Open the trunk lid. 2. Remove the rear light (see here). 3. Remove the baseless lamp from the rear lamp holder. 4. Install the new lamp and all parts in the reverse order of removal.
To replace the bulbs in the license plate lights, perform the following steps. 1. Open the trunk lid. 2. Use a screwdriver to pry off the housing of the license plate light... 3. ...and remove the light from the trunk lid opening. 4. Using a screwdriver, push the license plate light bulb out of the holder in the light... 5. ...and remove the baseless lamp (for clarity, shown on the removed license plate light). 6. Install a new lamp into the flashlight socket and lens. 7. Replace the lamp in the second license plate light in the same way.
To replace the lamp in the general interior lighting lamp, perform the following operations.
1. Using a screwdriver, pry up the diffuser of the general lighting lamp... 2. ...and remove the diffuser.
3. Remove the lamp from the spring contacts. 4. Insert a new lamp. 5. Reinstall the diffuser.
To replace the lamp in the luggage compartment lamp, perform steps 1. Use a screwdriver to pry the trunk lamp 2. ... and remove the lamp from the opening in the rear parcel shelf. 3. Using a screwdriver, push the trunk light bulb out of the holder in the lamp... 4. ...and remove the baseless lamp (for clarity, shown on the removed luggage compartment light). 5. Insert the new lamp and replace the shade.
The procedure for installing DRLs on a Volkswagen Polo
In order to install daytime running lights on a Volkswagen Polo, it is recommended to use the instructions below.
- Remove all grilles.
- Make slits.
- Insert DRL lamps.
- Insulate the wires.
- Remove all wiring into corrugated tubes.
- Mount everything on the car.
- Decide on the connection diagram.
- Assemble an electrical circuit.
- Place everything in the corrugation.
- Remove the light switch.
- Connect DRL.
- Check the operation of the DRL.
- Check operation in different modes.
Requirements for installing DRLs
Before installing daytime running lights on a Volkswagen Polo sedan, it is important to make sure that they comply with the following rules, which are enshrined in law:
- the height of the DRL from the ground is more than 25 cm;
- daytime running lights are located at a height of no more than 150 cm;
- the distance between the right and left DRL headlights must be at least 60 cm;
- the covered area is in the range of 25-250 cm2;
- The luminous intensity is in the range of 400-800 Cd.
How to change the low beam light bulb on a Polo sedan
Which is better xenon / halogen / native yellow light? Arguments?
Evgeny (Ajanabh) Hello. The native yellow light is halogen! Xenon with headlight washers must be installed, otherwise it is of little use in bad weather, it will only blind oncoming people. If you really want it to be white, then buy halogens for xenon and don’t worry.
Evgeny (Ajanabh) There was a bi-xenon, the near one is shining normally, the distant one finally has an incomprehensible light bulbs going here and there but the distant one doesn’t shine, I took it off and installed an Osram night braker plus and I’m happy, both the near and far ones are all Good!!!
Yury (Aristophanes) Evgeniy, Osram night braker plus - white light???
Mark (Pangiota) I bought German lamps with a temperature of 4300 kl and they shine perfectly in the fog lights and installed them in the low beams, and changed the dimensions, 1300 rubles for everything and the luminous flux is better and white light, on the Polo it is problematic to make xenon because the H4 lamp is low beam in one, and I’ll suggest fogs NV 4)) By the way, the original lamps were also crap))
Change the light bulbs and don't bother with xenon))
Ivan (Eugenia) Evgeniy, is the light very white? Does it look like xenon light?
Evgeny (Ajanabh) Demid, the light is yellowish...
- Ivan (Eugenia) Eugene, much?
- Ivan (Eugenia) Can you tell me if there is something specifically white?
- Evgeny (Ajanabh) Demid, no it’s ok)))))
Evgeny (Ajanabh) I don’t know, but one thing I know for sure is that I won’t take anything else with the blue flask and I don’t recommend it to others...
Ivan (Eugenia) I had these back on the 14th, it seemed normal....then I actually installed xenon
Stas (Becker) I installed the xenon myself, it is installed very quickly (just xenon, not bi!). I don’t use high beams so I didn’t bother with it. Whatever you say, xenon is brighter!
Alexander (Takayoshi) You'll only blind oncoming drivers. Take away your rights for this. Or just knock out your headlights and all those smart guys who have xenon
- they put it in their garage
- Ruslan (Benedykta) Alexander, 5+
- Ivan (Eugenia) Alexander, 5++++
Ivan (Eugenia) Tired of pseudo-xenon guys!!! They instruct the collective farm and drive around, and the people they meet have balls on their foreheads from being blinded, especially in wet weather! I also like xenon, it makes the car look more beautiful, but only when the xenon is factory-made, and not a Chinese one installed in a garage! They especially kill pelvis pipes on kopecks, sixes, tens with xenon! If the headlight is already made for halogen, then install halogens, especially since the choice of halogens is huge; if you want xenon, then install the factory one, but of course the factory one will cost a pretty penny, you will have to change the headlights, install washers, but at least there will be light and oncoming people will not be blinded !
Ivan (Eugenia) I especially like the “ducks” that tint the windshield and install Xenon. Stas, does the monoxenon have low beam and high beam? Rofl
Nikolay (Hieronimo) don’t cars with lenses dazzle with xenon? The only thing they have is that the auto-corrector lowers the headlights, but sometimes it doesn’t have time to lower the headlights on a bump, and with lenses they will blind you no worse... it actually hits them right in the eye))
Artem (Nirmohini) Nikolay, it’s one thing when xenon blinds you for a second maximum on bumps. But it’s another thing when a moron sitting behind you (I can’t say it any other way) in an AvtoTAZ with garage xenon constantly blinds you. Only tinting the rear window can save you from such people! Well, I’m generally silent about oncoming people; you’re driving almost with your eyes closed...
Source: https://koloritno.info/avto-voprosy-i-otvety/kak-pomenyat-lampochku-blizhnego-sveta-na-Polo-sedan.php
Tools required for installation
In order to install daytime running lights on a Volkswagen Polo, you need the tools that are shown in the table below.
| Criterion | Light-emitting diode | Halogen lamp |
| Durability | Long service life | Service life often does not exceed 1000 hours |
| Load on on-board network | Minimal | Less compared to low beam, but higher than LED |
| Glow brightness | High | Sufficient for DRL |
| Vibration Tolerance | Not afraid of vibrations and overloads | High risk of filament breakage |
| Stylish | Wide possibilities for tuning | Very limited styling options |
| Heat | Minimum | May lead to meltdowns. Cracks are also common when water drops hit the heated glass of the DRL. |
Headlight adaptation
Dismantling the headlight may be necessary if it is replaced, or if it becomes necessary to remove the front bumper. In this case, you will need to disconnect the block with the power wire and unscrew the two fastening screws in the upper part of the headlight using a 20mm Torx wrench.
Video: removing the headlight of a VW Polo Sedan
After installing a new headlight (or an old one after repair), as a rule, it is necessary to adjust the direction of the light fluxes. At a service station, conditions for adaptation are better, but if necessary, you can adjust the headlights yourself. On the body of the headlamp, you need to find regulators that adjust the light beam in the horizontal and vertical planes. When starting the adjustment, you should make sure that the car is fueled and equipped, the air pressure in the tires is correct, and there is a load weighing 75 kg on the driver’s seat. The sequence of actions in this case is as follows:
- the light beam control switch is set to position “0” (i.e., there is only a driver in the car or a driver with a front passenger);
- low beam turns on;
- one of the headlights is covered with opaque material;
- the light beam is adjusted in the vertical plane by rotating the regulator, which is located closer to the axis of the car, with a Phillips screwdriver;
- the same manipulations are performed with the second regulator;
- the second headlight is closed and the procedure is repeated;
- PTF adjustment is performed in the same way.
It should be remembered that when adjusting the headlights, the car must be located on a strictly horizontal surface. The point of regulation is to bring the beam angle into line with the value indicated on the headlight. What does this mean? On headlights, as a rule, the standard angle of “incidence” of the light beam is indicated: as a rule, this value is expressed as a percentage with the headlight on next to it, for example, 1%. How to check if the adjustment is correct? If you park the car at a distance of 5 meters from a vertical wall and turn on the low beam, then the upper limit of the light flux reflected on the wall should be at a distance of 5 cm from the horizontal (5 cm is 1% of 5 m). The horizontal line on the wall can be set, for example, using a laser level. If the light beam is directed above a given line, it will blind oncoming drivers; if below, the illuminated road surface will be insufficient for safe driving.
Vertical and horizontal headlight adjustments are made using white controls
The best low and high beam lamps for the Polo sedan
A selection of the best lamps for replacing low and high beams in a Volkswagen Polo sedan. At the end of the article there is a price comparison.
In the selection I included products from well-known brands - reliable and proven European manufacturers. Take care of yourself, install high-quality light bulbs with a transparent history, behind which there are experienced engineers and years of testing.
If you don't have a manufacturer preference, then decide what's more important: brighter light or longer service life.
Which lamp is suitable for a pre-restyling Polo sedan?
Suitable vehicle years: 2010, 2011, 2012, 2013, 2014, 2015, 2016.
55/60 H4 L/L lamps are installed at the factory:
- 55/60 is the power of low beam (55) and high beam (60) in watts,
- H4 - lamp base type,
- L/L - long-life, lamps with extended life.
Please note that the same bulb is used for low and high beam.
Quick comparison: the best low and high beam lamps for the pre-restyling Polo sedan
Model Features Rating Link
| Philips X-treme Vision | the brightest, give white light | ★★★★★ | Buy |
| Philips LongLife EcoVision | inexpensive, extended service life | ★★★★✩ | Buy |
| Bosch Pure light | inexpensive, universal replacement for standard lamps | ★★★★✩ | Buy |
| Narva | increased brightness | ★★★★✩ | Buy |
Philips X-treme Vision
Features declared by the manufacturer:
- bright white light,
- increase the lighting area in front of the car by 45 m,
- high quality quartz glass.
One of the highest brightness levels and incredible comfort in the dark.
Technical characteristics: - luminous flux - 1650 ± 15% and 1000 ± 15% lm, - color temperature - 3500 K, - service life - 450 hours.
- The package contains two lamps.
- Country of origin: Poland.
- What we like best: White, bright light.
Philips lamp test results
Good ADAC score, results:
- very good road lighting,
- short service life,
- relatively expensive (but each lamp is tested at the factory).
Auto Express test winner. According to the measurement results, the border of the bright light spot is 75 meters from the car.
Check prices and availability.
Philips LongLife EcoVision - durable low beam bulbs for Polo sedan
Features declared by the manufacturer:
- high strength quartz glass,
- resistant to temperature changes and vibration,
- high internal pressure - powerful light.
Specifications:
- technology - halogen, - service life - 3000 hours.
- There are two pieces in the package.
- Country of origin: Poland, Germany.
- What we like most: the color is close to standard lamps, they should last longer than regular lamps.
- Check prices and availability.
Bosch Pure light
Features declared by the manufacturer:
- a universal series of high-quality products for passenger cars,
- indicators as close as possible to standard lamps,
- certified by ECE (Economic Commission for Europe),
- do not transmit the ultraviolet spectrum to protect the headlights.
- There is one piece in the package.
- Country of origin: Poland, Germany.
- What we like most: a very well-known manufacturer, the characteristics are the same as standard lamps.
Bosch lamp test results
ADAC satisfactory rating, results:
- balanced result.
The Pure Light Bosch is a typical standard lamp. All ratings are average.
Check prices and availability.
Narva
Features declared by the manufacturer:
- improved visibility by 30%,
- special filament design.
- There is one piece in the package.
- Country of origin: Germany.
- What we like most: Increased brightness.
- Check prices and availability.
Price comparison for low beam bulbs
For the chart, I took all prices from one site.
As can be seen from the histogram, Philips Extreme are the most expensive. Philips LongLife is more than twice as expensive. Bosch and Narva are the most affordable.
Which lamp is suitable for the restyled Polo sedan?
Suitable vehicle years: 2016, 2022, 2022.
55 H7 lamps are installed at the factory:
- 55 is the light power in watts,
- H7 - base type.
The lamps used for low and high beam are the same.
Quick comparison: the best H7 lamps for the restyled Polo sedan
Model Features Rating Link
| Philips X-treme Vision | well, very bright | ★★★★★ | Buy |
| Philips LongLife EcoVision | inexpensive and durable | ★★★★✩ | Buy |
| Bosch Xenon Blue | bright blue-white light | ★★★★✩ | Buy |
| Bosch Pure light | inexpensive, universal replacement for standard lamps | ★★★★✩ | Buy |
Philips X-treme Vision - the brightest light bulbs
Features declared by the manufacturer:
- up to 130% brighter white light,
- increase the lighting area in front of the car by 45 m,
- high quality quartz glass,
- Patented technology for powerful light output.
Designed for perfect visibility and unsurpassed quality.
Technical characteristics: - luminous flux - 1500 ± 15% lm, - color temperature - 3500 K, - service life - 450 hours.
Country of origin: Poland.
What we like best: White and very bright light.
Test results
Good ADAC score, results:
- very good road lighting,
- short service life,
- relatively expensive (but each lamp is tested at the factory).
Auto Express test winner. According to the measurement results, the border of the bright light spot is 75 meters from the car.
Check prices and availability.
Philips LongLife EcoVision - durable lamps for Polo sedan
Features declared by the manufacturer:
- high strength quartz glass,
- resistant to temperature changes and vibration,
- high internal pressure provides more powerful light,
- protect headlights from harmful ultraviolet radiation.
Specifications:
— technology — halogen, — luminous flux — 1500 ± 10% lm, — service life — 1500 hours.
- Country of origin: Poland.
- What we like most: They should last much longer than regular lamps.
- Check prices and availability.
Bosch Xenon Blue
Features declared by the manufacturer:
- up to 50% more light,
- white-blue tint.
- Country of origin: Germany, Hungary.
- What we like best: Bright blue-white light, and it's Bosch!
- Check prices and availability.
Bosch Pure light
Features declared by the manufacturer:
- a universal series of high-quality products for passenger cars,
- indicators as close as possible to standard lamps,
- certified by ECE (Economic Commission for Europe),
- do not transmit the ultraviolet spectrum to protect the headlights.
- The package contains one lamp.
- Country of origin: Poland, Germany.
- What we like best: well-known manufacturer, characteristics - the same as standard lamps.
Bosch lamp test results
ADAC satisfactory rating, results:
- balanced result.
The Pure Light Bosch is a typical standard lamp. All ratings are average.
Check prices and availability.
Source: https://blizhniy-svet.ru/2017/02/25/Lampy-blizhnego-sveta-na-polo-sedan.html
DRL option using LED strips
Some car owners resort to installing daytime running lights without purchasing lampshades with DRLs. LED strips are used for these purposes. The cost is much lower, and the options for tuning are expanding. One way is given below.
- Remove decorative plugs.
- Cut holes for the LED strip.
- Prepare the LED strip by cutting it into pieces of the required length.
- Insert the LED strip into its seats.
- Make electrical wiring.
- Fill everything with epoxy resin.
- Electrically connect both homemade DRL headlights.
- Install daytime running lights on the car.
- Check performance.
see also
Comments 18
Thanks for the instructions, today it burned out on the passenger side, mileage is 10,000, I will change it.
Please). I still have the stock one on the passenger side. Mileage 45,000 km.
Same story, only changed a year later...
You won't regret it, just change the polarity.
These holes are not for removing the trim, but for adjusting the PTF, if there are any, the hook is needed to remove the caps that are placed on the wheel bolts!
Those. Is it absolutely not recommended to remove the pads this way?
They're not expensive, it's a thing