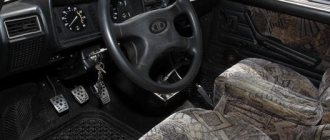
Checking components
Naturally, disassembling the stove on a VAZ 2110 and checking its components is necessary if you are dissatisfied with its operation, and also if it cannot be adjusted.
So:
The first thing to do is check to see if the fuse has blown. And although, if this happens, the thought immediately arises - change the blown fuse, do not rush. This is unlikely to immediately solve the problem; most likely, it is not the cause, but a consequence of some kind of failure that needs to be found; First of all, you need to check whether the damper moves when the parameters of the heater sensor change
Carefully, so as not to break the wire going to the backlight, remove the deflectors. Now you can clearly see whether the damper is turning or not
If you need to replace the heater damper, then installing an aluminum one instead of a plastic one will be justified; Check the resistance of the temperature sensor. If the temperature in the cabin is 16°C, then its resistance should be 250 Ohms, at 22°C - about 200 Ohms. If this is not the case, then installing a new sensor should help; It is also advisable to check the controller: remove it from the socket, turn on the ignition and, using the handle to change the temperature parameters, measure the voltage on the long connector. If the voltage does not change, then it is faulty; To check the gear motor of the stove, you will have to do a little disassembly: remove the frill, get to the drive of the gear motor (brown and pink wires are connected to it). Apply current from the battery to the connector. If it spins, it means it’s working, if not, you may need to install a new one; If the heater only operates in one position, the additional resistance (resistor) through which the fan is connected may have burned out. Installation of a new one is possible only from the engine compartment; Check if the wires in the controller are burnt out. To do this, it needs to be disassembled; On the right under the hood you will find the relay box. It is very possible that a wire has come loose from the relay responsible for operating the heater. At the same time, check the relay that turns on the heated rear window. If you do not have such heating, when tuning the stove, you can include this relay in the system; If the air entering the VAZ 2110 interior does not warm up sufficiently, be sure to check the antifreeze level, as well as the absence of its leakage from the heater;
Weak supply of warm air, stove modernization
One of the main problems of the VAZ-2110 heater is leakage and poor-quality assembly, low quality of air duct elements.
The stove can wildly heat up the air entering it, but the barely perceptible warm breath of the heater can reach the cabin. It's all about leaky air duct connections, and, unfortunately, there are quite a lot of them. Firstly, it is recommended to seal the primary air ducts ; a leak of heated air is often detected between them and the stove itself; it simply warms the engine shield.
Modernization of the heater for the driver’s feet, we will write a separate article about this. The photo shows our editorial car.
To eliminate this drawback, unfortunately, you will have to spend more than one hour, since it is impossible to get to the air ducts without dismantling the front panel.
It is necessary to check and seal each junction of plastic air ducts and their joints with the interior and glass air deflectors. Individuals who are particularly disappointed in the factory stove completely throw away the stock air ducts and replace them with corrugated hoses, which are abundant in hardware stores. The joints are sealed with polyurethane foam or modelin.
Of course, there is a lot of work, but the time spent is worth it - after modernization, absolutely all the warm air will flow only for its intended purpose.
Video about the modification of the heater damper of the VAZ-2110
If the stove on a VAZ 2110 blows cold air, but is itself heated to a temperature of 90 degrees, then the reason is hidden in the standard air ducts. Most likely, they are either damaged or have fallen off from the stove itself. And to get to them you will have to disassemble and remove the entire panel. If you still cannot restore them, you can simply replace them with corrugated hoses purchased from building materials and install them. And seal all joints tightly and thoroughly with polyurethane foam or modelin.
If the stove on a VAZ 2110 blows cold air, then there is only one reason - the stove radiator is clogged. If the engine is cooled with water, then rust can form in the radiator, and at high temperatures, scale can also form. Small pipes in the radiator can become clogged if you (accidentally) mix antifreeze with antifreeze, this mixture will simply curdle. In addition, some short-sighted car enthusiasts add a special radiator sealant to the coolant, which also clogs the radiators from the inside. It's quite easy to check. You need to warm up the engine to a temperature of 90 degrees, turn on the heater and check the inlet and outlet pipes of the heater by touch. If the temperature on them is different, then the radiator is simply clogged and must be replaced. But the process of replacing it is quite labor-intensive.
Causes of poor-quality foot airflow
Almost all vehicle owners face the problem when the heater in the driver’s feet does not work on a VAZ-2110. The heating system on domestic cars has significant disadvantages - this is a weak air flow into the driver’s feet and towards the side windows. Often this situation occurs even during normal operation of the heater.
There may be several reasons for this, and all of them are related to the technical features of the heating system design.
The first and main reason why the stove does not heat with the required intensity is poor-quality sealing of the heating system air ducts. The heater ducts are made of plastic and have a large number of slots around the perimeter. As a result, a significant amount of warm air is lost through the holes in the air ducts and a weak flow reaches the final destination.
The second element of the heating system, which requires improvement for better heating of the interior, is the plastic air distribution unit. People also call the driver his Christmas tree. This unit also has slots, which significantly reduces the flow of warm air to the driver's feet, side windows and to the rear seats of the vehicle.
The next detail that causes poor heating of the interior is. Due to its design features, it does not fit tightly to the panel body. As a result, most of the hot air remains in the engine compartment and in the dashboard.
As you can see, the complex reason that the stove is blowing weakly is poor-quality sealing of the VAZ-2110 heater elements and the presence of a large number of cracks in the car’s heating system.
Before you begin to eliminate factory defects in the heater, you need to make sure that it is working properly
In case of problems with the functioning of the stove, it is important to first repair worn-out or damaged parts, and only then upgrade the heating system. Only in this case, modifications to the heating system of the vehicle will give a tangible positive result.
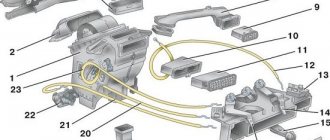
Diagram and explanations for it
Below is a diagram of the parts that make up the heater system of a VAZ 2110 car.
It is worth saying that recirculation operates in the “tens” heater system, as the diagram tells us. In simple words: air circulates inside the VAZ 2110, and is not taken from the street. The main advantage is that dust and unpleasant odors do not enter the cabin from the street. There are more disadvantages to such a stove system - the glass quickly fogs up. It is recommended to open windows more often if the outside temperature allows it. Air stagnation negatively affects the health of the driver and his companions. The heater gear motor can rarely be repaired, so it should be replaced immediately.
For VAZ 2110 owners who want to modify the heater system or carry out electrical repairs, an automatic control circuit will be useful.
Advice from experienced car owners
Eugene:
“I never thought I would encounter such a problem, but it happened. After repairing the cylinder head, it became very difficult to warm up the interior. I spent a long time searching for why, and it turned out that the engine was throttling. I did everything as advised, the coolant stopped bubbling only after 4 hours, but now it’s always warm in the cabin.”
Sanya:
“I have a VAZ 2109i, it blew cold at idle. I added coolant to the expansion tank, everything was ok.”
Rustam:
“I drive a 6th Mazda. Last winter, the heater began to act like a fool: over 2 tons of revolutions, hot air came out of it, over 3 tons, despite how much the temperature was set, the heater practically boiled with boiling water, but as soon as you stopped, the air became cool. I went through all the possible options described in the article, the problem did not go away, after a long search, the service station technicians found the reason - the climate control system had failed.”
We recommend: What to do if the wipers on a VAZ-2110 do not work: possible reasons
Ruslan:
“On my Priora, the stove also blew cold at idle, so to fix this I had to constantly add antifreeze. Got tired of it, sealed the lower pipe, now everything works properly.”
Oleg:
“As a service station worker, I can say that the warmest stove among all domestic cars is in Kalina, but sometimes it also malfunctions
As a rule, the whole problem lies either in the gasket of the pump, or in the pump itself, so if you are the owner of the named car, in which case the first thing you should pay attention to is the pump and its components.”
Repair
As we have already noted, the design of stoves on dozens with carburetor and injection engines has practically no differences. Therefore, the repair instructions below are suitable for owners of a VAZ 2110 with both types of power units.
If you are planning to overhaul your old-style stove, we recommend starting with the purchase of a radiator. Use copper as it is more efficient and helps the heater work better.
To carry out repairs correctly, strictly follow the points presented in our instructions and rely on video materials.
- There is a plug on the engine block through which coolant is drained into any container. If you plan to use the same antifreeze or antifreeze again, choose clean containers.
- Next you need to move the frill forward. This process will take quite a long time, so be patient.
- Next, you need to remove the windshield wipers and get rid of as much as possible of everything that could interfere with the repair process.
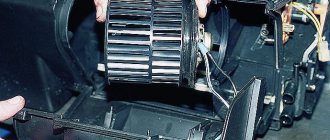
- Remove the body of your stove. It is divided into two parts, which is important to know in advance. The front part of the stove body is removed directly along with the fan.
- After this comes the stage of dismantling the cabin filter. Check its current status. If the filter is dirty, this is an excellent reason to replace it.
- The next stage involves removing the second part of the housing.
- Loosen the clamps used on the hoses a little. This will allow you to easily remove the hoses.
- Having applied some effort, you can now finally remove the radiator from its seat.
Reassembly
In fact, reassembling the unit only involves following the opposite sequence of operations. By disassembling the stove, you have the opportunity to simultaneously inspect other elements of your car to make sure they are working.
The only nuance that you should pay attention to when reassembling is the type of stove. If you have an old-style heater, then it is important to pay attention to a couple of issues.
- When the plastic housing is mounted in place, make sure that the pedal fits neatly into the groove intended for it.
- Check how tightly all the nodes fit into their seats. Otherwise, unpleasant consequences may arise that will force you to dismantle the entire assembly again. And this, as you already understand, is not an easy process.
That's it, now all that remains is to return the coolant back into the system and tighten the plug securely. Test your vehicle in a garage before driving it on public roads.
Operating modes
You can configure the heater operation manually or automatically. That is, you can set the temperature sensor according to your wishes, for example, at 22°C. If everything is in order, then the manufacturers promise that the deviations will be no more than 2°C, after which the relay will turn on the heating again, and after reaching the specified parameters, turn it off. But if failures occur, then after checking the functionality, it is quite possible that the sensor or relay will need to be replaced.
You can set the automatic mode. For this there is a special screw, the so-called tuning screw. It is advisable to make adjustments with the windows and doors closed. The fan handle should be in position “A”, and set the temperature at your discretion.
Take a test thermometer to the salon. If after 15 minutes the temperature does not correspond to the specified parameters, then you need to remove the controller from the socket and turn its adjustment screw. Clockwise to increase the temperature, counterclockwise to decrease it. If this does not help, then the sensor needs to be replaced.
SAUO block without panel
In addition, you may need to install a new control unit, or even tuning the entire heating system.
Adjusting the heater dampers from vertical to horizontal
Owners of old cars (as early as 1998) have a central air duct deflector with a vertical lever (old style). It is no longer possible to find spare parts for it; they are simply not on sale. Is it possible to replace the vertical lever of the stove dampers with a horizontal one (of a new type)? Replacing the central air duct with vertical adjustment of the heater dampers can be done for several reasons. For example, for purely aesthetic reasons or so that on bumps the lever does not slide from the “in the face” position to the “frontal” position. In order for the damper to be fixed better, you just need to replace some elements with new ones, but you can no longer find parts for the vertical damper control lever in stores Maybe. Therefore, it makes sense to install a central deflector with a horizontal lever, but what is needed for this?
If you ask in stores what you need to replace the vertical heater lever in a VAZ 2110 with a horizontal one, you won’t hear a clear answer.
In fact, everything is simpler than it seems. It turns out that on the damper, which we move with a lever, there are two options for attaching the mechanism - for both horizontal and vertical execution. Apparently the manufacturer took into account the fact that sooner or later it will be necessary to replace the old-style central deflector with a new-style deflector. So, to make horizontal adjustment of the stove dampers you need:
- Intermediate lever for heating system control (Art. 2110-8109074)
- Horizontal switch bracket (Art. 2110-8109026-10)
- Distributor drive rod (Art. 2110-8103040-10). You can use a thick paper clip instead.
Finding these three elements is also not easy, so it makes sense to look for them at a disassembly. The price of such a kit will be about 500 rubles. Replacement procedure:
- We remove the old deflector with vertical damper control (we hook it up with a screwdriver; if you don’t understand, read the instructions).
- Remove the damper rod.
- Install the new horizontal shift bracket and secure it.
- We hook the new damper rod to another fastener.
- We install a new central deflector with horizontal adjustment of the flaps.
Conclusion
Replacing the old-style central air deflector of a VAZ 2110 with a new one is not difficult; it is much more difficult to find the necessary parts for this. If you are satisfied with the operation of the vertical heater lever and it does not go down on bumps, and you decided to change it only for aesthetic reasons, then you can restore its former attractiveness with the help of vinyl film. Photo source: Key words: xn--2111-43da1a8c.xn--p1ai
Causes of poor foot airflow
Heater malfunction
Air through the cabin filter is taken from the street by the rotating blades of the electric heater motor. Through a damper system, air is distributed through air ducts and supplied into the cabin through deflectors and non-adjustable grilles.
Air, like any gaseous medium, tends to follow the path of least resistance. Therefore, it is logical that the air flows first come out of the central and side deflectors. The feet of the driver and passengers are blown last. Structurally, the air ducts to the central deflector and the upper side airflow points have a larger cross-section, and it is much easier for air to pass through them.
Initially, you need to make sure that nothing interferes with the intake of air from the atmosphere. After all, if the air is supplied in insufficient volume, then it will not be enough to supply all airflow points with the intensity that was calculated at the design stage of the car.
Check the condition of the cabin filter. To do this, remove the wipers and frill. The cabin filter is located on the right side of the vehicle under the windshield. It is covered with a plastic casing, which is secured with four self-tapping screws. Unscrew the screws and remove the cabin filter. We start the engine, warm it up to operating temperature and check the operation of the stove. If the situation has improved, change the cabin filter and close the issue.
The second common cause is a clogged heater core. In this case, the heating of the interior will be weak, because warm air does not come out of all the deflectors well, and not just into the legs. But the fact is that when driving for a long time, your feet begin to freeze first, so it seems that the problem is in this part of the airflow.
Video: Why the stove does not blow at the feet of VAZ 2111,2110
This malfunction is easily diagnosed. We find two pipes for supplying antifreeze to the heater radiator (rubber hoses on the left side in the direction of travel of the car). With the engine warm, carefully touch the two pipes one at a time with the heater running at full power. The difference in temperature between the pipes should be minimal. If one pipe is hot and the second is cold or barely warm, we wash or replace the heater radiator.
Checking the operation of the dampers
There are nine exit points for air flows from the heater on the VAZ-2110:
- central deflector;
- two side deflectors and two windshield air vents;
- heated feet of the driver and front passenger;
- two outputs for heating the feet of rear passengers.
In an ideally operating system, the pressure generated by the heater motor is sufficient to create an effective flow to warm the feet. However, over time, gaps form in the joints of the air ducts, and the dampers of the VAZ-2110 heater begin to fit loosely to the body. This leads to atomization of the air flow. As a result, a minimum amount of air reaches the distant exit points.
First, dismantle the panel with the central deflector. It is held in place by four plastic clips. To remove it, simply pry it off one of the sides with a suitable object, such as a flat-head screwdriver. Be careful: the clips are fragile.
Evaluate the damper's performance
In older cars with a manual damper drive, pay attention to the play in the linkage of the rods. A broken rod system will not allow the damper to fit tightly to the body in the extreme position, which will cause air to leak from the cold circuit
The problem is corrected by adjusting the damper. In a mechanical drive, it is possible to shorten the rod due to a movable lock on a gear rod or a threaded tip. During the adjustment process, check that the position of the switch on the panel corresponds to the actual position of the damper.
Another reason why the VAZ-2110 stove does not blow into your feet is a malfunction in the operation of the automatic heater control system (AHC) unit or the gear motor of the VAZ-2110 stove. In this case, there is usually insufficiently warm or even cold air from the stove operating in maximum heating mode. This is due to the incorrect position of the damper in which the gearmotor sets it.
Evaluate the operation of the gear motor of the VAZ-2110 stove. To do this, visually check how it closes the damper when switching modes. The easiest way to do this is to remove the panel with the central deflector. Move the temperature knob to the extreme position (for example, set the minimum temperature), then sharply switch to the opposite mode. The damper should completely block the channel visible from the driver's position. If this does not happen, the problem lies in the gear motor or the automatic control system unit. Check the serviceability of the gearmotor and unit.
Device
First of all, you should know the very structure of the heating system in order to clearly understand what and how to repair, because for the VAZ 2110, interruptions in the operation of the heater are a typical phenomenon, and from time to time requiring the intervention of reliable hands - be it a driver or a service station worker.
For stable and high-quality driving in a car, it is recommended not only to be able to use the heating system, but also to understand the heater’s structure. The operating principle of the system can be found here: https://vazweb.ru/desyatka/otoplenie/otopitel.html
So, the heating system consists of: 1. The actual heater unit, which provides heating for the interior. It is represented (by importance of details):
- An electric motor on which a fan is also attached to pump hot air;
- A radiator, without which the entire system does not work. Moreover, unlike the old heater, the radiator of the VAZ 2110 stove of the new model does not have a tap that shuts off the flow of antifreeze (antifreeze) through the radiator. Thus, it is always (whether in winter or in summer) heated. This was done supposedly in order to eliminate leaks that were often observed through this tap, and also to heat the interior as quickly as possible when necessary. In the summer, the supply ventilation goes past the radiator, but still some VAZ 2110 owners, when repairing the stove, add this tap to the system;
- There are three dampers. One is responsible for air intake recirculation, the second opens/closes the heater duct, the third, the most important for the interior, controls the heater;
- A resistor that regulates the blowing speed.
All parts are packaged in a block with additional valves, shields, and fittings. This entire device is housed in a housing and is located under the hood closer to the instrument panel.
2. The next block represents the air ducts of the VAZ 2110. They extend directly from the stove and provide:
- Interior ventilation through central nozzles;
- The air distributor works to supply heat (or regular air for ventilation);
- Two air ducts are directed to the rear of the cabin;
- There is a whole system of five nozzles for heating the feet;
- Two side air ducts provide heating for the side windows and part of the interior, providing better heating;
- Two nozzles for ventilation.
This, in a nutshell, is the principle of distribution of hot or cold air inside the VAZ 2110.
3. The electronic control unit for the stove operates from the passenger compartment. It includes:
- Controller handle. This device allows you to set the temperature in the cabin that the stove unit should produce. It turns on by turning the knob and sets the temperature from the air, the temperature of which will correspond to that outside, up to 30°C. Most often, this part is called the ACS controller (automatic heater control system);
- The temperature sensor is responsible for turning on the heater when the temperature in the cabin drops by 2 degrees against the set one. The sensor has a microfan, and if the control knob is in position A, then the micromotor in the stove block turns on and the damper begins to operate, ensuring proper heating. Therefore, before starting repairs of the heating system, the operation of this sensor is usually checked. It is located next to the heating lamp on the ceiling of the VAZ 2110. Since it is not repairable, in the event of a breakdown this device should be replaced immediately.
This material will help you quickly and efficiently replace the stove fan in a VAZ 2110: https://vazweb.ru/desyatka/otoplenie/zamena-ventilyatora-pechki.html
Ceiling interior air temperature sensor
Priora heater control unit pinout
| Colored electrical diagrams VAZ 2170-71-72 LADA Priora |
Engine Control DiagramCar Front Wiring Harness ConnectionDashboard Harness ConnectionCar Rear Wiring Harness Connection
Colored electrical diagrams VAZ 2170 LADA Priora
Electronic engine control diagram Connection diagrams for the wiring harness of the front, rear of the car doors, trunk lid
| Instrument panel harness wiring diagram |
List of elements of the electrical connection diagram of the instrument panel harness of the LADA 2170 car
1, 2, 3 - instrument panel harness connectors to the front harness; 4 – instrument panel harness connector to the rear harness; 5 – contacts of the mounting block connector; 6 – brake light switch; 7 – instrument cluster; 8 – lighting control module; 9 – driver airbag module; 10 – horn switch; 11 – diagnostic block; 12 – on-board computer mode switch; 18 – ignition switch; 14, 15 – blocks to the electric power steering control unit; 16 – electrical package controller; 17 – light switch alarm;18 – windshield wiper switch;19 – air flow distribution gearmotor;20 – heater control unit;21 – heater electric motor switch;22 – rear window heating switch;23 – clock;24, 25 – instrument panel harness connectors to the radio;26 – hazard warning switch; 27 – glove compartment lighting switch; 28 – glove compartment lighting switch; 29 – instrument panel harness connector to the ignition system harness; 30 – airbag system control unit. Al, A2, AZ – instrument panel harness grounding points. B – mounting block block.
Instrument panel harness – 2170-3724030.
Ignition system harness wiring diagram
List of elements of the electrical connection diagram of the ignition system harness of the LADA 2170 car
1 – controller;2 – ignition system harness connector to the instrument panel harness;3 – main fuse box;4 * speed sensor;5 – rough road sensor;6 – oil pressure warning lamp sensor;7 – throttle position sensor;8 – sensor coolant temperature;9 – coolant temperature indicator sensor;10 – mass air flow sensor;11 – idle speed control;12 – electric fuel pump relay;13 – electric fuel pump power circuit fuse (15 A);14 – ignition relay;15 – relay fuse ignition (15 A); 16 – controller power supply fuse (7.5 A); 17 – crankshaft position sensor; 18 – oxygen sensor; 19 phase sensor; 20 – knock sensor; 21 – canister purge solenoid valve; 22 – sensor oxygen diagnostic;23 – ignition coil;24 – spark plugs;25 – injectors;26 – ignition coil wiring harness block to the ignition system harness;27 – ignition system harness block to the ignition coil wiring harness;28 – ignition system harness block to the injector harness ;29 – injector harness block to the ignition system harness. A – to the plus terminal of the battery; Bl, B2 – grounding points of the ignition system harness. C1 – grounding point of the ignition coil wiring harness. Ignition system wiring harness – 2170-37240*26 .Ignition coil wiring harness – 1118-3724148. Injector wiring harness – 11186-3724036.
List of elements of the electrical connection diagram of the front vehicle harness LADA 2170
1 – starter; 2 – battery; 3 – generator; 4 * battery and starter harness connectors and front harness; 5-7 front harness connectors to the instrument panel harness; 8 – engine compartment lamp switch; 9 – left headlight; 10 – right headlight ;11 - brake fluid level sensor;12 – air temperature sensor;13 – washer motor;14 – reverse light switch;15 – engine electric fan;16 – heater damper gearmotor;17 – additional resistor;18 – windshield wiper motor;19 – main fuse block; 20 – heater electric motor; 21, 22 – sound signal Al, A2, Bl, B2 – grounding points of the front harness. Front wiring harness – 2170-3724010. Battery wiring harness with housing – 2170-3724080. Battery connecting wiring harness and starter - 2170-3724070.
Dismantling of air ducts
Sometimes, in addition to removing the deflectors, you also have to remove the air ducts themselves (this may be necessary if they are damaged or severely clogged).
In order to dismantle them, you need:
- remove the deflectors (how to do this was described above);
- remove the dashboard by unscrewing the fastening screws;
- disconnect the side air ducts (left and right) by unscrewing two screws securing them to the central air duct;
- disconnect the central air duct by unscrewing three screws - one in the center and two at the edges.
After the air ducts have been cleaned or replaced with new ones, their installation and assembly is carried out according to the specified scheme, but in the reverse order.
Guide to upgrading the VAZ 2110 stove
- Correcting deficiencies in airflow of side deflectors
This deficiency can be corrected by one of two methods. The simplest method is to simply seal all the holes into which the air flow is dispersed, this will greatly increase the efficiency of glass blowing. The second method is to lay corrugations instead of air ducts, but this method is more effective in improving the airflow for the feet of front and rear passengers; for the side deflectors the improvements will be insignificant.
That is why it is better to do sealing. To do this, you need to use modelin (anti-creaking). Using this material, it is necessary to seal everything, including bolt holes.
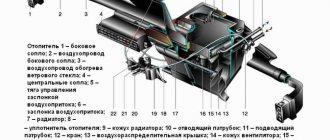
Heating ducts and control systems
1 – air ducts through which the rear of the car is blown 2 – lining for the tunnel 3 – air ducts through which air flows to the feet 4 – this nozzle warms up the center of the car. 5 – side heating 6 – heating of the side front windows 7 – heating control system 8 – air distribution housing 9 – damper for the footwell air supply 10 – damper for windshield blowing 11 – heater.
The design and principle of operation of the cooling system of the “tens” engine.
Any cooling system is designed not only to cool parts, but also to perform some other functions, namely:
- ventilation and air conditioning, heating the air in the heating system;
- cooling air in the turbocharger;
- cooling the working fluid in the automatic transmission;
- cooling the lubricant, or rather the oil in this system.
Design of the cooling system of the VAZ 2110 injection engine.
- Heater radiator
- Heater radiator steam hose
- Outlet hose
- Supply hose
- Coolant temperature sensor (in the cylinder head)
- Pump inlet hose
- Thermostat
- Charging hose
- Expansion tank plug
- Coolant level indicator sensor
- Expansion tank
- Outlet pipe
- Carburetor starter fluid chamber
- Radiator outlet hose
- Radiator inlet hose
- Radiator steam hose
- Left radiator tank
- Electric fan switch sensor
- Fan motor
- Electric fan impeller
- Right radiator tank
- Drain plug
- Electric fan shroud
- Timing belt
- Coolant pump impeller
- Coolant pump inlet pipe
- Coolant supply hose to throttle body
- Coolant drain hose from throttle pipe
- Exhaust coolant temperature sensor
- Radiator tubes
- Radiator core
The principle of operation of the cooling system of an injection engine.
If we talk directly about the cooling system of the VAZ 2110, then it is liquid, its circulation occurs forcibly, and is filled into the expansion tank.
The basis for creating the liquid used in this system is water combined with ethylene glycol. Such a liquid can freeze only at the lowest possible temperatures, and also create an elevated boiling point. By adding various additives to it, you can increase the service life of the oil seal, as well as slow down the process of corrosion of the system itself. Full filling of liquid requires the latter in a volume of 7.8 liters.
The movement of liquid throughout the cooling system of the VAZ 2110 injector is ensured by a centrifugal pump, which is fixed in the cylinder block and is activated by the timing belt.
As you know, the liquid gradually heats up from the friction of the working surfaces of the parts. And depending on the reached temperature of the liquid, the cooling system initially circulates in a small circle, and after heating it begins to move in a large circle. That is, when a certain heating point is reached, the thermostat is triggered, after which it opens and changes the direction of movement of the liquid. This process is already regulated by a pair of valves located in this thermostat. In it, the bypass valve regulates the movement of coolant in a small circle, and the main valve in a large circle. Thus, when one of these valves opens, the other closes, and vice versa.
Until the engine warms up well, the bypass valve is in the open position, and the coolant flows in a small circle through the cylinder block, throttle valve and heater radiator. This heating radiator is built directly into the engine cooling system, therefore, when liquid passes through it, the car interior is heated.
At the moment when the coolant is heated to 85°C, the main thermostat valve begins to open when the bypass valve closes. At this moment, the coolant flows simultaneously through both the small and large circles. And already at 102°C, the liquid enters the radiator, flowing only in a large circle. There, thanks to the flow of air from the outside, it is cooled.
It turns out that the injection system of the VAZ 2110 engine is designed in such a way that if the air flow does not cool the liquid well, then the fan is automatically turned on using a signal from the electronic control unit. And in the case of strong heating of the liquid, its volume begins to increase, and then its excess returns back to the expansion tank. This tank contains a valve that maintains the required pressure in the system.
It is necessary to monitor and check the coolant level only when the car’s power unit is cold. If you notice a regular decrease in it, be sure to check the entire system for leaks. Well, a complete replacement of the coolant in the VAZ 2110 injector must be done every 75,000 kilometers.
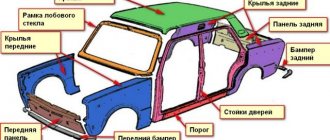
Stove design
This unit includes several devices. The radiator is the main element of the stove - it heats the air entering the cabin. It is located under the hood. The next component is the air distributor, equipped with special pipes that run through the cabin of the 2110.
If we compare the “ten” with previous models, an important innovation has appeared in its heating system - an evaporator (the diagram includes it in the list). The device is installed in an air conditioning system. Not all owners know about its existence, since it rarely fails.
To control the operation of the heater, an SUAO unit is installed in the VAZ 2110 car, which is called a controller in the technical operating manual. The unit works in conjunction with a temperature sensor in the cabin; it is also called a ceiling sensor. The sensor reports the temperature to the unit, then this indicator is compared with the set temperature on the handle. If the indicators differ by more than 2°, warm or cooled air is supplied to the VAZ 2110 interior.
It’s worth taking a closer look at the handle, or more precisely at its extreme positions – MAX and MIN. If the heater knob is set to one of these indicators, heat is supplied without the operation of the temperature sensor in the cabin. The scheme includes all of the above elements.
The device of the “tens” heater includes another unit - a gearmotor, which is responsible for opening and closing the damper. The miniature electric motor performs an important task in the operation of the heating system, as evidenced by the diagram. If the gearmotor is faulty, the system will only produce cold or hot air. If the gearmotor fails when the damper is closed, the system will stop functioning. We have described the main components of the VAZ 2110 heater; the diagram contains a more detailed list.
Let us highlight the main components of the system:
- Radiator.
- Air distributor.
- SUAO block.
- Ceiling sensor.
- Lever.
- Damper.
- Gearmotor.
In the heating system, a radiator is installed for heating, which enters the VAZ 2110. It is also called a heat exchanger. Heating is carried out by the heat of the antifreeze. This component is connected to the engine cooling system by pipes and hoses. Antifreeze constantly circulates through the heat exchanger of the stove. The damper, based on the commands of the unit, directs the incoming air to the radiator or directly into the passenger compartment. If the heater damper is in an intermediate position, then one part passes through the heat exchanger, and the second bypasses the radiator. If we compare this part of the stove with previous generations of the VAZ, it has a number of useful improvements, as the diagram demonstrates.
SUAO and ceiling sensor
These components of the VAZ 2110 heater are connected and operate according to the following principle:
- The sensor determines the temperature inside the car;
- This data is sent to the SUAO block;
- The block compares the temperature with the position set on the handle of the VAZ 2110 stove;
- After comparison, the position of the damper changes or remains the same - it depends on the indicator;
- This way the temperature in the cabin is controlled;
- If the heater handle is set to MAX or MIN, then the data from the ceiling sensor is not taken into account.
All these actions are demonstrated by the diagram. The block is a set of microcircuits; the normal operation of the stove depends on its serviceability. Both the sensor and the control system can be replaced.
Damper and gearmotor
The heater gear motor changes the position of the damper, due to which air is supplied to the cabin. This component is controlled by the control system block. If the device is faulty, the damper will not move. The unit is a miniature electric motor. When it breaks, it is usually replaced, since repairing it will be problematic. This also applies to the damper. The diagram shows the connections between the gearbox and the block.
Diagnosis of recirculation system malfunctions
If outside air continues to flow when the button is pressed, there is a problem with the system. You can determine the cause of the breakdown by diagnosing the cooling system, which involves performing the following actions:
- turning on the ignition, starting the power unit;
- setting the maximum fan speed mode;
- pressing the recirculation key.
This triggers the valve and closes the damper. If the car is moving at a constant speed and the damper is completely closed for several seconds, the system is working properly. If there are suspicious sounds (clicks, pops) and the damper moves jerkily, we can talk about problems.
Components and processes of the VAZ-2112 heater
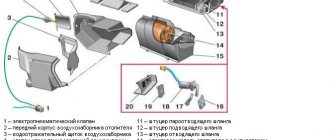
The heater circuit consists of the following elements:
- electro-pneumatic valve;
- housing with the air intake of the heating system, consisting of front and rear parts;
- water-reflective air intake flap;
- valve for controlling the recirculation damper;
- recirculation damper on the air intake;
- damper on the stove channel;
- stove control damper;
- radiator and its casing;
- fittings on the steam exhaust and supply hoses;
- stove electric motor in the housing and fan;
- support platform for the lever from the heater control damper drive and the lever itself;
- micromotor gearbox with damper drive;
- resistor;
- cover from the stove casing.
The radiator is located horizontally under the instrument panel. It is housed in a plastic casing. The radiator design includes two plastic tanks and a pair of aluminum tubes with pressed plates on them. There is a steam outlet fitting on the left tank. The passage of intake air through the radiator depends on the position in which the dampers are located. If the dampers are in their extreme position, then the entire air flow may pass through the radiator or not at all.
Lack of tap - plus or minus?
If older VAZ models have a tap that can be used to shut off the flow of antifreeze to the radiator, the VAZ-2112 is not equipped with such an element. If the engine is running, the radiator will heat up regardless of the time of year. This design feature of the stove makes it possible to achieve a slight inertia, which is inherent in the system during start-up. In other words, the required temperature will be reached in a shorter time. In addition, the user will not encounter leaks that arise as a result of a leak in the faucet. The electronic control unit, which generates the necessary commands, is responsible for the ability to conveniently control the operation of the stove.
As we already know, the VAZ heater circuit does not provide for a heater tap. An air damper is provided to control the temperature inside the cabin. This mechanism is responsible for regulating the flow of heated air. In the VAZ-2112, antifreeze is supplied to the heating system year-round, which does not suit all drivers. Therefore, some owners of VAZ-2112, 21124 and other models belonging to the tenth family additionally install a tap that allows you to control the supply of antifreeze.
The control of the VAZ-2112 stove is automatic, and the temperature error does not exceed 2 degrees. The presence of an air damper in practice turns out to be more preferable, since the valve has a tendency to sour and jam. In short, with an air damper, heating is less problematic and more reliable.
Ventilation principle
In VAZ cars of the tenth series, the supply and exhaust system is responsible for interior ventilation. The principle of its operation is to supply air inside the cabin through special holes, which are located in the trim on the wind window. This process can be carried out independently while the machine is moving or forcefully due to the operation of the fan. There are also special openings for air to escape, which can be found between the upholstery and the inner door panels. Then the air flow follows through the holes that are located at the ends of the doors. Through these holes, air can only escape, but not enter the car, which is prevented by the valves. With such a ventilation system, we get better thermal insulation and slower cooling of the interior.
The VAZ-2112 has a supply and exhaust ventilation system
Recirculation system
To ensure that the interior warms up faster and cold air does not come in from the street, which is especially important when driving on dusty roads, the car is equipped with a recirculation system. There is a recirculation button on the instrument panel; when pressed, the electro-pneumatic valve is activated. Due to the vacuum, the recirculation system flap, which is located inside the intake manifold, blocks the flow of outside air into the car. The recirculation system can only be activated when the engine is running. When the fan is turned on, air circulation throughout the cabin will continue, and the air ducts of the heating system will be activated.
Fan and motor
The fan can operate in three modes:
- low speed;
- average speed;
- auto mode.
The electric motor on the fan is installed as a commutator type, with permanent magnets and direct current. If the rotation speed is maximum, then the current consumption will be 14 A.
The electric motor can operate from the on-board network or through an additional resistor. The first option involves maximum speed. The design of the additional resistor has two spirals with different resistances of 0.23 and 0.82 Ohms. When two spirals are connected to the circuit at once, the fan rotates at low speed. The inclusion of one spiral with a resistance of 0.23 Ohm allows the fan to operate at medium speed.
The fan wheel must not be pressed from the motor shaft, as such actions may disrupt the balancing. If repair of the electric motor is required, it may only consist of cleaning the collector; if all other problems arise, it is necessary to replace not only the electric motor, but also the fan wheel.
Electric motor on a VAZ-2112 fan
Differences in design
The VAZ 2110 was equipped with stoves of the so-called new or old model. Both systems, including those on the VAZ, which has an injector instead of a carburetor, are not particularly different in design.
So, the immediate differences:
- The main difference between the new stove and the old one is in the design of the heater radiator. Therefore, if you are repairing a heating system and decide to install a new model instead of an old radiator, then take into account some nuances;
- In addition, the SAUO controller is also not exactly like that. 4 or 5 position controllers manufactured before the fall of 2003 have already been discontinued and are not suitable for new heater models;
- The micro-gearboxes are also different, starting from release in September 2003. They differ in resistors (shaft position sensors), so you need to check whether the resistor in the MMR model that you purchased is interchangeable.
MMR of the old type MMR of the new type
If you are planning a major overhaul of the stove, especially if you still have an outdated system, start by purchasing a new stove radiator (it is better to buy a copper one, it heats much better), and this will only improve the performance of the heater.
But the design of the VAZ injector stove is practically no different from carburetor cars.
The following is a breakdown of the following points:
- The engine block has a plug from which antifreeze is drained into some container;
- The frill is moved forward a little (a lengthy operation), the windshield wipers and everything that gets in the way are removed;
- The heater housing is removed. You should know that the body is divided into two parts. The front one is removed along with the fan;
- Next comes the cabin filter housing. It can be changed at the same time;
- The other part of the fan housing is removed;
- The clamps are loosened, the hoses are removed;
- Then, with some effort, the radiator is removed.
Assembly, as they say, is in reverse order
Just one more nuance: if you have an outdated stove, then pay attention to two points:
- When installing the plastic case, make sure that the pedal fits into the desired groove;
- Knowing the structure of all components, be sure to double-check their tightness.
Before adding antifreeze, do not forget to make sure that the engine block has a well-tightened plug. Be sure to make sure that the entire system is running smoothly and more efficiently than before.
Heater replacement
VAZ 2110 additional interior heater
To perform this operation, you need to know and be able to do the following:
- The car must be prepared for the repair process, removal of parts, mechanisms and other parts.
Note: The vehicle must be placed on a level road surface. Repairs should not be made without special wheel stands that will hold the car in place. Also, you need to take care of the handbrake, which must be turned on. Don't forget about the ignition key, which you need to take with you.
- After installing the car and its preliminary preparation, it is necessary to disconnect the negative terminal from the battery.
- Using a special socket wrench with the number “12”, you need to slightly loosen the nut securing the wire terminal. This operation must be carried out with a negative output. The terminal is removed from the battery.
- The decorative trim on the engine must be removed.
Removing the decorative trim
Note: since the VAZ 2110 car has several engine options, it is necessary to describe the removal of the decorative trim on both engine options.
- Engine 2112 (1.5i) - using a socket wrench with the number “10”, unscrew the 4 fastening nuts that attach the plastic lining to the cylinder head cover.
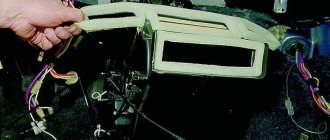
VAZ 2110 interior heater diagram
- The oil filler head has a cap that must be unscrewed and removed.
- The plastic cover is removed.
- Engine 21124 (1.6i) - requires the removal of four fasteners, which are made of rubber. They protect the cylinder head cover.
- The plastic engine cover can be removed with a slight upward movement of the hand. Along with the cover, the fastening elements are also detached; you should be extremely careful not to lose them.
Disadvantages of the heater in the VAZ-2110
The main disadvantages, as a result of which car owners are forced to improve and modernize the heating unit:
- Weak air flow to the side mirrors and driver's feet. This problem often occurs during normal operation of the heating unit.
- Often consumers encounter a leak on a radiator device. The unit is equipped with a special tap, which wears out over time and begins to leak coolant. The faucet requires repair, but often the problem can only be solved by replacing the radiator assembly.
- The central air duct of the system includes two parts that are not sealed together. From the radiator device, this blower must supply a heat flow to the feet of the passengers sitting in the rear. If we take into account all the bends, then this is at least 2.5 meters. Of course, the heat flow does not reach the rear passengers.
Symptoms of a heater malfunction
The main signs by which you can identify problems with the heating unit:
- The temperature mode of the heater is not regulated. The problem usually lies in the control unit or in the operation of the heater dampers.
- The sensor located on the ceiling does not function. It is designed to determine the temperature inside the car.
- The heating unit does not function; only cold air flow is supplied to the vehicle interior.
- The side windows of the car or the feet of the driver and passengers are blown with hot air ineffectively.
- The volume of refrigerant in the cooling system decreases. The problem can manifest itself covertly or overtly. In the latter case, a leak can be noticed from the lines of the heating system or radiator device.
- The heating unit functions, but is very noisy.
The channel In Sandro's garage spoke in detail about replacing the electric motor of the heating unit on the "ten".
Description of the heating system on "Dvenashka"
In VAZ 2112 cars, supply and exhaust ventilation is used. In this case, the air flow enters through special holes that are located in the windshield lining. The air itself can be supplied forcefully, under the influence of a heater fan, or arbitrarily. Air flows out of the cabin through gaps located between the door panels, as well as at their ends. Special valves are built into these openings that allow air to escape and also delay its entry, improving the thermal insulation of the cabin.