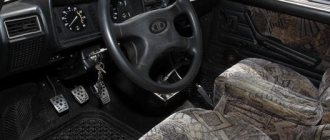
Cleanliness under the hood - logbook of the 2012 Lada Granta AT Luxe on DRIVE2
It's no secret that a lot of dirt collects under the hood of a grant. First of all, this is due to the gap between the hood and the frame (not that there is a huge gap; the problem is that it is located exactly in the place where all the dirt flies). Therefore, cunning people figured out how to heal it at a cost of about 300 rubles. I washed the engine at the car wash.
And here is the result of a clean engine compartment of a standard Lada 1.6 16V
Motor after washing
I didn’t bother and bought seals from Alamara (you could, of course, measure the length with a meter, then go to the store and save about 50 rubles) The kit includes one long strip of seal that we will torment with a utility knife. By the way, if you cut it beforehand, it will be much easier than on the machine itself during installation.
As I read, many people didn’t bother and fastened them simply by squeezing the seal. I decided to unscrew the radiator frame and clamp the seal with it for reliability. When I was attaching the seal to the hood trim, I realized that it would be easier to break out the pistons and attach new ones in their place (to push the seal as far as possible). By the way, I didn’t find any grand caps in the stores; I installed the decimal caps; they fit perfectly, tightly. In general, accept the job
Price: 300 ₽ Mileage: 18,000 km
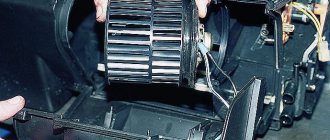
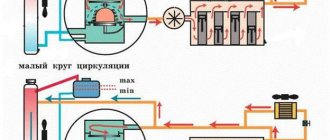
Cooling
To cool the interior air, do the following:
- Switch switch 1 (see Fig. 2) of the electric fan operating modes to one of the positions “1”, “2”, “3” or “4”.
- Place the regulator handle 4 opposite the pictogram.
- In the 3 pushbutton switch block, press the air conditioner switch key. The indicator located on the switch button will light green all the time the air conditioner is operating.
When the air passing through the evaporator cools, the water vapor contained in it condenses. The condensate is drained through a drain pipe under the bottom of the car. If the ambient air humidity is high, a puddle of water may form under the car, which is an indirect sign that the air conditioning system is working properly.
Turning on the air conditioner while the engine is running under difficult conditions (long climbs, heavy city traffic, etc.) can lead to engine overheating. Monitor the coolant temperature gauge: if the temperature exceeds the permissible value, turn off the air conditioner. During long trips in city traffic, the efficiency of the air conditioner may decrease due to the intense thermal conditions of the engine. This is not a sign of malfunction; the air conditioner will operate effectively when driving under normal road conditions.
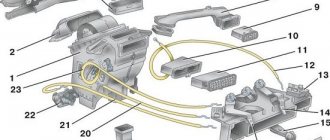
- climate block grants
- air duct grants
- air conditioning grants
- stove grants
Lada Granta has become a really popular car. And, in many ways, this happened thanks to the affordable price and good components. For example, the stove installed on the Lada Granta is quite good, as it warms up the interior to the required level very quickly. AvtoVAZ engineers did a very good job on this issue, since for our harsh winters the issue of high-quality heating of the interior is very relevant.
Instrument symbols and indicators on the Lada Granta display
1. Emergency low oil pressure warning light, turns on red when the ignition is turned on and goes out after the engine is started, the lamp is lit when the engine is running and a constant (for 5.s) buzzer signal indicates insufficient oil pressure in the system
2. The ABS anti-lock brake system status indicator (optional) turns on in orange when the ignition is turned on and after 2 seconds. after starting the engine it goes out; in other cases, the lamp is lit indicating a system malfunction, which should be repaired at a specialized service station
3. The brake system emergency indicator turns on in red when the ignition is turned on and goes out after the engine is started, the lamp is lit and the buzzer signal (5 turns on) when the engine is running indicates that the brake fluid level has dropped below the “MIN” mark in the master cylinder reservoir, operate the vehicle. with the indicator on it is prohibited
4. The Check Engine malfunction indicator turns on in orange when the ignition is turned on and goes out after the engine starts; the lamp is lit after starting the engine or while driving indicates a failure of any element of the engine management system (does not mean that the engine must be stopped immediately, however, the cause must be eliminated as soon as possible), the error can be determined using the diagnostic connector
5. The coolant overheat indicator turns on in red when the ignition is turned on and after 5 seconds. after starting the engine it goes out, the sound signal indicates engine overheating (t>115C), the signal will be repeated until the temperature drops below 110C, when the indicator turns on, it is prohibited to operate the car, otherwise it will lead to serious engine damage
6. The battery charging indicator turns on in red when the ignition is turned on and goes out after the engine is started; the lamp is lit or glows half-lit while the engine is running, indicating a lack of charging current due to a malfunction of the generator or voltage regulator, as well as low voltage (or a break). ) alternator drive belt, operating the vehicle with the indicator on is prohibited
Winter insulation
As statistics show, fuel consumption in the cold months of the year increases by 20-25%. This is caused by prolonged warm-up of the engine. Medium-power units require almost 500 mg of gasoline to heat to operating temperatures. If we take into account current fuel tariffs, we can determine how much money car owners are literally wasting. And the monthly amount of such heating is simply huge. Therefore, every car enthusiast tries to find ways to reduce such losses.
Such a task is achievable by using several methods. The first of these is a complete refusal to warm up the engine. By the way, most foreign automakers make similar recommendations. If you travel without traffic jams over short distances, it is quite possible to achieve such savings. However, then a lot of financial resources may be required to overhaul the pistons - because sudden loads on each of the cold parts cause their destruction.
If the manufacturer considers it important only to fulfill warranty obligations, further maintenance is already the driver’s problem.
Experts strongly recommend warming up the engine at least partially by idling, and then while driving. The most popular way among Russian car enthusiasts to reduce warming up using a cold start is to cover the radiator grille with various dense materials, including cardboard.
It is impossible to prove the effectiveness of this method, but experts believe it can lead to boiling of the engine.
The feasibility of such warming up of the unit is being actively discussed online today. Of course, any car owner can try it, but only if they have an extra engine. During the process of heating and subsequent cooling, the influence of the cardboard is reduced to zero - it is capable of trapping warm air masses flowing not in the side direction, but upward.
Another popular way to reduce the consumption of precious fuel is to insulate the engine immediately after the onset of winter. It is covered with felt, a used blanket or an old jacket.
It is possible to reduce the warm-up time of the main unit of a vehicle with the help of high-quality insulation. This will allow car owners to significantly reduce fuel consumption, as well as ensure the safety of all parts. Such insulation is carried out not by closing the radiator, but by insulating the engine compartment.
According to special tests, the most optimal solution would be to use special materials as engine insulation in winter that can withstand up to 1200 degrees and are made from fire-resistant fiber using high-tech solutions.
Car body
Usually the body is mounted on a frame, but there are also cars with a frameless design, and then the body simultaneously performs the functions of a frame. The car body structure is:
- single-volume, when the engine, passenger and cargo compartments are located in one volume (an example would be minivans or vans);
- two-volume, in which the engine compartment is provided, and places for passengers and cargo are combined in one volume (station wagons, hatchbacks, crossovers and SUVs);
- three-volume, where there are separate compartments for each part of the car body - cargo, passenger and engine (pick-ups, sedans and coupes).
Depending on the nature of the load, the body can have three types:
Most modern passenger cars have a supporting structure that absorbs all the loads acting on the car. The general structure of a passenger car body includes the following basic elements:
spars, which are load-bearing beams in the form of a rectangular profile pipe, they are front, rear and roof spars;
Body load-bearing system. This system allows you to reduce the weight of the vehicle, lower the center of gravity, and therefore increase driving stability.
- pillars - structural elements that support the roof (front, rear and middle);
- beams and cross members, which are located at the roof, side members, under the engine mounts, and each row of seats, there is also a front cross member and a radiator cross member;
- thresholds and floors;
- wheel arches.
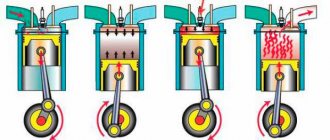
Car engine, its types
The heart of the car, its main component, is the engine. It is this part of the car that creates torque, which is transmitted to the wheels, causing the car to move in space. Today there are the following main types of car engines:
- ICE or internal combustion engine, which uses the energy of the fuel burned in its cylinders to produce mechanical energy;
- an electric motor powered by electrical energy from batteries or hydrogen cells (cars powered by hydrogen cells today are already available from most leading automakers as prototypes and are even in small-scale production);
- hybrid engines that combine an electric motor and an internal combustion engine in one unit, the connecting link between which is a generator.
It is a set of mechanisms that convert the thermal energy of the fuel burning in its cylinders into mechanical energy.
According to the type of fuel burned, all internal combustion engines are divided into the following types:
- gasoline;
- diesel;
- gas;
- hydrogen, in which the fuel is liquid hydrogen (installed only on experimental models).
According to the design of internal combustion engines there are:
To keep it clean under the hood! — logbook of Lada Granta 2190 PORT 2012 on DRIVE2
I bought a seal kit for the 2108 a long time ago in order to put it under the hood to keep the engine clean.
The engine was also washed before the start of winter.
and today it was time to install the seal itself. The topic, in principle, is not new, but I will share how I did it. I installed it on the hood itself, on the trim, as well as to the edge of the radiator grille and to the headlights. It is attached to the hood trim quite easily, the clips are removed one by one and the seal is gradually tried on and attached.
It is better to remove the clips, after installing the seal, return them to their place
It opens easily, locks tightly, and cuts easily. At first I wanted to install it from edge to edge, but I saw that there was quite a lot left and let it all go along the perimeter of the sheathing.
It also fits very well to the grille. But when I installed it, I loosened the bolts so that the seal would fit straight into place.
And the final touch.
Everything is ready, I’ll see if there is any effect.
How to replace fuses or relays
Before you remove a device that has become unusable, you need to turn off the power to the car. To do this, disconnect the wire connected to the minus terminal from the battery.
When making a replacement, it is important to remember the following:
- on the reverse side of the protective cover there is a diagram of the location of the fuses;
- if the device you need is located on the edge, then it is easy to remove it by hand;
- in other cases, use either pliers or special forceps;
- A blown fuse is visible to the naked eye.
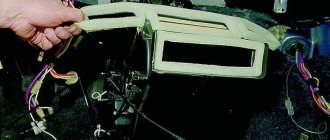
The instrument panel trim is held in place by six clips. To remove it, you need to pull the bottom edge towards you.
- guided by the diagram on its back side, we find the required fuse or a relay that has become unusable;
- remove it with tweezers;
- insert a new one.
In some cases, when the fuse link remains intact, it is necessary to inspect the socket itself. It is impossible to identify such a problem externally, so they use a tester switched to Ohms.
Steering
To move normally in a car, the driver needs to make turns, U-turns or detours, that is, deviate from straight-line movement, or simply control his car so that it does not drift to the side. For this purpose, its design provides steering control. This is one of the simplest mechanisms in a car. Let's look at the names of some of the elements below. The steering system consists of:
steering wheel with steering column, this is the name of the ordinary shaft on which the steering wheel is rigidly mounted;
These devices consist of a steering system that is connected to the front wheels by steering and brakes.
- steering mechanism, consisting of a rack and pinion mounted on the steering column shaft, it converts the rotational movement of the steering wheel into translational movement of the rack in the horizontal plane;
- steering gear, which transmits the influence from the steering rack to the wheels to turn them, and includes side rods, a pendulum lever and wheel turning arms.
Modern cars use an additional element - power steering, which allows the driver to use less force to turn the steering wheel. It comes in the following types:
- mechanical;
- pneumatic booster;
- hydraulic;
- electric;
- combined electric hydraulic booster.
Transmission
The main purpose of the transmission is to transfer torque from the engine crankshaft to the wheels. The elements of which it consists have the following names:
- A clutch, which is two friction discs pressed against each other, which connect the engine crankshaft to the gearbox shaft. This connection of the shafts of the two mechanisms is made detachable so that, by pressing the disks, it is possible to break the connection between the engine and the gearbox, to change gears and change the speed of rotation of the wheels.
This is a power transmission that connects the engine with the driving wheels of the car.
- Gearbox (or gearbox). This unit is used to change the speed and direction of movement of the car.
- A cardan transmission, which is a shaft with articulated joints at the ends, serves to transmit torque to the rear drive wheels. It is used only in rear-wheel drive and all-wheel drive vehicles.
- The main gear located on the drive axle of the vehicle. It transmits torque from the driveshaft to the axle shafts, changing the direction of rotation by 90°.
- A differential is a mechanism that serves to provide different rotation speeds of the right and left drive wheels when the car turns.
- Drive shafts or axle shafts are elements that transmit rotation to the wheels.
All-wheel drive vehicles have a transfer case that distributes rotation to both axles.
Brake system
The brake system is of the following types according to the type of drive:
- mechanical;
- hydraulic;
- pneumatic;
- combined.
Modern passenger cars are equipped with a hydraulic brake system, which consists of the following elements:
- brake pedals;
- main hydraulic cylinder of the brake system;
- master cylinder filling tank for filling brake fluid;
- vacuum booster, not available in all models;
- front and rear brake piping systems;
- wheel brake cylinders;
- brake pads pressed by wheel cylinders to the wheel rim when braking a vehicle.
Electrical equipment
One of the most complex systems of passenger cars with many different elements and wires connecting them, entangling the entire car body, is electrical equipment, which serves to provide electricity to all electrical devices and electronic systems. Electrical equipment includes the following devices and systems:
- battery;
- generator;
- ignition system;
- light optics and interior lighting system;
- drives for electric motors of fans, windshield wipers, window lifts and other devices;
- heated windows and interior;
- all electronics of the automatic transmission, on-board computer and protective systems (ABS, SRS), engine management and others;
- power steering;
- anti-theft alarm;
- sound signal.
Lada Granta
Grant's liftback is a 3-volume body, implying a successful combination of the luggage compartment lid and the rear window. It is noteworthy that during the Soviet era, liftbacks as such did not exist. There was such a model – IZH-2125 Combi, but it only embodied some of Liftback’s ideas. In fact, such a word was not legalized in the CAS, although such concepts as fastback, phaeton and even breg were found there.
Thus, the Lada Granta Liftback restores historical justice, because in addition to the new name, the car was produced precisely at IAZ, now referred to as OAS.
Liftback is not just a word. So, this type of body looks enviably good in terms of LCD performance. This figure has become twice as high as that of hatchbacks, although less than that of sedans due to design features.
In particular, the difference in design features between a liftback and a sedan lies primarily in the “rear cross member”. The liftback does not have this part at all; it is not provided for, but in sedans it goes behind the back of the rear sofa.
Trying to somehow compensate for the loss in the LCD/c, the engineers went to the following. They added amplifiers in some places, thus significantly increasing the figure, and only falling short of the sedan's result.
In addition, due to the introduction of amplifiers, the liftback became 15 kg heavier, and this, in turn, had a negative impact on the torsion indicator.
Making it easier to open the hood
Gas strut installed on the machine
No one doubts that the gas hood stop is much more convenient. The car owner will certainly appreciate its advantages when manipulating the engine compartment in rainy weather. The shortcoming in the form of standard stops can always be corrected.
It is best to purchase a ready-made kit consisting of a strut spacer and a gas stop. The installation procedure is quite simple and takes about 20 minutes, but if technical skills are not enough, it is better to entrust the work to professionals. After installing the gas stop, the Lada hood will open on its own and close with an applied force of over 5 kilograms.
Timely replacement of the stop with a gas one will eliminate the need to search on forums for the answer to the question: what to do if the hood does not open? If such a problem does occur and the hood does not open, then you need to take a closer look at the car. There is a cable located on the front right, behind the radiator grille, it needs to be hooked. It is better to use a hook made of wire for this.
If this procedure does not help, you will need the help of a second person. One opens the hood in normal mode, the other presses lightly in the area of the lock. It is better, of course, to prevent a problem from occurring. Therefore, if the Kalina hood does not fit tightly and makes a rattling sound when driving, you need to immediately adjust its lock. This is not difficult to do; all you need is a pair of pliers with a large grip and a flathead screwdriver. First of all, you need to loosen the locknut. In this case, you need to keep the rod from turning with a screwdriver.
Sometimes it seems that the Lada hood creates too many problems, but the following arguments can be made in its defense.
- The Lada hood itself is attached very competently, the mounting loops are installed conveniently.
- The painting is done with high quality. When traveling on Russian roads, where a fairly large stone can easily fly in and scratch or chip the paint, this is very important.
- The Lada's hood is designed in such a way that it practically does not overheat.
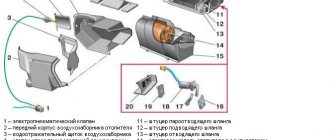
Components of an air conditioner
The thermostatic valve is located in the evaporator housing and is designed to reduce pressure. This phenomenon causes the refrigerant to boil in the evaporator. It should be noted that the device does not require configuration.
As for the receiver-dryer, this unit is used for liquefied refrigerant purification. Filtration is carried out using silica gel. Long-term depressurization of the air conditioning system requires replacement of the device. This is due to the fact that the dehumidifier in the Frost model, after refueling the system, is not able to fully perform its functions. The result can be the formation of acids and their destruction inside the air conditioning system.
The components of the structure under consideration are connected to each other by a pipeline. This product is made of aluminum alloy and has a single sealed circuit. During the operation of the vehicle, it is recommended to avoid possible dents or scratches on this pipeline.
The moving elements of the air conditioner are connected to each other by special flexible inserts made of synthetic raw materials. These inserts can withstand pressures up to 30 bar. Each rubber pipeline connection is equipped with rings that are designed to improve sealing. It should be noted that these rings are disposable, so they require replacement when dismantling or disconnecting pipelines and inserts.
Safety rules when working with electrical equipment
Rules to consider for safe work with electrical equipment:
- Before you independently figure out how to improve your car's electrical system and begin any work related to electrical equipment and devices, you need to disconnect the battery. Disconnecting the battery power cable is only allowed when the ignition is turned off and the engine is turned off.
- When diagnosing the integrity of electrical circuits, a short to ground of any current-carrying conductors is not allowed. To ensure safety, you don’t even need to check the cables for a “spark.” This can cause a short circuit and further failure of electrical equipment.
- It is not recommended to use safety devices that are not specified by the manufacturer for use in this machine model. There is also no need to install parts that are designed for higher loads. It is not allowed to use a wire instead of a fuse if the latter fails. Such manipulations may lead to fire.
- When carrying out welding work on a vehicle, the user must first turn off the power supply and disconnect the battery, generator unit, and control module. To protect the battery terminals from oxidation, they must be regularly cleaned from traces of plaque. The same applies to the tips of any other wires.
Let's get down to business
So, the hood buffer in our case will consist of a regular seal, glued in the required places. If you already have the sealant in hand, you can begin work, here is a brief sequence of actions:
- First of all, open the hood, then carefully tighten all the bolts and connections that are on it.
- Now you can glue the seal. First we apply it to the hood trim. Don't forget to first disconnect the plastic clips (there should be 4 of them).
- Afterwards, attach the seal to the headlights, top and radiator grille. (the seal on the grille and hood should overlap each other).
That's all, but for greater reliability, the seal can also be glued in the area of the compartment in which the wiper motor is located. The principle of operation is similar, and the process itself will take no more than 5 minutes.
Video where I wash the engine
Engine washing tips
Washing the engine can be financially expensive due to the failure of sensors (for example, a speed sensor) or a generator, or other “participants” of the electrical circuit. Therefore, it is necessary to fulfill some simple conditions.
- We remove the battery.
Or we remove the ground and plus wire so that it doesn’t short out and bang-bang happens. Yes, batteries explode very well. Removing the battery completely - Without fanaticism. We quickly walk through the dirty places from the car wash. We walk even faster in the generator area.
- We cover the MAF sensor (mass fuel flow sensor) with a bag or otherwise protect it.
This sensor is very capricious and fragile. We protect the mass air flow sensor - We don’t pour on the generator at all.
- It is advisable to spray it with some kind of chemical, I don’t spray it. If it shines, it won’t last long, since the engine compartment of the Lada Grant “gets clogged” with dirt quickly, or more precisely, very quickly.
- We blow all sensor chips with compressed air.
We blow out all the chips where water could get in - The longer it takes to dry after washing, the better.
About the conventions
Let us remember that the practical Lada Granta model went into production back in 2011. This modern car is full of new modifications of complex instruments and electronic devices. All this aims to provide the driver with maximum driving comfort. Today VAZ produces the Lada Granta in three versions in terms of equipment:
- "Norm";
- "Standard";
- "Luxury".
The first two options have the same wiring diagram, but in the “Lux” it is different. It's a shame that the factory operating instructions for the car do not contain this wiring diagram. However, do not rush to get upset, because such an album with the entire list of schemes can be purchased in the market network of auto goods.
Electrical cabling involves the presence of a large number of bundles. The wiring diagram has symbols and serial numbers, each of which is assigned to a strictly specific pantograph. These consumers in the diagram are switched into the general network via conventional lines. To increase clarity, the developers used different colors for the lines. Next, the wires are assembled into bundles, which are connected to electrical units using special connectors.
The first number in the wire marking indicates the plug, connector or terminal to which this cable is connected. The number present behind the fraction sign indicates its correspondence to the contact number of the pantograph.
The reader can familiarize himself with the operating principle of a particular electronic unit on his own. If the defects are minor, then they do not create difficulties during the repair or replacement process. But the situation changes when a complex component fails, which implies the need to turn to electricians. To understand the situation with a malfunction of a specific pantograph, the owner of a LADA Granta does not need to remember all the details and details of the layout drawing, but it will be enough to know the location of the device and the features of the wiring leading to it.
Information about techniques that allow you to quickly replace a fuse or relay that has become unusable will also be useful. The Lada Granta mounting block provides backup fuses and relays of the same nature. Safety elements are necessary to protect circuits from current overloads, which lead not only to failure of the device, but also protect the circuit from short circuits, which pose a risk of subsequent fire. In such a situation, the fuse-link heats up, after which its element burns out, thereby cutting off the power supply to the pantograph. Fuses may only be replaced with analogues set to the same maximum current. Neglecting this important rule can also cause breakdowns and fires.
We install the gas stop
We snap off the plastic clips, and then place the seal over the edge of the sound insulation. As a result, the seals will prevent dirt and dust from entering the engine compartment during rainy or dusty weather. Subsequently, another, working method was invented.
But this is also much better than without a seal at all or with a figure-of-eight seal
Everyone knows that the Volzhsky Automobile Plant pays little attention to the quality of assembly and materials, and sound insulation was no exception.
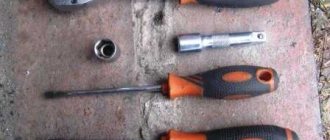
Screwdriver and screws. Brackets for installing a gas stop (you can make it yourself or buy suitable ones at any hardware store). There is nothing complicated here either - the emphasis is installed within half an hour. Next, focus on them, and the job is done. The procedure is also quite simple and can be done with your own hands. Stick to the entire inside surface of the hood.
I think that no one will argue with the fact that engine protection for Russian roads is a mandatory procedure. I looked around the entire engine compartment, I looked and saw such a nuisance. Engine tuning is an improvement in the performance properties of a car's power unit. With a high degree of boost, significant changes are made to the power unit. The intake/exhaust elements are replaced, the camshafts and camshafts are changed, the displacement is increased and a special engine control program (chip tuning) is written.
Lada (“Lada”) is a brand of cars produced by AvtoVAZ OJSC. Previously, it was used only for export cars, and for the domestic market, cars were produced under the Zhiguli brand. Not everything on the D2 website is equally useful. Good luck to this good man! In short, colleagues, I urge you to check all solutions and innovations before publication! The secret of success is very simple: affordable price and quality acceptable for our country.
The problem appears about a few years after the car is actively used on our roads. Don't forget to first disconnect the plastic clips (there should be 4 of them). Tuning the power unit is divided according to the degree of boost. Typically, amateur tuning begins with reprogramming the engine controller.
The same seal for car doors (preferably from Lada Granta). We will purchase a door seal from a VAZ-2108 from the store in advance; we will use it as a grant hood seal. The seal - the hood buffer (that's what it's called) fell into pieces. On foreign cars, a hood seal is provided for this purpose, which protects the engine compartment from dirt. You can easily make such protection with your own hands for the Lada Granta.
The hood seal on the grant helps retain engine heat in the engine compartment for longer.
We will purchase a door seal from a VAZ-2108 from the store in advance; we will use it as a grant hood seal.
| We attach the seal to the standard hood insulation |
| It is not difficult to attach: we move the standard thermal insulation a little and put the purchased seal on it |
| We also install a seal at the point of contact between the hood and the radiator grille |
| We attach it to the partition, it holds quite firmly |
| Also, the seal on the frill prevents water from entering the area of the windshield wiper motor and cabin filter. |
Don't forget to install a seal at the point of contact between the hood and headlights.
Now on the highway the oncoming flow of air will not blow into the engine compartment and will not cool the engine (especially important in winter!). Also, coupled with the heat and sound insulation of the hood, it allows you to retain engine heat longer and also contributes to its rapid warming up.
The Lada Granta has a number of disadvantages, just like any other car. One of them is the gap between the hood and the body (radiator grille and headlights), through which dirt gets into the engine compartment. This problem can be solved with a simple modification, which consists of installing an additional rubber seal.
On the Lada Granta, an additional hood seal can be installed in several ways in different places. To achieve maximum results, we recommend using all options in combination. You will need to buy VAZ 2108 or VAZ 2109 door seals, and then install it on the radiator grille.
The second attachment point for the additional seal from the “nine” is the hood sound insulation. We snap off the plastic clips, and then place the seal over the edge of the sound insulation.
Another D-shaped seal, which can be purchased at a hardware store, will help supplement the protection of the engine compartment from dirt. We glue it along the edge, the perimeter of the hood.
The process of installing the seal on the Granta hood is also shown in the video:
As a result, the seals will prevent dirt and dust from entering the engine compartment during rainy or dusty weather. Let us remind you that other modification instructions can be found in the Lada Granta Tuning category.
Join our club, share your first impressions of the car, start your blog on our website. In the near future we will hold a competition for the best review of the Lada Granta.
Do you have dirt under the hood? The fact is that the manufacturer, as usual, saved money and did not install a hood seal on the Lada Granta. To get rid of this, we’ll install it ourselves.
To protect the engine compartment from flying dust and dirt, we need a regular door seal from a number eight or ten.
Let's sum it up
Having an electrical diagram of a Lada Granta car at hand will not be superfluous for any owner. Such information potential can provide invaluable assistance in the event of a malfunction, which is especially important for cases on the road.
First look at the car
It is worth paying tribute to the VAZ design engineers and their efforts for creating a car that is practical, spacious and at the same time compact. The new Lada liftback has become shorter than the sedan, by some 14 mm. On the one hand, the luggage compartment capacity has decreased by 40 liters, but it has become noticeably more convenient to load and unload large luggage. The trunk is now not so far out, but due to the sloping rear window there is room for storing purchases and things at a greater height. When loading long items, the rear bench folds down to create additional space.
Changes in the appearance of the trunk and rear of the car are clearly visible in the photo. It is impossible not to note the overall completeness and integrity of the design concept in observing the oblique and streamlined body shapes from the hood to the trunk. In comparison with the photo of Priora, the profile of Granta Liftback looks sharper and more aggressive.
To give the body its current appearance, the designers needed to completely redesign the entire rear part of the Lada Granta sedan. The curve of the rear door rim was changed, stamped panels different from the old ones were used, and the internal plastic lining was completely replaced. The rear doors of the liftback differ in size from those on the sedan, with the window sill raised by 12 mm and the upper edge lowered by 8 mm.
The ceiling of the liftback above the rear passenger row has become a little lower, but people up to 2 m tall will not experience any discomfort. Plant experts note that VAZ has increased body rigidity by 2 times compared to the Lada Samara and has become approximately 10% stronger than the Lada Kalina of the first series.
First of all, people who have previously used and are accustomed to Samara are considered as potential buyers of this VAZ model. The features characteristic of Samara are preserved here: high ground clearance and a spacious interior.
Spacious interior is one of the main advantages of the model
Fuse layout diagram in the mounting block
Mounting block diagram
Fuse box (painted numbers all day)
| Fuse no. | Current strength, A | Protected electrical circuits |
| F1 | 15 | Controller, engine cooling fan relay, short circuit 2x2, injectors |
| F2 | 30 | Window lifters |
| F3 | 15 | Emergency Signal |
| F4 | 20 | Windshield wiper, airbag |
| F5 | 7.5 | 15 terminal |
| F6 | 7.5 | Reversing light |
| F7 | 7.5 | Canister valve, mass air flow sensor, DC1/2, speed sensor |
| F8 | 30 | Heated rear window |
| F9 | 5 | Side light right |
| F10 | 5 | Side light left |
| F11 | 5 | Rear fog light |
| F12 | 7.5 | Low beam right |
| F13 | 7.5 | Low beam left |
| F14 | 10 | High beam right |
| F15 | 10 | High beam left |
| F16 | — | — |
| F17 | — | — |
| F18 | — | — |
| F19 | — | — |
| F20 | 15 | Horn, trunk lock, gearbox, cigarette lighter, diagnostic connector |
| F21 | 15 | Gasoline pump |
| F22 | 15 | central locking |
| F23 | 10 | DRL |
| F24 | — | — |
| F25 | 10 | Interior lighting, brake light |
| F26 | — | — |
| F27 | — | — |
| F28 | — | — |
| F29 | — | — |
| F30 | — | — |
| F31 | — | — |
| F32 | 30 | Heater, EUR |