Starter replacement
Many owners, at the first malfunction of the starter, change the entire unit, without understanding the causes of the breakdown itself. But in most cases, the reasons for failure are as follows:
- Failure of the solenoid relay - purchased and replaced separately
- Brush wear
- Burning dimes on the retractor relay
Each of the problems listed above can be solved much cheaper than buying a new starter for a Priora. Therefore, first you should contact a specialist who will tell you exactly what the reason is and answer whether it can be repaired or not!
If repair is no longer possible, which is extremely rare, then a replacement must be made. To do this you will need the following tool:
- 13 mm head
- extension
- ratchet or wrench
Required Tools
In order to remove or install the starter on a Priora, you will need the tools from the table below.
Table - Tools required to replace the front strut
| Name | Note |
| Spanner | "at 13", "at 15" |
| open-end wrench | "at 13", "at 15" |
| Pliers | Can be replaced with pliers |
| Screwdriver | With a thin flat blade |
| Silicone Grease | If you plan to remove the air filter |
| Head | "at 13" |
| Vorotok | With extension and ratchet |
| Penetrating lubricant | For example, WD-40 |
| Rags and wire brush | To clean dirt |
Replacing the starter on a Lada Priora can be carried out without access from the bottom. If you don’t want to remove the air filter and the wires going to the sensors, then you can dismantle and install the unit from underneath. In this case, you will need an inspection hole, overpass or lift to access the place where the starter is located.
Starter replacement
Many owners, at the first malfunction of the starter, change the entire unit, without understanding the causes of the breakdown itself. But in most cases, the reasons for failure are as follows:
- Failure of the solenoid relay - purchased and replaced separately
- Brush wear
- Burning dimes on the retractor relay
Each of the problems listed above can be solved much cheaper than buying a new starter for a Priora. Therefore, first you should contact a specialist who will tell you exactly what the reason is and answer whether it can be repaired or not!
If repair is no longer possible, which is extremely rare, then a replacement must be made. To do this you will need the following tool:
- 13 mm head
- extension
- ratchet or wrench
The procedure for replacing the starter on a Priora with your own hands
This repair is very simple, so it won’t take more than 25-20 minutes. The ideal option is to work either in the inspection hole, or to remove the air filter housing from the cushions, after which very good access to the starter opens.
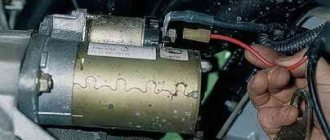
First of all, we disconnect the “-” terminal from the car’s battery, after which we disconnect all the wires from the starter, one of which is screwed on with a nut.
Then you need to unscrew the three starter mounting nuts, one on top:
And it’s more convenient to unscrew two from the bottom, as clearly shown in the photo below.
When they are unscrewed, you can easily remove it, since there are no more fasteners left.
Installation of a new one during a complete replacement occurs in the reverse order, and no difficulties will arise when performing this repair.
It is important to keep in mind that the starters on the Priora were installed with both three fasteners and two (old and new). Therefore, before buying a new one, make sure which one was on your car.
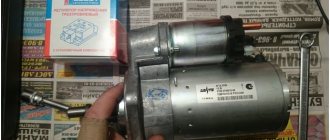
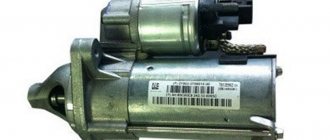
The price of a new 2170 can range from 3,500 to 4,000 rubles, although you can find Chinese options a little cheaper, but of relatively dubious quality. The most reliable and problem-free are KZATE factory production, which can easily cover over 200,000 km of a vehicle without repairs.
Article and price
Below is a table with the article number and cost of the original starter and its analogues.
| Factory models | |||
| Manufacturer | Power, kWt) | vendor code | Price (Rubles) |
| AvtoVAZ | 1,4 | 21100370801002 | Up to 4000 |
| AvtoVAZ | 1,8 | 5702370815 | Up to 4100 |
| Good analogues of factory models | |||
| Lauber | 1,4 | 221182 | Up to 6200 |
| Bosch | 1,4 | 986023780 | Up to 7300 |
| Bosch | 1,8 | 1108203 | Up to 11000 |
| Motorherz | 1,8 | STB1182WA | Up to 4800 |
Priora starter relay where is the photo located
If the starter does not work when the ignition key is turned to position “II,” there may be a malfunction of both the starter itself and its activation circuit. To check, turn off the ignition and disconnect the wire block from the terminal of the starter traction relay windings.
Using a screwdriver, we bridge the terminal of the traction relay and the tip of the wire connected to the “positive” terminal of the battery. If the crankshaft rotates, then the starter is working, and the cause of the malfunction is a violation in its activation circuit. Otherwise, the starter or its traction relay is faulty. If it is not possible to eliminate the malfunction in the activation circuit of a working starter, then, if necessary, in this way (by turning on the ignition and closing the terminals), you can start the engine and drive to the repair site. A malfunction in the starter switching circuit can be caused by damage to: the starter relay, the power circuit or relay control circuit, the ignition switch contact group. To troubleshoot the starter circuit...
...in the car interior we remove the starter relay and fuses from the mounting block. To check the starter relay, install a known-good relay type 902.3747-11 in its place. To do this, you can use the adjacent heated rear window relay. If the starter turns on with the newly installed relay, then the starter relay has failed and must be replaced. If not, check the power circuit and starter relay control circuit. To check the power circuit, remove the starter relay from the mounting block.
We insert a jumper (piece of wire) into the sockets of the power contacts of the relay “30” and “87”. We turn the key in the ignition switch to position “II” - “starter”. If the starter turns on, the power circuit is working, if not, then we check it with a tester...
...is “+12 V” supplied to socket “30” of the starter relay when the ignition key is in position “II”. In this case, the second (“negative”) tester probe can be connected to the head of the instrument panel mounting screw. If voltage is supplied to socket “30”, use a tester to check the integrity of the circuit from socket “87” of the starter relay to the tip of the starter traction relay control wire. If voltage is not supplied to socket “30,” we check the circuit from terminal “50” of the ignition switch to socket “30” of the relay. If the circuit is in good condition, it is necessary to replace the ignition switch contact group. If the starter power circuit is working properly, check the starter relay control circuit. To do this, insert the tester probe into socket “86” of the starter relay, connect the second probe to ground. With the ignition on, check...
...is “+12 V” supplied from the main relay of the engine management system to socket “86” of the starter relay. Then we insert the tester probes into the relay sockets “85” and “86” and check...
...is there ground in socket "85" of the relay... ...connected to terminal "50" of the controller. Otherwise, we check the integrity of the starter relay control circuits: from the main relay of the control system and output “50” of the controller - respectively to sockets “86” and “85” of the starter relay.
The starter does not turn on a Priora
A car has long ceased to be a luxury. It’s hard to imagine life without a car these days. Many people drive a car every day and for any need - to work, study, dacha, shopping, on vacation. And that's why it becomes very bad when the car won't start. Plans are ruined, meetings are cancelled, people lose money!
We will look at situations where the starter works, but the car still does not start, another time. And now - about what to do if the starter on a Priora does not turn.
First, let's understand how a starter works and what its structure is. An electric motor with a gear that meshes with the engine flywheel and turns it when started. All this is hidden in a housing on which the solenoid relay is mounted. It is designed to control the movement of the gear and supply power to the electric motor.
When you turn the ignition key, current is supplied to the relay. Using an electromagnet, it is retracted, using a special mechanism, it moves the gear and starts the engine by closing the contacts. When the key is released, power stops being supplied to the magnet of the solenoid relay, the relay operates in the other direction and the contacts open. So, we know what the principle of operation of the starter looks like in general terms, so now it will be easier for us to understand why the starter does not turn on the Priora.
If you hear clicking sounds when you turn the ignition key and the lights on the instrument panel go out, it may be the battery. It needs to be checked, recharged, topped up with electrolyte or replaced. Is the battery OK? Then the situation becomes more interesting. Check the wires that come from the battery. If they get hot, check their contact with the battery. Remove the terminals from the battery, clean, lubricate them (sometimes oxidation occurs) and reinstall.
Check the connection between the ground terminal and the body. If necessary, clean this connection. Check the connection between the plus terminal and the starter. Determine if power is supplied to the solenoid relay from the ignition switch. To do this, you need to disconnect the connector from the relay, and turn the ignition key “to start” and measure the voltage at the connector.
The Priora starter still won't turn? Then you will have to remove it from the car and check it.
The removal procedure looks like this: disconnect the battery terminals, unscrew and remove the air filter, unscrew and remove the positive wire from the starter. Then disconnect the connector from the relay, unscrew the starter mounting nuts and remove it. We are already much closer to solving the question of why the Priora’s starter does not turn. Now we take the wires for lighting (crocodiles) and connect them with the negative wire of the battery and the starter housing. We connect the positive one to the relay connector, after which the gear should be activated and ejected forward. If not, change the retractor.
You can hook the negative wire to the starter housing, and the positive wire to the lower terminal of the solenoid relay. The electric motor didn't work? The culprit is most likely the motor brushes.
In this article, we briefly examined the reasons why the starter does not turn on a Priora.
Description of the Priorov starter
Before we talk about how to repair a starter, let's get acquainted with the basic description of the mechanism. Let's start with the purpose and location.
Purpose and location
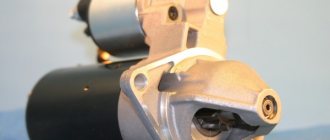
An electric starter is a unit used to convert electrical energy into mechanical energy, which is necessary to start the engine. In fact, this mechanism is an electric DC motor equipped with a mechanical drive. The principle of operation of the device is to close the retractor and retainer coils, as well as move the core, which helps push out the bendix. As a result, the Bendix engages with the flywheel of the power unit, and under the influence of the anchor, this flywheel begins to spin. Accordingly, this leads to the engine starting. In Lada Priora cars, the starter unit is located on the gearbox, under the housing of the engine air filter element.
Which starter is better to install on Priora?
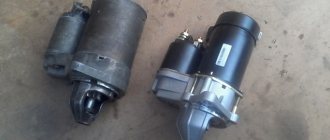
Today you can find many models of starters on sale from various manufacturers, but they are all divided into geared and gearless. Both one and the second type have both their advantages and disadvantages. The main advantage of the gearless version is reliability and the ability to repair in case of breakdown, which is due to its fairly simple design. As for the disadvantages, such mechanisms are characterized by high voltage consumption and heavy weight.
Geared devices began to be used relatively recently; the addition of a gearbox to the design made it possible to improve the technical characteristics of the unit as a whole. The main advantage is considered to be higher reliability of engine starting, in particular at low temperatures. This advantage is achieved as a result of increased torque. The electric motor itself is smaller in size, but the rotation speed of the device is higher, and accordingly, less current is required to start the motor. In the production of geared devices, fewer expensive materials are used; accordingly, their cost is an order of magnitude lower than that of gearless ones.
As for directly choosing a starter, in practice geared devices are more reliable and fail much less frequently than gearless ones. But in this case, you need to remember that under no circumstances should you allow the starter mechanism to operate while the power unit is running. This is because the rotation frequency of the armature will be several times higher; accordingly, its conductors can come out of the grooves and touch the stationary components of the device, thus destroying its structure (video author - CompsMaster).
Basic faults
The starter has several basic faults that occur quite often.
- Battery;
- Solenoid relay;
- Brushes;
- Bendix;
- Rotor and stator windings;
If the starter does not rotate or clicks appear when you turn the ignition key, then the battery is most likely discharged. If the battery is charged, you should check the condition of the marks on it. Poor contact or oxide on the stamps will interfere with starting the car, since the starter requires a large current to rotate the engine, and weakening the contact of the stamps or their oxidation will increase the resistance, which will make it impossible to start the internal combustion engine.
battery
If the starter does not rotate or clicks appear when you turn the ignition key, then the battery is most likely discharged. If the battery is charged, you should check the condition of the marks on it. Poor contact or oxide on the stamps will interfere with starting the car, since the starter requires a large current to rotate the engine, and weakening the contact of the stamps or their oxidation will increase the resistance, which will make it impossible to start the internal combustion engine.
Retractor
If, when you turn the key, the starter rotates but does not start the engine, then the culprit is most likely the solenoid relay. The main culprit for relay failure is a break in its winding.
Brushes
Brushes are the most common starter element that fails. If they wear out, starting the engine is impossible, since they do not provide contact with the rotor commutator. When the brushes are worn down to 4 mm, they must be replaced.
Bendix
The Bendix is a type of overrunning clutch that engages the gears with the flywheel. Its failure is a mechanical failure of the starter. It is impossible to repair it, just replace it with a new one.
Windings
The winding fails due to increased currents generated when the engine starts in cold weather or when the bendix jams. The wire wound on laminated steel simply cannot withstand such current surges and breaks. This can be solved by replacing the rotor or stator, and best of all the starter.
Classification of faults
The starter is an electromechanical device, so faults can be classified as electrical or mechanical.
Electrical breakdowns
Such malfunctions often occur due to insufficient power supply. The reasons for inoperability may be:
- Dead battery.
- Damaged wiring.
- Winding short circuit.
- Oxidation and burning of contacts.
Mechanical damage may be caused by electrical problems. The parts of the starting device are subject to heavy loads, especially in severe frost, since the device must generate high power and pass high voltage.
The most vulnerable components are:
- Bushing and armature corrector.
- Brushes.
- Heels.
- Fork.
- Gear.
- Solenoid relay.
- Damper spring.
Extraneous noise, unpleasant odor and untimely activation of the starter can be evidence of mechanical failure.
Common Mechanical Failures
- Untimely switching on. The motor rotates, but during start-up a metallic grinding noise is heard. In this case, most likely the damper spring is faulty, the gear or bushings are unusable. The exact cause is determined visually after disassembly.
- The starting device works, but there is no rotation of the crankshaft and there are extraneous sounds. The cause may be a broken bushing.
- The starter does not work when trying to start. You need to tap the back of the starter with a mallet. If operation resumes upon impact, the brushes may be worn.
- After starting the engine, friction and metal grinding can be heard. The engine must be turned off immediately. Most likely the relay is stuck. The exact cause is determined during disassembly.
- The retractor relay clicks are heard, but the mechanism does not work. The battery may not be sufficiently charged. The voltage supplied to the mechanism is weak; there is enough current to operate the relay, but the terminals are not closed by the contact plate. You need to remove the battery and connect the charging unit. If such symptoms occur when the battery is charged, then the heels may burn or the power cable may malfunction.
- When the battery is charged, the starter rotates slowly. The bushings may be worn out or the electric drive may be dirty.
- When you try to start the engine, a burning smell may come from the device. The winding in the traction relay may have burned out. The anchor can also burn out, but this happens less often. In this case, the wires connected to the starter overheat.
- The retractor on the starter does not work. There is a fault in the electrical circuit. It is necessary to check the integrity of the wires and the operation of all components included in the electrical circuit.
Replacement
Work on removing and installing the starter can be carried out without a higher education as a mechanic. Using the step-by-step instructions below, anyone who has ever held a key in their hands can cope with the task.
Necessary tool
- Phillips and flat head screwdriver
- Ratchet, extension and socket for “13mm” and “15mm”
- Open-end wrench for “10mm” and “13mm”
- Penetrating lubricant (WD-40)
- And the desire to repair your own car with your own hands.
Step-by-step replacement instructions
Work can be carried out both from the inspection hole and from above. We will consider the option of doing the work from above, as it is simpler and more convenient. And not everyone has an inspection hole.
- First of all, disconnect the negative terminal of the battery and remove the air filter housing along with the mass air flow sensor.
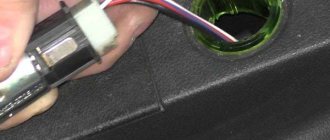
- Then, on the solenoid relay, use a 13mm open-end wrench to unscrew the power wire and remove the “mother” chip from the relay (marked with red arrows in the picture).
- Using a ratchet with a 13mm socket and an extension, unscrew the two starter mounting nuts. Below and above.
- Next, we remove the starter from the engine compartment and inspect it.
- We install it in the reverse order and check its functionality by test running the car.
Replacement from under the bottom of the car is similar to the instructions outlined above, but only to carry out work from an inspection hole or overpass it is necessary to remove the engine crankcase protection.
Replacing the Priora starter, main faults
The car starter starts the engine. The Priora will not start without his participation. Without it, starting a movement is simply impossible. Sometimes the Lada Priora does not start because the fuse has blown, or the starter relay has malfunctioned; it is marked K3. Sometimes it clicks but doesn't turn. The reasons are in the details.
The starter on a Priora consists of the following parts: bendex, retractor relay, armature and others - for a complete list of how many parts the starter of a Priora car contains, see the article below. It is advisable for car owners to know where this mechanism is located on a Lada Priora car - it is located immediately under the air filter.
The price of the part is a starter for a Priora engine (16 valves): from 2750 to 4500 rubles. When a breakdown occurs, the device on the Priora stops turning.
Standard starter and analogues - article number and price
Unfortunately, if the mechanism does not work, the problem can only be solved by replacing it. Neither installing new parts under the body, nor any cleaning will save the situation. The standard starter for a Priora with 16 valves goes under catalog number 2111.3708010-01, its cost is about 4,000 rubles. As analogues we can consider:
- "Baker." Article 5702370800010, costs 3,700 rubles;
- "Starvolt." Article lst0190, price - 3,200 rubles;
- Valeo. Article 438285, costs from 3,700 rubles;
- For automatic transmission, article number 219002370801000, costs from 3,900 rubles;
- "BATE". Article 51323708000, costs from 2,750 rubles;
- Gearbox – 51213708000bate, costs from 2950 rubles;
- "Kzate." Article 5702370800, costs from 3,300 rubles;
- Pramo (Eltra). Article TS12E901, price – 3,800 rubles;
- Fenox gearbox. Article 2110-3708010, price – 4,500 rubles.
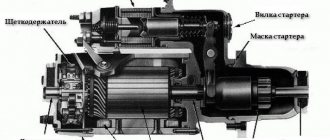
Lada Priora starter: device and principle of operation
As mentioned earlier, this part can be installed on the Priora of two types: geared and gearless. Sometimes it may be necessary to remove the starter, note that it is located under the engine, on the right - closer to the space under the air filter.
To ensure that the starter unit does not wear out so quickly, it has a special mechanism that disengages the gear from the crankshaft flywheel - the Priora starter retractor relay. If it were not there, the service life of the unit would be greatly reduced, or repairs would be required.
Geared
This mechanism is small in size. It turns out this way because the gearbox allows you to increase or decrease the torque. The planetary gearbox itself in the car in question is located between the armature and the bendix; it serves as a “buffer” and an intermediate part between them. Thus, it does not take up so much space in the case, under which there are:
- bendix;
- fork;
- anchor;
- stator;
- solenoid relay;
- mask;
- gearbox
Its main difference is that the bendix is fixed on its own shaft, and it interacts with the Priora engine through a gearbox.
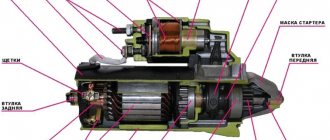
Gearless
A gearless starter is much larger than its counterpart, but it does the same job of receiving electrical energy from the battery and sending it to the crankshaft to start the engine. It consists of the following components:
- relay;
- an electric motor containing the traction relay cores and winding;
- brushes and holders, “brush assembly”;
- solenoid relay;
- stator;
- fork;
- contact bolts;
- anchor;
- starter mask;
- retaining ring;
- freewheel;
- front bushing and rear bushing;
- starter bendix Priora;
- gear.
The gearbox operates according to the following algorithm:
- Power is supplied from the battery through the wiring harness.
- The anchor is retracted.
- The Bendix is attached to the gear, “thrown out”, the pin contacts are closed, and voltage is applied to them.
- The armature rotates, the torque is transmitted to the bendix, through it to the gear, and it is already in contact with the engine flywheel.
- As soon as the ignition key is released, the retractor relay disconnects the bendix and the gear.
Basic faults
Externally, a breakdown of the Priora starter can be recognized by the following signs:
- “turns” and at the same time starts the engine;
- does not “twist”;
- continues to “twist” after the key is released;
- creaks, clicks are heard;
- It spins, but for too long.
- The reason may lie in a faulty battery, in the starter itself and fuses. The most common are those that are most likely to disable
- the car – it’s worth taking a closer look.
Doesn't turn on
If the engine does not start, the problem may be:
- discharged or broken battery;
- no closure of contacts 50 and 30;
- terminals or tips are oxidized;
- interturn closure;
- short circuit to ground;
- open circuit “starter - traction relay”;
- the ignition module is faulty;
- break in the traction relay winding;
- brush wear;
- the anchor jams;
- the additional relay or the control circuit connected to it is damaged.
Lada Priora - checking and repairing the starter
To preliminary check the Lada Priora starter and make a decision on its repair or replacement, you will need:
- Serviceable and charged battery;
- Power cables with crocodile lugs;
- Flat screwdriver;
- A set of keys;
- Wire brush.
- Check sequence:
- -First of all, it is necessary to ensure free access to the starter, for which you should remove the air filter housing together with the exhaust pipe, since on the Lada Priora, as well as on some modifications of the Lada Kalina and Grant (with a lever gearbox), the starter is installed on the gearbox with side of the radiator directly below the air filter. Do not forget about disconnecting the power wires from the battery, thereby eliminating the possibility of accidental damage to the central switch;
- -Next, we disconnect the thickest current-carrying wire from the starter, which is secured to the upper stud of the solenoid relay using a nut at “13”;
- -Set the gearshift lever to neutral;
- -We place the battery closer to the workplace (of course, you can use a standard battery if it is known to be in good working order) and put one of the “crocodiles” on its negative terminal, connect the other end of the wire to the starter housing (most conveniently to the bolt of the solenoid relay). For more reliable contact, we clean the connection points with a metal brush;
-Using the second wire, we connect the “+” of the battery and the contact on the back of the solenoid relay. At the moment the wire touches the “male”, the solenoid relay should operate, and the sound of a characteristic click can be heard.
If no sounds are heard, we repeat the test, only this time we attach the negative crocodile to the lower bolt of the solenoid relay (we again bring the positive crocodile to the male terminal).
If this check does not show a positive result, feel free to change the solenoid relay, and to perform this procedure you do not even have to dismantle the starter itself. If the relay works, then most likely the problem lies in the starter brush assembly.
-We continue checking, for which we again throw the crocodile “-” onto the body, and bring the crocodile with “plus” to the lower bolt of the solenoid relay. With this combination, the starter should begin to rotate, emitting a characteristic hum. If the starter turns too slowly, the brush assembly may be faulty or the armature is jammed. If the starter does not turn at all, the reason is in the winding;
-In conclusion, we carry out a general check, for which we throw the “+” terminal onto the upper pin of the solenoid relay, after which we use a screwdriver or wrench to bridge the “male” and “+” crocodile.
With this connection scheme, the starter should work, and extraneous noise in the form of crunching and clicking, which may indicate mechanical damage to the bendix or gearbox (for example, loose bushings or destruction of bearings), is unacceptable.
In such a situation, further disassembly of the starter is necessary in order to identify a specific defect.
To disassemble and repair the Lada Priora starter, you must have on hand:
- Flat and Phillips screwdrivers;
- Wrenches for 8,10,13, 15 and 17;
- Lubricant (lithol, grease, CV joint or analogues);
- Carburetor cleaning fluid, rags and wire brush.
After removing the starter from the car, you should first of all inspect it externally. There should be no visible cracks, scuffs or signs of significant wear on the gear (if these signs are present, the bendix must be replaced). There should also be no damage to the armature bushing or shaft.
To check the bendix, turn it with a screwdriver. It should rotate without jamming, and only in one direction.
Partial disassembly of the starter is performed as follows:
- Using a 13mm wrench, unscrew the contact wire nut on the lower stud of the solenoid relay;
- Using the “8” key, the bolts securing the retractor relay are unscrewed, and the relay itself is removed, after which it becomes possible to pull the armature off the bendix lever;
- Using a “10” wrench, unscrew the nuts of the tie rods and unscrew the screws holding the brush assembly with the cover. If the lid is “stuck”, you can rip it off by prying it off with a screwdriver;
- The stator with the armature and brush assembly is removed from the studs;
- The brush assembly is removed from the anchor and its external condition is checked. If there is less than 3.5 mm left from the edge of the brushes to the copper conductor, the brush assembly is replaced as an assembly. In turn, there should be no short circuit between the winding and the shaft on the armature; in addition, there should be no scuffing or signs of severe wear on the armature. You can try to remove minor damage to the commutator using sandpaper.
Starter problems and their elimination
If the starter clicks but does not turn, then first of all attention should be paid to the battery. Most likely, its charge is not enough to start the car. You should also inspect the condition of the terminals. More rarely, the culprit for clicking is the traction relay.
If the starter does not turn the crankshaft of the power plant, then conditionally possible causes can be divided into mechanical and electrical. The first most often includes problems with the clutch or drive gear. If there are any malfunctions, the listed elements must be replaced.
In the electrical part, the weak point is the brushes. They are the most susceptible to wear and tear. When the remaining length of the brushes begins to be 4 mm or less, they must be replaced.
How to change the solenoid relay?
One of the main parts of any starter is the solenoid relay, which is located next to it. This mechanism performs two functions at once:
- supplies voltage to the stator and rotor windings;
- moves the bendix, which engages the starter gear with the flywheel crown.
- Frame.
- Two threaded power contacts.
- There is a coil inside.
- The core is made of metal, which is affected by the electromagnetic field of the coil. It also has a kind of “hook” for connecting to the bendix.
- Contact Group.
To replace the solenoid relay you need keys 10 and 13, as well as a screwdriver. First you need to disconnect the battery.
To do this, use a 10mm wrench to loosen the terminal. Then you can proceed to disconnect the solenoid relay. To do this, use a 13 mm wrench to unscrew the two nuts on the power contacts. The relay is attached to the starter housing using 2-3 bolts (depending on the specific design). They need to be unscrewed using a screwdriver. This completes the dismantling; installation of the new relay is carried out in the reverse order.
Principle of operation
- When you turn the ignition key, voltage appears on the coil of the solenoid relay, which attracts the core.
- The core pulls the bendix out of the starter housing and engages it with the flywheel.
- As soon as the bendix engages the flywheel, a short circuit occurs, voltage is applied to the brush holder and causes the starter rotor to rotate.
- The rotor begins to rotate the bendix through the gearbox, thereby rotating the engine crankshaft and starting it.
- As soon as the engine starts, you release the ignition key, the voltage disappears on all elements of the starter and the retractor, under the influence of the return spring, disengages the bendix from the flywheel.
How to remove the starter for replacement or repair?
Now let's talk about the case when it is necessary to completely remove the starter on a Priora. There may be several reasons for this - from repairing the clutch to replacing the starter itself. But if the reason lies in the fact that the car cannot be started, it is worth checking whether the starter is really to blame. Quite often the reason lies in other nodes. And if the Priora does not start, the starter is not always to blame.
In order to dismantle the mechanism, you will need to perform simple manipulations:
- Turn off the power - use a 10mm wrench to loosen the terminal.
- Using a 13mm wrench, unscrew the nuts that secure the starter housing to the engine block.
- Using the same wrench, unscrew the nuts on the solenoid relay.
- Remove the wire from the relay.
- Remove the starter through the bottom or top (provided that the air purification filter housing is removed).
Typically, repairing a starter on a Priora consists of changing the brushes, cleaning the lamellas, installing a new bendix and retractor relay. If there is severe damage to the housing or windings, then it will be more effective not to repair, but to completely replace the unit.
Signs of a generator malfunction
Generator faults are not always easy to identify. Some of them (the so-called “floating” faults) are determined only on a special stand.
But if you notice that the headlights have become dimmer while the engine is running, and that extraneous noise interferes with the normal sound of the running engine or that the battery is quickly discharged, then it’s time to contact the experts. Because it is better to prevent a malfunction by repairing the generator in a timely manner than to ruin your day one day with an unexpected breakdown.
Recently, it has become very convenient to contact specialized companies whose specialization is the repair, maintenance and sale of starters and generators. Modern equipment, combined with qualified personnel and a large selection of spare parts, will allow you to eliminate any malfunction in just a few hours. And diagnostics with disassembly and analysis of the degree of wear of parts will help to quickly determine the degree of performance and carry out restoration work.
However, you can try to diagnose and eliminate some of the causes of generator malfunctions yourself.
If the battery in the car is not charging, then first of all you need to check the tension of the alternator belt - the belt should be tensioned without sagging. This, of course, can be done by eye, but it is better to use a dynamometer: if you pull the longest branch of the alternator belt with a force of 10 kgf, then it should bend no more than 10-15 mm.
On most machines, the tension of the alternator belt can be adjusted by loosening the nut securing the alternator housing to the adjusting bar and using a pry bar to move it away from the engine. After setting the required belt tension, tighten the generator mounting nut back.
If the tension of the generator belt is normal, then most likely the voltage regulator relay needs to be replaced. On older cars it is a plastic box screwed to the front fender mudguard, but in modern cars the regulator is built directly into the generator itself.
To replace the relay-regulator in the generator, you must first unscrew the two mounting screws, disconnect the contacts, and then remove the regulator along with the brush assembly from the generator housing.
Check the slip rings: burnt ones should be cleaned with fine-grained sandpaper and wiped with a cloth soaked in solvent.
For the first time after installing a new regulator, the voltage may be slightly different from the nominal one. When the new generator brushes get used, everything will return to normal.