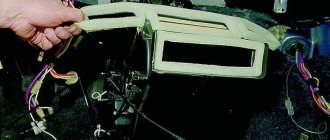
Hi all. The cold weather has arrived, the long-awaited snow will soon fall in our region, and since last winter the stove has not suited me at all. Now you have the opportunity to drive your car into a spacious garage, time and desire, and what else do you need? Straight arms - available! Breaking is not building, so I dismantled this miracle of Russian engineering. The only problem arose when I started to pull out the torpedo - the iron cross member, which gives rigidity to the structure and holds the central frame, did not work:
For ease of installation and so as not to unscrew the steering column, I recommend using a chisel to separate this structure, as I showed in the photo above. Then there will be no problems with installation afterwards. At the spot welding joint there is a hole into which you can easily screw a bolt.
I washed it simply - I took it apart, raked out the centuries-old leaves, picked up laundry soap and a sponge and off I went. Be sure to dry it afterwards. While our plastic is drying, we pick up the element with the adjustments and disassemble it completely (don’t forget how it was initially, otherwise there is a chance of assembling it incorrectly). We clean it, then lubricate it with SILICONE grease (other grease hardens in the cold):
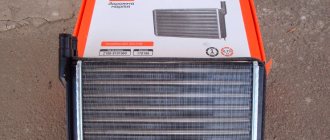
To optimize vehicle production and reduce their cost, AvtoVAZ uses the same components for models of different families. An example of such an assembly is the stove of the VAZ-2114 car, which belongs to the Samara-2 family. When designing this car, the interior heating system was borrowed from the models of the first Samara family - VAZ-2108-21099.
The VAZ-2114 stove is integrated, with heat intake from the engine cooling system and forced air circulation. Structurally, the interior heater of this car is simple, which has a positive effect on the reliability of the system.
The principle of operation of the heater cables on the VAZ 2114
The operation of a car's heating system is to transfer and redirect the heat that is released as a result of engine operation. Heat is removed by the cooling system and supplied, among other things, to the heater radiator. Then, when the switch is turned on (turned on), the heating system starts a motor that blows out hot air and passes it through the car panel deflectors. Air redirection to a particular area is carried out directly by the driver by switching the airflow positions.
When clicked, the picture enlarges
Most cases of stove malfunctions are associated with just one reason and this is the VAZ 2114 stove cable. The fact is that over time the tension of the cable weakens. This occurs as a result of its constant tension, weakening when moving the lever for adjusting the heating mode (cold and hot). There are also cases when the cable completely flies off the stove tap. As a result, the stove valve does not open completely, thereby you do not receive significant portions of hot air from the heating system.
What to do? To change or not to change? Here are the most common questions from car enthusiasts. Let's answer this: before replacing anything, you should find the cause of the malfunction and try to eliminate it.
Design of the VAZ-21099 heater
And here everything is simple: the created flow passes through the radiator honeycombs, where heat exchange occurs, therefore, heat is transferred to the air, which then blows through the air ducts to the desired areas.
The design of the VAZ-21099 stove includes several main components:
- stove body made of plastic;
- heating system radiator (connected to the cooling system);
- electric fan;
- air channel;
- heater control mechanism.
This car used heaters of two modifications (old and new), which differed slightly in design, but their components are completely identical.
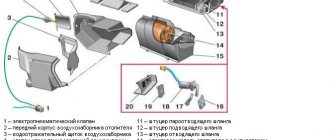
Housing, radiator, dampers
The shroud provides the necessary heat reorientation because the movement generated by the fan motor is directly introduced into the fan motor rather than being dissipated. The body of the VAZ 2109 stove itself consists of two halves connected to each other by special brackets. To reduce flow losses, a gasket is placed between its halves. Partitions are made inside both halves to ensure correct direction.
In addition, inside this case there is a niche in which the radiator is installed. The radiator was originally made of brass, but is now almost always made of aluminum. The design of the stove radiator 2109 is identical to the main one (consists of two tanks, pipes through which the coolant circulates and plates forming a honeycomb), but much smaller in size.
Video: The stove in the VAZ 2108, 2109, 21099, 2110, 2111, 2112, 2113, 2114, 2115 HEATS poorly
Air is blown out thanks to the stove shock absorbers, which are also installed inside the housing. These elements are movable, making it possible to close some air ducts and open others. There are three of them in total: the main one (heating control), an air duct that redirects between the foot area and the power source into the cabin, and a flow damper to the windshield.
Additional shock absorbers are installed on the side and central deflectors. It turns out that by default, air from the body constantly blows onto the deflectors and this is done so that the flow always has an exit. Thanks to the presence of blinds, it is possible to supply hot air to several zones simultaneously (interior space and windshield or windshield and foot area).
The main heater damper supplies air flow to the radiator or bypasses it. This is because the heater also plays the role of a cabin ventilation system. This allows for fresh air to be provided in summer. And to do this, you only need to redirect the movement around the heat exchanger, and the heated coolant will stop supplying the radiator itself. To disconnect the heat exchanger from the cooling system, use the stove valve, which is located on the supply pipe in front of the radiator.
Fan
The air flow is created by a squirrel-cage fan driven by an electric motor. These two elements are enclosed in a separate housing mounted above the heater body. In addition, it is designed to provide the easiest access to the electric motor, since it is considered one of the weakest components of the system.
There are three fan operating modes. This allows you to select optimal air supply conditions (cold or hot).
Control mechanism
Video: Useful tips for cars. Why does the VAZ stove not work?
To control the heater and redirect air flow and open and close the coolant supply valve, a control mechanism displayed on the center console is used. This is a three-movement mechanism and a fan operating mode switch.
The lower slider is the main one, as it changes the operating mode of the system (heating or ventilation). Control two elements simultaneously: the main damper and the tap. When this slider is switched to the “ventilation” mode, the valve and damper close simultaneously, which ensures air movement bypasses the heat exchanger. And everything is exactly the opposite: when switching to the “heating” mode.
The other two sliders control the other two flaps: windshield power and footwell power. For example, when you move them to the center (left slider all the way to the right and right slider all the way to the left), the footwell duct will close and the duct leading to the windshield will be open. When these sliders are moved apart at the edges, hot air blows into the legs (and its supply to the central dampers will also be blocked).
The carriage is connected to the shock absorbers and the crane by cables. In addition, the main slider accommodates two cables at the same time as it opens and closes the damper and faucet at the same time.
Diagnostics of the operation of the VAZ 2114 stove cables
In order to inspect the valve cable of the VAZ 2114 stove, you need to dismantle the side panel trim on the driver's side (to the right of the gas pedal). Further details:
- Start and warm up the car engine thoroughly.
- Unscrew the three side trim mounting bolts.
- Turn your gaze towards the heater valve.
- Check to see if the cable has come loose from the faucet.
- Move the heater lever on the instrument panel to maximum heating mode.
- Pull the cable towards you and hold it in this position
- Check if hot air is coming from the deflectors.
Now that the source of the problem has been identified. It is required to fix, give constant tension and thereby ensure good operation and correct throughput.
One of the options for increasing the tension is a method in which a part (0.5-1 centimeter) of the cable is bent at the point of direct connection to the heater lever. To do this you will need:
- Remove the second trim, only from the passenger seat side.
- Take pliers and pull the cable towards you (at this moment, the temperature switch should be at maximum heating mode).
- Bend the additional amount of cable formed (its amount is selected experimentally, and in each specific case it differs and, as a rule, amounts to 0.5 centimeters).
- We hook it up to the temperature switch of the stove.
Main causes of malfunction
Like any device, the stove can break.
The stove on the VAZ 2114 is characterized by the following malfunctions:
- Leaking air ducts. Heat loss is possible at the joints of the air ducts.
- Radiator leak. If there is a hole in it, it should be replaced.
- Air may stop blowing if the radiator is clogged. In this case, it needs to be cleaned.
Car heater motor
If the VAZ 2114 heater does not work, then the cause of the problem may be in the wires through which there is weak contact, as well as in the resistor.
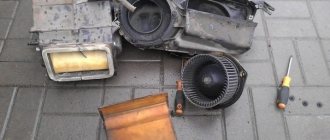
Replacing heater cables on a VAZ 2114
Sometimes situations occur when, for one reason or another, the product becomes bent or even breaks off. Such cases require removing the device and replacing it with a new one. Recommendations for analysis are as follows:
- The metal clips that hold the cable in place must be disconnected.
- One end of the cable is connected to the tap, the other side to the lever for adjusting the air temperature in the cabin. Any sequence of disconnection can be followed. But it will be most convenient to first disconnect the end from the stove tap, unfasten all the clips and, last of all, disconnect it from the lever.
- Now the product should be carefully removed from the case.
- When reinstalling the new part, start by attaching it to the tap.
There are a lot of different models on the auto goods market that differ in length, thickness, various types, and shapes of both ends. In order not to make a mistake when purchasing a new product, we advise you to take it with you to the store. Usually cables are sold in one set of several pieces at once.
So we learned how to change the heater cables on a VAZ 2114. The most important thing when carrying out work is not to rush, to understand the principle of operation of the hot and cold air supply mechanism. We wish you warm heaters!)
A car uses many systems and mechanisms. One of them is the interior heating system. The VAZ-2114 is also equipped with it. Unlike an air conditioner, a stove is required in cars. After all, in the heat you can open the windows. But in winter you won’t be able to cope with the cold in the cabin without a stove. What does this element represent? How does the heating system of the VAZ-2114 work? The diagram, principle of operation and malfunctions are further in our article.
Repair work
Knowing the structure of the stove, it is easy to repair. Before starting repairs, it is necessary to remove the wire from ground and drain the coolant.
Repair consists of the following steps:
- First you need to remove the instrument panel and carefully disconnect the air pipe through which air enters the cabin.
- Next, you should check the electrical system: resistor wires, electric motor, fan. In addition, you need to check the outlet and inlet hoses of the faucet.
- Next, you should unscrew the two nuts from the shield that secure the faucet.
- Then you need to remove the seal from the tap pipes.
- Next, the nuts are unscrewed, with which the stove is attached to the body.
- Now you can remove the stove.
- Having completed the necessary repairs and adjustments, the heater is reinstalled in the reverse order.
After repairs, you should check the operation of the heating system. It should turn on as soon as the engine starts.
Heater repair at VAZ
Characteristics and device
The main purpose of this system is to maintain optimal temperature in the cabin during the winter season. In addition to comfort, the stove is needed to prevent the windows, especially the windshield, from sweating. To prevent condensation from forming on it, special nozzles are provided at the top of the panel. However, first things first. Below is a diagram of the interior heating system:
- Water deflector shield.
- Windshield heating nozzle assembled with air ducts.
- Side nozzle designed for heating and ventilation of the interior.
- Central deflector.
- The heater is assembled with an electric motor.
- Interior ventilation nozzle.
- Stove tap seal.
- Rear heater pipe of VAZ-2114.
- Stove supply pipe.
Repair and replacement of the heater control unit VAZ 21083 and 21093
The control unit for the internal heater VAZ 21083 or 21093 (models with a “high” instrument panel) must be removed and checked for malfunctions in cases where:
- Too much force is required to operate the lever
- when the respective levers are switched, there is no change in the direction of the air and/or change in the temperature of the air supplied to the passenger compartment.
The cause of the above malfunctions may be a breakdown of the sealing bracket on the control unit housing, or deformation of the bracket, or its absence for any reason. To understand what action needs to be taken: reinstall the brackets or replace the heater control unit, the latter will need to be disassembled.
To do this, you need to unscrew the two bolts securing the bottom of the front panel
and shoot him down.
We unscrew the two screws that secure the control unit to the panel body.
Press the control unit and remove it. But it will not be possible to remove it completely, because it is held in place by the damper control cables and terminal cables.
visual inspection required. If there are no brackets at the installation location,
but the mounting locations of the brackets are not damaged, so we simply install the bracket. In the event of a failure at the installation site, the heater control unit must be replaced.
Replacing the control unit must begin with its proper disassembly. To do this, remove the terminal from the heater fan speed regulator and two backlight terminals (in the following figure, respectively, numbered 1, 2 and 3). After removing the terminals, remove the brackets for fixing the cables (the direction of the applied force is indicated in the figure):
Before removing the cables, you need to remember which lever they belong to (or rather, sign). We pull out the cable from the holes in the levers:
We remove the control unit itself. It is necessary to remove the indicator from the removed control unit
and the fan speed controller itself, as well as the backlight.
To remove the controller relay, unscrew the plastic nut. To do this, insert a flat-head screwdriver into the grooves of the nut and unscrew it
The backlight is removed by turning counterclockwise:
Install in reverse order. We install the backlight lamp along the grooves and turn it clockwise until it stops. The relay must be installed in the groove before tightening the nut.
Tighten the nut. We connect the terminal to the relay and two terminals to the backlight. Let's start installing the cables. Before securing the cable with the bracket, install it in such a way that the end of the casing rests against the protrusions on the case and the cable passes between them:
Install the bracket so that the “nose”
and click on it.
Do the same operations with the remaining cables. Before installing the panel cover, you must make sure that all levers are working properly, that the backlight and fan speed control are working properly.
Having checked everything and made sure that it is working correctly, we install the control unit in place and fix it with two self-tapping screws,
There would be no problems with comfort when driving a VAZ-21099 car if the interior of this sedan were not equipped with a heating system. In addition, ensuring a comfortable temperature in the cabin can be considered a secondary task, the main one being heating the windows (front and front side doors) to ensure visibility in cold weather.
The VAZ-21099 uses a heating system that is classic for all cars, in which the air is heated using an additional radiator of the cooling system installed in the passenger compartment under the dashboard. Thanks to this position, it is possible to provide heating to several zones: blowing through the front and side windows, under your feet and directly inside yourself.
To ensure the operability of the furnace, it is necessary that the flow movement is not unauthorized (due to temperature changes), but forced. And for this purpose, the heating system is additionally equipped with an electric fan.
How does it work
The principle of operation of the system is quite simple. It is based on the transfer of heat from a liquid. So, the heater radiator is connected to the main terminals of the engine cooling system. Inside the heat exchanger there is antifreeze or antifreeze. So, when the engine heats up, hot liquid flows in a “large” circle to the heater radiator. When the ACS (control unit) is turned on, the heater motor is activated. Warm air begins to move through the nozzles. The direction can be different - on the windshield, side, in the center of the cabin. One or more deflectors are activated, depending on the position of the stove lever.
That is, heat exchange occurs - hot antifreeze is cooled not only in the main radiator (which stands in front of the engine and is shown in the photo below), but also in the heat exchanger of the heating system.
Heaters old and new
Finally, we note that the VAZ-21099 of several years of production used heaters with certain design features, which concerned the angle of the radiator and the location of the main shock absorber.
In the so-called old-fashioned stoves (on cars before 1998), the radiator was installed almost vertically, and the main damper was located under the heat exchanger. There was a partition between the rear wall of the case and the radiator, which formed a channel that ensured air flow through the case.
When the damper was open, the air flow moved through the radiator, where it was heated and supplied to the air ducts. In ventilation mode, the main door closed the heat exchanger, forming, together with the front wall of the housing, another channel through which the flow went directly into the air ducts.
Newer model heaters (on 1998 vehicles) had a much smaller radiator angle than older heaters, which are believed to provide a larger area of airflow contact for heat transfer.
The position and shape of the main flap changes (it becomes arched). It began to sit above the radiator. In the closed position (ventilation mode), the damper ensures air movement along the shortest path to the air ducts. In heating mode, it blocked the cold air supply to the air ducts and directed the flow down into the housing, from where it was directed to the heat exchanger.
Interior ventilation and heating are adjusted according to the outside temperature as indicated below.
Outside air can enter the vehicle interior:
- with the door windows down;
Rice. 1.11. Internal ventilation and heating controls: 1 — instrument panel; 2 — side nozzles; 3 - central nozzles; 4 — heater electric fan switch; 5 — lever for air supply to the legs; 6 — air heating control lever; 7 — air supply lever to the windshield; 8 — lever for side blocking of injectors; 9 — lever for changing the direction of air flow; 10 — lever for shutting off the central nozzle; 11 — rear window heating switch
— through the upper slots of the instrument panel 1 (Fig. 1.11), if you move lever 5 to the right and lever 7 to the left;
- using 2 side and 3 central nozzles with nozzle flaps opened by levers 8 and 10;
— through the holes in the heater cover, if lever 5 is moved to the left and lever 7 to the right.
By turning the levers of the 9 guide vanes of the side 2 and central 3 nozzles, the direction of the air flow changes. To increase the air flow into the cabin, turn on the electric heater fan with switch 4.
Anti-fog protection for windshield, front door windows and rear window
To protect the windshield and front door windows from fogging, it is enough to direct cold air onto them, for which:
— move lever 5 to the right and lever 7 to the left;
— close the side and central deflector flaps with levers 8 and 10 to increase the air flow to the windshield and windows. If it is necessary to partially heat the incoming air, move lever 6 to the right.
To protect the rear window from fogging, turn on the heated rear window using switch 11.
Internal heating
The air entering the cabin is heated by moving lever 6 to the right. Levers 5 and 7 can direct air to the driver's and passenger's footwells or up to the windshield. When the side and center ventilation flaps are open, air will flow into the vehicle interior. If necessary, the amount of supply air can be increased by turning on the electric fan in the appropriate mode.
The heater blows poorly into the legs and side windows
The heating system of the VAZ-2114 is not reliable. Over time, the stove stops heating the legs and side windows normally. Moreover, the problem is not in the temperature of the air (on the contrary, it can be hot), but in the strength of the flow with which it comes from the nozzles. In this case, you will have to modify the air flow channels. To do this, remove the front panel so that there is access to the nozzles.
Deflectors for car windows and hood: installation and removal instructions
Deflectors on car windows and hoods are used everywhere. Most vehicles on the road are equipped with black or body-colored visors pasted over the sliding windows.
Some vehicles have a similar design in the front part of the hood. What are these devices used for? How to choose and install a deflector with your own hands?
Why are deflectors needed?
The structures under consideration have several functional purposes, which include:
- Protection of the hood from mechanical damage - a deflector mounted in the front part of the hood changes the direction of the air flow flowing around the car. Together with the upward flow, small stones and wheel spikes are diverted from the car, flying out from under the vehicle in front. In the absence of the so-called “fly swatters” all this ends up in the windshield of the car. In addition to the above, the deflector mechanically protects the edge of the hood from flying sand and dust.
- Protection of the windshield from insects - the direction of the oncoming flow changing under the influence of the device helps to remove mosquitoes and midges, which in warm weather literally stick to the windshields of cars that are not equipped with protective devices. Installing a fly swatter solves this problem.
- Improving the design of the car - visors and fly swatters significantly improve the appearance of most cars. Black elements look best when installed on light-colored cars.
- Protection from splashes in the cabin - a deflector on the car windows allows you to open them a little even in heavy rain. Of course, if the window is completely lowered, the device will not save you.
Criteria for choosing car deflectors
Installation of deflectors begins with their selection and purchase. It is necessary to select products based on several parameters. First of all, the visors must match the shape of the door or hood where they are planned to be mounted
It is important that the coincidence of all angles is accurate. Otherwise, the installed deflectors will not last long and will soon disappear
The second selection criterion is the method of attaching the products to the glass. There are plug-in and self-adhesive visors. Installing a hood deflector is always done in one way, so there is nothing to choose from.
The quality of a product is determined by its manufacturer. It is preferable to purchase goods from a monobrand manufacturer. However, devices of acceptable quality can also be sold by brands that develop several car models at once.
The most famous companies today are the following:
- Mono-brand (products for one brand of vehicle): climair, airpiex, heko.
- Multi-brand (products for several brands): autoclover, mobis.
- Little-known (not very common, usually Russian manufacturers): strelka, cobra, comfort.
Fly swatter installation procedure
Installing a fly swatter on the hood requires some knowledge. Violation of the installation technique leads to damage to the paintwork. The result is accelerated corrosion of the metal under the deflector.
Things to consider before installation
Before gluing the deflectors to the car, you should evaluate the condition of the hood edge.
Corroded areas should be cleaned, treated with a rust converter, puttied, primed and painted. The device should not be placed on rusty surfaces, as moisture almost always accumulates under the device. This will lead to the final destruction of the metal within several months.
The second factor to consider is the speed at which you plan to travel. On relatively low-speed vehicles, installation of deflectors can be carried out using adhesive tape or standard fasteners. For high-speed vehicles, additional fastenings should be made.
If installation is planned using glue or tape, the temperature in the room where the work is being carried out must be at least 10 °C. Otherwise, the fixing compounds will not stick to the paintwork and the deflector will fall off at the first shake. Installation using mechanical clips or bolts can be done at any temperature.
FakeHeader
Comments 7
I cut a piece of metal from a nail of the same diameter and fused it into plastic))))
I thought about doing this too) what was the result? Doesn't the nail fall out over time?
No, that’s how the former Logan sold it, it seems to me that it turned out even stronger than the standard one, now I’ll have to do it on the Sander, otherwise passengers have a bad habit of twisting the deflector until the crap...))))
I should also try soldering a stud)
I cut a piece of metal from a nail of the same diameter and fused it into plastic))))
I don’t even understand where the carnation is and why?
There are 4 latches in the “curtains” of the deflector, reminiscent of some kind of pistons. They broke off from the author. This problem is common, and in order not to buy a new “flap”, a piece of nail similar in diameter and length is soldered into place of the broken piston
The overall impression of a car's interior is made up of little things. Only a set of measures to improve the interior make it truly attractive and unique. Let's consider one of these modifications, which concerns air duct deflectors and can significantly change the interior of the Lada Largus.