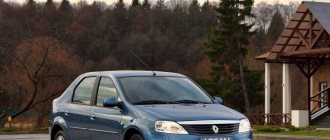
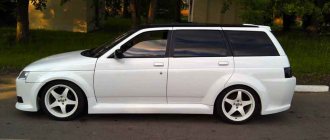
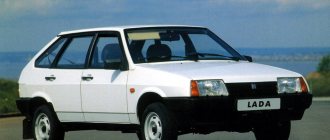
Often the owner of a “ten” wants to make some changes to his car. Moreover, both the exterior and the interior of the iron horse become the object of attention. If we talk about interior tuning, then first of all there is a desire to update the instrument panel. The stock one, especially the old one, looks quite dull, so the desire to change it is quite understandable.
Updating the dashboard on the VAZ 2110
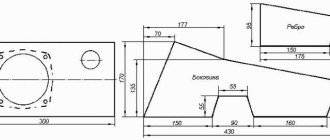
The main disadvantage of the tens topedo is its excessive susceptibility to deformation. As a result, careless movement leads to the loss of the original geometry.
It is not surprising that many car enthusiasts are looking for a way to strengthen this module.
To solve this problem they will need
- Screwdriver with a set of open-end wrenches;
- Sandpaper sheet;
- A bottle of epoxy;
- Cylinder with polyurethane foam;
- A skein of fiberglass fabric.
Instructions for removing the panel before tuning
Before starting to redo the panel, the car owner should make it a rule to act extremely carefully. Otherwise, instead of tuning, he risks doing the banal restoration of a part that is far from cheap and deformed with his own hands.
Due to the fact that it is unrealistic to modify the dashboard, leaving it in its original place, this spare part will have to be removed from the mounts using a screwdriver with a Phillips-shaped bat.
Algorithm for tuning a torpedo on a VAZ 2110
The further sequence of actions is as follows.
- The unscrewed dashboard is wiped off from accumulated dirt, for which a slightly damp dishwashing sponge is used.
- Polyurethane foam is squeezed onto a clean panel.
- When it hardens, the mounting layer is processed using sandpaper until it acquires the desired shape.
- The panel modified as a result of the described actions should be made stronger. For this purpose, fiberglass is applied to it in several layers, which is then glued with epoxy resin. After the glue has dried, the surface should be sanded again.
- At this stage, the panel is covered with high quality vinyl film. When selecting it, the car owner should focus on his own color preferences. Typically, car enthusiasts use a carbon-colored film.
Reasons for disassembly
So, we have already almost indicated the first reason - I don’t like it. This may also be necessary in the following cases:
- For tuning. That is, when we try with all possible forces to correct the “face” of the car, which everyone sitting in the cabin is staring at, that is, the torpedo. To improve comfort and overall aesthetic appearance, you can install new linings, of which there are quite a few types today. The following linings are perfect for the VAZ 2110: • Euro 1, also known as Caprice. It looks nice, but it doesn't have a shelf on the passenger side;
Panel trim VAZ 2110 Euro-1• Euro 2 – similar to the previous one, but with a passenger shelf;
Panel trim VAZ 2110 Euro-2
• There are trims that are installed directly on top of the instrument panel. Installing them yourself is not at all difficult. Among these, one of the most popular is Chestnut;
Panel trim VAZ 2110 Kashtan
Panel trim VAZ 2110 Kashtan
Panel trim VAZ 2110 Kashtan• In addition, you can order an exclusive trim that makes the interior similar to that of the Nissan Primera, with the instrument panel in the center.
Trim Chestnut panel VAZ 2110 (dashboard according to class=”aligncenter” width=”600″ height=”416″[/img] Trim Chestnut panel VAZ 2110 (dashboard in the center) - In order to get to the wiring, change some wire in it, or maybe a complete replacement of the entire wiring harness is necessary;
- To install a new stereo or video system, as well as supply other equipment that is necessary, but not provided for by the designers;
- Replace, fix or clean air ducts;
- When you need wind and noise insulation, since the standard one on the VAZ 2110 leaves much to be desired. Let’s not argue that tens of them are always making noise and rattling, and I really want to get rid of it.
Interior sizing Bimast Bomb Interior sizing Bimast Bomb Interior sizing Bimast Bomb
Sizing with Splen on top of Bimast
Sizing with Splen on top of Bimast
Sizing with Splen on top of Bimast
Sizing with Splen on top of Bimast
Perhaps car owners will also find other reasons to replace the dashboard.
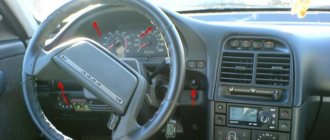
Changing the dashboard backlight on a VAZ 2110
Due to the fact that the standard dashboard lighting on the 10 is carried out using ordinary incandescent lamps, you can often hear complaints about insufficient brightness.
That is why many car enthusiasts prefer to install LED lamps instead of such lamps. They not only shine better, but also work much longer.
Backlight tuning algorithm
In order to install LED elements, you will have to remove the instrument unit from the dashboard. The lamp seats are located on its rear surface, and therefore there is no other way to remove the standard lamps.
The sequence of work operations for replacing the backlight is as follows.
- The steering wheel of the ten is moved to the lowest possible position.
- Using a Phillips screwdriver, unscrew a pair of screws located on top of the instrument modules.
- After this, the cover can be freely removed; to do this, simply pull it out with a smooth movement.
- Below, three more threaded connections will open, securing the block with lamps. These three screws can also be unscrewed with a Phillips screwdriver.
- Next, you need to pull out the block with the instrument modules, for which you first disconnect all the wires. Factory standard lamps are taken out and LEDs are installed instead.
- After this, the instrument unit is mounted in its position and the dashboard is reassembled.
Dismantling algorithm
So, let's begin:
- We remove and remove the front seats from the interior so that they do not interfere with the disassembly;
- Disconnect power from the battery;
- We lower the steering wheel of the VAZ 2110 to the lower position;
- Unscrew the screws that secure the panel covers. These are two screws on both sides of the tunnel. Now you can remove the shield;
- We remove the plug on the tunnel in the center by prying it off with a screwdriver;
- We unscrew the screws of the central tunnel to remove it. Before doing this, disconnect the wires from the cigarette lighter;
- We remove the air duct for heating the interior of the VAZ 2110. To do this, having disconnected the cover from the gearbox, you need to pry off the latches with a screwdriver, then remove the air duct;
- We remove the central panel by unscrewing it from the floor;
- Now it is possible to disassemble the torpedo. First, unscrew the mount that holds the glove compartment, disconnect it from the backlight, and take it out;
- In the hole where the glove compartment was located, we remove the screws on both sides, as well as directly behind the glove compartment;
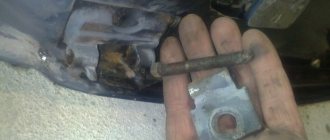
- We unscrew the VAZ 2110 torpedo mount with a key and a screwdriver;
- Near the left pillar we pull out the air duct by prying it with a screwdriver;
- With special care you need to remove the torpedo, supporting it with your hands while unscrewing the nut with a spanner. Then, lifting it up, remove it from the pins;
- Now you need to remove all the wires, marking them with a marker as you go so that you don’t get confused when reinstalling them;
- It became possible to replace the lining and carry out noise insulation work.
We unscrew the two self-tapping screws fastening the right flap of the floor tunnel lining. Remove the flap (Left is similar) Using a screwdriver, remove the plug from the floor tunnel lining cover. Use a Phillips screwdriver to unscrew the self-tapping screws fastening the lining cover: two in the middle part of the tunnel
and two in the rear part Lift the cover of the floor tunnel lining Disconnect the cigarette lighter wire connectors Using a screwdriver, disconnect the holder of the gear lever cover from the floor tunnel lining cover Using a “10” wrench, unscrew the nut securing the interior heating air duct and remove the air duct Using a “10” socket, unscrew: two nuts in the middle part of the front fastening of the floor tunnel lining housing
and two rear mounting nuts
Remove the housing of the floor tunnel lining Using a Phillips screwdriver, unscrew the two self-tapping screws securing the glove box hinge brackets. Holding the glove box, disconnect the wires from the lampshade and remove the box. Using a Phillips screwdriver, unscrew the two self-tapping screws securing the instrument panel, located: on the left - under the cover of the mounting block and on the right - under the glove box
Using a Phillips screwdriver, unscrew two screws (one on each side) of the lower side fastening of the instrument panel. Using a Phillips screwdriver and a 8" wrench, unscrew the two screws securing the instrument panel to the controller bracket. Using a screwdriver, remove the side nozzles for ventilation and heating of the interior. Using a 10" socket, unscrew two nuts of the upper fastening of the instrument panel Lifting up, remove the instrument panel from the studs and move it back To completely remove the instrument panel, disconnect the connectors of the wiring harnesses (having previously marked them) and remove the headlight hydraulic corrector
Remove the instrument panel Use a screwdriver to pry up the foot heating air duct and disconnect it from the air distributor housing
Painting the ceiling on a VAZ 2110
During the operation of the machine, its ceiling inevitably becomes dirty and loses its original color. Over time, dirty stains may even appear on it.
This situation does not make the car look neat, so many car enthusiasts order a complete reupholstery of the ceiling.
It is almost impossible to do this at home, and a good salon specialist will charge quite a lot of money for such work. That is why more and more owners of VAZ models decide to simply paint the ceiling of the car, and not change the upholstery on it.
Consumables for updating a car ceiling
To implement such a project it will be necessary
- Universal paint supplied to the market in spray cans. For a dozen of them you will need at least five. After treatment with this paint, the interior needs to be ventilated for about a week;
- Or a mix of water-based emulsion and universal paint, which adheres much better to the ceiling surface.
Backlight color and intensity
The color of the backlight, as well as the intensity, also plays a big role not so much in the aesthetics of the panel’s perception, but in readability and ergonomics. A bright, annoying color will not only distract you from the road at night, but also cause fatigue. Your eyes will get tired very quickly, even if bright ruby or lemon are your favorite colors.
It is simply impossible to withstand them for a long time - the reaction speed drops, the eyes get tired and watery, and bright objects overboard can merge with the lighting of the tidy and go unnoticed. It's also worth thinking about glare. Few people initially pay attention to them, but constant bright glare points on all the windows will not immediately make driving comfortable.
Algorithm for tuning the ceiling on a VAZ 2110
Before you start painting the ceiling covering, it must be dismantled.
- The screws securing the covering are unscrewed. The plastic clamps open. The removed ceiling is removed from the car.
- When tuning with a mixture of paints, they are taken in equal proportions.
- The paint chosen by the car enthusiast is applied to the ceiling with a simple roller. It is necessary to ensure that the paint does not penetrate the coating to a great depth.
- After painting, the coating dries for a long time and only then is installed in its standard position.
Changing the color of the instrument panel scale
If desired, you can also change the instrument panel by changing the color of the scale. Such modification will also not take much time and effort. Let's consider the following features of performing such work:
- To begin with, as in previous cases, you need to dismantle the structure. By completely disassembling the structure, you can significantly change it.
- You can change the dial by removing the previously applied scale. This can be done using a knife. However, it is not possible to remove everything mechanically - you need to use a solvent. With a careful approach to solving the problem, you can completely remove the old scale without significant damage to the base.
- After the base has been changed, the LED strip is attached. In our case, a green ribbon was chosen. We fasten the tape and connect it directly to the light bulb socket.
- White goes well with green. That is why it is necessary to dismantle the hands, clean them of green color and apply white varnish. If there is no special varnish, then you can use the one that is used for applying to nails.
Sidebar: Important: The tuning in question can significantly increase the readability of the dashboard: during the day, all values are quite clearly visible, at night the backlight does not hurt the eyes. That is why the combination of white and green can be chosen when upgrading the instrument panel.
Sound insulation of a VAZ 2110 car
The high sound permeability of the VAZ interior consistently causes sharp criticism from car enthusiasts.
That's why they often install sound insulation using:
- Vibroplast placed on iron parts of the body;
- Isolon, mounted as the next layer;
- Foam rubber at least a centimeter thick;
- Mastic;
- White Spirit.
Step-by-step instructions for soundproofing a car
Before you begin to protect the cabin from engine and street noise, it must be disassembled.
It is necessary to remove and remove the dashboard, the seats of both rows and, in general, any parts that can prevent a decrease in sound permeability.
- Next, all iron surfaces are thoroughly washed.
- The mastic is diluted with white spirit to form a watery mayonnaise.
- Now you can cover the interior with vibroplast. You should start from the front of the cabin. The vibroplast is fixed using a mastic solution, which is applied with a brush.
- Then they cover the doors with vibroplast, having previously removed the trim from them.
- Then the vibroplast is laid on the floor, while 2 layers of insulator can be laid on the area above the muffler.
- At the next stage, the vibroplast is coated with isolon. It is fixed with the same mastic solution.
- At the last stage, foam rubber sheets are applied, which are fixed with liquid nails. Foam rubber is especially effective for sound insulation from the dashboard, ceiling and door trim.
Upon completion of the insulator sticker, the parts are fixed in their standard positions.
External tuning
The outer part is the first place where pumping of the VAZ-2110 begins. Tuning the external structure includes several elements, which we will dwell on in more detail:
- Bumpers. These decorative protective elements are subject to various modifications. Of course, there are two options for making these parts. Firstly, stamped. There are several types of tuning bumpers from different ones, "Bogdan". They are fairly standard and are not aimed at improving aerodynamic performance. Secondly, there is also an individual order. In this case, the tuning studio calculates the aerodynamic characteristics. And due to the bumper, the streamlining of the car improves and the resistance to the flow of oncoming air is reduced.
- Door sills, like bumpers, perform aerodynamic functions, which improves air flow.
- Wing. Its main function is to reduce the vehicle's ground clearance, which allows air to flow over the top of the car rather than under it.
- The hood air intake serves as an additional engine cooler. It gets very hot at high revs and speeds.
Remaking the steering wheel for a VAZ 2110
The factory steering wheel of the ten, which is not equipped with braid, is deservedly considered excessively thin. On top of that, it does not create enough friction force for confident driving.
These factors do not have the best effect on accident-free driving.
- That is why, soon after purchasing dozens of them, the steering wheel is covered with braid.
- For this purpose, the “M” option is suitable, designed for handlebars up to thirty-nine centimeters wide.
- The purchased braid is put on the steering wheel hoop, after which the edges are connected with a special needle and nylon thread.
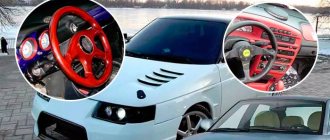
Replacing the standard steering wheel with a designer one
Anyone wishing to install a new steering wheel must have at their disposal a Phillips screwdriver and a 24mm socket.
- The logo plate lifts up and is removed.
- The horn panel is secured with three screws. They are unscrewed and this part is removed.
- The 24 nut that secures the steering wheel is unscrewed using a socket.
- The steering wheel is dismantled and a new one purchased from a design studio is installed.
Dashboard covers
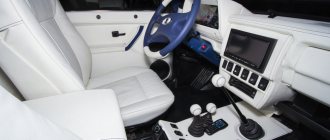
Let's consider another tuning option. The standard “tens” torpedo does not have a very attractive appearance. It can be changed using special overlays. In stores today you can choose the most suitable option from several presented on the shelves. Such overlays look very impressive, significantly transforming the interior of the car, of course, for the better.
Even more impressive changes come from the combination of the trim and the change in instrument panel lighting. However, before you start tuning, you should think carefully. Despite its not very attractive appearance, the “tens” torpedo is quite practical. Many car owners have already appreciated this moment. The overlay will simply be a beautiful element of the interior. The vast majority of them have a rounded shape, so they are not very practical. Here you will have to make a choice between stylish appearance and convenience. However, many agree to sacrifice practicality in favor of attractiveness - this is a matter of personal preferences and taste.
Tuning car seats for VAZ 2110
Dozens of factory seats consistently cause criticism due to their discomfort. That's why they are usually replaced with seats from an Octavia, Hyundai or BMW.
- The seats of these foreign cars are distinguished from dozens of chairs by carefully honed ergonomics, elegance and small size.
- True, it will be unrealistic to install them in a garage workshop.
- The fact is that for this procedure the fastenings require structural modification.
Accordingly, the car must be delivered to the design and tuning studio, having agreed on the cost of the work. Usually it does not exceed eighty thousand rubles.
Changing odometer color
You can significantly modify the dashboard by removing the protective film from the surface of the screen. This is due to the fact that such a film is green in color. The work consists of the following stages:
1. The structure will be installed in order to get to the screen. 2. The next step can be called removing the film. As a rule, it is attached to the surface of the screen using special glue. 3. After removing the film, you should spend a lot of time cleaning the adhesive. To perform this type of work, you should use a knife.
In the standard version, the instrument panel has a greenish tint; after carrying out the work in question, it will become bluish. Whether to carry out such work or not is everyone’s choice.
Photos of examples of interior tuning on a VAZ 2110
Do-it-yourself modification
Any motorist wants to modify his car with his own hands. Those who succeed in this show ideal clear examples. They inspire others. What can you really improve in your garage if you have a standard set of tools and units for repairs? You can:
- Make body kits from fiberglass.
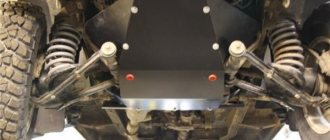
- Install new chassis and suspension elements.
- Replace the exhaust system.
- Modify the engine.
- Install wheels and tires.
- Install the acoustics and all accessories for it.
- Replace mirrors.
Installing a new cover
Installation of a new lining occurs after preliminary preparation:
- It is necessary to measure and trim off excess material;
- But it’s better not to cut off what seemed to be superfluous under the instrument panel, otherwise there will be a gap near the steering column, and you can make cuts to bend it a little if necessary;
- Near the side air ducts, trimming is also done during installation, measuring on site;
- We carry out fitting and adjust trimming;
- We apply anti-creak to avoid squeaking in future operation;
- We choose the method of installing the dashboard with a Euro trim: use new brackets included in the kit or drill them out from the old trim;
- All that remains is to install the instrument cluster you need and secure the Euro trim with self-tapping screws, which are then hidden under the plastic trim.
With panel disassembly
The first stage is carried out according to the plan already described. Next, we proceed like this:
- We assemble the trim, installing our instrument cluster, air duct panels and those accessories included in the kit;
- At the base of the panel we carefully attach the wiring harness;
- We connect the wires from the Euro pad to this harness, tightening everything with mounting ties;
- We connect devices to the required buttons using connectors;
- We secure the cover with self-tapping screws.
This method, although it takes more time, provides high-quality sound insulation to eliminate all annoying squeaks.
We also recommend replacing light bulbs with high-quality analogues or LEDs. So, the updated panel will look even more solid.
Wheels and tires
One of the essential attributes of car modification is the installation of wheels and tires. There are many varieties of them. A wide range will allow you to choose the best option for the VAZ-2110. The tuning, photos of which are presented in the article, makes it clear that motorists mainly choose chrome wheels and low-profile tires for this car.
The selection is carried out according to the technical characteristics of the fasteners. It depends on the number of bolts, the space between them, and clearance capabilities. Thus, the optimal sizes are 195/65R15 and 205/60 R14.
Acoustics
The last tuning option is to install acoustics. The car can accommodate up to 8 speakers. They are located in the following places: four in the doors, two on the rear shelf and the last 2 in the instrument panel. As in many other cars, the amplifier or subwoofer is installed in the trunk. Also, in some cases, you can mount an SD receiver there. Instead of a standard radio, a CD-DVD player is installed, which has a retractable screen. One common such acoustic player is Texet, which is easy to connect. In addition, in this case the price-quality ratio corresponds to reality. Although you can choose any other option at the discretion of the owner.
During installation, the wires are laid under the carpeted floor, and therefore they will be less exposed to external influences. In addition, they will not get in the way underfoot. Installation can be done either by yourself or by contacting audio professionals who can select equipment and install it.
How to upholster a car dashboard yourself
You should not expect that all the work can be completed without disassembling the interior. The entire front panel will have to be removed to provide full access.
Tools
You will need both a standard plumbing tool for assembly and disassembly work to remove the torpedo, and a more specialized one directly for tightening operations.
- A set of screwdrivers and wrenches for working in hard-to-reach places. Mirrors, flexible holders and gimbal extensions may be required.
- A special device for removing plastic clips and latches.
- Industrial hair dryer with adjustable air temperature.
- You may need a sewing machine for working with leather.
- Marker, knives and scissors. The cutting tool must be of high quality and sharp.
- Spatulas, rollers and brushes.
You should not hope that a cheap and low-quality tool will allow you to get a decent result.
This is interesting: Replacing the front strut support bearing with and without removing the shock absorber
Even in skillful hands, they can ruin everything, after which they will have to start over, suffering material losses.
Consumables
The list of consumables is determined by the selected material. But some list items will become common to all coverages:
- liquid and wipes for degreasing surfaces, used in painting;
- sandpaper of varying degrees of grain, very fine is not required here;
- glue for the selected covering material;
- non-woven fabric for creating a model - patterns, preferably with spot application of glue;
- threads for stitching leather, here you cannot skimp on quality and decorativeness;
- directly the covering material itself, preferably with a reserve.
You will also need disposable gloves to protect your hands and antistatic wipes to remove dust from the part.
Preparation (removing the dashboard)
You must work in accordance with the repair manual for a specific car, since not all fasteners are visible to the eye.
Plastic elements, especially those that have already served, must be handled with care; they become brittle over time, and if broken fastening points are not restored, in the future this place can become a source of annoying noise. Moreover, the mass of the torpedo will increase noticeably.
Constriction technology + video
Work on the removed parprise begins with the preparation of patterns. The locations of the seams are determined, and a decision is made on the size of the pieces of material. Various options are possible, starting from a single cover and ending with pasting in small fragments.
Non-woven blanks are glued to the workpieces and seam tolerances are determined.
Non-woven fabric, unlike paper, has increased strength and is used in the sewing industry as a lining material. After complete pasting, the patterns are carefully separated from the parts of the torpedo.
Note: What does the Knock Sensor affect and how to check it
The removed patterns are placed on the wrong side of the material lying on a flat surface. The boundaries, taking into account the seams, are outlined with a marker, and the parts are cut out.
For the final check, sheets of material are once again applied to the dashboard, and the entire geometry is checked. After this, the cover can be sewn, if required by the technology of the specific material.
Before pasting, the surface of the torpedo must be prepared. The parts are sanded, degreased, and dust and other contaminants are carefully removed from them. A layer of primer is applied, which can be primer or glue. The same is done with the details of the tight material.
A layer of glue is applied to the dried material, in accordance with its technological features. After this, you can proceed directly to pasting.
It is necessary to carefully monitor the elimination of air bubbles, so it is better to work from the center to the edges. All seam locations must be aligned and located along the intended lines.
The glued parprise is blown with an industrial hairdryer to ensure uniform shrinkage and complete distribution of the glue over the surface; at this stage, it is still possible to smooth out the resulting folds and bubbles. A rubber roller is used to roll out the material. Complete polymerization of the glue usually occurs within a day.