The catalog of materials for repairing VAZ 2101, 2103 or 2106 will allow visitors to the etlib.ru portal to repair a broken car part on their own. This collection of instructions is a modern guide to vehicle maintenance , repair and operation. The instructions presented in the form of videos will be an excellent tool, which will demonstrate with a clear example each action of the technician during troubleshooting.
In addition to video tutorials, the site also contains other materials. They contain no less valuable information for those who want to repair a VAZ 2101 with their own hands or any other of the above models. The instructions are supplemented with photographs taken during the repair work. They will make it easier for even inexperienced drivers to understand the algorithm of actions.
There are a number of procedures that are most often looking for . Using one of the manuals, you can replace the valves of a VAZ 2101 yourself. For drivers who decide to repair a VAZ 2103 with their own hands, the material that details The replacement of the VAZ 2103 timing chain is described.
As for VAZ 2106 drivers, they need the VAZ 2106 repair manual most of all. Owners are interested in replacing the VAZ 2106 generator, replacing the VAZ 2106 clutch and replacing the VAZ 2106 pads. All these procedures allow you to restore the car’s performance in the event of a sudden breakdown. A little less often, you may need to replace the VAZ 2106 stove, as well as replace the VAZ 2106 oil seals.
If there is no specific information on the site pages. It can always be obtained from other visitors. Experienced motorists will help with advice and tell you how to make repairs for a VAZ 2106 yourself without negative consequences.
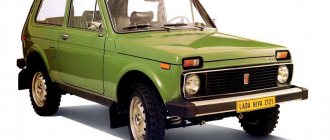
Historical information – VAZ 2101
The Soviet rear-wheel drive car was first assembled in 1970. He became the founder of a whole family, which continued to be produced until 2012.
The VAZ 2101 was presented in a sedan body with a 4-speed gearbox and two types of engines 1.2 and 1.3 liters (the latter for the updated version of the VAZ 21011).
For owners of the VAZ 2101 model, maintenance and repairs were cheaper than foreign cars, which made the car popular in the domestic market.
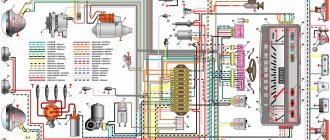
Wiring harness in the cabin
The front wiring harness, located in the engine compartment, is the main electrical system. The front beam enters the car interior through a technological hole with a seal under the instrument panel. The front end electrical system connects to the dash wires, fuse box, switches, and ignition. In this part of the cabin, the main electrical circuits are protected by fuses.
The new cable will provide sufficient voltage to power current consumers in the cabin
The fuse box is located to the left of the steering wheel. Auxiliary relays are attached to the bracket behind the block. The reliable operation of the VAZ 2101 depends on the proper functioning of electrical devices and relays. Fuses protect the electrical circuits of the VAZ 2101 from short circuits.
Simple fuses are a reliable safety element in the event of a short circuit
List of electrical components protected by fuses:
- Horn, brake lights, interior lamps, cigarette lighter, portable lamp socket (16 A).
- Heating motor, wiper relay, windshield washer motor (8 A).
- Main beam of the left headlight, high beam indicator lamp (8 A).
- High beam of the right headlight (8 A).
- Low beam left headlight (8 A).
- Low beam of the right headlight (8 A).
- Side light of the left sidelight, side light of the right rear light, size indicator lamp, instrument panel light, license plate light, trunk light (8 A).
- Side light of the right side light, side light of the left rear light, cigarette lighter lamp, engine compartment light (8 A).
- Coolant temperature sensor, fuel level sensor and reserve indicator lamp, oil pressure lamp, parking brake lamp and brake fluid level indicator, battery charge level lamp, direction indicators and their indicator lamp, reversing lamp, glove compartment lamp ) (8 A).
- Generator (excitation winding), voltage regulator (8 A).
It is not recommended to replace fuses with homemade jumpers. A foreign device may cause electrical parts to malfunction.
Video: replacing an old VAZ 2101 fuse box with a modern analogue
Switching of instruments in the cabin is made with low-voltage wires with elastic oil- and gasoline-resistant insulation. To facilitate troubleshooting, the wire insulation is made in different colors. For greater distinction, spiral and longitudinal strips are applied to the insulation surface to eliminate the presence of two wires of the same color in the bundles .
On the steering column there are contacts for switches for the direction indicator, low and high beam, and sound signal. In the assembly shop, the contacts of these switches are lubricated with a special conductive grease, which must not be removed during repairs. Lubrication reduces friction and prevents oxidation of contacts and possible sparking.
If the order of connecting elements is violated, traffic participants may be misinformed
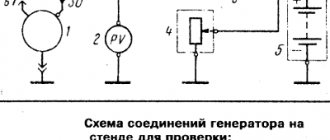
Position numbers of electrical circuit elements on the turn signal connection diagram:
- Sidelights.
- Side direction indicators.
- Battery.
- Generator.
- Egnition lock.
- Fuse box.
- Relay interrupter.
- Power indicator.
- Switch.
- Rear lights.
The intermittent signal of the turn signals is determined by the breaker relay. The ground connection is provided by black wires, the positive connection is provided by pink or orange wires. Inside the car, the wires are connected:
- instrument panel and indicator lights;
- headlight clusters;
- direction indicators;
- interior lighting;
- wiper;
- foot-operated windshield washer.
The rear wiring harness runs along the left side of the cabin under the floor mats. A thread runs from it to the light switch in the door pillar and the parking brake lamp switch. The branch to the right lamp runs behind the rear beam along the floor of the body, where the wires connecting the level indicator and fuel reserve sensor are located. The wires in the bundle are secured to the floor with adhesive tape.
Historical information – VAZ 2106
VAZ 2106 is a modernized version of the VAZ 2103, which appeared in 1975 and continued to be produced until 2005. Among the features, it is worth highlighting minor changes to the exterior , the ability to choose a 4 or 5-speed gearbox, as well as a 1.6 liter engine with a power of 76 hp.
In total, VAZ 2106 engines were built in the following line:
- VAZ-2106 - petrol 8-valve 1.6.
- VAZ-2103 - petrol 8-valve 1.5.
- VAZ-21011 - petrol 8-valve 1.3.
Replacing the wiring yourself
If there are numerous problems in the car's electrical system, you should think about completely replacing the wiring, rather than individual sections. When laying new wires, it is not recommended to combine low voltage wires with high voltage wires into one bundle. Reliable fastening to the housing will prevent pinching of wires and damage to the insulation. Appropriate plug blocks will ensure tight contact, which will eliminate the occurrence of breakdown and oxidation.
Numerous wires are hidden behind the instrument panel
Replacing the wiring can be done independently by a car enthusiast who has a superficial knowledge of electrics.
Reasons for replacement
The amount of work depends on the degree of significance of the reason:
- malfunctions of lighting devices;
- interruptions in the operation of electronics;
- significant oxidation of contacts;
- frequent lack of current in the wires;
- battery discharge;
- numerous damage to wire insulation;
- lots of twists.
To replace part of the electrical wiring in the cabin, you need to prepare:
- electrical components connection diagram;
- wires with different sections and colored insulation;
- electrical tape;
- connecting blocks;
- wire terminals;
- crimping pliers.
Replacement steps
Before starting work, you should sketch out the location of the wires and pinout of the terminals.
Replacement of wiring should be carried out in accordance with safety rules and electrical diagram:
- Disconnect battery.
- Remove decorative plastic elements in the interior.
- Determine the location of the required wire bundle.
- Mark the wires to be replaced on the diagram.
- Disconnect the connectors and carefully, without pulling, remove the old wires.
- Lay new wires.
- Connect the pads.
- Make sure the wires are located according to the diagram.
- Install decorative elements.
- Connect the battery.
When owning a car with a long history, the wires should be replaced as a set
When replacing wiring on the instrument panel, follow the connection diagram.
The search for faulty electrical appliances should begin with their connection diagram
Position numbers of electrical circuit elements on the diagram of control devices:
- Oil pressure warning light sensor.
- Coolant temperature gauge sensor.
- Level indicator and fuel reserve sensor.
- Fuel reserve warning lamp.
- Indicator lamp for parking brake and brake fluid level.
- Oil pressure warning lamp.
- Fuel level indicator.
- Instrument cluster.
- Coolant temperature gauge.
- Fuse box.
- Ignition switch.
- Generator.
- Accumulator battery.
- Parking brake warning light relay.
- Parking brake warning lamp switch.
- Brake fluid level sensor.
To avoid significant confusion in the wires and tedious identification of damage, you should consider purchasing a wiring harness kit for this model with all the pads, plugs and connectors.
Video: replacing wiring and installing an instrument panel from a VAZ 2106
How to repair sills and the underbody of a car with and without welding
The sills and underbody of the car, like many other parts of the body, receive damage over time that cannot be avoided during intensive use of personal equipment.
But before repairing damaged thresholds, it is necessary to clearly define the restoration methods used in practice. As an option, the possibility of repairing car sills without welding should not be excluded. For a better understanding of existing techniques, it is advisable to familiarize yourself with the varieties of these cabinet products.
Fixed and removable
The designs of most machines provide only two types of threshold elements. The first ones are “seated” for welding and form a single whole with the body and side member, the second ones are removable or overhead sills.
The second type of thresholds is installed extremely rarely and most often for the purpose of additional protection from mechanical damage and strengthening the body.
Restoration of rigidly fixed thresholds is possible only by leveling the damaged areas, welding them, or completely replacing them with new elements. However, not everyone can weld thresholds with their own hands, even if they have a welding machine.
Restoring heavily worn removable thresholds attached to the body using special screws, as a rule, comes down to updating them. However, the seemingly simple replacement of thresholds also requires preparing the body for the upcoming repair.
Nature of damage requiring repair
The main types of damage to the sills (regardless of their type) and the bottom include:
- mechanical damage resulting from contact with other cars or as a result of impacts from stones and gravel particles;
- a corrosive effect on the material, leading to the formation of rusty cracks and cavities, the protective treatment of which does not bring tangible results.
The first group of faults is associated with the peculiarities of domestic roads and leads to the car losing its strength characteristics, and, as a consequence, the impossibility of operation in the previous modes. If there are a large number of them and the spar is damaged, driving a car becomes completely unsafe.
Corrosion processes also pose a serious threat to the supporting structure, which increases over time. Despite the many ways to combat corrosion, they, however, do not stop the destruction process, which ultimately leads to the need to replace rotten elements.
With non-removable body parts, the only way out of this situation is to use welding of the thresholds using any known method.
Technologies for restoring damage to the structure of these parts differ both in the methods used and in the cost of the materials used in welding.
Repair methods
The choice of method for restoring the sills and bottom depends on the nature of the damage received and can be reduced to the following options:
- classic welding of fixed body parts;
- straightening of small dents on removable and non-removable elements, for which the former must be removed from the car;
- replacement with new products (in case of severe damage or rust);
- Do-it-yourself threshold repair without welding using non-standard restoration techniques.
Atypical options include the use of fiberglass with epoxy glue, as well as a method that allows you to stretch the thresholds using special mechanisms. The latter method allows you to completely restore the previous shape of any car products (including the famous VAZ brand).
- One of the types of threshold stretching involves the use of special vacuum inverters, with the help of which any deformation (a dent, for example) is corrected due to the difference in pressure inside and outside the structure.
- Repairing the bottom without welding may consist of regular inspection of straightening, cleaning and painting.
Self-brewing
Restoration of non-removable thresholds and the bottom can begin only after placing the car on a repair platform or in a pit with a size sufficient for welding. The bottom is inspected by tapping it with a hammer.
- In case of severe rust damage, it is necessary to clean the surface around the embedded area using sandpaper or a grinding tool..
- Repairing a body by welding, including welding the bottom, comes down to installing a small patch of metal of the same structure and thickness on the damaged area.
- But first you should prepare the problem area, namely, carefully cut out the rusted metal.
- If painting after welding is not intended, then the appropriate color of the patch should be selected in advance, which, together with the threshold, after repair, must be carefully sanded and treated with an anti-corrosion compound.
If you have a certain skill and the necessary tools (semi-automatic or gas welding), anyone can repair the sills and bottom with their own hands. In addition to tools and materials, you only need a little free time and desire.
Source: https://svaring.com/welding/v-bytu/svarka-porogov
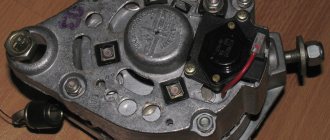
If there is smoke coming from the exhaust
If the engine begins to smoke, then most likely the seals on the valves have been destroyed. Or the guide bushings are completely worn out. Minor faults include, for example, incorrect carburetor settings; it creates a mixture that is too rich. And the saddest failure is the destruction of the piston rings. On the VAZ 2101, the engine was initially equipped with a classic contact ignition system. It is very picky and requires constant care, cleaning contacts, and adjusting gaps. Therefore, many motorists prefer to install a contactless ignition system. But what kind of engine can be installed on the VAZ 2101? There is only one answer to this - anyone! It all depends on how “golden” your hands are.
If the engine troits - reasons
Causes of “triple tripping” of a VAZ car engine
- Incorrect ignition timing
- Spark plug fault
- High voltage wire breakdown. Capacitor failure
- Loss of tightness in the intake manifold area (intake manifold, carburetor)
- Burnout of valve, piston
- Broken piston rings
- Incorrect valve adjustment
- Destruction and wear of rockers (valve levers)
- Cylinder head gasket failure
- Wear, hardening, destruction of valve stem seals
- Very low fuel quality
- Incorrect carburetor adjustment
- Wear of distributor shaft, rotary plate bearing
- Loss of tightness of the membrane of the vacuum ignition advancer
- Use of spark plugs that are not suitable for the engine and other “malfunctions”
Incorrect ignition timing. With this option, I personally know not a tripping, but a seemingly slamming of the engine (missing), which is accompanied by “bouncing” of the entire engine. This is especially noticeable at idle; as the speed increases, the skips disappear. Most likely, your ignition is set too early; this may also be indicated by jerky cranking of the engine by the starter when starting.
A faulty spark plug is one of the most common causes of engine misfiring.
There is nothing special to tell here, it is important to remember and replace spark plugs regularly, and the presence of a spark on an inverted spark plug at atmospheric pressure does not indicate its full functionality, because ignition occurs under much more difficult conditions (Za Rulem magazine, dating back to Soviet times).
Breakdown of the high-voltage wire and capacitor on the contact ignition system. A wire breakdown can be determined by replacing all wires, as well as the capacitor
You can also try to determine the breakdown of the wire by looking at them in complete darkness; if there is a breakdown somewhere, you will see flashes.
Loss of tightness in the collector area, as a rule, does not occur on its own. More often this happens due to incorrect assembly or bad gaskets.
As a rule, when a piston or valve burns out, the cylinder stops working altogether or does not work for a long time. It can only be determined by measuring compression and opening the engine.
Breakage or sticking of piston rings is also not a very common occurrence, because a number of conditions are necessary for its occurrence. You can check it by measuring the compression; if it turns out to be low, then eliminate cylinder head malfunctions in a simple way - pour a little oil into the cylinder; if the compression increases, then there is a malfunction in the piston system.
With incorrect valve adjustment, everything is already clear - any valve may not open or close completely. Proper valve adjustment can cure this problem. Rocker wear can cause a similar problem. The valve stops opening correctly and the cylinder stops working.
Trambler. Quite often, on not new machines, wear of both the shaft itself and the bushings in which it rotates occurs, as a result of which it becomes impossible to establish an adequate gap between the contacts. The same thing happens if the swing plate bearing is worn out. Also, misfires can occur due to depressurization in the vacuum ignition timing advancer, where the membrane may fail.