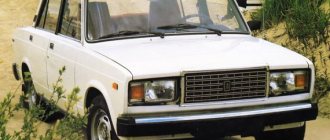
Having become a symbol of a new era in the automotive industry, the VAZ 2101 over the years has turned into a cult car of the domestic automobile industry. Some models can still be found on the roads of the country, and all thanks to the careful care of their owners for their technical condition.
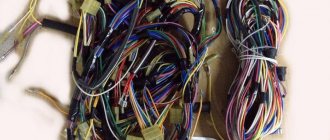
Original wiring diagram for VAZ 2101
It is clear that time does not spare anyone, and many elements of the car require replacement. In particular, the wiring of the VAZ 2101 was initially designed for 15 years of operation. Today on sale you can find many options for ready-made wiring kits for classics, but:
- You need to know the parameters of the products offered;
- Their compliance with the technical regulations of the car manufacturer (and rarely anyone has preserved the instructions);
- Correspondence of connectors and terminal blocks of equipment installed on the vehicle.
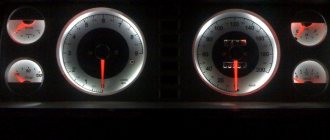
Instrument panel VAZ 2101
The dashboard makes driving a car more comfortable, so it should be convenient and simple to use, displaying important information to the driver.
The standard dashboard of the VAZ 2101 has a limited number of instruments and indicators and is characterized by rather dim backlighting
The instrument panel of the VAZ “kopek” consists of the following elements:
- 6 indicator lights;
- 3 pointer instruments;
- 1 digital indicator.
Instruments and indicators of the VAZ 2101 instrument panel: 1 - fuel reserve warning lamp; 2 — fuel level indicator; 3 — speedometer; 4 — liquid temperature indicator in the engine cooling system; 5 - warning lamp for turning on the parking brake and signaling an insufficient level of brake fluid in the reservoir; 6 — control lamp for oil pressure in the engine lubrication system; 7 — battery charge indicator lamp; 8 — trip counter; 9 — control lamp for turning on the direction indicators; 10 — control lamp for turning on the side light; 11 — control lamp for turning on the high beam headlights
The panel equipment also includes:
- speedometer;
- odometer;
- coolant temperature gauge;
- fuel level indicator;
- fuel reserve warning lamp;
- block of warning lamps: activation of the parking brake and signaling of insufficient level of brake fluid in the reservoir;
- oil pressure in the engine lubrication system;
- battery charge;
- turning on the direction indicators;
- turning on the side light;
- turning on the high beam headlights.
Which one can I put?
If you are not satisfied with the design of the VAZ 2101 dashboard, it can be replaced or updated as follows:
- buy and install a more modern version, which is equipped with an on-board computer, which will not be cheap;
- update the dashboard by replacing instrument scales and arrows;
- install a device from another car.
When choosing an instrument panel, you need to take into account that the configuration may differ significantly and is not at all suitable for the “classics”. In this case, you will need to make adjustments according to the seat in the front panel.
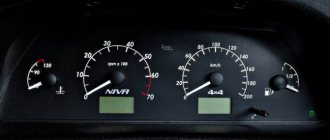
From another VAZ model
On a VAZ 2101, it is possible to install a homemade dashboard using instruments from a VAZ 2106. It can use a speedometer, tachometer, temperature and fuel level indicator, which will look more informative compared to the standard instrument panel. Connecting the indicators should not raise any questions, with the exception of the tachometer: it must be connected in accordance with the “six” diagram.
The dashboard of the VAZ 2101 can be modified by installing additional devices from the VAZ 2106
More information about the instrument panel of the VAZ 2106: https://bumper.guru/klassicheskie-modeli-vaz/elektrooborudovanie/panel-priborov/panel-priborov-vaz-2106.html
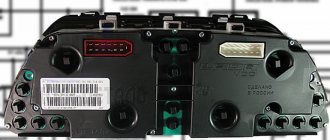
From "Gazelle"
To install the dashboard from the Gazelle, you will need to make quite serious changes to it, since it is very different in size from the standard product. In addition, the connection diagrams and terminals of the cars are not the same at all.
To install a Gazelle dashboard on a penny, a serious modification will be required
From a foreign car
The best option, but also the most difficult, is to introduce an instrument panel from a foreign car. In most cases, this requires replacing the entire front panel. The most suitable options for a “penny” would be devices from models that were produced in the late 1980s - early 1990s, for example, the BMW E30.
For the VAZ 2101 it is necessary to select the most suitable torpedo based on instruments and indicators
Car modifications
VAZ-2101. The basic Soviet VAZ-2101 sedan with a 1.2-liter engine was produced by the Volzhsky Automobile Plant from 1970 to 1982.
VAZ-21011. Modernized in 1974, the car has a 1.3-liter engine and a more presentable appearance.
VAZ-21012. Export modification with right-hand steering wheel for countries with left-hand traffic.
VAZ-21013. This model is completely identical in appearance to the VAZ-21011 model, but with a 1.2 liter engine it has been produced since 1977.
VAZ-21014. Modification of VAZ-21011 with right-hand drive.
VAZ-21016. A car for law enforcement agencies, externally identical to the VAZ-2101 model, but with a VAZ-21011 engine.
VAZ-21018. A special vehicle with a 1-section rotary engine producing 70 horsepower.
VAZ-21019. Another model with a rotary engine, this time a 2-section, with a capacity of 120 horsepower.
Download the manual for the device and operation of the car
Main and additional fuse blocks
| F1 (16A) | Heater fan, rear window defroster, rear wiper and washer system, windshield washer pump |
| F2 (8A) | Steering column switch, windshield wipers, hazard warning lights, breaker relay (in turn signal mode), reverse light, instrument cluster (coolant temperature gauge, fuel level gauge, tachometer, warning lights: turn indicators, differential lock, parking brake, emergency condition of the working brake system, insufficient oil pressure, fuel reserve, battery charge) |
| F3 (8A) | Left headlight (high beam), high beam indicator lamp |
| F4 (8A) | Right headlight (high beam) |
| F5 (8A) | Left headlight (low beam) |
| F6 (8A) | Right headlight (low beam) |
| F7 (8A) | Side light lamps in the left front and left rear lights, license plate lights, side light indicator lamp |
| F8 (8A) | Side light lamps in the right front and right rear lamps, backlight lamps for the instrument cluster, cigarette lighter, switches, heating and ventilation control unit |
| F9 (8A) | Hazard switch, breaker relay (in hazard mode), heated tailgate glass relay contacts |
| F10 (8A) | Sound signal, interior lamps, brake lamps in the rear lights |
| F11, F12 (8A) | Reserve |
| F13 (8A) | Fog light relay contacts in rear lights |
| F14 (16A) | Cigarette lighter |
| F15 (16A), F16 (8A) | Reserve |
Also interesting: Where is the Chevrolet Niva fuel pump relay located?
| F11 (8A) | Turn signal lamps and relay-breaker for turn signals and hazard warning lights (in hazard warning mode) |
| F12 (8A) | Daytime running light relay, daytime running light bulbs |
| F13 (8A) | Rear Fog Lamps and Relays |
| F14 (16A) | Cigarette lighter |
| F15 (16A) | Spare |
| F16 (8A) | Spare |
| Fuse number and rating | Protected circuit |
| Main unit | |
| 1 (16A)* | Electric windows for front doors Electric side mirrors |
| 2 (16A)** | Air conditioning fan, air conditioning compressor |
| 9 (16A)* | Side mirror heaters |
| 10 (16A)* | Central interior lamp |
| Additional block | |
| 15 (16A)* | Air conditioning fan, air conditioning compressor |
Interior reupholstery — Lada 2106, 1.6 l., 1988 on DRIVE2
The interior was disassembled for body repairs. At the same time I decided to cover everything with light leatherette. I re-upholstered it for the first time and it was my first experience working with leather. Accordingly, mistakes cannot be avoided, enough of them were made, folds were cut off incorrectly somewhere, and a lot of material was translated. Despite the shortcomings, I was pleased with the result.
The first thing that was reupholstered was the ceiling from 2107. After the ceiling, it seemed like a simple matter to me and I took hold of the dashboard and lit a cigarette. The shape of a six-piece torpedo is not so simple that it can be covered in one piece; folds are guaranteed. I came up with a little trick along the way. We take the torpedo and disassemble it. If there are cracks or other imperfections, you need to sand the protruding parts. We degrease everything.
Disassembled torpedo 2106.
It is wise to start gluing from the right side of the tidy, where the deepest recess is located.
Gradually coat it with glue, heat it with a hairdryer, pull it out and glue it. The same operations with the glove compartment and moldings. Glue used 88 Moment in jars. It took about 4 meters of leatherette material and 6 cans of glue, 750g each.
We disassemble the dashboard and paste it over according to the same principle.
Reupholstered dashboard.
It was not possible to pull the material onto the dashboard; I made a cut on the left side of the driver's side. It doesn't catch the eye. This is how it turned out when assembled.
Instrument panel in the dashboard.
The console ala GTI, the gear knob and the hazard warning panel were also reupholstered.
The steering column cover and steering wheel have not yet been retightened. Another problem: I didn’t take into account the thickness of the material; the dashboard and glove compartment needed to be sharpened around the perimeter before covering it. It's hard to get up, don't repeat my mistakes.
Dismantling instructions
Let's briefly consider the process of dismantling the dashboard using the example of a car of the ninth model:
- First of all, the hood opens and the battery is disconnected.
- Next, there are two screws on the top of the shield trim; they should be unscrewed.
- Then the lining itself is dismantled.
- Now work is being done on the shield. The device is removed from the seat, all wires leading to it are disconnected.
- The device is removed from the installation site, diagnostic equipment is used to check it, and if necessary, repairs are carried out. Further installation is carried out in the reverse order (the author of the video about removing the tidy is the In the Garage channel).
What is tuning and how is it useful?
Car tuning (from English tuning - setting, adjustment) is a modification, technical improvement of a car, making changes to the factory characteristics in order to improve its characteristics. In simple words, tuning is a modification of a car to suit individual needs and tastes.
Almost everything in the car is subject to tuning: engine, transmission, suspension, wheels, brakes, seats, steering wheel, dashboard, lights, headlights, bumpers, mirrors and much more.
Tuning the appearance of a car (painting it in unusual colors, installing cast or forged wheels, stickers, airbrushing, tinting windows, installing spoilers, changing headlights, etc.) is also called styling, as it allows you to create an individual style for the car, making it stand out in traffic.
Manuals for all cars
1. Technical data 1.0 Technical data 1.1 Main overall dimensions of the VAZ-2101 car 1.2 Main overall dimensions of the VAZ-21011 car 1.3 Main overall dimensions of the VAZ-2102 car 1.4 Technical characteristics of cars 1.5 Controls and monitoring devices 1.6 Ignition switch 1.7 Ventilation and heating controls interior 2. Operation and maintenance 3. Engine 4. Fuel system 5. Ignition system 6. Starting and charging system 7. Transmission 8. Chassis 9. Steering 10. Brake system 11. Electrical equipment 12. Body 13. Repair features 14. Applications Frequently asked questionsLinks to other sites