On the VAZ 2107, the braking system is presented in the form of disc brakes on the front wheels and drum brakes on the rear. The brakes are operated by the brake fluid in the system. However, the type of braking system leads to the fact that the load on the front and rear wheels is distributed unevenly. Initially, the load is distributed to the front wheels, and then to the rear. To redistribute the load on the wheels during braking, a pressure regulator (sorcerer) is installed on VAZ 2107 cars. What kind of mechanism is this and what it is intended for, we will find out further.
Where is he hiding and what is he needed for?
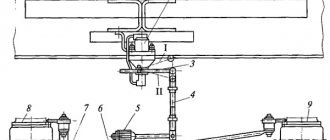
The force regulator is included in the rear brake circuit. It is located at the rear of the car, near the bridge. Connects the left and right brake drums to the master cylinder. In fact, the force from the GTZ is transmitted first to it, and from it to the rear brake mechanisms.
“Sorcerer” distributes braking forces between the front and rear brakes depending on the load on the rear of the car. That is, the more weight on the rear axle, the more the rear wheels brake, even to the point of locking. The less, the lower the brake fluid pressure is transmitted to the rear pads, the weaker the braking. Sometimes, during emergency braking with an empty trunk, the rear wheels practically do not take part in slowing down the car or start working much later than the front ones.
This is necessary so that the “stern” of the car, when you sharply press the brake, does not overtake the hood of your “seven”. Why? Do you remember when you were a child, when riding a bicycle, you sharply pressed the brake and turned the steering wheel, and you spun beautiful pirouettes on the asphalt when the rear wheels were skidding? And when they were carrying someone heavy on the trunk, and when they tried to perform the same maneuver, nothing worked? So that there would be no such tricks on cars, a brake force regulator for the rear brakes was invented.
Its meaning is that when the rear axle is loaded, the contact patch of the rear wheels with the road increases, and with sharp braking, it is more difficult to send it into a skid. A large mass puts pressure on the wheels, they brake more effectively, and it is harder to move this mass from the trajectory.
The opposite happens when the trunk is empty and there are no passengers on the back seat. The mass of the “ass” is small, the wheels do not grip the road well, and it is easier to turn it. The braking efficiency is minimal, there is a high probability of the wheels locking, and, like on a bicycle, when you turn the steering wheel, the rear axle skids.
Video why you need a sorcerer in a Lada:
Video: Adjusting the Brake Pressure Regulator VAZ 2107
Welcome! In this article we will carefully consider the question that torments many car enthusiasts, and it sounds something like this: “How to set up a warlock on a Samara family car?” After reading, the question arises: “What kind of sorcerer are we talking about?” We explain! Wizard. The popular name for the brake pressure regulator, you will find this word in the article.
Record! The following tools will be useful to you: a 13-inch wrench, a flat-head screwdriver, a small wire or a drill bit 2.0-2.1 mm wide.
Share this! Thanks to the sorcerer, the car does not slip during critical braking, and the braking distance becomes shorter. There are situations in life when you have to brake sharply on the road, for example, because of a pedestrian, cat, or dog who suddenly jumped onto the road. If such cases have happened in your life, tell us about it in the comments and, most importantly, share your experience of what to do in such a situation. Current advice will be very useful for people!
Result:
When to set it up? Warlock adjustment needed:
- If you have previously done work related to removing the rear suspension, beam.
- After carrying out various works related to replacing springs, replacing shock absorbers and other parts of the suspension. in other words, any intervention for the ride height configuration.
Record! An incorrectly configured mechanic forces the car to move to the side during unexpected braking, and the braking process loses its effectiveness. We advise you to closely monitor the warlock’s condition.
Install the wizard on VAZ 2108-VAZ 21099
Record! We advise you to go to the article about the whereabouts of the warlock (also about many fascinating things) “Brake pressure regulator and what is your car for?”
1) At the very beginning of the operation, drive the car into the inspection hole and press it from behind so that the car’s suspension is in the middle position.
Record! It is recommended to make adjustments on an unloaded vehicle!
2) Then, using a “13” wrench, loosen the bolt, securing the regulator to the bracket.
3) After unscrewing the bolt, insert a wire (drill) of appropriate thickness into the gap between the lever and the lever spring (the place where the wire is inserted into the gap is marked with a reddish arrow). But to insert the wire at the same time, use a screwdriver to move the bracket until the wire fits into the gap (the place where the bracket moves with the screwdriver is indicated by the blue arrow).
Record! The thickness of the drill/wire is “2.0-2.1 mm”, otherwise the warlock will not be able to adjust normally.
4) And finally tighten the bolt that secures the warlock to the bracket.
Record! Be sure to remove the wire after tightening the bolt!
Confirmation:
The check is carried out after adjustment to see if it can be adjusted.
1) First, be sure to hire your own assistant using at least some other method.
2) Next, find a non-hazardous area and be sure to level it.
Record! We mean a place where pedestrians do not drive, do not drive cars, and do not walk with animals.
3) Ask the assistant to get out of the car, accelerate to “40 km/h” and sharply press the brake pedal.
Record! In the meantime, the assistant must closely watch the rear wheels of the car, since in the event of unexpected braking they should not be blocked immediately, but very late. Only the front wheels are locked at once!
- If the rear wheels lock with an obvious delay or are not locked at all when braking, reduce the gap between the lever and the spring.
- If the vehicle's rear wheels lock very early, increase the clearance. Remember that if the rear wheels are locked very early, there is a high possibility of slipping when sliding!
Have a nice day, dear motorists! Regarding auto brakes, I automatically want to start the material with obvious, but always appropriate words: Auto brake system. it's your safety. I can't argue.
The effectiveness of the braking system is especially important now, when there are massive high-speed cars on the roads.
And in order for the brake system to honestly cope with its tasks, it needs constant maintenance.
These include: periodically checking the brake water level, diagnosing brake lines and adjusting disc and drum brakes.
Adjust the vehicle's brakes if necessary.
Brake adjustment can be divided into full adjustment and running adjustment. A complete brake adjustment involves disassembling the brake mechanism for replacement or adjustment.
Partial brake adjustments are usually done on your own in the garage. The main focus is on how the rear brake pressure regulator works. It is especially important to adjust the rear brake pressure regulator after adjusting the brake system. Those. if you have changed from drum brakes to disc brakes.
The brakes are adjusted when replacing the brake pads or replacing the brake disc. And, usually, these operations are performed immediately, after which the brakes are adjusted immediately.
To adjust disc brakes and brakes in general on various models of foreign cars, there is, first, an instruction on the use of your car.
Traditional brake adjustments include:
- adjusting the brake drive (brake pedal travel);
- adjustment of brake devices (the gap between the brake disc and brake pads), in addition, the rear brake regulator is checked and adjusted without failure;
- adjusting the parking brake (hand brake).
Important! Before adjusting the front brakes, make sure the bearings are adjusted correctly. And if you have rear disc brakes, check your rear wheel bearing alignment.
Adjusting the brake drive (free pedal)
This is done to ensure the required clearance between the pusher and the piston of the head brake cylinder. The pedal free movement step should be indicated in the manual, as it may vary and depend on the type of brake system of your car.
The drive is adjusted by configuring the length of the pusher by winding it around the connecting rod. Once the required pedal free play has been achieved, the lock nut is tightened and you should again check that the free play is within the specifications indicated in the manual.
Adjusting the gap between the pads and brake drums
This brake adjustment is required after a certain operating time. The wear of the friction linings increases, and the gap increases accordingly. In this case, when braking, the pedal noticeably moves forward, approaching the floor.
The current is regulated by eccentrics, which are located above the wheel axles, extending through the brake support plates. Eccentric adjustment, like any brake adjustment, is carried out while the wheel is suspended.
By turning the wheel, the eccentric is immediately adjusted to the amount of clearance until the device begins to brake the wheel.
Installing the brake pressure regulator
The brake pressure regulator is located at the rear and is designed to evenly distribute braking force to the rear axle.
Checking the serviceability of the regulator is carried out with the help of an assistant. When pressing the brake pedal, the assistant looks at the regulator. If the lever (piston) protrudes from the regulator body, all that remains is to check the pressure.
How it works
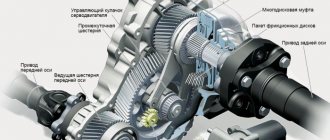
The design of the regulator consists of a lever that is attached to the rear axle and the “shaman” itself. Through this lever (torsion bar) the angle of inclination of the rear of the car relative to the ground is transmitted, respectively, the degree of pressure on the piston. The more the car is pressed, the more it is loaded, the more the piston is pressed - more pressure goes to the rear pads. The diagram below shows how to connect the regulator to the car body and axle.
The regulator itself consists of:
- Housings
- Traffic jams
- Piston
- Piston return spring
- Two fittings to which the brake system pipes are connected. The lower one is supplied with pressure from the master cylinder, the upper one is supplied with a line to the rear brakes.
Principle of operation
As you know, when braking, the front brakes are the first to engage. At the same time, the car “bites” its nose. The whole mass presses on the front, the rear rises. The less cargo you carry in the trunk, the lighter the rear end, which means it will rise higher during emergency braking.
The “sorcerer” is attached to the body, it rises with it. Since it is connected by means of a lever to the rear axle, which is stationary relative to the road, when the car body moves up, the pressure of this lever on the regulator piston decreases. It, under the action of the return spring, closes and reduces the pressure of the brake fluid to the rear working cylinders.
If the trunk is loaded or there are passengers sitting on the rear sofa, then the rear of the car will rise less relative to the road when braking. This means that the lever will put more pressure on the regulator piston, which will not close and reduce the brake fluid pressure. In this case, the rear brakes will work at full power.
Thus, the braking forces on the rear wheels are adjusted, depending on the weight of the load pressing on the rear axle. The smaller the mass of the “stern”, the weaker the rear brakes will work; the larger the weight, the stronger. This is the principle of operation of the brake pressure regulator.
Setting the brake force regulator
Adjustment of the sorcerer should be done on an overpass or inspection hole. At the same time, the car is unloaded and driven to the work site. To perform the manipulation you will need:
- Socket wrench 13 or corresponding socket;
- Drill diameter 2 mm.
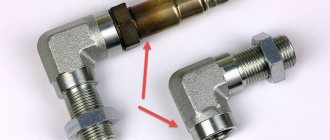
To adjust the sorcerer, use a wrench to loosen the bolt securing it to the lever bracket. Next, use a screwdriver to move the bracket until the resulting gap allows you to insert a prepared two-millimeter drill into it. After this, the bolt is tightened.
Note: the brake pressure regulator of the VAZ-2110 and previous VAZ models turns sour during operation so that it is not possible to move its bracket. In such a situation, you should pour WD-40 liquid over the rusted area, wait 15-30 minutes, and then use a hammer to move the part to the side using a soft drift.
How to check functionality
To do this, we go with a friend to a closed area where there is no traffic or pedestrians. We ask the assistant to stand at a certain distance from the starting point of the car and control the behavior of the rear wheels. We accelerate to 40-60 km/h and press the brake next to the observer. At this moment, you need to remember how the rear wheels behaved when braking.
If the rear brakes did not work, the wheels continued to spin freely until they came to a complete stop - this means that the regulator is faulty or not adjusted. The same conclusion can be drawn if the wheels immediately lock and the “stern” skids. There are two options: adjust the “sorcerer” or check it visually, and if it breaks, replace it.
The video below shows the check of the sorcerer and its incorrect operation . In the first video, the rear and front wheels are locked simultaneously, in the second - only the rear ones:
You can also test it in a garage. Raise the right rear side with a jack. The second person presses the brake pedal. You are trying to turn a hanging wheel. If it doesn't spin, then the brakes are on, which shouldn't happen. The wheel spins and as the jack is lowered, more force is needed to turn the wheel, which means the “shaman” is working correctly. If the test fails, let's look at what could break in the regulator.
Adjusting the brakes on the VAZ-2105
It’s probably not worth reminding once again how important the serviceability of the brake system is. Minor damage or misadjustment can result in brake failure or reduced effectiveness. The consequences in this case can be unpredictable. That is why the brakes should be adjusted from time to time and their performance checked.
When should I start working?
Many car enthusiasts drive their cars for years without paying due attention to the braking system. This is quite dangerous. Brake adjustment is required after installing a new brake disc or pads. In addition, it would not be superfluous to carry out adjustment work after tuning the brake system or serious intervention in its design.
It is important to know that there are two adjustment options - partial and full. In the first case, the work is carried out without disassembling the mechanisms (all work can be done in a garage). In this case, special attention is paid to the pressure regulator, checking the brake pedal travel, adjusting the handbrake, and so on. As for the complete adjustment, it is carried out at specialized service stations and implies a complete revision of all components and replacement of faulty elements.
Features of adjusting brakes on the VAZ-2107
Let's look at how to set up the brake system on one of the most popular domestic cars - the "Seven". We will roughly divide the work into several stages:
- Adjusting the pedal free play. The first thing to do is measure the brake free play. The main condition is that the engine is turned off. The acceptable parameter is 3-5 mm. If the free play is within the range indicated above, then you can proceed to further work. If not, then adjust the free play using a special brake light switch (it is located directly above the brake pedal near its base).
If the switch is too close to the pedal lever, the pedal cannot return to its original position. At the same time, the pads continue to slightly squeeze the brake discs (hence the overheating). To correct the situation, you need to loosen the locknut and change the position of the switch. The adjustment is made until the pedal returns completely to its original position and the free play is in the range from 3 to 5 mm. After completion of work, the locknut must be tightened.
Malfunctions
To determine the cause of the failure, a visual inspection of the mechanism is sufficient, so we climb under the car and take a look.
The most common cause of sorcerer failure is piston jamming.
This is due to its location on the bottom of the car. Strangely, all the road dirt, winter reagents and other “poop” collect on it. We test the piston head for movement. If, when you press it, the rod does not go inward and does not move at all, it is jammed. The first sign of a wedge may be a torn or collapsed boot. If it is damaged, then all the “shit” from the road will get into the regulator body, it will refuse to work.
Regulator controls are missing.
It’s rare, but it happens that a lever falls out, brackets and other parts of the structure break, or simply rot. If something is missing, it will be clearly visible, so the “shaman” does not “shamanize.”
In the case of a visual inspection, nothing criminal was found, everything works - you just need to configure it.
How to regulate
There are several ways to adjust the brake force adjuster. Depending on the availability of certain devices and tools, car mechanics use all of them.
Method 1 – according to “Murzilka”
- We hang the rear axle of the car on a jack
- We rest the ruler against the horizontal platform of the longitudinal spar of the body (in the area where the brake control lever is attached to the bridge, above it)
- By lowering or raising the car body with a jack, we achieve a distance of 14.5 cm from the side member to the place where the torsion bar (lever) is fixed to the bracket.
Remember, the bracket has two bolts - the bottom one is screwed to the bridge, and the top one holds this lever. So, we measure from the top bolt
- Having established this distance, we move to the opposite side, to the place where the “sorcerer” is attached. We remove the rubber boot and shine a flashlight at the point of contact of the piston head with the lever. Using the adjusting bolt (the top one, it slides in the oval hole of the regulator bracket), we turn the “shaman” body until the piston and torsion bar lightly touch.
- Tighten the upper adjusting bolt and the lower fixing bolt. We lower the car and conduct field tests
Method 2 - using a device (article 67.7820-9518)
1. We jack up the car and climb into the hole.
2. Unscrew the bolt securing the adjuster lever from the rear axle bracket, remove it from the eye
3. We screw a special device to the torsion bar, resting its upper part against the body (bottom) of the car. In order for it to rest, you need to raise or lower the car on a jack.
4. If it rests on the bottom - this is the treasured 145 mm, as written in the instructions
5. Next, repeat the steps with the “sorcerer” body, as described in method 1
6. At the end of the adjustment, do not forget to screw the lever into place and throw away the device so that it does not interfere with driving.
Method 3 - unusual
I found it on the Internet, I’ll be honest - I haven’t tried it, I don’t have the necessary tools. To use it you need a laser level gauge or level. We install it on the floor of the garage and repeat all the steps as described in method 2. Except for using the “device”.
We set 14.5 cm from the spar to the laser beam. We combine the regulator control lever with the beam and adjust the position of the regulator body with a bolt, as described in the first two methods. We clamp everything, return it to its place, and carry out the check, as mentioned above. We rejoice at the correct work.
Video on how to regulate the sorcerer on the seven in the third way:
If the adjustment did not help restore the functionality of the brake force regulator, then there are two options: install a new one or throw it away and install a tee instead . Let's look at each of them in detail.
Recommendations
Comments 16
Where should the tube be screwed in?
Never think “this won’t happen to me.” It’s good if it doesn’t happen, but what if it does? You can drive a car for ten years with a bunch of airbags and nothing will happen, but why are they needed then? If you buy a car, throw them away right away. It's the same with brakes. BRAKES ARE YOUR LIFE AND SAFETY!
Well, yes, car designers came up with it in vain, just like that, they had nothing to do. Extract from those documentation: Emergency braking of a vehicle must be carried out with maximum efficiency while maintaining stable movement. This problem is solved by regulating the distribution of braking forces along the axes of the vehicle. The “ideal” distribution is taken to be one in which maximum braking forces are applied to all wheels, equal to the adhesion forces of the wheels with the road. Below, such braking forces will be called “ideal”. The wheels are on the verge of blocking under the influence of these forces. The movement of the car is considered stable if all the wheels or wheels of the front axle are on the verge of blocking. When the wheels of the rear axle are on the verge of blocking, the vehicle's movement is unstable. The adhesion force Pφ of the wheel is proportional to the normal reaction Zк of the road to the wheel Pφ= Zкφ, where φ is the coefficient of adhesion of the wheel to the road. When braking, the normal reactions on the wheels change: on the wheels of the front axle they increase, on the wheels of the rear axle they decrease by the same amount. Therefore, the distribution of braking forces along the axes should be variable depending on the weight state of the car and road conditions, assessed by the adhesion coefficient φ. The braking force Ti on the wheels of the ith axle is generally expressed by the dependence Ti=piKi where pi is the brake fluid pressure in the brake circuit of the ith axle; Ki is the proportionality coefficient of the i-th axis. The proportionality coefficient depends on the design of the brake mechanism and the radius of the wheels. For each car model, its value is constant. The ratio of the “ideal” pressures p1 and p2 in the brake circuits of the front and rear axles, at which the braking forces will be maximum and all wheels are on the verge of blocking. I think I explained it clearly? Well, here’s another: www.toyota-club.net/files…4-05-10_rem_zr_coldun.htm And for a snack: autonewsmonitoring.info/p…koldun-na-avtomobile.html Now let’s attack me screaming, yes I am It’s not my first day behind the wheel, but I’m a professional Schumacher. Guys, I thought so too 15 years ago, only my thoughts changed after I tumbled through the roof three times. And the experienced mechanics then said why. Yes, I later understood it myself when I studied the principle of operation of this mechanism and analyzed my accident
Read more: Volzhsky standard bearings reviews
There are too many smart people and no brains, but are YOU sure that your sorcerer is a worker and not a sour one? And that he won’t let you down at the right time? I had cars with and without the sorcerer and I didn’t see any difference in emergency braking either, I will say moreover, emergency braking is the most dangerous, all the wheels are blocked and you are dragged straight or to the side
gud. do not listen to anyone. Everything slows down perfectly, my working 14 does not stop as well as my 07 without a sorcerer. nothing goes anywhere and the ass doesn’t move forward. even with a sharp and full press on the brake.
I also want to throw out the sorcerer. The brakes are now weak even after bleeding, it seems to me that the reason is a sorcerer. Is it worth throwing it away?
I threw it away and don't regret it. It brakes better in both summer and winter.
Do I need to buy something or is it simply removed and the connections can be secured without additional nodes?
You unscrew the hose from the sorcerer and screw it into the tee, from which the tubes go to the wheels. All.
Ok got it, well I'll try)
I threw it away and don't regret it. It brakes better in both summer and winter.
and how do you achieve this? the rear is lighter at the moment of braking and in general, when skidding the rear will grab and the front will slow down, I drove without a sorcerer, it’s no better
How to replace
To change the brake adjuster, we will arm ourselves with the following tools:
- Use a metal brush and WD-40 penetrating lubricant or rust converter. If we run out of such liquids, then we make them ourselves; read how to do this in this article.
- Special wrench for unscrewing brake pipes.
- The key for “10” and “13”, which can be used to disassemble the floor of the “seven”.
Before dismantling, it is advisable to clean all threaded connections from dirt; due to their location, there will be enough of it there. We use a metal brush and carefully remove dirt without damaging the thread. We wet it generously with rust converter so that the nuts and bolts can be easily unscrewed. We wait a while for WD to take effect.
- Disconnect the governor control rod from the axle and body.
Using a “10” wrench, unscrew the nut securing the lever to the rear axle bracket. Using the same wrench, unscrew the nuts of the bracket holding it to the body.
- Use a special wrench to remove the brake pipes from the mechanism. Unscrew the “sorcerer” mounting bracket.
- We free the muffler from the rubber suspension and lower it down so that it does not interfere.
- Carefully pull the brake adjuster with traction from the car and get out of the hole.
- We lay the structure on a workbench and move aside the boot that protects the junction of the torsion bar and the “shaman” valve. We unscrew the bolt holding the lever locking ear from the body and remove it.
- We throw away the non-working “sorcerer”, because there is no point in repairing it.
Attention! This lever must be handled carefully. It is difficult to find it on the open market, since it is not in demand and is not imported, only on order. The new regulator is sold without it.
Assembly is carried out in reverse order. After installation, do not forget to adjust it, as stated above.
How to install a tee instead of a sorcerer
In the case of the VAZ 2106-07, you can simply remove the regulator; the tee is already installed in the system; the main line from the GTZ is simply connected to it. More about this.
- Using a special “10” wrench, unscrew the brake pipe fittings from the mechanism.
- We unscrew the tube coming from the brake adjuster from the rear brake hose; we will no longer need it.
- Disconnect the control lever from the axle and body. We take out the regulator assembly with the rod, go to the trash can and throw it away.
- Carefully bend the brake pipe from the master cylinder to reduce its length. It should not dangle under the bottom of the car. We connect it to the brake hose of the rear brakes.
Now there will be no “shaman” in the system who controls the degree of braking of the rear wheels. All the force from the main one goes through the tee to both rear brake cylinders. Therefore, deceleration will occur with both wheels, simultaneously with the front ones. You must control the drift yourself.
Examination
The operation of the VAZ-2109, 2110 and other AvtoVAZ models is checked on the move, in closed areas. To do this, accelerate the car to a speed of 40 km/h and sharply press the brake. The rear wheels should lock 1/2 second later than the front wheels.
The wheels are monitored by an assistant located outside the car. If wheel locking occurs noticeably later or does not occur at all, and also if the rear axle is locked simultaneously with the front, the sorcerer adjustment procedure is repeated.
To increase the response time of the rear brakes, the gap between the adjuster and the bracket is increased; to shorten it, it is reduced accordingly.
Good afternoon dear friends. In this review we will talk about the brake force regulator - an integral element of the braking system of classic VAZ models. People call him “sorcerer”, “shaman”. Because not every owner of a Zhiguli knows why he is needed and how he works, how he “shamanizes” his car. Today we will try to clarify the meaning of the brake pressure regulator and its purpose when braking a car. Let's start from the very beginning, where it is located and what it is needed for.