The main signs of injector malfunction on a VAZ-2114: check and signs of clogging
If, while driving, your car lost its dynamics, began to accelerate more slowly, and in general there were interruptions in its stable operation due to difficult starting and increased fuel consumption, one of the injectors installed on the engine may have failed. In this article we will tell you in detail how to check them, and what are the nuances in such work.
Symptoms of a problem
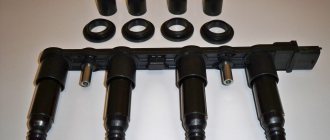
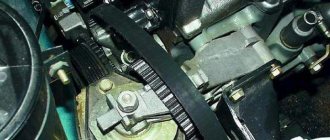
Fuel rail
There are several key symptoms that indicate the presence of such a problem:
- There are misfires at idle;
- Fuel consumption increases sharply;
- There is instability in engine operation;
- The car accelerates more slowly than usual when the gas pedal is fully pressed.
It is very important to identify such a problem, since the injectors supply fuel to the system. Without fuel, engine operation is impossible. It is not always worth replacing them immediately, since they often need to be cleaned.
Step-by-step procedure for dismantling injectors
Despite the fact that many advise carrying out such work in the company of an assistant, it is difficult, but it is quite possible to do it alone, with your own hands.
- First of all, put the car on a flat surface and turn on the handbrake.
- We relieve the pressure in the fuel system: to do this, disconnect the terminal from the fuel pump and start the engine. When it has used up all the remaining gasoline, crank the engine with the starter a couple more times, thereby finally relieving the pressure in the fuel line.
Unscrew the gasoline supply pipes
Use a screwdriver to unscrew the bracket on which the fuel pipes are attached.
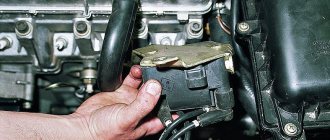
Removing the fuel rail
Removing the injector from the VAZ-2114 fuel rail
Depending on which of the injectors has failed, the replacement process is absolutely identical.
- When the injector is on the ramp, press the spring retainer and remove the block.
As a rule, nothing prevents you from removing the lock.
The bracket will come out of place if you pry it with a screwdriver.
Step-by-step procedure for checking injectors
When nothing interferes with the operation of the dismantled ramp, we reconnect the power supply and gasoline supply pipes to it. Don't forget about the negative terminal of the battery.
- When everything is connected and ready for testing, we fix the ramp with the injectors so that four measuring containers of the same volume can be placed under them. This is necessary to ensure that the measurements are made as accurately as possible.
- Next, it is best to ask an assistant to sit in the driver’s seat, and if this is not possible, secure the ramp motionless and start the engine yourself.
- While the starter is “spinning” the engine, make sure that the injectors work in the same rhythm and the fuel is sprayed evenly. When carrying out such diagnostics, it is very clearly visible which of the four injectors is “snotty” or does not work at all.
It is noticeable how one of the injectors works differently than the other.
The check ends some time after the injectors are turned off.
The latter should be given special attention if any of the pads does not work at all, because damage to the wiring becomes the reason for this. If damage is present, then it is necessary to replace the nozzle with a new one (see “more about choosing nozzles”).
Procedure for checking injector power supply
- First of all, disconnect all the pads from the injectors.
- Then, we connect two wires to the pre-working block, the other end of which we bring to the “non-working” injector.
- Next, turn on the ignition and if the injector starts working, this means it is necessary to replace the non-working element of the electrical circuit - the block, and if not, then only the injector needs to be replaced.
Resistance faults
- In order to diagnose the injector windings, you must disconnect the negative terminal from the battery and all injector power connectors.
- Next, we connect the multimeter probes to the injector contacts and measure their resistance.
Values are within normal limits.
As you can see for yourself, in order to check the condition of the injectors on a VAZ-2114 with your own hands, there is nothing difficult. You just need to carefully read our article and strictly follow the order of actions.
How to check injection nozzles without removing them from the engine
Malfunctions of the injector (nozzles) occur on both diesel and gasoline engines. In the design of the power supply system of an injection engine, the nozzle is an element that is responsible for injecting a sprayed portion of fuel into the combustion chamber under a certain pressure.
Precise dosing, tightness and timely operation of the injection nozzle ensure stable and proper operation of the engine in all operating modes. If the injector “flows” (passes excess fuel at a time when its supply is not required), the efficiency of fuel atomization decreases (the shape of the torch is disrupted) and other injector malfunctions occur, then the engine begins to smoke gray or black smoke, loses power, consumes a lot of fuel and etc.
Read in this article
Which indicates possible problems with the injector
Let us immediately note that there can be many reasons for unstable engine operation, ranging from a clogged fuel filter, a broken fuel pump, a failed spark plug or a faulty coil, to loss of compression, problems with the timing belt, etc. Along with this, one of the main signs of injector malfunction is difficulty starting the engine, especially when cold, as well as gasoline or diesel consumption (depending on the engine type), which increases noticeably. It is also necessary to note the unstable operation of the internal combustion engine in idle mode, similar to the so-called “triple” of the engine.
When driving, it is possible that one or several symptoms may occur quite frequently:
- presence of jerks, very slow reactions when pressing the gas pedal;
- obvious failures and loss of dynamics when trying to accelerate sharply;
- the car may jerk while driving, when releasing the gas, and also after changing the load mode on the engine;
It must be added that such a malfunction must be corrected immediately, since problems with the injector negatively affect not only the service life of the engine and transmission, but also overall traffic safety. In a vehicle with faulty injectors, the driver may experience serious difficulties when overtaking, on steep hills, etc.
How to understand what is wrong with the VAZ-2114 engine
The concept of “engine tripling” was invented by motorists themselves. It is associated with the design and operation of four-cylinder internal combustion engines. If one of the four cylinders failed, the internal combustion engine still continued to operate on the three remaining cylinders. But such a failure was distinguished by a characteristic sound, which was called “engine tripping” - functioning on only three cylinders. In this case, the fuel mixture in the idle cylinder will not burn as expected, but will accumulate.
If you do not respond to such a failure in the system in time, the fuel mixture will be diluted with oil, enter the crankcase with oil and dilute it thinner and thinner. In this case, the oil will lose its lubricating functions, which will lead to rapid wear of the rings, cylinder-piston group and other important parts of the car. A little later, the engine will have to be repaired not partially, but completely.
Similar failures occur in the VAZ-2114. They can be recognized by their characteristic features:
- The engine in idle mode manifests itself with periodic twitching, unevenly.
- When driving, the VAZ-2114 does not gain the required power.
- The car moves jerkily.
- If you press the gas pedal, failures in engine operation will be detected.
- An uneven exhaust comes out of the muffler, which is interrupted and accompanied by popping noises.
Against the background of these signs that the VAZ-2114 engine is failing, the driver may notice an increase in fuel consumption.
Self-check of injectors
Let's start with the fact that automobile injectors are divided into several types, of which two types have found widespread use at different times: mechanical injectors and electromagnetic (electromechanical) injectors.
Electromagnetic injectors are based on a special valve that opens and closes the injector to supply fuel under the influence of a control pulse from the engine ECU. Mechanical injectors open as a result of increased fuel pressure in the injector. Let us add that modern cars often have electromagnetic devices installed.
To check the injectors with your own hands without removing them from the car, you can use several methods. The simplest and most affordable way to quickly check injection nozzles without removing them from the car is to analyze the noise emitted by the engine during operation.
How to check the power supply to the injectors
This check is carried out if the injectors themselves are working, but any of the injectors do not work when the ignition is turned on.
- for diagnostics, the connector is disconnected from the injector, after which two wires need to be connected to the battery;
- the other ends of the wires are attached to the injector contacts;
- then you need to turn on the ignition and record the presence or absence of fuel leakage;
- if fuel flows, then this sign indicates problems in the electrical circuit;
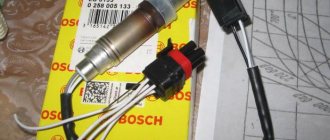
Another diagnostic technique is to check the injector using a multimeter. This method allows you to measure the resistance on the injectors without removing them from the engine.
- Before starting work, you need to find out what impedance (resistance) the injectors installed on a particular vehicle have. The fact is that there are injection nozzles with both high and low resistance.
- The next step is to turn off the ignition and also reset the negative terminal from the battery.
- Next you will need to disconnect the electrical connector on the injector. To do this, you need to use a screwdriver with a thin tip, with which you need to unclip a special clip located on the block.
- After disconnecting the connector, switch the multimeter to the desired operating mode for measuring resistance (ohmmeter), connect the contacts of the multimeter to the corresponding contacts of the injector to measure impedance.
- The resistance between the outer and central contacts of a high-impedance injector should be between 11-12 and 15-17 ohms. If the car uses low resistance injectors, then the indicator should be from 2 to 5 Ohms.
If obvious deviations from acceptable standards are noticed, then the injector must be removed from the engine for detailed diagnostics. It is also possible to replace the injector with a known good one, after which the engine performance is assessed.
Comprehensive diagnostics of the operation of injectors on the ramp
For such a check, the fuel rail will need to be removed from the engine along with the injectors attached to it. After this, you need to connect all electrical contacts to the ramp and injectors if they were disconnected before removal. It is also necessary to return the negative terminal of the battery to its place.
- The ramp must be placed in the engine compartment so that a measuring container with a scale can be placed under each of the injectors.
- It is necessary to connect the fuel supply pipes to the ramp and additionally check the reliability of their fastening.
- The next step is to turn on the ignition, after which you need to crank the engine a little with the starter. This operation is best performed with an assistant.
- While an assistant rotates the engine, check the efficiency of all injectors. The fuel supply must be the same on all injectors.
- The final step will be to turn off the ignition and check the fuel level in the containers. The specified level must be equal in each container.
In addition to self-checking, you can use the injector diagnostic service at a car service center. This operation is performed on a special testing stand. Testing an injector on a bench allows you to accurately determine not only the efficiency of fuel supply, but also the shape of the torch during fuel spraying.
How to check injectors without removing them from the engine?
Checking the winding resistance level on the injectors
1. You can carry out an inspection by turning off the ignition and removing the negative terminal from the battery.
2. Using a thin screwdriver or an awl, you need to unclip the spring clip on the block.
3. Disconnect the connector from the injector.
4. Attach an ohmmeter to the injector terminals and measure the winding resistance.
5. If the resistance between the side and central pins of the connector is within 11–15 Ohms, then the injector is working properly. If the device shows more or less than required, it should be changed.
Checking the functionality of all injectors
1. Initially, you need to remove the fuel rail on which the injectors are installed.
2. Then you should connect the wire block to the ramp harness. If the “-” terminal was removed from the battery, then put it back on.
3. Connect the fuel pipes to each other and, using a wrench, tightly tighten the fittings securing them.
4. Place a measuring cup or any other container with markings under each nozzle.
5. Using the starter, crank the engine and monitor the operation of all injectors. Fuel should come out evenly from each.
6. Turn off the ignition and check the fuel level in the measuring cups, it should be the same. If the amount of fuel in the containers does not match, replace or clean the nozzle that has come out of alignment.
7. Inspect all injectors for flaws or defects. There should be no fuel leaks on the spray part when the ignition is turned off. If there are such flaws, then the part is not sealed and needs to be replaced.
How to clean the injectors yourself without removing them from the engine
During the diagnostic process, a common cause of unstable engine operation is that the injection nozzles are clogged. There are several ways to clean injectors, among which mechanical, ultrasonic or cleaning using special chemical compounds can be used.
In some cases, pouring a special injector cleaner additive into the fuel tank is enough to normalize the operation of the entire system. It is also recommended to rev the engine to high speeds at certain intervals and accelerate the car to 110-130 km/h. on flat sections of the path. In this mode you need to drive 10-20 kilometers. Continuous operation of the injectors under load allows for so-called self-cleaning.
Cleaning the injector should be done as a preventive measure, and not after signs of malfunction appear. If the car is operated in city driving mode on fuel of questionable quality, then the interval of preventive measures should be reduced in relation to individual operating conditions.
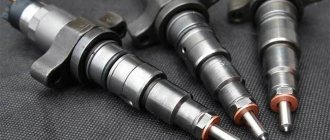
When and why you need to remove fuel injectors from the engine. Removing injectors on gasoline and diesel engines: features of the dismantling process.
Cleaning a car injector without removing the injectors. Methods for cleaning injectors with removal on a cavitation stand. Ultrasonic and hydrodynamic cavitation.
Malfunctions of diesel injectors, checking and self-identification of problems. Cleaning diesel engine injector nozzles, regulating injection pressure.
Common diesel engine malfunctions and diagnostics of units of this type. Checking the fuel system of a diesel engine, useful tips.
Operating principle and distinctive features of gas injectors. Basic parameters when choosing nozzles for gas equipment 4. Which gas injectors are best to buy.
Features of operation and causes of malfunctions of diesel injectors. How to independently remove, troubleshoot, disassemble and repair diesel engine injectors.
Injectors on the VAZ 2114: faults and their elimination
In the VAZ 2114, the carburetor, used in AvtoVAZ cars before this model, was replaced by a more modern injector. If earlier the fuel supply could be adjusted manually by moving the valves, now an electronic system has begun to control the injection of gasoline, and in order to customize it you need to arm yourself with a computer and a programmer.
To carry out control using the ECU, it was necessary to install many sensors on the engine, increase the pressure in the fuel rail, and perform injection using injectors.
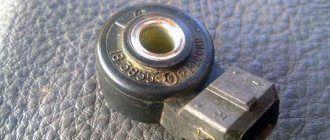
Injectors are solenoid valves that open a very small hole when the ECU sends a signal to it. Due to high pressure, fuel is injected through this hole. How much gasoline will be injected into the combustion chamber depends on the opening time, hole size and pressure. The time is calculated by the ECU in accordance with a program that takes into account the indicators of many sensors.
The maximum possible performance of VAZ 2114 injectors depends on the size of the hole; when tuning, they are replaced with more efficient ones, but do not forget about the pressure. It is created by the fuel pump, and is discharged from the fuel rail by the regulator into the “return”.
When installing powerful injectors on a VAZ 2114, it will most likely be necessary to improve the fuel pump so that it can maintain the required pressure and ensure normal operation of the injectors.
Injectors for the VAZ 2114 8 valves and 16 valves are installed one on each cylinder, that is, there are four in total. Fuel is injected not directly into the combustion chamber, but into the intake manifold, which also branches into four in front of it, where gasoline is mixed with air; for this, gasoline must be sprayed as much as possible before injection.
This allows the mixture to be formed separately for each engine cylinder, which improves the mixture performance.
Many people believe that the fuel injection system is complex in its design, but in fact it is not.
The entire fuel system for the VAZ 2114 consists of these elements:
- Gas tank.
- Coarse filter located in front of the fuel pump.
- Submersible fuel pump, which is located directly in the gas tank.
- Fuel line.
- Fine filter.
- Fuel rail.
- Injectors inject fuel from the rack into the intake manifold.
- Pressure regulator.
- Return fuel route.
From all this, the ECU controls the activation of the fuel pump and the opening/closing of the fuel injectors.
Malfunctions that injectors may have
Injectors are a fairly precise mechanism; they can open and close several times per second, while providing:
- lightning-fast opening;
- good fuel flow;
- fine atomization of gasoline for better mixing with air;
- tight and fast closing.
The life of injectors is highly dependent on the quality of gasoline and the frequency of replacement of fuel filters. Any, even the smallest debris can prevent them from fulfilling their purpose.
Over time, the injectors become clogged with deposits and the following problems may occur:
- The injectors do not open immediately when a signal is given, or if they do not open at all, they become jammed.
- Less gasoline may pass through a clogged hole than the ECU calculated, this will lead to a lean mixture.
- Debris can also interfere with the atomization of fuel, causing it to flow in a stream and not mix enough with the air.
- A loose closure means that more gasoline than necessary will enter the combustion chamber.
Such malfunctions in the fuel system can, in turn, lead to the following problems with the operation of the engine as a whole:
- misfires at idle;
- significant loss of power;
- unstable engine operation;
- increased fuel consumption;
- Difficulty starting the engine.
The reason for such changes in operation may be dirty or failed injectors. They very rarely become completely unusable and you can always try cleaning them before replacing VAZ 2114 injectors.
To increase the service life, it is recommended to clean the injectors of the VAZ 2114 every 40 thousand kilometers; the service life also greatly depends on the quality of the gasoline used.
What you need to know about injectors
The quality of the fuel used has a huge impact on the safety and efficiency of the injectors on your VAZ 2114. Alas, the quality of domestic fuel leaves much to be desired. If you regularly fill your car with low-quality gasoline, the injectors will not last more than 120 thousand kilometers.
Unscrew the fuel pipe
The optimal replacement frequency is about 80-90 thousand kilometers.
As for the cost, original injectors for the VAZ 2114 cost from 500 rubles apiece . Foreign analogues are more expensive, sometimes several times. But the price is largely justified by reliability and longer service life. Therefore, if possible, buy high-quality imported devices.
Checking the serviceability of VAZ 2114 injectors
Before cleaning the injectors, you need to check their performance; there are several methods for this:
- With the engine running, touch the injectors with your hands; they should vibrate, but not from the operation of the internal combustion engine, but on their own. But this only speaks about the fact of their opening and closing; nothing can be said about the quality of their work using this method.
- You can also check the fact of operation by unscrewing the cap nuts with the motor running. At the same time, the engine speed should decrease; if this does not happen, then the injector is not working.
- You can check the quality of the injectors yourself only by removing them from the engine. So, after removal, you need to connect its contacts through a button to the battery, and supply some liquid under pressure to the input (a carb cleaner in a can will do). When you press the button, the nozzle should open and spray the liquid evenly, namely spray, and not just splash. If this does not happen, then the nozzle may be clogged, or there is not enough fluid pressure at the inlet. When the button is not pressed, the nozzle should not leak. This method also does not indicate the amount of deposits on the nozzle and the safety of its performance, although you can resort to measuring the volume of liquid sprayed, but the result will still not be accurate enough.
- Entrust the inspection to professionals at a special stand, where they will check the injector according to all parameters.
They are serviceable, but with problems with spraying and opening/closing, you can try to rinse them and, if there is no result, clean them.
How to restore the performance of a VAZ-2114 engine: expert advice
Automotive repair experts recommend that motorists use several tips to restore the functioning of a VAZ-2114 engine that is tripping.
First tip: check and replace the electronic control unit.
Second tip: check and replace the oxygen sensor.
Third tip: check the functionality of the crankshaft position sensor. This can be done using the electronic control unit. This device will generate an error if the crankshaft position sensor is faulty. This means you will have to replace it with a new one.
Fourth tip: check and replace the ignition coil.
Fifth tip: check and replace the air filter.
Sixth tip: check the correct placement of the timing belt.
As you can see, almost every piece of advice contains two stages - checking and replacing some part related to the proper functioning of the VAZ-2114 engine. Therefore, the easiest way would be to immediately allocate a few hours of your time in order to come to grips with the search for the problem of its tripling. Although the best option, but more expensive, is to entrust the inspection to qualified service center specialists, who will find a solution to the existing problem much faster.
Cleaning injectors VAZ 2114
To clean the injectors, they need to be removed from the car, this is done as follows:
- From a vehicle with the engine not running, disconnect the battery terminal.
- Relieve pressure in the fuel rail. On the back there is a valve with a cap; by unscrewing it and pressing the valve with a thin screwdriver, you can release the pressure.
- For convenience, remove the air filter pipe.
- Disconnect both fuel pipes.
- Disconnect the connectors from the injectors.
- Unscrew the fuel rail.
- The injectors are removed along with the ramp; in order to disconnect them, you need to move the fixing washer and pull the nozzle.
After removal, you can begin cleaning yourself:
- Remove the O-rings from the injectors and soak for a short time in acetone or gasoline.
- After soaking, carefully clean the nozzles with a needle and remove any other external deposits.
- To clean the inside you will need carburetor cleaning fluid, a syringe, a tube that fits tightly in diameter to the injector inlet holes, and a button with wiring.
- Connect the injector through the button to the battery terminals, as you did when checking.
- Fill the syringe with liquid and connect it to the nozzle using a tube.
- Apply pressure with the syringe and press the button.
- Liquid should spray out of the nozzle.
- Repeat this procedure several times, constantly maintaining pressure with the syringe.
- After washing, it is better to immediately replace the fuel filters.
This method removes only surface deposits; for deep cleaning of VAZ 2114 injectors, send them for ultrasonic cleaning.
VAZ 2114 injectors - their selection and replacement, as well as malfunctions
So we got around to cleaning the injectors or, as they say in the services, the injector. The reason for this action was, as it seemed to me in the last month, insufficient throttle response on the highway. There were no obvious signs of clogged injectors or throttle: the car runs stably at idle. Or maybe I just got too drunk and this condition of mine coincided with a period of driving in fairly hot weather, and in the heat the car stalls even with clean injectors, because the air is less dense than in cool weather.
I remember one day relatively recently I went to my mother-in-law’s dacha to pick berries, we went there at about 11-12 o’clock, we left from there at about 20 o’clock. So, on the way back the car was noticeably faster, accelerated easier, and at the same time instantaneous fuel consumption according to BC was less, like the average per 100 km. However, for some reason I moved away from the topic of injectors, or as Winnie the Pooh used to say: “So, where was I going to go?” And I was going to outline my sequence of actions in the archetypal matter of periodically cleaning the injector, especially considering the quality of our gasoline.
And in general, for the purposes of prevention, it would also be time, otherwise the mileage has already approached 80. I didn’t clean the injector at the service center, it was strangled by a toad - that’s about 1.5 - 2 thousand rubles. And while cleaning, I realized that this is the real price for this work, but it’s better to do it myself, because there is nothing complicated, and the money is 10 times cheaper. You will need a carb cleaner (150 rubles), an injector block, a button and a light bulb with wires (30-50 rubles).
Well, let's get started. The first step is to relieve the pressure in the rail. To do this, remove the terminal from the fuel pump and then try to start the engine. For some, the engine seizes and even runs for some time on the remains of gasoline in the ramp, but mine flatly refused. In general, I turned the starter 2 times at 10 revolutions each. After that, we remove the terminal from the battery, we won’t need it anymore.
Next on the list:
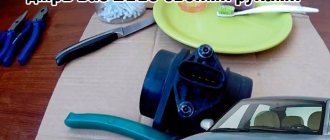
1. Remove the air filter along with the corrugation that goes to the throttle valve and remove the mass air flow sensor connector.
2. I also recommend removing the throttle valve itself. There will be more space and scope for manipulating the removal of the ramp, and you can also clean it. We also remove 2 connectors.
3. Carefully check the temperature of the exhaust manifold with pens! Why do you ask?, but so that the remaining gasoline in the ramp, when unscrewing it from the line, does not flare up (getting on the manifold) and force you to check the expiration date of your fire extinguisher. For example, my pipes were already just warm, unlike the valve cover, it remained hot for quite a long time.
4. Next, disconnect all the injectors from the power supply, unscrew the ramp from the line and unscrew the 2 hex bolts that secure the ramp itself. The bolts are VERY tight! It seems they are coated with a little thread sealant at the factory. The main thing is to tear them out of place, after which they can be unscrewed literally with your fingers.
The procedure for removing the ramp is quite sophisticated. After unscrewing the 2 hexagons, the ramp rests on the injectors inserted into the intake manifold quite well. Although it sways easily. We pull it out by shaking it and at the same time pulling the nozzles out of their seats. Then we turn the ramp along its axis 180 degrees so that the nozzles point upward and pull it out from the side of the 1st cylinder. I was unable to pull it out without turning the ramp over, because it rests on the intake manifold. In Murzilka, removing the ramp involves removing the entire intake tract, but I did it without unnecessary manipulations.
ramp with nozzles
carburetor cleaner
Then remove the clamps from the injectors and pull the injectors out of the ramp. They are held in place on the ramp simply by rubber bands, but they fit so damn tight! Honestly, I barely pulled it out. Immerse the injectors in a container with carburetor cleaner for 30 minutes or more. I recommend removing the rubber bands first. I also filled the ramp with cleaner. While they are soaking, we go to lunch, because war is war, and lunch is on schedule. That's exactly what I did.
injectors drooping
ramp with cleaner
We ate and began assembling the device for direct cleaning. My device consists of a syringe, an injector block, a light bulb and a non-latching button. At the time of soldering, the button died the death of the brave: the soldering iron turned out to be more powerful than necessary and the contact was simply unsoldered inside the case, as a result of which the button stopped working, so the role of the button was performed by 2 tinned wires. By shorting the wiring for a couple of fractions of a second, we simulate the opening of the injector. The power wires were connected directly to the battery. The light bulb is needed for voltage drop and as a current-limiting resistor.
After the injectors have acidified, we take some soft cloth and begin to diligently but carefully clean the visible carbon deposits near the nozzles and on the fuel supply side.
After we have cleaned the injectors, we connect them one by one to our device. Everything is clear with the terminal, I’ll describe it myself, so to speak, the “dropper”. We put the syringe on the gasoline intake end of the nozzle.
IV
True, your injectors may be different because at the factory, even within the same batch of cars, they install the injectors that are available, this is not critical, but before the flushing procedure you need to think about a couple of options for connecting it to the flushing system. We cut off the nose of the syringe and this end fits perfectly onto the nozzle with the necessary force and tightness, as if these syringes were specially made for these purposes.
Before putting the syringe on the nozzle, fill it almost completely with cleaner, or put the syringe on, pull out the piston and fill in the cleaner, then carefully insert the piston. It is better to do this work with a partner: one presses the piston, creating the necessary pressure, the other closes the wires, simulating the pulses supplied to the nozzle. It is impossible to keep the contacts closed for a long time because the injector winding may burn out, because it is designed for intermittent operation. In this simple way we clean all 4 injectors. One more thing: after the injectors have turned off, liquid may get into the contacts; this is not critical when they are lying in this liquid. The main thing before connecting the terminal is to blow the contacts yourself or with a pump in order to dry them and avoid short circuits and damage to the nozzle.
scheme
After cleaning the injectors, I cleaned the throttle body. In general, it was not dirty, there was a slight coating on the inside. Just in case, I bought a throttle body gasket, but as it turned out, it was in vain (or maybe not). The fact is that when installing the gasket, it blocks some hole (not round, but of such a complex shape) going into the manifold. Therefore, in order to free myself from the need to once again remove the throttle, I decided not to install it.
air intake tract
throttle and gasket
After all the cleaning procedures, we reassemble in the reverse order, connect all the sensors, etc. After installing the ramp and everything else, I discovered that I had not installed the injector retainers on the ramp. They apparently serve to ensure that when the ramp is removed, the injectors remain on it and do not stick out from the block. I decided not to bother with this matter for now because... They do not affect the installation strength of the ramp and injectors in any way. The ramp and injectors fit like a glove even without these clamps.
clean
clean
injector seats
The last thing we do is connect the power to the fuel pump and check all the sensors in the engine compartment again. Connect the battery terminal and start the engine. Mine started right away, ran lightly for 10-15 seconds, apparently there were some cleaner residues in the injectors, and it started working smoothly. I drove a little in first gear on a “country” road, turned it up to 5 thousand. Works great. Well, in general, I end my story on this positive note.
How often do you need to change VAZ injectors and how can you determine the malfunction?
The fuel injector is the most important part in the design of every car. Not a single modern passenger car can do without it, including the cars of the Volzhsky Automobile Plant of the tenth family. Injectors (VAZ 2110-2114) are used to atomize fuel due to high pressure, which amounts to several atmospheres. In this article we will learn how to determine the malfunction of this spare part and how long it takes to replace and clean them.
Service life
Now, probably, every Russian motorist knows what “quality” fuel he puts into the tank. The gasoline that is sold at gas stations for 30 rubles per liter cannot be called pure. In any case, it will contain a certain percentage of sulfur and impurities, but exactly how much of it will be in gasoline depends on the integrity of the company. As practice shows, fuel injectors (VAZ 2112-2114) need thorough cleaning after 20-30 thousand kilometers. Therefore, they need to be cleaned at least once a year.
Of course, there is no need to wait until another 20 or 30 thousand kilometers are added to the meter needle (perhaps this spare part will last another 40 thousand), since their exact service life is always different. And in order to notice a malfunction in time, you need to know certain signs by which the car behaves strangely. These include the following factors:
- The engine suddenly stalls at idle.
- Average fuel consumption increases by 10-30 percent.
- The machine cannot produce the power it developed before.
- The speed of the car either increases or decreases.
- Exhausts have become more polluted.
If you notice at least one of these signs, it means that the injectors on your VAZ need cleaning. However, before starting work, it is necessary to diagnose the car and only after that (if necessary) clean it. Why "if necessary"? The fact is that not only VAZ injectors, but a number of other units and components can show similar signs. Therefore, there is no need to do anything ahead of time.
As for diagnostics, of course, it needs to be carried out at a service center. But you don’t have to clean VAZ injectors there - you can do this process yourself. If you give your iron friend a few hours of free time, you can save about 1.5 thousand rubles.
What changes after the injectors are cleaned?
In this case, VAZ will get rid of all the problems that overtook it before the repair. After this process, you will notice that the car begins to consume less gasoline, the engine no longer stalls, the speed does not jump, and the power will increase significantly. In winter, the engine will start more smoothly, and the acceleration speed may also increase. It should also be remembered that the effectiveness of cleaning directly depends on the degree of contamination - the more accumulations there were on the injectors, the more problems with the operation of the gasoline engine will be eliminated at the output.
Injectors for VAZ 2114
On VAZ cars, carburetor engines were replaced by inverter engines. Unlike the previous generation of engines, now the fuel supply to the combustion chamber is carried out not by one unit - the carburetor, but by an entire system. Car enthusiasts call it an injector.
In such an engine, it will no longer be possible to manually regulate fuel consumption or engine idle speed. An injector is a complex system that is controlled by special electronics. It receives and analyzes data from a large number of sensors, and then regulates the fuel supply to the engine.
VAZ 2114 is equipped with an injection engine. You can see a “check engine” sign on the dashboard. If this signal comes on, you need to diagnose the vehicle's operation in order to maintain the serviceability of all components. However, if, in addition to the burning icon, other symptoms of deteriorated vehicle performance are recorded, then you need to check the VAZ 2114 injectors.
VAZ 2114 car injector system
The VAZ 2114 is equipped with an engine with a distributed fuel injection system (injector), and the stable operation of the engine of this car depends on the quality of gasoline. A low octane number of fuel leads to a drop in power and unstable operation of the power unit. As a result, any parts of the internal combustion engine (ICE) may fail. Mechanical impurities in fuel lead to clogging of fuel filters. the fuel pump is damaged. the injectors are clogged. You have to disassemble the fuel system (TS) and clean the injector. How the VAZ 2114 injector works, how to clean it and in what cases, how to remove and install the fuel rail, we will look at in this short article.
Signs of injector failure
If misfires occur at idle, if the engine becomes unstable, and fuel consumption increases significantly, if the car accelerates slowly, you need to diagnose the injectors. An injector is an electromechanical atomization system that supplies fuel to the combustion chamber. If the nozzle is dirty or faulty, it must be replaced or cleaned at all costs - repair is useless.
During engine operation, various deposits remain in the elements of the car’s fuel system, namely injectors, fuel frame, and intake valves. The main reason for the deteriorating performance of nozzles and the fuel system is, first of all, their contamination. One of the main causes of pollution is the presence of heavy fractions in fuel. Deposits accumulate especially intensively immediately after the engine has stopped.
At this point, the injector body is heated by the engine, and the fuel does not cool the atomizer. Lighter fractions in the working area of the nozzle will simply evaporate, and heavier fractions will accumulate in the form of deposits and thereby reduce the cross-section of the channel. Deposits 5 microns thick can change the channel capacity by a quarter. If the fuel spray holes become dirty, this will impair the creation of the air/fuel mixture.
Since the gasoline sold at domestic gas stations does not always meet modern standards, the injectors do not last even 100 thousand km. The cost of a new VAZ part is about 500 rubles. Although many car enthusiasts argue that it is worth buying imported components.
How to check injectors without removing them from the engine
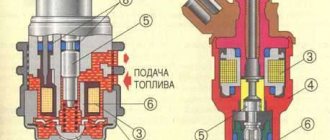
The injector is an electromechanical valve that acts as an electric magnet. When voltage is applied to the injector winding, an electromagnetic field arises that can retract the core and needle of the shut-off device, while allowing a flow of fuel to the engine combustion chamber. An additional fuel filter is mounted on the input channel of the devices.
The injector is the final element of the fuel system, into which fuel enters under high pressure. The entire operation of an internal combustion engine directly depends on the performance of this component. When the pressure level drops when opening the injector, it opens earlier, which causes black smoke to form. If the pressure at the moment of opening increases, then it opens later and white smoke appears.
How to extend the life of the sprayer?
To begin with, if the car's mileage is low, you can try using various fuel additives. Buying them is not a problem; they are sold at gas stations and stores. They are inexpensive. This method can be used, but regularity is important here. So, replacing injectors on a VAZ will not be needed any time soon. But not all car enthusiasts prefer to use chemicals, believing that the use of additives can lead to even more widespread clogging of the injector.
Cleaning the injectors on the VAZ 2114 is recommended every 40 thousand km. These services are provided in many service stations. Cleaning there is carried out on stands using ultrasound. Some argue that it is not very effective at the price they charge for it. Many car enthusiasts prefer to clean the injectors themselves. It is not difficult. Some people check the operation of nozzles and injectors on stands, but purchasing a stand to check it a couple of times a year is wasteful.
You can check the injectors and injector in a simpler way. If you suspect that the injectors are not working properly, you need to start the car and let the engine idle and run at high speeds. Next, you need to unscrew the caps on the injectors and then check their serviceability.
Extending the life of injector nozzles
How to extend the life of injectors? At the initial stage, with low mileage, various special additives that are added to the gas tank with fuel can help out. They can be bought in specialized stores, car markets and junkyards.
The cost of additives is low. This method is good if you do it regularly, and it can extend the life of the injectors, but it will not clean them completely. Some car enthusiasts, on the contrary, are against the use of chemicals, believing that additives clog the injector even more.
It is recommended to clean the injectors every 40 thousand km. Many auto repair shops provide cleaning services. The cost starts from 1,500 rubles, and the procedure is done on special equipment using ultrasound. But in order to save time and money, you can carry out this procedure yourself. Cleaning the VAZ 2114 injectors with your own hands is not difficult even for a beginner. But first you need to determine the performance of the injector nozzles. If you suspect this malfunction, then how to check the injectors of the VAZ 2114? Many car enthusiasts do this on a special stand, but it makes no sense to buy it for rare diagnostics. In this article we will talk about checking without additional devices.
Ultrasound or chemicals for cleaning the injector?
So, it was decided that the injectors and injector needed to be cleaned. Which method should I choose? Common methods are washing the injector without removing the injectors or cleaning the injector on an ultrasonic bench. The cleaning efficiency of the second method is several orders of magnitude higher, but in this case, except for the nozzles, nothing else is cleaned. For VAZ cars, sometimes cleaning is not the right solution. It is much easier and cheaper to simply replace the injectors.
Today, simple single-circuit installations are used for washing and cleaning. These are containers in which the solvent is located. The unit is placed next to the machine. A hose is connected to the inlet of the fuel rail to inject the product into the system. The cleaner, which acts as both a cleaning agent and a fuel, is supplied to the system by a compressor.
But there is a drawback: this method does not allow the cleaning fluid to pass through the pressure regulator and shut-off valve. This is ineffective and does not flush out the fuel system. Double-circuit stands are much more efficient, since the cleaning liquid passes through all fuel systems. As for ultrasound, it began to be used back in 1985. A bath for such cleaning is a container with a cleaner. An ultrasonic emitter is installed at the bottom of this bath.
The disadvantage is that you only need to clean the injector nozzle. And modern sprayers cannot be cleaned using ultrasound. And this process is quite labor-intensive.
It is preferable to use imported solvents as a cleaner for injectors and injectors. They are of high quality. These are, for example, injector cleaning products such as the German Liqui Moly, the Belgian Winns or the American Hi-Gear. Domestic products were also tested, but neither “Toilet duckling” nor “Moidodyr” were suitable for these purposes.
Cleaning VAZ injectors
To clean the nozzles, you need to disconnect the minus on the car battery, then remove the protective cover and air filter. The pipeline must be unscrewed from the pump and nozzle and the brackets removed. Next, using a spanner, you need to twist the injectors and the washer. Don't forget to remove the electrical connectors and slide the ramp clamp and the frame itself. This sequence of actions must be done for all 4 sprayers.
Before cleaning the injectors, you first need to carefully examine them. If signs of leakage are noticeable, they will need to be replaced. Next you need to remove the seals from the body and injector nozzle. Finished parts should be temporarily soaked in acetone or solvent. At this time, you can start cleaning the ramp and valve cover.
As practice shows, the ramp can be cleaned perfectly with a vacuum cleaner. Now let's move on to cleaning. You can see coke around the nozzles, it needs to be removed. Next, using a needle or pin, you need to clean the surface near the nozzle. The outside of the nozzle is now completely clean.
To clean it from the inside, you need electrical tape, a carburetor cleaner, a tube and a syringe. The product must be supplied under pressure through the tube. This action must be repeated several times for each nozzle. Then all that remains is to dry everything well, install new seals and put the structure back together.
Functionality check
Checking functionality yourself:
- Check the performance of the injectors on a cold engine, but with the engine running. We touch each nozzle with an ordinary hand. The working nozzle should pulsate and “tremble”. But this method is not entirely informative.
- There is another way to effectively diagnose. Add idle speed and let the car run. Then we loosen the cap nuts holding the injectors one by one, and the engine speed should decrease. When this does not happen, it is concluded that this injector is not working. If a malfunction is detected, you can clean the injectors yourself.
How can you clean the injectors on a VAZ 2114 yourself in order to reduce the cost of replacing spare parts, repairing and servicing the car? Cleaning injectors on a VAZ 2114 is quite simple.
- First you need to remove them.
- For safety reasons, turn off the engine and let it cool. Disconnect the negative cable on the battery, remove the protective casing and air filter. We unscrew the high-pressure pipeline from the nozzle and pump, remove it from the bracket supporting it.
- Using a spanner, unscrew the nozzle along with the old washer and remove it. In this case, it is necessary to disconnect the electrical connector and slide the lock along the ramp to remove it. And so all 4 pieces.
- Now let’s get to the main question: “How to clean the injectors on a VAZ 2114”? The injectors need to be examined first. If there are signs of leakage, it is better to immediately replace the spare parts with new ones.
- For the rest, it is necessary to remove the o-rings from the atomizer and body. Prepared injectors should be soaked in acetone or gasoline for a while, this will allow them to be better cleaned.
- The product is supplied under pressure through a tube, simulating injection. It will take several such movements for each nozzle so that they break through and begin to spray the liquid evenly.
- Then you need to let the injectors dry, put new o-rings on them and reassemble everything in the reverse order, while changing the fuel filter and the fuel pump mesh. .
Most modern cars are equipped with injection engines; the days of carburetor engines are gone forever. Injection power plants are more economical, environmentally friendly and productive, but at the same time they have a more complex design and injection system, consisting of a pressure regulator, injectors equipped with an electromagnetic valve, a fuel line, a fuel rail, intake valves and a number of other parts.