Every car requires care. Only under this condition will it function normally. In this article we will talk about one of the most important components of a car - the timing mechanism. To be more precise, here we will talk about replacing the timing belt on a Mitsubishi Lancer. The manufacturer of this car claims that the belt should be changed only after 90 kilometers. I must say that this is quite a lot; other cars have a slightly shorter belt drive service life. But it is not at all necessary that it will last exactly that long - the service life can be longer or shorter. This depends on several reasons: first of all, on the quality of the belt itself, on operating conditions and on driving style.
About the car
The Mitsubishi Lancer 9 first rolled off the assembly line in 1973. At first there were 12 modifications with engine capacities from 1.2 to 1.6 liters. In the 70s, Lancer 9 was produced with a coupe body. Then the car began to be produced with four doors and engines of 1.6 and 1.8 liters.
Lancer 9 is the ninth generation and, under an agreement with Mitsubishi, it was produced in our country from 2007 to 2015. Over 8 years, 145 thousand copies of the model were sold in our country at a price starting at 760 thousand rubles.
The car is equipped with two versions of 16 valve engines:
- SOHC - one camshaft with valves is used (engines 4G13,4G18);
- DOHC - two camshafts are used (4G63 engine).
Step-by-step replacement with marking
Has the Mitsubishi Lancer 9 timing belt expired or did the breakdown occur earlier? The part must be replaced immediately. Fortunately, we can carry out the repairs entirely with our own hands and only require the owner to have certain tools and basic car mechanic skills.
Replacement is carried out using the following devices, that is, their presence is mandatory:
The part replacement algorithm includes the following steps.
All that remains is to assemble the structure to its original state and continue to operate the car.
Set the TDC (top dead center) marks on the crankshaft and camshaft mentioned in steps 5 and 9 of the replacement process.
Replacement procedure
Replacing the timing belt of a Mitsubishi Lancer 9 is not an easy procedure, requiring partial disassembly of the engine and certain conditions. In this case, it is necessary to have a garage, specialized tools and a classified selection of replacement parts.
Therefore, it is safer to turn to specialists, to a service station, where everything is adapted for this. However, you can change the timing drive on Lancer 9 yourself; you just need to have basic skills in servicing and repairing the car.
Algorithm of actions
- Jack up the car on the right side, then remove the front wheel and fender liner.
- Strengthen the machine for stability by placing additional support under it.
- First, you need to remove the power steering drive from the engine.
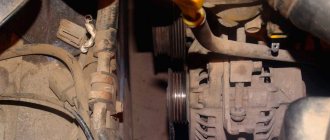
- Remove the generator and pump drive.
- Remove the crankshaft pulley, first unscrew the bolt.
Attention! In order to tear off the pulley fasteners, it is recommended to install a socket wrench with a long lever on the head of the bolt and, by briefly turning on the starter, move it from its place.
- Remove the upper and lower timing covers, marking them beforehand so as not to confuse them later.
Remove the top protective cover
- Place marks on the camshaft and crankshafts. Carefully remove the tension roller spring using pliers and then remove it.
- Unscrew the fasteners from the power steering pump and the engine mount. Remove the suspension base.
- Replace the timing drive. Put on the new belt so that the surface opposite the roller is taut.
Reassemble the engine for Lancer 9 in the reverse order.
Alignment marks
When disassembling and assembling the engine for Lancer 9, special attention should be paid to the crank mechanism (CVM) and timing components, since they are interconnected. Before disconnecting these mechanisms, you must first set marks on the corresponding shafts of these devices.
To set the marks, turn the crankshaft.
For SOHC engine
The camshaft mark must be aligned with the mark on the cylinder head.
SOHC locating mark
The crankshaft mark must be aligned with the mark on the cylinder block on both engine types. To see this mark, you need to remove the generator drive pulley and power steering pump.
Crankshaft mark for all engine types
For DOHC engine
It is necessary that the two camshaft marks align with the slots on the rear timing cover. The crankshaft mark must be installed in the same way as the SOHC engine mark.
DOHC timing marks
Additional verification method
There is another way to make sure that the piston of the first cylinder is at TDC.
To do this you need:
- Remove the spark plug in the first cylinder.
- Set the piston to TDC. To do this, install the plug in the cylinder hole with a slight tension, then engage 5th gear and put the wheel in place. Smoothly turn it clockwise. As soon as the plug flies out, the compression process has begun and the piston is in the upper position.
- Place a mark on the crankshaft pulley.
- After this, set the camshaft to the mark.
Attention! Disconnected camshafts and crankshafts must not be rotated to avoid disrupting the coordinated operation of the crankshaft and timing gear devices.
Before removing the tension roller, it is recommended to secure the above-mentioned shafts together. To do this, you can tie the gears together with wire or tighten them with clamps and attach them to the pulley mounting bolt.
When assembling the engine for Lancer 9, special attention should be paid to the marks; therefore, it would be more correct to first install the tension roller and belt and only then turn the tensioner. If you pay close attention to this procedure, the Lancer 9 timing marks should coincide with the protruding marks on the motor housing.
To make sure of this, you need to reinstall the piston of the first cylinder to TDC, and then check the alignment of the marks. To do this, you need to put the wheel on the hub and, turning it, make two revolutions of the crankshaft. The marks must match.
Timing belt tension
When assembling the Mitsubishi Lancer 9 engine, before installing the upper timing cover, you need to tension the drive.
To do this you need:
- Rotate the crankshaft one or two turns clockwise and set the piston of the first cylinder to TDC.
- Remove the cover from the service hole.
- Make sure that the tension roller is loosened so that it tensions the belt under the action of a spring.
- Check the gap between the timing drive and the cover. The nominal value should be 31–34 mm.
- Tighten the roller mounting bolt.
- Install the service hole cover.
- Install the upper timing cover.
After replacing the drive and tensioning the belt, start the car and check engine operation.
Work technology
Algorithm of actions:
- Remove the power steering drive belt. To do this, loosen 3 fastening bolts (you can get to two of them through the technological holes in the pulley), and then unscrew the adjusting bolt, after which the power steering pump will move, which will allow you to remove the belt;
- Jack up the front of the car on the right side (in the direction of travel), remove the wheel;
- Remove the protective cover on the fender liner to gain access to the crankshaft pulley;
- We dismantle the generator drive. Loosen the bolt securing the unit to the engine (located at the bottom of the generator) and the adjusting bolt lock. Then unscrew the adjusting bolt a little and remove it from the bracket. We feed the generator towards the engine and remove the belt;
- Unscrew the bolt securing the pulley to the pump and remove it;
- We dismantle the crankshaft pulley. To do this, ask the assistant to turn on the 5th gear at the gearbox and hold down the brake pedal, thus stopping the engine, which will allow you to tear off the pulley mounting bolt;
- Unscrew the 3 mounting bolts of the upper protective cover of the timing drive and remove it;
- We dismantle the lower timing cover by unscrewing its 5 fasteners;
- We set marks on the crankshaft and timing belt. To do this, turn on the 5th speed at the gearbox, put the wheel on the hub, and turning it, align the marks with the special ridges on the engine. We make sure that the marks on the knees and camshafts coincide with the sagging marks;
- Using pliers, remove the end of the roller tension spring from the groove and remove it. We unscrew the bolt securing the roller and dismantle it. After this, turning the crankshafts and timing gear is strictly prohibited, so as not to displace the marks;
- We install a stop (a wooden beam of suitable height) under the power unit;
- Unscrew the motor mount (mount). Moreover, you should unscrew its fasteners both to the body and to the engine. Remove the support;
- We unscrew the bolts of the jumper installed between the landing pad of the engine support and the power steering pump. Don’t forget to lubricate the contacts with graphite grease;
- Remove the timing belt;
- Install a new roller and secure it with a bolt;
- We put on a new belt, correctly placing it behind the roller;
- Install the tension spring.
After this, we check that the marks match correctly. To do this, after installing the new belt and tensioning it with a roller, turn on 5th gear again and install the wheel.
When turning the wheel, we make two revolutions of the crankshaft, align it with the mark and see if it coincides with the influx on the camshaft.
You can turn the gear off with the key.
If the location of the marks is not violated, we assemble the power unit in the reverse order. For convenience and correct assembly, it is advisable to mark some elements and parts with a marker or chalk during disassembly.
Timing for replacing the timing belt on Lancer 9
According to the instructions, the timing belt on a Mitsubishi Lancer 9 needs to be replaced after 90 thousand km. mileage However, sometimes you should not wait for the required resource to be exhausted, but carry out such a procedure ahead of schedule.
Reasons for this may include:
- Excessive wear of the profile track on the inner surface of the belt.
- Oil leaks on any surface.
- Deformation as a result of mechanical damage, as well as visible cracks and chips.
- Cord delamination.
- The detection of any of the listed defects should serve as a reason to replace this important element in the engine structure.
Design features and purpose
The gas distribution mechanism controls the supply of fuel to the cylinders.
Its operation is impossible without a drive. Modern manufacturers produce systems with chain and belt drives. Many cars have a belt. This product is a closed rubber belt with special teeth on the inside. It passes through several pulleys, but its main purpose is to synchronize the rotation of the camshaft and crankshaft. The use of rubber makes the operation of such a belt almost silent. The high elasticity of rubber can lead to its most unpleasant consequences. If you find the slightest defect, you should urgently change the timing belt.
What spare parts are worth purchasing?
Before you begin scheduled repairs, you need to prepare original consumables:
- Timing drive. The original belt for Mitsubishi Lancer 9 should have the article number MD342154. There is also a replacement for this timing drive under serial number 1145A051, Gates 5535XS, Contitech CT1008. They are not supplied from the manufacturer's factory, but according to their characteristics they are well suited as an analogue.
- Power steering drive MD375935 (Gates 5PK1063 – analogue).
- Alternator belt MN183019 (Gates 5PK903 - analogue).
- Belt tension roller MD356509 (NTN JPU57-008A-4 analogue).
- Camshaft seals – 2 pcs.
- Crankshaft oil seals – 2 pcs.
- Water pump.
It should be noted here that experts recommend replacing the tension roller and pump on Lancer 9 after 150–170 thousand kilometers, it all depends on their wear. If after removing the belt there is no play in the bearings of these parts, then they can not be removed during scheduled repairs after 90 thousand km. Also, seals can only be changed during the second scheduled repair.
Generator belt
Along with the timing belt is such an important component as the alternator belt on the Mitsubishi Lancer. This part is a closed rubber ring, but slightly smaller and thinner in comparison with the timing belt. The main task is to rotate the generator shaft and charge the battery.
Breaking this belt is not such a critical problem. When you drive, your battery will stop charging. With the remaining charge, you can always take it to a garage or auto repair shop, and then simply make a replacement.
How to choose an alternator belt for Mitsubishi Lancer 9 and 10? There is only one piece of advice here - don’t save money, but order a quality product. A cheap belt will stretch and break very quickly. As a result, you will still have to buy a new belt, but this time it will be a good one. When purchasing, pay attention to the inscriptions and markings. If they are printed crookedly or blurry, then most likely you are looking at a fake.
Which product is better to supply?
In conclusion of the article, we note the most popular and reliable parts of the timing system that may need to be replaced. Only by choosing and purchasing high-quality spare parts for Lancer 9 can you guarantee long and reliable service for the car.
| Product, name | Name, catalog numbers |
| Original timing belts | Mitsubishi MD342154 and Mitsubishi 1145A051 |
| Analogs of belts | Gates 5535XS, Contitech CT1008 and SUN A343YU100 |
| Timing belt tensioner roller, original | Mitsubishi MD356509 |
| Analogs of rollers | NTN JPU 57-008 A-4, NTN NEP57008A6 and SUN A343YU100 |
| Original power steering belt (analogue) | Mitsubishi MD375935 (Gates 5PK 1063) |
| Original alternator belt (analogue) | Mitsubishi MN183019 (Gates 5PK903) |
Mitsubishi Lancer 9 timing kit
All the above parts are of very high quality and are used in almost all official Mitsubishi services in Russia and the CIS countries. They are guaranteed to ensure long and reliable service of the car engine. In general, replacing the timing belt of a Mitsubishi Lancer 9 is a simple task, but it does require some preparation and knowledge.
Source
What else can be changed together with the timing drive?
In the process of replacing the timing belt on a Mitsubishi Lancer 9 1.6, you have access to a number of other consumables and components, which allows you to change them at the same time, rather than dividing the work into two separate stages.
So, while servicing the timing drive, you can simultaneously replace:
But these elements can be replaced every second time when replacing the timing belt. That is, we install only a new timing belt and pulley once, and at the next replacement we also install the above-mentioned spare parts, and this is every 140 - 180 thousand km. mileage
The situation with the selection of attachment belts is the same as with the timing drive - there are both original consumables and their analogues.
Original consumables should be looked for by the following indices - Mitsubishi MD375935 (power steering) and MN183019 (generator).
As for analogues, for replacement you can purchase belts from two companies - Mitsuboshi (5PK1065 - power steering, 5PK905 - generator), and Gates (5PK1063 - power steering, 5PK903 - generator).
An alternative method for unscrewing the crankshaft pulley
One of the most difficult moments when disassembling an engine is unscrewing the crankshaft pulley fasteners. This bolt often “sticks” and is difficult to remove, and it is not always possible to do this by blocking the engine with the gearbox and brakes.
As an alternative to the above method of breaking the bolt, you can use a starter (although it is not advisable).
The technology for its implementation is as follows:
The power of the starter with a well-charged battery is quite enough to break the pulley bolt. But this method should be used only as a last resort if other methods have not brought results.
Source