Despite its age, the good old eight-valve engine in all its variations not only does not leave the roads, but also continues to be produced in new incarnations by the Togliatti plant. But despite its unpretentiousness and sufficient resource, in some ways it has long been outdated - and to a large extent the gas distribution mechanism is outdated. No matter how simple and “indestructible” the “camshaft-pushrod-valve” system is, wear in it is inevitable, and hence the need for regular adjustment of thermal clearances.
Adjusting valves on a VAZ 2110
In this case, we only consider adjusting the valves on a VAZ 2110 with an 8-valve engine, since it is not carried out on a 16-valve engine, since hydraulic compensators are installed on them.
Thus, if you are the owner of a dozen with a sixteen-valve engine, then when a characteristic knock appears, you only need to replace the hydraulic valves, but if your VAZ 2110-12 is equipped with an eight-valve engine, then you need to adjust the thermal clearances of the valves. This procedure, if you have the necessary tools, can be done with your own hands. We will help you in this matter with step-by-step instructions with photographs.
Self- adjustment of valves on a VAZ 2110 looks like this:
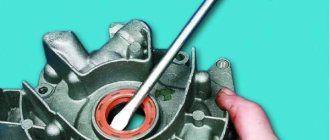
First remove the valve cover;
Install a special device for adjustment (you can do without it using 2 powerful flat-blade screwdrivers);
Installation of a device for adjusting valves of a VAZ 2110
Place the first cylinder at TDC. To do this, you need to set marks on the crankshaft and camshaft (on an 8-cl. engine; on a 16-valve engine).
Rotate the crankshaft another 40-50° (corresponds to 2.5-3 teeth of the camshaft pulley).
We mark our marks for further adjustment. We count the teeth and put marks after the 11th, then after 10, 5 and again after the 11th tooth.
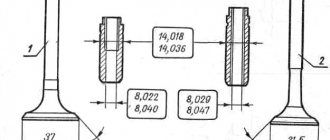
We take the required set of washers (thickness 3-4.5 mm in increments of 0.05 mm), tweezers and a feeler gauge, measure the gaps one by one and install adjusting washers of the required thickness. We find out the required thickness of the washer using the formula:
H = B+(A–C), where A is the measured gap, B is the thickness of the old adjusting washer, C is the nominal gap, H is the thickness of the new washer under the pusher obtained by calculation.
Set of washers for valve adjustment
Installing the adjusting washer
In the table below, you can see the sequence in which you need to turn the crankshaft half a turn and adjust the valve clearances on the 8-valve VAZ 2110 engine. By the way, install the new washer in the pusher with the marking down.
| Angle of rotation of the crankshaft from the alignment of the marks, degrees. | Exhaust cam, clearance 0.35mm | Intake cam, clearance 0.20 mm |
| 40-50 | 1 | 3 |
| 220-230 | 5 | 2 |
| 400-410 | 8 | 6 |
| 580-590 | 4 | 7 |
After installing the washer, remove the lock and check the gap with a feeler gauge again. If the selection was made correctly, then a 0.20 or 0.35 mm feeler gauge should enter the gap with little effort.
Checking thermal clearances VAZ 2110
We carry out this procedure on all the valves, then we assemble everything in the reverse order, start the car and observe a noticeable difference in engine performance after adjusting the valves.
Source
Installation and adjustment of a split gear on a VAZ
| During engine production, a slight deviation in the dimensions of the parts of the gas distribution mechanism and the crank mechanism is allowed. Due to this, the valve timing (GDP) of an engine of one model may differ from the nominal ones. Sometimes the error can be within one tooth on the gear, which negatively affects the operation of the power unit. To compensate for this error, it is recommended to install adjustable camshaft gears. |
Installing a split gear on a VAZ 2110
- We turn out the spark plug of the 1st cylinder and install a micrometer with an extension of about 200 mm.
- We engage 5th gear and begin to slowly rotate the wheel in the direction of travel.
- We determine the top dead center (TDC) using the instrument (the needle has stopped or gone in the opposite direction).
- We remove the timing belt and mark the tooth on the gear in the position in which they are well fixed.
- We remove the standard one and put on the split gear, marking it with a mark.
- We put on the belt according to the marks made on the toothed part of the gears.
- We set the TDC indicator and combine the marks with the real values.
Adjusting split gears, changing the FGR
- deterioration of low-end dynamics
- Fuel consumption increases at high speeds
- idle speed is less stable
- In winter, the engine warms up more slowly
- fuel consumption at idle speed decreases (by approximately 0.1-0.2 l/100 km). Good for cities with traffic jams.
- good pickup at high speeds (from 3000 rpm to 6000 rpm), increase in power by about 4%.
xn--2111-43da1a8c.xn--p1ai
Self-adjustment of thermal valve clearances on a VAZ 2110
Despite its age, the good old eight-valve engine in all its variations not only does not leave the roads, but also continues to be produced in new incarnations by the Togliatti plant. But despite its unpretentiousness and sufficient resource, in some ways it has long been outdated - and to a large extent the gas distribution mechanism is outdated. No matter how simple and “indestructible” the “camshaft-pushrod-valve” system is, wear in it is inevitable, and hence the need for regular adjustment of thermal clearances.
Adjustment frequency
The need to adjust the valve clearances in the VAZ 2110 is remembered when the characteristic sound of rattling pushers is heard from under the hood. With this, the VAZ 8-valve engine was lucky: there are engines in which the valve clearances manage to decrease as they wear out, and here the burnout of the valves and the need to dismantle the head would already remind of itself.
However, there is still no need to postpone adjustment until the last minute. The noise of the gas distribution mechanism itself is a direct consequence of the increase in shock loads in it: the top of the cam does not roll onto the pusher, but hits it. Even when idling, each cam will experience more than 400 such impacts per minute - and how many of them will there be in one trip? And impacts mean an increase in wear and a risk of developing fatigue stresses, and on the most loaded part of the camshaft.
Factory regulations require the first valve adjustment at 3000 mileage (breaking in of parts), then at 45,000 and then every 45,000 mileage. When purchasing a VAZ 2110 secondhand, it is worth combining valve adjustment with replacing the timing belt in order to immediately have a guaranteed starting point for routine procedures. As the mileage increases, a valve grinding procedure may be necessary.
Tool for work
In addition to the everyday set of sockets and spanners, which the owner of a VAZ 10 should already have, a few more tools will be required:
- A device that presses out pushers for removing adjusting washers from them. You can get by with a couple of powerful screwdrivers, but the price issue here is not so great that you pay for the savings with less convenience. You can completely remove the camshaft - but then you will have to remove the timing belt as well, again there is no gain in time.
- A set of feeler gauges - we will use them to measure the gaps.
- Micrometer - This is not necessary, but is very useful. When adjusting, the thickness of the new washer is calculated based on the thickness of the old one and the measured gap, but what to do if the thickness marking on the washer is erased (and no one has canceled the wear?). You can borrow a 0-25 mm micrometer, fortunately you can trust it by simple mixing without calibers.
Adjustment process
Having opened the hood, the first thing you should do is unscrew the spark plugs: it will be much more convenient to rotate the crankshaft. Everything that would interfere with the removal of the valve cover is also dismantled: the throttle cable bracket, the crankcase ventilation pipes.
Next, remove the valve cover itself by unscrewing the two shaped nuts at the edges. It is better to separate the cover more carefully so as not to damage the gasket and stud seals.
In the eight-valve VAZ 2110, two cams are open, and it is easier to illustrate the operation on the second cylinder. However, the camshaft beds will not interfere with the remaining cylinders.
When an inline four is operating, each two cylinders operate in antiphase - when the compression stroke ends at the top dead center (TDC) of the first cylinder, then in the fourth cylinder the piston is also at the top point, but at the end of the exhaust stroke. Similarly in the second and fourth, but with a difference of half a turn of the crankshaft. For us, this means that we will measure the gap in two valves at one time:
| Crankshaft rotation degrees | Exhaust valve | Inlet valve |
| 40-50 | 1 | 3 |
| 220-230 | 5 | 2 |
| 400-410 | 8 | 6 |
| 580-590 | 4 | 7 |
The numbers of the cams under which the clearance is measured are indicated starting from the camshaft pulley.
To start work, install the camshaft pulley according to the marks (the protrusion on the pulley opposite the protrusion on the casing). Rotate the pulley clockwise using a spanner wrench or a ratchet head.
When marks 1 and 4 coincide, the cylinders are set at top dead center. However, for any real-life engine, the intake and exhaust phases are not only wider than one stroke (90 degrees along the crankshaft or 180 degrees along the camshaft), but also shifted relative to the dead points. Therefore, the table above shows the points when the cams stand on the pushers strictly with the backs of their heads. It would be possible to measure the gap without such precision - the back of the cam has the shape of an arc, the center of which coincides with the axis of rotation of the camshaft, but no one is safe from an unevenly worn or initially inaccurately machined camshaft.
It is convenient to use pulley teeth to measure angles: 3 teeth on the camshaft are approximately equal to 50 degrees on the crankshaft.
Having aligned the camshaft, we measure the gaps in a pair of valves with feeler gauges: in the first case, under the first and third cams. Starting from a probe with a thickness of 0.2 mm, we sort through the plates from the set until the next one begins to enter the gap without noticeable force, but with a barely perceptible interference. We record the resulting gap. The nominal clearance for the intake valve is 0.2 mm, for the exhaust valve – 0.35 mm (the exhaust valves heat up more during engine operation, and a larger gap is given to compensate for their lengthening).
If the measured gap “floats away”, remove the adjusting washer using a device, pressing the pusher and picking up the washer with a thin object. Before doing this, you may have to turn the pusher for convenience with the groove facing you.
Now calculate the thickness of the washer that is needed. It’s easier if the removed washer has markings on the lower end (which is why they are placed with the markings facing down when installed), and the upper end does not have noticeable signs of wear. Then it is enough to add to the marked thickness the difference between the measured gap and the nominal one. For example, if the clearance on the exhaust valve is measured at 0.5 mm, and the washer in the pusher was rated 2.2 mm, then the new one should have a thickness of 2.2 + (0.5-0.35) = 2.35 mm. If the markings on the washer are erased or illegible, wear is noticeable - it is better to measure its thickness with a micrometer.
Do-it-yourself replacement of a VAZ 2107 ball joint
2. Next, using a metal brush, clean the ball joint mounts.
4. Take a “22” wrench and unscrew the nuts of the upper and lower ball joints by about one and a half to two turns.
6. As a rule, in one step, it is possible to pull out two ball joints at once: the upper one “shoots off” first, and then the lower one. If for some reason the ball does not give in and remains in place, then using a steel drift and hammer, you can help it come out. The blows must be applied to the protrusion, which is on the steering knuckle.
You might be interested in: Do-it-yourself replacement of brake fluid on a VAZ 2110
8. If the finger rotates, clamp the lever using a pry bar.
13. Before installing the ball joint, it must be thoroughly lubricated; for this use ShRB-4, Litol-24 lubricant.
14. Install the boot with the washer.
15. Now you can tighten the ball to the lever. Install the ball into the fist and tighten the nut.
17. If it doesn’t help, install an adjustable wrench in the gap between the lower arm and the fist and use it to keep your finger from turning.
18.The nut is unscrewed, you can raise your fist upward. In the cut between the upper part of the fist and the lower arm, set the key to “22”, this will make further work more convenient.
21. Take the new ball joint and check for grease in the lower part. To do this, use the key set to “7” and unscrew the plug with it.
23. Place the ball joint in place at the bottom of the lever and screw it to the knuckle.
Hello! Today I would like to talk a little about ball joints, or more precisely about replacing ball joints. Ball joints are one of the main suspension elements, which, despite their small size, perform very important functions. The ball joint consists of the following parts:
- Frame
- Finger
- Plastic liner
- Rubber boot
If we talk about ball joints, then it is worth noting that there are upper and lower ones (not interchangeable).
The main cause of wear is a violation of the tightness of the rubber boot, which protects the rubbing parts of the ball joint (liner pin). The original operating instructions for my car say that the service life of the ball joint is limited by the service life of the rubber boot
So, pay all attention to the condition of the boot, although this is unlikely to help you with the quality of today’s spare parts...
Do-it-yourself valve adjustment on a VAZ 2110 8 valves
To prevent camshaft wear and valve burnout, attention should be paid to the prevention of the gas distribution mechanism. Engines with a simpler timing system require periodic tuning. Adjusting the valves of the VAZ 2110 8 valves with your own hands is a common task for many motorists. We will try to describe in detail the entire work process.
For reference! The valves on the VAZ 2110 with an injection 16-valve engine cannot be adjusted. These engines have a gas distribution mechanism with hydraulic compensators, which should be changed periodically.
Why do you need customization?
All models of the “tenth” family, starting from 2110, where power units with 8 valves are installed, require adjustment of the latter. It is not the valves themselves that are adjusted, but the thermal clearances between their pushers and the camshaft cams. It is well known that metal expands significantly when heated, which also manifests itself in the cam-pusher pair. If there are large gaps between them, the valves will not open completely, and the injector will supply less fuel to the cylinders.
If there are no gaps after thermal expansion, the round part of the cam will press on the pusher, causing most valves to be open constantly. This leads to a sharp decrease in compression and engine inoperability.
There are signs by which you can determine that it is time to adjust the VAZ-2110 valves:
- the appearance of loud clicking sounds coming from the top of the cylinder head;
- failure of one or more cylinders due to lack of compression;
- carrying out repairs related to disassembling the power unit and dismantling the camshaft.
Clicks when the engine is running are heard under the valve cover when the thermal gaps are too large. These sounds cannot be confused with anything; in addition, they are accompanied by a decrease in engine power and a drop in the dynamics of the rather “high-spirited” VAZ-2110 car. When there are no gaps, there is no knocking, but the engine is unstable, “troubles” or refuses to start at all. The diagnosis is confirmed by measuring compression in all cylinders.
In VAZ-2110 - VAZ-2112 cars (16 valves), there is no need to adjust the thermal clearances. These more advanced motors are equipped with devices that automatically provide optimal settings: hydraulic compensators. When one of the problems described above appears, the hydraulic compensators are replaced with new ones, and they last quite a long time, at least 100 thousand kilometers.
Setting rules
Every car owner can refer to the manual regulations. It is worth saying that the nominal installation of valves on the VAZ 2110 8-valve injector occurs at the factory. According to the operating instructions, it is recommended to carry out the first adjustment at 10,000 km. This mode is called running-in. And then, adjustments should be made every 45,000 km. In some cases, engines operate properly up to 80,000 km.
For reference! The installation of valve pusher washers on VAZ 2110-12 vehicles (8 valves), with injection and carburetor engines, is completely identical.
Replacing the fuel pump
The replacement process is quite easy. Just follow the instructions and you'll finish the job in no time.
- Disconnect battery power.
- Unscrew the fuel pump cap.
- Remove the connectors from the fuel pump.
- Loosen the clamp slightly, which is located directly on the fuel hose. It makes no sense to remove it completely.
- Unscrew both hoses through which fuel is supplied.
- Remove the gaskets. It is better to immediately replace them with new ones. These are consumable, cheap materials.
- The fuel pump is secured with 8 bolts. Unscrew them all and save the bolts.
- Remove the O-ring.
- Remove the fuel pump along with the float.
- Remove the seal, which is made of rubber.
- Replace the new fuel pump.
- Reassemble in reverse order.
It is hardly worth trying to repair an old fuel pump. It is difficult to vouch for the quality of the repairs performed, since one malfunction may lead to others. There is no point in taking risks. In addition, a new fuel pump is far from the most expensive pleasure for a VAZ 2110.
Doing the work yourself, the entire process of dismantling and installing the pump will take you about 20-30 minutes.
Follow the instructions, avoid any attempts at amateur activities. Please note that the cost of such a procedure at a service station will be even more expensive than purchasing the newest electronic fuel pump. Therefore, spending money on this makes no sense if everything can be done yourself.
The good thing about the VAZ 2110 is that the cost of its parts is incredibly affordable for domestic consumers. Plus, the design of the machine is quite simple, which allows you to carry out a number of repair work yourself, without fear of the consequences of incorrect repair.
Please note that if you do not have any experience in car repair and maintenance, it is not recommended to start your practice with such an activity as replacing a fuel pump. Practice on simpler tasks and over time you will learn all the joys of doing your own repairs.
Symptoms
To understand that the valves on the VAZ 2110 engine need adjustment, it is enough to know the behavior of the engine. After prolonged use, the car owner may notice that the engine has begun to work somehow differently. This fact should alert you, because the consequences can be serious.
The main symptoms of a faulty valve mechanism adjustment on a VAZ 2110 look like this:
- the engine is noisy when starting up after a long period of parking (clacks);
- compression in the cylinders disappears (the engine loses its former power);
- Valve cover gasket leaks oil;
- “shots” appeared in the carburetor or muffler;
- fuel consumption has increased.
The listed signs can be diagnosed independently, without resorting to the services of a car service. Before you put the VAZ 2110 in for repairs and begin adjusting the valves, you should prepare a mechanic’s tool: a micrometer, a rack for pressing the pushers and a multi-part feeler gauge. The last thing to measure is the thermal gap between the camshaft cam and the adjusting washer. Instead of a rack, it is possible to use two powerful slotted screwdrivers.
The installation kit (fixture and probe) is sold in most Auto Parts stores, and you can buy auto parts in Minsk here exist.by. Its cost varies from 200 to 500 rubles. Correct installation of valves on a VAZ 2110 8 valve injector or carburetor is the key to success.
Why is it necessary to adjust valves?
The correct valve lifter clearance ensures stable operation of the power unit at full power. Valves are divided into two types:
- Intake, the main task of which is timely opening for the entry of the fuel mixture into the combustion chamber and subsequent closing, ensuring the creation of the required compression ratio. Insufficient tappet clearance causes the tappets to open too early, resulting in fuel flowing in too early and also igniting early. Too large a gap ensures that the valve opens too late, causing fuel to enter and ignite in the combustion chamber too late. All this leads to insufficient power of the power unit and rapid burnout of the working surface of the valves. Checking the thermal clearance of valves.
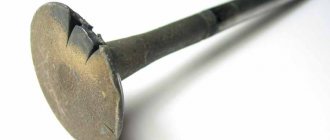
- Exhausts, their main job is to ensure the exit of exhaust gases from the combustion chamber, which are formed as a result of fuel combustion. Early opening does not allow the piston to fully work out its stroke, disrupting compression in the cylinder. Opening too late does not allow exhaust gases to leave the combustion chamber, which penetrate into the engine crankcase, creating excess pressure, thereby causing rapid failure of internal parts and oil seals.
Using a rod, a flag and tweezers, we take out the old washer. Valve adjusting washer.
How to adjust valves on a VAZ 2110
There is no need to purchase shims in advance. They are relatively expensive. Initially, you have to establish the size of the gaps and only then buy the required number of washers with the exact dimensions. It is better to carry out work in a garage with good lighting. The roof and walls will protect from unwanted wind and rain, which can carry dirt into the open camshaft.
Attention! Before adjusting the valve mechanism on the VAZ 2110, the engine must be cooled.
Disassembly
If everything is ready, then we proceed to the first part of the repair - dismantling the parts:
- disconnect the terminal from the battery;
- remove the air filter housing (on a carburetor engine);
- disconnect the crankcase gas hoses and the throttle cable bracket from the valve cover;
- unscrew the bolts of the timing case. Remove the cover and gain access to the pulley;
- unscrew the spark plugs (this will make it easier to rotate the crankshaft to find TDC and BDC);
- Unscrew the valve cover nuts and remove it.
Before direct tuning, you should remember the mechanism of operation of the timing belt. Namely, the operating order of the valves (in our case, a VAZ 2110 with an 8-valve injector).
| Camshaft rotation angle, degrees | Cam No. (counting from camshaft pulley) | |
| Exhaust (gap 0.35.mm) | Inlet (gap 0.20mm) | |
| 0 plus 2-3 teeth | 1 | 3 |
| 90 plus 2-3 teeth | 5 | 2 |
| 180 plus 2-3 teeth | 8 | 6 |
| 270 plus 2-3 teeth | 4 | 7 |
The sequence of adjusting the gaps in the valve mechanism
| Crankshaft rotation angle, degrees | N of the cylinder in which the compression stroke occurs (end) | N adjustable valves (cams) |
| 4 | 8 and 6 | |
| 180 | 2 | 4 and 7 |
| 360 | 1 | 1 and 3 |
| 540 | 3 | 5 and 2 |
The procedure for adjusting the valves on a VAZ 2110 with an 8-valve engine must be performed in the same sequence as in the table. As for installing valves on a VAZ 2110 with 16-valve engines, the diagram looks completely different.
| valve | 1 class (you) | 2 cells (ch) | Zkl (vp) | 4th grade (you) | 5th grade (you) | 6 cells (ch) | 7 cells (vp) | 8th grade (you) |
| Should ±0.05 | 0,30 (0,35) | 0,20 | 0,20 | 0,30 (0,35) | 0,30 (0,35) | 0,20 | 0,20 | 0,30 (0,35) |
| largest gap | 0,25 | 0,35 | 0,40 | 0,35 | 0,40 | 0,30 | 0,30 | 0,40 |
| washer | 4,30 | 3,82 | 3,52 | 4,22 | 4,50 | 4,27 | 3,87 | 4,25 |
| What kind of washer is needed | 4,25 (4,20) | 3,97 | 3,72 | 4,27 (4,22) | 4,6 (4,55) | 4,37 | 3,97 | 4,35 (4,3) |
Adjustment
After removing the valve cover, it is necessary to remove any remaining engine oil near the tappets. This can be done with a medical syringe or a rubber bulb. If there is a retaining rod, you should install it on the two outer studs intended for fastening the cylinder head cover.
Then, we proceed to the second part of the repair and do the following:
- We set the top dead center by aligning the marks of the camshaft pulley and the inner timing case. There are two ways to do this. Hanging and rotating one front wheel. Use a spanner wrench (head) to rotate the camshaft by the pulley mounting bolt, but this operation is dangerous due to breakage of the mounting bolt;
- After finding the top dead center, turn the camshaft slightly so that the pulley moves 40-50° from TDC (this is 2.5-3 teeth). We put our mark, from which we will then rotate the camshaft several more times, making additional marks;
- We measure the thermal clearance of the first valve (exhaust) by slipping one of the feeler gauges (0.35/0.4/0.45 mm) between the camshaft cam and the pusher. Nominal clearance 0.35 mm;
- if the first probe passes freely, then take a larger size (0.4 mm). The pitch is 0.05 mm;
- if the 0.4 or 0.45 probe does not pass, then it is necessary to replace the adjusting washer;
- We turn the pusher with the groove towards us, press it with the lever of the locking rack and take out the used washer with tweezers. Its inner side contains numbers with the original size;
- to calculate the required value, you must use the formula H = B + (A - C). Where:
- H—thickness of the new washer, mm;
- B—thickness of the used washer, mm;
- A - measured gap, mm;
- C—nominal gap, mm.
- The resulting result H is written down in a notepad. You will have to buy a washer of this exact size for the repair valve, rounding up the value;
- according to the table, we move on to the third valve (intake), its nominal clearance is 0.2 mm;
- measure the gap by inserting feeler gauges in order: 0.2/0.25/0.30 mm;
- write down the size of the probe, which is not included in the thermal gap;
- take out the washer and calculate the repair size using the above formula;
- then, according to the table, we turn the crankshaft several times to the indicated degrees and perform the operation with all the valves;
- We go to the store and buy the required number of adjusting washers of the required thickness, according to calculations;
- We install the washers in the pushers, according to the notebook;
- all valve clearances on the VAZ 2110 should be restored to the nominal sizes of 0.2 and 0.35, thanks to the use of adjusting washers;
- checking new thermal gaps;
- after replacing the washers, it is necessary to put the dismantled parts in place;
- we start the engine and observe its operation.
It is recommended to replace the cylinder head cover gasket on a VAZ 2110 (8 valves) with an injection engine, after adjusting the valves.
How to adjust the thermal gap
All work is carried out using specialized washers, which must be folded in the area between the fist and the end of the valve.
On the fifteenth VAZ model, all work is done with the engine idling. The whole process is quite simple, but if you do not have even minimal experience in car repair, the best solution would be to contact a service center. In addition to standard tools, you need to prepare:
- A set of measuring pliers for determining the gap.
- A device with which you will recess the valve tappet.
- Before purchasing washers, it is recommended to take measurements so as not to take unnecessary elements that you do not need at all.
The work execution looks like this:
- First of all, the valve cover is removed. To do this, remove the air filter, loosen the pipe going to the cylinder head and disconnect it. Next, dismantle the throttle valve control device and carefully remove the cylinder block cover.
- Unscrew the spark plugs.
- Remove the cover that protects the gas distribution system.
- Rotate the engine crankshaft clockwise until the mark on the timing pulley aligns with the mark on the rear cover. The shaft can only be turned using a wrench using the bolts that secure the generator pulley.
- If you miss the mark, crank the engine in the same direction a few more revolutions.
- As soon as the marks come together, rotate the crankshaft a few more teeth of the gas distribution system.
- Now measure the clearance of the exhaust valve on the first cylinder and the intake valve on the third cylinder. According to the standard, the gap at the inlet should be about 0.2 mm, at the outlet 0.4 mm.
- If the clearances coincide with the recommended values, lower the cylinder piston to the bottom position using a special tool and remove the washer.
- Now measure the size of the washer you need. This is done by subtracting the thermal gap from the recommended value, and then adding the thickness of the washer used to the resulting number.
- Measure the thermal clearance for each valve in turn with each crankshaft half turn.
- Place washers of appropriate sizes and repeat all measurements.
How to adjust the valves of a VAZ 2110 8 valves
To prevent camshaft wear and valve burnout, attention should be paid to the prevention of the gas distribution mechanism. Engines with a simpler timing system require periodic tuning. Adjusting the valves of the VAZ 2110 8 valves with your own hands is a common task for many motorists. We will try to describe in detail the entire work process.
For reference! The valves on the VAZ 2110 with an injection 16-valve engine cannot be adjusted. These engines have a gas distribution mechanism with hydraulic compensators, which should be changed periodically.
Adjustment process
You should not buy adjusting washers in advance, as the cost of these parts is quite high. First of all, you should decide on the size of the gaps, and only then go to the store in order to select the right size of washers and buy them in the right quantity. All work should be carried out in a garage with good lighting, since a closed room will protect the car from the extremely undesirable effects of rain and wind, which inevitably carry dirt into the uncovered camshaft.
At the same time, do not forget to cool the engine before adjusting the valves of the VAZ-2110 eight-valve engine
Disassembling VAZ 2110 valves
Adjusting the VAZ-2110 valves (8 valves) always begins with dismantling the necessary components, which is performed as follows:
- The battery terminal is disconnected.
- The air filter housing is dismantled (if the car uses a carburetor engine).
- The gas cable bracket, as well as the crankcase gas hoses, are disconnected from the valve cover.
- All the bolts that secure the timing case are completely removed. Once the cover is removed, you can freely work with the pulley.
- Get the spark plugs. Due to this, the rotation of the crankshaft will be simplified, which will help to find BDC and TDC.
- The valve cover is removed.
Before proceeding with the actual adjustment, you should understand the features of the timing mechanism.
Read the instructions for your car and read the operating order of the valves. In particular, there will be a table indicating the order in which the valves are adjusted. It is worth noting that the adjustment of the VAZ-2112 valves (16 valves) provides for a completely different scheme.
How to adjust gaps yourself
After dismantling the valve cover, any remaining engine oil near the tappets should be completely eliminated. To do this, you should use an ordinary rubber bulb or a special medical syringe. If you have a retaining rod, you will need to place it on the two outer studs, with which the cylinder head cover is secured.
After this, you can proceed directly to the repair:
- The top dead center is set. To do this, you will need to align the marks located on the inner timing case and the camshaft pulley. To do this, you can hang and spin one front wheel, then use a spanner to turn the camshaft, securing it to the bolt securing the pulley. However, you should immediately warn that this operation may result in the bolt breaking, so it should be performed extremely carefully, and it is even better to first stock up on an additional bolt.
- Once top dead center is located, the camshaft should be rotated to move the pulley approximately 40-50 degrees from TDC. Now you will need to put your mark, from which several more rotations of the camshaft will be carried out with additional marks.
- The thermal clearance of the exhaust valve is measured. To do this, one of the screws should be placed between the pusher and the camshaft cam. The standard gap is 0.35 mm.
- If the probe passes without any obstacles, you should take a larger one and repeat the procedure in increments of 0.05 mm.
- If a probe with a diameter of 0.4 or 0.45 mm can no longer pass, this indicates the need to replace the adjusting washer.
- The pusher turns so that the groove is facing you, after which you will need to push the locking rack lever on it and remove the used washer from there using simple tweezers. There will be numbers on it indicating the original size.
- To obtain the required size, you need to subtract the difference between the measured and nominal gap from the thickness of the used washer, and then write it down in a notebook so that you can later buy the required washer in the store.
- The nominal clearance in the intake valve is 0.2 mm. The gap is measured in the same increments as in the previous case.
- The washer is replaced in the same way as in the previous case.
- In accordance with the table, the crankshaft is rotated to the desired angle, after which the procedure is performed with each valve separately.
- All the necessary washers are purchased at the store.
- The washers are mounted in the pushers.
- All gaps must correspond to the standard ones, that is, 0.2 or 0.35.
- New thermal clearances are being checked.
- When the new washers are installed, all dismantled components are returned to the workplace.
- The engine is started and its operation is monitored.
Setting rules
Every car owner can refer to the manual regulations. It is worth saying that the nominal installation of valves on the VAZ 2110 8-valve injector occurs at the factory. According to the operating instructions, it is recommended to carry out the first adjustment at 10,000 km. This mode is called running-in. And then, adjustments should be made every 45,000 km. In some cases, engines operate properly up to 80,000 km.
For reference! The installation of valve pusher washers on VAZ 2110-12 vehicles (8 valves), with injection and carburetor engines, is completely identical.
The fuel pump and its role in the fuel system of the VAZ 2110
In the “ten”, as in other cars where power plants for fuel are installed, the gas pump serves as an element that pumps fuel in the “fuel tank-motor” circuit. It supplies gasoline to the metering component, the function of which, depending on the design of the fuel complex, is played by either a carburetor or an injector in the injection engine system.
In cars of different types of fuel supply, an electric fuel injector pump is used, or a mechanical fuel pump on carburetor modifications. Accordingly, in order to buy a gasoline pump, you need to know what type of gasoline units are installed and operated in a car that requires repair of the fuel system.
To buy VAZ 2110 fuel pumps, the price of which is affordable for most of our car enthusiasts, should be factory-made. Of course, this part for an injection engine is structurally more complex and costs more, but the price limits are very reasonable and acceptable within their limits. In addition, the fuel injector pump, the price of which is higher than its analogue on a carburetor engine, is technologically more complex and has a number of significant advantages.
Symptoms
To understand that the valves on the VAZ 2110 engine need adjustment, it is enough to know the behavior of the engine. After prolonged use, the car owner may notice that the engine has begun to work somehow differently. This fact should alert you, because the consequences can be serious.
The main symptoms of a faulty valve mechanism adjustment on a VAZ 2110 look like this:
- the engine is noisy when starting up after a long period of parking (clacks);
- compression in the cylinders disappears (the engine loses its former power);
- Valve cover gasket leaks oil;
- “shots” appeared in the carburetor or muffler;
- fuel consumption has increased.
The listed signs can be diagnosed independently, without resorting to the services of a car service. Before you put the VAZ 2110 in for repairs and begin adjusting the valves, you should prepare a mechanic’s tool: a micrometer, a rack for pressing the pushers and a multi-part feeler gauge. The last thing to measure is the thermal gap between the camshaft cam and the adjusting washer. Instead of a rack, it is possible to use two powerful slotted screwdrivers.
The installation kit (fixture and probe) is sold in most Auto Parts stores. Its cost varies from 200 to 500 rubles. Correct installation of valves on a VAZ 2110 8 valve injector or carburetor is the key to success.
Troubleshooting
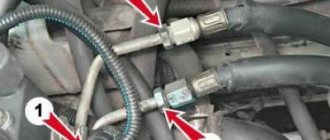
The main symptoms of a malfunction of the VAZ 2110 fuel pump are engine interruptions in various operating modes, lack of pressure in the fuel system, loss of acceleration dynamics, increased fuel consumption, or complete failure when trying to start the engine.
The first step is to check the functionality of the pump. When you turn on the ignition, you should hear a slight whirring sound from the pump under the rear seat for a few seconds.
If the engine is running, it is necessary to check the fuel supply pressure using a pressure gauge; the fuel supply pressure to the injector should be 3.5 - 4 atmospheres. If the sound of the fuel pump is not heard, if you have an electrical tester, you can check whether power is being supplied to the pump.
To do this, you need to remove the back seat of the VAZ 2110, the decorative cover, and the terminal from the fuel pump housing, turn on the key to crank the starter, if the tester does not receive power, you need to check the relay, fuse or wiring trace for a break! If there is power, the fuel pump needs to be replaced.
The serviceability of the relay can be checked by replacing it with a working one from the fuse box, for example the high beam headlight relay. When replacing a new relay, you need to pay attention to the manufacturer and the recommendations of a spare parts specialist in the store; it is better not to save on the cost of the relay.
How to adjust valves on a VAZ 2110
There is no need to purchase shims in advance. They are relatively expensive. Initially, you have to establish the size of the gaps and only then buy the required number of washers with the exact dimensions. It is better to carry out work in a garage with good lighting. The roof and walls will protect from unwanted wind and rain, which can carry dirt into the open camshaft.
Attention! Before adjusting the valve mechanism on the VAZ 2110, the engine must be cooled.
Disassembly
If everything is ready, then we proceed to the first part of the repair - dismantling the parts:
- disconnect the terminal from the battery;
- remove the air filter housing (on a carburetor engine);
- disconnect the crankcase gas hoses and the throttle cable bracket from the valve cover;
- unscrew the bolts of the timing case. Remove the cover and gain access to the pulley;
- unscrew the spark plugs (this will make it easier to rotate the crankshaft to find TDC and BDC);
- Unscrew the valve cover nuts and remove it.
Before direct tuning, you should remember the mechanism of operation of the timing belt. Namely, the operating order of the valves (in our case, a VAZ 2110 with an 8-valve injector).
| Camshaft rotation angle, degrees | Cam No. (counting from camshaft pulley) | |
| Exhaust (gap 0.35.mm) | Inlet (gap 0.20mm) | |
| 0 plus 2-3 teeth | 1 | 3 |
| 90 plus 2-3 teeth | 5 | 2 |
| 180 plus 2-3 teeth | 8 | 6 |
| 270 plus 2-3 teeth | 4 | 7 |
The sequence of adjusting the gaps in the valve mechanism
| Crankshaft rotation angle, degrees | N of the cylinder in which the compression stroke occurs (end) | N adjustable valves (cams) |
| 4 | 8 and 6 | |
| 180 | 2 | 4 and 7 |
| 360 | 1 | 1 and 3 |
| 540 | 3 | 5 and 2 |
The procedure for adjusting the valves on a VAZ 2110 with an 8-valve engine must be performed in the same sequence as in the table. As for installing valves on a VAZ 2110 with 16-valve engines, the diagram looks completely different.
| valve | 1 class (you) | 2 cells (ch) | Zkl (vp) | 4th grade (you) | 5th grade (you) | 6 cells (ch) | 7 cells (vp) | 8th grade (you) |
| Should ±0.05 | 0,30 (0,35) | 0,20 | 0,20 | 0,30 (0,35) | 0,30 (0,35) | 0,20 | 0,20 | 0,30 (0,35) |
| largest gap | 0,25 | 0,35 | 0,40 | 0,35 | 0,40 | 0,30 | 0,30 | 0,40 |
| washer | 4,30 | 3,82 | 3,52 | 4,22 | 4,50 | 4,27 | 3,87 | 4,25 |
| What kind of washer is needed | 4,25 (4,20) | 3,97 | 3,72 | 4,27 (4,22) | 4,6 (4,55) | 4,37 | 3,97 | 4,35 (4,3) |
Adjustment
After removing the valve cover, it is necessary to remove any remaining engine oil near the tappets. This can be done with a medical syringe or a rubber bulb. If there is a retaining rod, you should install it on the two outer studs intended for fastening the cylinder head cover.
Then, we proceed to the second part of the repair and do the following:
- We set the top dead center by aligning the marks of the camshaft pulley and the inner timing case. There are two ways to do this. Hanging and rotating one front wheel. Use a spanner wrench (head) to rotate the camshaft by the pulley mounting bolt, but this operation is dangerous due to breakage of the mounting bolt;
- After finding the top dead center, turn the camshaft slightly so that the pulley moves 40-50° from TDC (this is 2.5-3 teeth). We put our mark, from which we will then rotate the camshaft several more times, making additional marks;
- We measure the thermal clearance of the first valve (exhaust) by slipping one of the feeler gauges (0.35/0.4/0.45 mm) between the camshaft cam and the pusher. Nominal clearance 0.35 mm;
- if the first probe passes freely, then take a larger size (0.4 mm). The pitch is 0.05 mm;
- if the 0.4 or 0.45 probe does not pass, then it is necessary to replace the adjusting washer;
- We turn the pusher with the groove towards us, press it with the lever of the locking rack and take out the used washer with tweezers. Its inner side contains numbers with the original size;
- to calculate the required value, you must use the formula H = B + (A - C). Where:
- H—thickness of the new washer, mm;
- B—thickness of the used washer, mm;
- A - measured gap, mm;
- C—nominal gap, mm.
- The resulting result H is written down in a notepad. You will have to buy a washer of this exact size for the repair valve, rounding up the value;
- according to the table, we move on to the third valve (intake), its nominal clearance is 0.2 mm;
- measure the gap by inserting feeler gauges in order: 0.2/0.25/0.30 mm;
- write down the size of the probe, which is not included in the thermal gap;
- take out the washer and calculate the repair size using the above formula;
- then, according to the table, we turn the crankshaft several times to the indicated degrees and perform the operation with all the valves;
- We go to the store and buy the required number of adjusting washers of the required thickness, according to calculations;
- We install the washers in the pushers, according to the notebook;
- all valve clearances on the VAZ 2110 should be restored to the nominal sizes of 0.2 and 0.35, thanks to the use of adjusting washers;
- checking new thermal gaps;
- after replacing the washers, it is necessary to put the dismantled parts in place;
- we start the engine and observe its operation.
It is recommended to replace the cylinder head cover gasket on a VAZ 2110 (8 valves) with an injection engine, after adjusting the valves.
How to replace on a 16-valve Lada Priora engine
Such an engine suffers mainly from a broken timing belt. The pistons “meet” the valves and, as a result, the latter bend, or rather, their bushings bend. Further operation of the vehicle is, however, impossible. All that remains is to replace the valves.
Procedure
- As in the case of an 8-valve engine, it is necessary to remove the cylinder head. Before this, remove the timing belt, disconnect the injector, armored wires, spark plugs and the BC head cover.
- After this, two camshafts are disconnected and then the head itself is removed. By the way, after dismantling it, the old gasket must be replaced. To remove the head, unscrew the mounting bracket. It is designed to keep the engine from tilting and is attached to the cylinder head.
- Pull out the valve seal using a special grip and remove the old valves using the same puller. Be careful, as the springs on the valve mechanism have a fairly high elasticity, which is why they often fly out and get lost.
- Pull out the old valves in the same way as on an 8-valve engine from the inside of the cylinder head and install new elements in their place.
- Reassemble all parts in the reverse order, install the head on the cylinder block and mount the camshafts. Put the cover on, secure it and install the timing belt.
- Install the remaining parts and wiring harnesses.
To prevent the valve from bending, it is recommended to periodically assess the condition of the belt and change it in a timely manner. However, many drivers, in order to save the life of the engine in the event of a belt break, install a new piston group. This method is very expensive and will require a lot of effort to implement. This is due to the fact that to install new pistons, you will need to disassemble the entire engine, which not every driver can do on their own.
Self-adjustment of thermal valve clearances on a VAZ 2110
Despite its age, the good old eight-valve engine in all its variations not only does not leave the roads, but also continues to be produced in new incarnations by the Togliatti plant. But despite its unpretentiousness and sufficient resource, in some ways it has long been outdated - and to a large extent the gas distribution mechanism is outdated. No matter how simple and “indestructible” the “camshaft-pushrod-valve” system is, wear in it is inevitable, and hence the need for regular adjustment of thermal clearances.
Device
In order to understand why there is a need to adjust the valves, you need to understand a little about the operation of the VAZ 2110. So, when the engine is cold, there is a gap between the cam and the pusher.
It is needed for the so-called compensation of thermal expansion. Simply put, we all know that when heated, all objects tend to expand.
So that there is room for expansion, and the component parts do not break or bend, there are gaps. However, they must be of a strictly defined size, otherwise instead of benefit we will get harm.
Adjustment frequency
The need to adjust the valve clearances in the VAZ 2110 is remembered when the characteristic sound of rattling pushers is heard from under the hood. With this, the VAZ 8-valve engine was lucky: there are engines in which the valve clearances manage to decrease as they wear out, and here the burnout of the valves and the need to dismantle the head would already remind of itself.
However, there is still no need to postpone adjustment until the last minute. The noise of the gas distribution mechanism itself is a direct consequence of the increase in shock loads in it: the top of the cam does not roll onto the pusher, but hits it. Even when idling, each cam will experience more than 400 such impacts per minute - and how many of them will there be in one trip? And impacts mean an increase in wear and a risk of developing fatigue stresses, and on the most loaded part of the camshaft.
Factory regulations require the first valve adjustment at 3000 mileage (breaking in of parts), then at 45,000 and then every 45,000 mileage. When purchasing a VAZ 2110 secondhand, it is worth combining valve adjustment with replacing the timing belt in order to immediately have a guaranteed starting point for routine procedures. As the mileage increases, a valve grinding procedure may be necessary.
Adjustment process
Having opened the hood, the first thing you should do is unscrew the spark plugs: it will be much more convenient to rotate the crankshaft. Everything that would interfere with the removal of the valve cover is also dismantled: the throttle cable bracket, the crankcase ventilation pipes.
Next, remove the valve cover itself by unscrewing the two shaped nuts at the edges. It is better to separate the cover more carefully so as not to damage the gasket and stud seals.
In the eight-valve VAZ 2110, two cams are open, and it is easier to illustrate the operation on the second cylinder. However, the camshaft beds will not interfere with the remaining cylinders.
When an inline four is operating, each two cylinders operate in antiphase - when the compression stroke ends at the top dead center (TDC) of the first cylinder, then in the fourth cylinder the piston is also at the top point, but at the end of the exhaust stroke. Similarly in the second and fourth, but with a difference of half a turn of the crankshaft. For us, this means that we will measure the gap in two valves at one time:
The numbers of the cams under which the clearance is measured are indicated starting from the camshaft pulley.
To start work, install the camshaft pulley according to the marks (the protrusion on the pulley opposite the protrusion on the casing). Rotate the pulley clockwise using a spanner wrench or a ratchet head.
When marks 1 and 4 coincide, the cylinders are set at top dead center. However, for any real-life engine, the intake and exhaust phases are not only wider than one stroke (90 degrees along the crankshaft or 180 degrees along the camshaft), but also shifted relative to the dead points. Therefore, the table above shows the points when the cams stand on the pushers strictly with the backs of their heads. It would be possible to measure the gap without such precision - the back of the cam has the shape of an arc, the center of which coincides with the axis of rotation of the camshaft, but no one is safe from an unevenly worn or initially inaccurately machined camshaft.
It is convenient to use pulley teeth to measure angles: 3 teeth on the camshaft are approximately equal to 50 degrees on the crankshaft.
Having aligned the camshaft, we measure the gaps in a pair of valves with feeler gauges: in the first case, under the first and third cams. Starting from a probe with a thickness of 0.2 mm, we sort through the plates from the set until the next one begins to enter the gap without noticeable force, but with a barely perceptible interference. We record the resulting gap. The nominal clearance for the intake valve is 0.2 mm, for the exhaust valve – 0.35 mm (the exhaust valves heat up more during engine operation, and a larger gap is given to compensate for their lengthening).
Tool for work
In addition to the everyday set of sockets and spanners, which the owner of a VAZ 10 should already have, a few more tools will be required:
- A device that presses out pushers for removing adjusting washers from them. You can get by with a couple of powerful screwdrivers, but the price issue here is not so great that you pay for the savings with less convenience. You can completely remove the camshaft - but then you will have to remove the timing belt as well, again there is no gain in time.
- A set of feeler gauges - we will use them to measure the gaps.
- Micrometer - This is not necessary, but is very useful. When adjusting, the thickness of the new washer is calculated based on the thickness of the old one and the measured gap, but what to do if the thickness marking on the washer is erased (and no one has canceled the wear?). You can borrow a 0-25 mm micrometer, fortunately you can trust it by simple mixing without calibers.
Something else useful for you:
Preparing and disassembling the mechanism
To carry out the work, you will have to purchase a special device for pressing the pushers and a set of adjusting washers of various thicknesses - you will not be able to do without them. If you constantly plan to make adjustments yourself, then this purchase will help you save money on car service costs. With a one-time promotion, purchasing devices is impractical; it is better to immediately contact the specialists.
To disassemble and adjust the clearances under the cams, you will need the following tools:
- a pair of flat probes with a thickness of 0.2 and 0.35 mm;
- a regular plumbing kit with screwdrivers and pliers;
- tweezers;
- sets of ring and open-end wrenches;
- spark plug wrench.
Since during the adjustment process you will have to repeatedly turn the crankshaft, to facilitate rotation it is recommended to unscrew all the spark plugs, having first removed and put the high-voltage wires aside. Further disassembly includes:
- Disconnecting from the valve cover all pipes that interfere with its removal.
- Unscrewing the valve cover and removing it. You need to make sure that the rubber bushings do not get lost from the holes.
- Removing the gasket.
- Removing the plastic timing belt cover.
After wiping off any oil stains on the cylinder head flange where the gasket was located with a rag, you can begin tuning.
Remember that adjustment is carried out only on a cold engine.
Symptoms of problems
So, the need for intervention is indicated by the following signs:
- You can hear the valves knocking;
- Compression in the engine drops, it, as they say, “does not hold up”;
- Oil “drives” from under the valve cover;
- The engine response decreases, it pulls poorly;
- “Shots” are heard through the muffler;
- The carburetor “sneezes”;
- Fuel consumption increases.
All of the listed symptoms can arise both for other reasons and “thanks to” poorly adjusted valves of the VAZ 2110. In order for them to close tightly and not knock, they need to be “brought back to normal.”