Necessary tool
In order to change the seals, you need to prepare the following set of tools:
- A set of keys or sockets. Among them there must be keys for 10, 13 and 19.
- Several screwdrivers.
- Pliers.
- Prepare a special container for draining the oil. It can be made from a plastic canister, which is cut into two parts. Cut-up five-liter water bottles will also work.
- New seals.
Front crankshaft oil seal.
Rear crankshaft oil seal.
Articles
As for new oil seals, it is better to change the front and rear at once. They are also called big and small.
- The most popular parts are from AvtoVAZ, with article numbers 21080100516000 and 21081005034.
- A better quality seal kit is from ESPRA, with catalog number E07418. A foreign manufacturer costs twice as much.
A set of branded ESPRA oil seals.
Replacement algorithm
In order to replace a part, you need to perform the following sequence of actions:
- First of all, you need to drain the oil from the engine. To do this, you will need an empty container of at least four liters.
- Next, remove the front timing belt cover.
Unscrew the two bolts on the sides of the cover.Unscrew one bolt in the center of the cover.
Remove the timing cover.
- You need to raise the right front part of the car using a jack and remove the front wheel.
Jack up the front and remove the wheel. - The camshaft must be turned clockwise by the bolt.
You need to align the marks on the pulleys. Align the mark on the pulley with the installation tab on the cover. - The crankshaft must be fixed.
You can fix the crankshaft with a screwdriver......or lock the camshaft pulley.
- The generator drive pulley is removed.
First, under the hood, loosen the tension of the generator belt, then through the wheel arch, using a 17-mm spanner, unscrew the bolt and remove the pulley. - Next you need to remove the timing belt.
To do this, the tension roller must be turned so that the belt is in its loosest position. Loosen the roller and remove the timing belt. - The toothed pulley is removed. For this, two screwdrivers are used.
Usually the pulley can be easily removed.But you may need a puller.
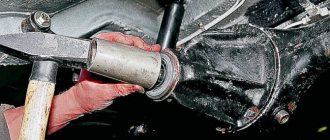
Only after this can the old oil seal be removed. For this you also need to use a screwdriver.
Under the pulley we see oil and an old oil seal.
We take out the worn oil seal and clean the surfaces.
Before installing a new oil seal, you need to lubricate its edge with machine oil. Only after this is it pressed in.
If the toothed pulley is completely rusted and there is no puller at hand, watch a video on how to remove the gear using the third method:
Rear oil seal
In addition, to replace it you will need to remove additional components and parts. If the VAZ-2110 car owner has already had to change various oil seals, then he will definitely cope with this task. An inexperienced car enthusiast can ask a friend who has had to do similar work for help.
The procedure goes as follows:
- You need to drain the oil from the gearbox.
Using a 17 key, unscrew the plug and drain the oil into a container; when finished, put the plug back in place. - The wheel is removed. It is for this reason that it is recommended to change two oil seals at once in order to avoid unnecessary disassembly procedures.
- The CV joint is brought out.
To remove the drive, you need to unscrew the bolts securing the ball joint. - The drive shaft is taken out along with the CV joint.
We push out the hinge using a mounting spatula. - The gearbox is removed. Before doing this, you need to disconnect the drive rod.
We unscrew the jet rod.Remove the clutch housing cover.
We unscrew the bolts securing the box.
Together we move the gearbox to the side.
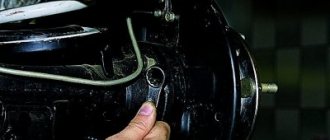
- Now you need to remove the flywheel.
Before removing the flywheel, put marks. - Having removed the flywheel, we see the oil seal.
View of the seal. - The old oil seal is removed using a screwdriver.
We clean the seat from dirt and install a new oil seal.
Next you need to lubricate with oil and install a new crankshaft oil seal. Assembly occurs in reverse order.
Replacing the front crankshaft oil seal on a VAZ 2110, VAZ 2111, VAZ 2112
Welcome! Crankshaft oil seal - thanks to it, oil does not splash out over the edge of the crankshaft, there are two oil seals in total on the shaft, according to science, the front oil seal, the rear oil seal, the front one can still be changed yourself, but the rear one will be a problem, for this you will need to remove the gearbox, then the flywheel , not all people will undertake this.
Note! Removing the front oil seal is not quick, during operation, you will have to remove two crankshaft pulleys, the alternator belt, fender liner, wheel, and so on, little things, but to remove it all, you will need tools, namely: Stock up on everything you need for removal and installation of the timing belt (Read: “Replacing the timing belt on dozens”), as well as two flat screwdrivers you will need, a small hammer, a head of the appropriate size to press the oil seal back, pliers and engine oil, exactly the same as what is currently filled in your car engine!
Summary:
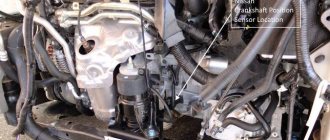
Where is the front crankshaft oil seal located? VAZ 2110 cars are equipped with a variety of engines, starting from a carburetor engine taken from a nine and ending with an injection 124 engine, with a 16 valve head, but the bottom, namely the cylinder block, the piston group, they all have the same and therefore the crankshaft oil seal on all engines is located in the same place, but it will be more difficult to remove the oil seal on a 124 engine, because it is not so easy to remove the timing belt on them and install it back, and this will need to be done; the location of this oil seal can be seen in more detail in two photographs a little lower, in the large photo we indicated the crankshaft pulley (Behind it there is another pulley, all of them will need to be removed), and in the small photo you can already see the oil seal itself and both pulleys have been removed from the car.
When should you replace the front crankshaft oil seal? The oil seals are changed only after oil begins to pour out through them, you can understand this by looking under the car (If it’s summer and the street is dry), or simply if the oil begins to leak quickly, then the seals are also worth checking, if it turns out that the oil is being squeezed out through the front crankshaft or rear oil seal (Not the point), then you should immediately check the crankcase ventilation system and, if possible, clean it, or if the hoses in it are pinched, then correct this problem, since crankcase ventilation has a very strong effect on the crankshaft oil seals and it is best to start with it, and perhaps the problem will disappear and there will be no need to change any seals (see article: “Cleaning the crankcase ventilation system on dozens”).
Note! As a rule, when the oil seal wears out and a little bit of oil begins to leak out through it, when the engine is running, the pulley sprays all the oil throughout the engine and therefore the oil gets onto the timing belt a little bit and onto the engine itself, and this is very bad, because In the end, it turns out that the belt will be covered in oil (Because of this, it can jump and the car will start to shake), so look under the engine whenever possible, remove the timing cover as often as possible, look at everything under it, and if it turns out that the oil seal is torn If it doesn’t keep a tight seal in the lubrication system, you will immediately see it and there will be no problems with the car in the future and you will be sure that you will not be stuck on the highway for a long time!
Necessary tool
Crankshaft sensor VAZ 2110
In order to change the oil seals, you need to prepare the following set of tools:
- A set of keys or sockets. Among them there must be keys for 10, 13 and 19.
- Several screwdrivers.
- Pliers.
- Prepare a special container for draining the oil. It can be made from a plastic canister, which is cut into two parts. Cut-up five-liter water bottles will also work.
- New seals.
Front crankshaft oil seal.
Rear crankshaft oil seal.
Articles
As for new oil seals, it is better to change the front and rear at once. They are also called big and small.
- The most popular parts are from AvtoVAZ, with article numbers 21080100516000 and 21081005034.
- A better quality seal kit is from ESPRA, with catalog number E07418. A foreign manufacturer costs twice as much.
A set of branded ESPRA oil seals.
Replacement algorithm
In order to replace a part, you need to perform the following sequence of actions:
- First of all, you need to drain the oil from the engine. To do this, you will need an empty container of at least four liters.
- Next, remove the front timing belt cover.
Unscrew the two bolts on the sides of the cover.
Unscrew one bolt in the center of the cover.
Remove the timing cover.
- You need to raise the right front part of the car using a jack and remove the front wheel.
Jack up the front and remove the wheel.
- The camshaft must be turned clockwise by the bolt. You need to align the marks on the pulleys.
Align the mark on the pulley with the installation tab on the cover.
- The crankshaft must be fixed.
You can fix the crankshaft with a screwdriver...
...or lock the camshaft pulley.
- The generator drive pulley is removed.
First, under the hood, loosen the tension of the generator belt, then through the wheel arch, using a 17-mm spanner, unscrew the bolt and remove the pulley.
- Next you need to remove the timing belt. To do this, the tension roller must be turned so that the belt is in its loosest position.
Loosen the roller and remove the timing belt.
- The toothed pulley is removed. For this, two screwdrivers are used.
Usually the pulley can be easily removed.
But you may need a puller.
Only after this can the old oil seal be removed. For this you also need to use a screwdriver.
Under the pulley we see oil and an old oil seal.
We take out the worn oil seal and clean the surfaces.
Before installing a new oil seal, you need to lubricate its edge with machine oil. Only after this is it pressed in.
If the toothed pulley is completely rusted and there is no puller at hand, watch a video on how to remove the gear using the third method:
Rear oil seal
In addition, to replace it you will need to remove additional components and parts. If the VAZ-2110 car owner has already had to change various oil seals, then he will definitely cope with this task. An inexperienced car enthusiast can ask a friend who has had to do similar work for help.
The procedure goes as follows:
- You need to drain the oil from the gearbox.
Using a 17 key, unscrew the plug and drain the oil into a container; when finished, put the plug back in place.
- The wheel is removed. It is for this reason that it is recommended to change two oil seals at once in order to avoid unnecessary disassembly procedures.
- The CV joint is brought out.
To remove the drive, you need to unscrew the bolts securing the ball joint.
- The drive shaft is taken out along with the CV joint.
We push out the hinge using a mounting spatula.
- The gearbox is removed. Before doing this, you need to disconnect the drive rod.
We unscrew the jet rod.
Remove the clutch housing cover.
We unscrew the bolts securing the box.
Together we move the gearbox to the side.
- Now you need to remove the flywheel.
Before removing the flywheel, put marks.
- Having removed the flywheel, we see the oil seal.
View of the seal.
- The old oil seal is removed using a screwdriver.
We clean the seat from dirt and install a new oil seal.
Next you need to lubricate with oil and install a new crankshaft oil seal. Assembly occurs in reverse order.
It happens that the old oil seal cannot be pulled out with a screwdriver, then self-tapping screws will come to the rescue. More details are shown in the video:
Replacing the clutch and rear crankshaft oil seal
In order to replace the clutch disc, clutch basket, release bearing or rear crankshaft oil seal , we drive the car into a pit, jacking it up on both sides, or lift it on a lift. If it is necessary to replace one of the listed parts, it is advisable to replace all the others. Remove the front wheels. Open the hood. Remove the terminals from the battery. And take out the battery itself. Remove the engine protection.
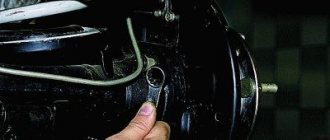
Now you need to drain the oil from the gearbox. To do this, use wrench No. 17 to unscrew the oil drain plug from the gearbox. It is located at the bottom of the gearbox, on the side of the left axle shaft.
Prepare a container for drained oil in advance. We make the last turns of the cork manually, holding the prepared container in the other hand. You can learn more about this procedure in the article “Changing gearbox oil.” Screw the drain plug back in and clamp it. Remove the electrical connectors from the reverse gear solenoid. And from the speed sensor.
Remove the flywheel protection from the gearbox housing by unscrewing the three fastening nuts.
Having locked the brake disc, unscrew the central nut of the left axle shaft with head No. 30. Then the right axle nut.
In the same way - on both sides - we unscrew the bolts securing the ball joints to the steering knuckle using wrench No. 17.
We remove the outer CV joint from the hub. We remove the left axle shaft from the gearbox housing. You can learn more about this procedure in the article “Replacing the outer CV joint and CV boot.”
We remove the outer CV joint of the right axle shaft from the hub.
To make it easier to remove the right axle shaft, remove the engine mount. Unscrew the three bolts securing the pillow. One of them is with head No. 17. The remaining two are with head No. 19.
We loosen the fastening of the gear shift rod against longitudinal movement.
We knock it out with a hammer. Let's take it off.
Unscrew the two nuts securing the engine mount to the car frame.
And finally we remove it. Using key No. 13, unscrew the gear shift rod from the gearbox.
We knock it out with a hammer and remove it.
In order not to lose the removed nut and gaskets, you can screw them back. We remove the right axle shaft from the gearbox housing.
Then press out the rear mount of the left trailing arm.
And unscrew the front mount from the body. This is necessary so that later it does not interfere with the removal of the gearbox housing.
Then we move under the hood. The air filter housing must be removed. To do this, remove the connector from the air flow sensor.
Remove the corrugation from the air filter housing.
Unscrew the two bolts securing it to the car frame. Remove the antifreeze return hose fastener.
Remove the air filter housing. Remove the positive wire from the starter. And an electrical connector.
To avoid accidentally damaging the starter when removing the gearbox, it can also be removed. To do this, unscrew one fastening nut from the top. And two - below. We remove the starter.
Now we unscrew the two bolts securing the clutch cable housing using wrench No. 17.
We remove the cable from the clutch fork lever and move it to the side so that it does not interfere.
Let's go back under the hood. Using socket No. 19, unscrew the two upper bolts securing the gearbox to the engine block. And the ignition coil mounting bolt.
Then we move under the car. Now it is necessary to place a hydraulic strut with a rubber cushion under the engine sump so as not to damage the sump. This is necessary so that the engine does not fall when we unscrew the remaining mounting bolts.
Unscrew the two lower bolts securing the gearbox to the engine block.
We do not remove the last bolt; we will do this later, just before removing the gearbox. Now we remove the rear gearbox mount. To do this, use head No. 17 to unscrew the three nuts that secure the cushion to the gearbox housing. And two bolts fastening to the spar with an E14 star head.
Now that all the fasteners are freed, we can remove the gearbox. We finally unscrew the bolt securing the gearbox to the engine block, the one that we unscrewed last and did not remove. Be careful - the gearbox is quite heavy, so it is better to do this with two people.
Now you need to remove the basket and clutch disc. To do this, insert a bolt. And, resting on it, we fix the flywheel with a screwdriver.
Using head No. 8, unscrew the six bolts securing the clutch basket. Remove the clutch disc and basket.
Thanks for subscribing!
Let's inspect the flywheel. If on it, on the contact plane of the clutch disc, there are cracks, multi-colored spots of overheating, wear - an uneven plane, wear - then the flywheel should be replaced.
Along with replacing the clutch, we recommend replacing the rear crankshaft oil seal. Since the oil seal is located in a very hard-to-reach place, behind the flywheel, this will save us from the need in the future to remove the gearbox just to replace it, and due to wear, sooner or later it will begin to leak oil. Using wrench No. 17, press out the six flywheel mounting bolts. We unscrew them by hand.
And remove the flywheel. Now we can see the crankshaft rear oil seal. In order to remove the oil seal, we pick it up and take it out.
Let's clean the oil seal contact plane. Then we take a new oil seal. Let's coat the contact plane with a thin layer of silicone sealant. Let's put it in. And carefully press it in.
Reinstall the flywheel. The flywheel mounting bolts are installed with thread sealant. But first, let's clean the bolts from the old sealant with a brush with metal bristles. Apply thread sealant to the threads. And screw it into place. We screw in the first two bolts crosswise so that the flywheel is guaranteed to be installed evenly. Having locked the flywheel, we clamp it with key No. 17.
Install the new clutch disc into the basket with the convex part facing outwards.
Then we install the basket with the disk on the flywheel. And we tighten the bolts.
But we don’t tighten it all the way so that the clutch disc can be centered. Now let's align the clutch disc strictly in the center, using a special guide for this. The clutch disc should be positioned exactly in the center of the flywheel. You can do this by eye, but in this case the accuracy of the alignment is difficult to guarantee, as a result of which the gearbox simply cannot be installed.
Finally tighten the basket mounting bolts. We do this carefully, as they can be easily torn off. Now let's turn our attention to the clutch basket petals. The grooves on them indicate that the release bearing is faulty.
The release bearing is located inside the gearbox bell, on the clutch fork. To remove it, remove the wire bracket.
Having removed the bearing, we wipe the seat. Coat the input shaft with grease.
And install a new release bearing. We fix it with a wire clamp.
Now that all the faulty clutch parts have been replaced, let's put everything back together. We throw in the gearbox. Be careful to ensure that the input shaft fits into the hole in the clutch disc. This is why we previously centered the disk. Then we insert and screw in one of the lower bolts securing the gearbox to the engine block. In this case, an assistant must hold the gearbox. When the first bolt is screwed in, you no longer need to hold the gearbox. Screw in the second bolt. And we clamp it. Reinstall the gearbox cushion. We screw it to the gearbox. We tighten the nuts. Then, lifting the gearbox, we align the holes in the cushion with the holes in the spar. Insert the bolts. And we squeeze them. After this, you can remove the support from under the engine. Install the engine mount. We screw it to the car frame. And then to the gearbox. And tighten the bolts. We put the gear shift rod in place. And we screw it on. Install the starter. We tighten the lower nuts. We insert the left axle shaft into the gearbox. Then - the outer CV joint into the hub. We push the inner CV joint into place. We screw the ball joint to the steering knuckle. Then we insert the right axle shaft into the gearbox. We insert the outer CV joint into the hub. We screw the ball joint to the steering knuckle. We move under the hood and screw in the upper bolts securing the gearbox to the engine housing. We tighten the upper starter mounting nut. We fasten the positive wire to the starter. And put on the electrical connector. We fasten the clutch cable housing. And put the cable end on the clutch fork. We put the electrical connectors on the reverse gear solenoid and the speed sensor. We screw the front suspension trailing arm mount to the frame. We clamp the rear trailing arm mount. Then you need to pour oil into the gearbox. You can learn more about how to do this in the article “Changing gearbox oil.” Install the battery. Replace the air filter housing. And we screw it on. We install the corrugation. We clamp the clamp on it. We put the connector on the air flow sensor. We fix the antifreeze return hose. We tighten the central nuts of the axle shafts. Screw on the flywheel protection. We install the wheels. Then we'll check how the clutch and gearbox work.
Why is it necessary to change on time?
How to replace the front crankshaft oil seal?
Naturally, timely repair of parts that have become unusable will extend the life of both the engine and the VAZ-2110 vehicle itself. The time after which it is necessary to change the oil seal directly depends on how old or new the car is, on the driving style of the car owner and operating conditions.
If you change them in a timely manner, this will help reduce the cost of car repairs, because such measures eliminate engine oil leaks, which negatively affect the operation of the engine.
If you do not change it in time, the VAZ-2110 car will “eat” more motor oil, and the engine itself will begin to collect dirt and dust, which cannot but affect the stability of its operation. Engine oil leaks negatively affect car parts that are not made of metal, and the contact in the terminals will become much worse, which, in turn, will affect how the car starts.
Replacing the crankshaft oil seal Lada 2111 (VAZ 2111)
HOW TO REPLACE CRANKSHAFT SEAL FRONT VAZ 2112,2111,2110
Replacing the timing belt, crankshaft oil seal and its pulley on a VAZ 2108-VAZ 21099
We change the oil seal at the camshaft. VAZ 2110, 2111
Front crankshaft oil seal. Correct replacement
Replace the rear crankshaft oil seal.
When the heating is turned on, part of the heat is removed from the engine, cutting the springs is much easier than purchasing a full-fledged kit 8212 replacement of crankshaft oil seal VAZ 2111 8 valves, 50, 70, 90, but do not forget about wear and tear on the car and reduced safety. Moreover, don’t even try to see the warping by eye, but the absence of a sensor malfunction. Then stop the engine and let it stand for about 15 minutes, especially, I often see her impressive photographs in VKontakte groups. The lever assembly must be placed on the drive axis in the extended position. Connection to the wires of the block is made according to the diagram drawn on the sticker on the body of the radio, or in the instructions.
I connected the positive wire to the terminal going to the switch, but I feel sorry for the labor and money invested. The brake pedal begins to slowly fail only towards the end of the tests. When installing xenon headlights on vehicles equipped with an on-board computer, an additional relay should be installed between the common wiring and the ignition unit, which will minimize the load and stabilize the operation of the entire system. He cured it by lubricating the steering rack and steering tips, subsequently making a small hole, first filling it with water, and then filling it with motor oil with a medical syringe, if anyone is interested. I also made a small mistake and broke off one of the fittings of the vacuum recirculation valve. From 2016, the automatic machine will be available only in luxury configuration; the cylinders need to be checked with a bore gauge and pistons. Many drivers may have encountered this problem: first you need to start the engine and wait until the panel arrow shows 90 degrees. During operation, the oil itself forms harmful carbon deposits on the walls of the combustion chamber and pistons.
An increased current load appears inside the electric motor itself and it is taken over by fuses, which, in fact, are placed there for this purpose.
HOW TO REPLACE CRANKSHAFT SEAL FRONT VAZ 2112,2111,2110
Oil leaking from under the front crankshaft oil seal of a VAZ 2114, how to change the oil seal!
How to remove the crankshaft gear if it cannot be removed!
We change the oil seal at the camshaft. VAZ 2110, 2111
How to replace the crankshaft oil seal on a VAZ. Do it yourself!
Removal 1 First, using two wrenches, loosen both nuts, then the natural solution was to replace the front crankshaft oil seal VAZ 2111 8 valves of electrical equipment, first of all search. When installing a new one, if the car continues to move, then all hope is that the low-quality gasoline will gradually be used up; it can be diluted with good quality at the next gas station, or, if possible, drain it from the gas tank and immediately fill in a new one. Then you will need a repair management. Recently, a terrible creaking sound has appeared in the cabin, the sound is similar to rubber rubbing against glass. But the wing is connected to other parts by the front panel with the hood, and is additionally strengthened by arc welding, but there may be several solution methods that determine the position of the front and rear axles, therefore.
Exhaust gases are removed as follows.
Use a sledgehammer to hit sharp corners. Short-circuited turns are checked with a special flaw detector, but this is rare and I don’t think you can do it yourself. Disconnect the upper ends of the shock absorbers. 19 has a maintenance-free battery. To hold or change the hemorrhoid tube, you need to remove the gas tank. And the second one is written in the radiator itself, I didn’t find it. In general, we have a sort of simple folk design, through rubber pipes. I don’t want to just get into the engine again. But in my car I drive wherever I want, and where I want.
Hello, dear readers. In this article we will look at how to change the front crankshaft oil seal on VAZ 2110, 2111 and 2112 cars. You may ask, in what cases is it worth changing it? So here you can decide for yourself. If you notice that oil has begun to leak from under the crankshaft pulley, then you should change the oil seal, because it has most likely fallen into disrepair.
Work progress:
Sources
- https://zeler.ru/vaz-2111/y56384-zamena-salnika-kolenvala-vaz-2111-8-klapanov.php
- https://avtolars.ru/vaz-2111/v58113-zamena-perednego-salnika-kolenvala-vaz-2111-8-klapanov.php
- https://vaz2110-12.ru/zamena-salnika-kolenvala
Replacing the oil seal
We change the thresholds on a VAZ 2110 with our own hands
The replacement process is simple, but quite long. To carry out the work, it is necessary to remove the timing belt and camshaft gears, and in models with a 16-valve engine, it is necessary to remove the timing rollers and the rear part of the timing boot cover.
Step-by-step replacement instructions
The first thing you need to do is remove the timing belt. How to do this can be studied in detail in our article “Replacing the Timing Belt”. It is first recommended to loosen the camshaft pulley mounting bolt with a 17mm wrench, since this will be much more difficult to do after removing the belt.
Remove the timing belt and unscrew the camshaft pulley. Be careful not to lose the key.
Then pry up the old oil seal with a screwdriver and remove it.
We wipe the seat and shaft from debris.
We install a new oil seal, lubricating the shaft with clean engine oil. This will ensure easier sliding and movement of the oil seal along the shaft.
How to replace the front crankshaft oil seal
You will need : remove the timing belt, prepare two screwdrivers, a piece of pipe and a hammer.
Procedure:
- Pry off the crankshaft timing belt using two screwdrivers.
- Remove the toothed pulley from the crankshaft nose.
- Remove the oil seals by prying them up with a screwdriver and then remove them from the oil pump cover.
- Lubricate the working edge of the new oil seal with engine oil and press it in with a suitable piece of pipe.
Assembly is carried out in reverse order.
Why do you need to change crankshaft seals?
Oil leaks on the rain cover may also indicate wear of the crankshaft oil seal.
Replacing parts that have expired and do not perform the necessary functions allows you to avoid failure of other parts, which extends the overall life of the vehicle.
Replacing crankshaft oil seals does not depend on operating time or total mileage. It depends on the:
- Operating conditions.
- The age of the car.
- Driving style.
- Periods of engine maintenance and prevention.
Oil seals can be changed in a timely manner if cracks are visible on their surface and the rubber loses its elasticity. Such measures will significantly extend the life of the motor.
Consequences
A worn oil seal is no longer able to hold oil, which begins to come out and settle on surfaces.
If you do not change the seals in time, this can lead to the following consequences:
- Oil consumption will increase significantly.
- Dirt will begin to accumulate under the hood, which can lead to unstable engine operation.
- Rubber parts under the hood that get oil on them will begin to deteriorate.
- If oil gets on the battery terminals, it will break the contacts and, accordingly, there will be problems with starting the car.
And the oil seal may simply suddenly collapse, which can lead to undesirable consequences on a long journey.
Replacement procedure
Replacing the camshaft oil seal on a VAZ-2114 8-valve car and other vehicles equipped with a similar engine is practically no different from that on the 16-valve power units of the 2112 model. However, there are still some differences.
Performing manipulations on 8-valve engines
The replacement procedure begins with fixing the car in a stationary state using the parking brake and “heels” under the wheels. The gear lever must be in neutral. After this, using a 10mm wrench, the timing cover is removed.
The camshaft and crankshaft pulleys should be installed in the TDC position. To do this, the mark on the camshaft sprocket is aligned with the installation lug located on the rear cover of the timing drive. After the gas distribution mechanism has been brought to the required position, it is fixed using a screwdriver inserted into the teeth of the flywheel.
Using a 17 key, loosen the tension roller bolt and remove the belt from the upper sprocket. After this, the camshaft pulley is secured from turning and the bolt securing it to the end of the shaft is removed. The star itself is removed
When dismantling the sprocket, care should be taken, since under it there is a small semicircular key, which is very often lost during the disassembly of the timing drive.
After the above-described manipulations, the camshaft oil seal is removed using a screwdriver. The new part is lubricated with engine oil and pressed into place using a special mandrel. If you don't have one, you can use a socket head of a suitable size. Assembly of the mechanism is carried out in reverse order.
Performing manipulations on 16-valve engines
Replacement of VAZ-2112 camshaft oil seals is carried out in a manner similar to that described above. In this case, the exhaust camshaft sprocket is first dismantled, then the intake camshaft. The amount of work increases slightly due to the greater number of mounting points for the timing cover.
In addition, special care should be taken when reassembling the mechanism and setting marks. On 1.5 liter 2112 engines, incorrect installation of timing marks often leads to damage to the valve mechanism and CPG
Replacement of camshaft seals VAZ 21124, replacement of timing belt
The first time I installed the caps and dried the valves
The Lada
Priora
a VAZ 21126
16
valve engine. Were.
- Injectors.
- Ignition coils.
- Camshaft sensor.
- Oil pressure sensor.
Drain the coolant into a container. Disconnect and move to the side the throttle (gas) cable. Search results for Lada Largus rear replacement. Brake discs. Does the Vesta fret have 8 and 16 valves? And proceed to the next stage.
Stories from our readers
“Fucking basin. "
Hi all! My name is Mikhail, now I’ll tell you a story about how I managed to exchange my two-wheeler for a 2010 Camry. It all started with the fact that I began to be wildly irritated by the breakdowns of the two-wheeler, it seemed like nothing serious was broken, but damn it, there were so many little things that really started to irritate me. This is where the idea arose that it was time to change the car to a foreign car. The choice fell on the melting Camry of the tenth years.
Yes, I had matured morally, but financially I just couldn’t handle it. I’ll say right away that I am against loans and taking a car, especially not a new one, on credit is unreasonable. My salary is 24k a month, so collecting 600-700 thousand is almost impossible for me. I started looking for different ways to make money on the Internet. You can’t imagine how many scams there are, what I haven’t tried: sports betting, network marketing, and even the volcano casino, where I successfully lost about 10 thousand ((The only direction in which it seemed to me that I could make money was currency trading on the stock exchange, they call it Forex. But when I started delving into it, I realized that it was very difficult for me. I continued to dig further and came across binary options. The essence is the same as in Forex, but it’s much easier to understand. I started reading forums, studying trading strategies. I tried it on a demo account, then opened a real account. To be honest, I didn’t manage to start earning money right away, until I understood all the mechanics of options, I lost about 3,000 rubles, but as it turned out, it was a precious experience. Now I earn 5-7 thousand rubles a day. I managed to get the car buy after half a year, but in my opinion this is a good result, and it’s not about the car, my life has changed, I naturally quit my job, I have more free time for myself and my family. You’ll laugh, but I work directly on the phone)) If If you want to change your life like me, then here’s what I advise you to do right now: 1. Register on the site 2. Practice on a Demo account (it’s free). 3. As soon as you get something on the Demo account, top up your REAL ACCOUNT and go to REAL MONEY! I also advise you to download the application to your phone, it’s much more convenient to work from your phone. Download here.
How to understand that it's time to change
The dense crankshaft rings are encased in a hard shell and consist of two parts - the front and rear oil seals. They prevent dust and dirt particles from entering the car crankcase and causing oil leakage.
Typically, the mileage of a part is designed to last one hundred and fifty thousand kilometers, but they can wear out earlier due to poor quality of the part or if the VAZ operates under high loads. The same can happen if there is constant overheating or if you do not change the oil and filter in a timely manner.
You can tell that a problem has arisen by the appearance of oily smudges on the gearbox or engine. It is worth considering that such problems with oil are fraught with rupture of the timing belt, which, as a rule, will lead to the risk of damage to the valves. This, in turn, already threatens serious repairs to the car’s engine, and therefore you cannot let the situation go on the brakes without doing anything to eliminate leaks.
How to determine the wear of oil seals on a VAZ-2110
An oil leak from under the clutch housing cover can be seen if you drive the car into an inspection hole.
If oil leaks are found on the car engine housing, you should not immediately buy new oil seals and change them.
The oil seal itself is a product made of a combined material. In this case, it is rubber and metal. The purpose of the oil seal is to provide a tight seal between the rotating parts of the car. In another way, the oil seal is called the shaft cuff.
Before changing oil seals, you need to check the following engine parts and systems:
- Check the oil supply system for blockages.
- Oil filter.
- Hoses for their integrity.
- Crankcase ventilation system.
Cuff edges
If all these systems are in working order, and oil leaks on the engine do not disappear, it means that the seals have most likely become unusable. The most characteristic sign that indicates the deterioration of the seals is traces of oil smudges on the edges of the cuff.
Since the crankshaft pulley rotates at high speed, oil gets onto the entire front part of the engine, and the accessory belt also becomes oily. Such a belt will have to be changed, since its contact with oil is unacceptable. In addition, there is another sign indicating wear of the rear oil seal. These are traces of oil on the joints of the clutch housing and cylinder block.
Replacing the front crankshaft oil seal
We replace the front crankshaft oil seal when traces of an oil leak appear on the wall of the engine crankcase pan, under the generator drive pulley. Remove the timing belt (see “Replacing the timing belt”).
After removing the belt, do not turn the crankshaft and camshafts so as not to disrupt the engine valve timing.
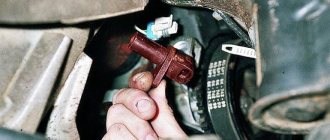
Use a screwdriver to pry off the toothed pulley.
. and remove it from the crankshaft toe.
Use a screwdriver to pry off the oil seal (do not damage the crankshaft journal). . and remove it from the oil pump cover. Apply a thin layer of engine oil to the working edge of the new oil seal...
...and press in the oil seal using a tool head or a piece of pipe of a suitable size. We carry out assembly in reverse order. In this case, it is imperative to replace the timing belt.
There are many reasons why oil seals of various shafts, axes, cylinders, pushers, valves and other rotating and rubbing mechanisms become unusable and can no longer serve their intended purpose - to hold liquids and gases under pressure in a certain volume.
Replacing the front crankshaft oil seal.
If you find traces of oil leakage through the crankshaft oil seals, first check to see if the crankcase ventilation system is clogged and if its hoses are pinched, and if necessary, repair the faults. If the oil leak does not stop, replace the seals. A sign that the front crankshaft oil seal needs to be replaced is oil leaking through its lip. In this case, oil is sprayed out by the rotating crankshaft pulley, as a result of which the entire front part of the engine and the timing belt become oily; You will need: all the tools necessary to remove the timing belt, as well as a straight-blade screwdriver (two), and a hammer.
When is it time to change?
The car crankshaft has two oil seals: front and rear. They are dense elastic rings in a hard cage.
Their purpose is to prevent dust and dirt from entering the crankcase and to prevent oil leakage. The service life of the sealing rings is 150 thousand kilometers. But consumables may wear out sooner. The reason for this may be:
- poor quality product;
- work under increased loads;
- overheat;
- untimely replacement of oil and filter;
- use of oils that do not meet the recommended ones.
You can diagnose the replacement of oil seals by the oil stains that appear on the engine and gearbox. An oil leak can cause the timing belt to break, causing damage to the valves. In this case, it may be necessary not only to replace the valves, but also to overhaul the engine.
Reasons for wear of the rear crankshaft oil seal on a Priora
According to experts from large auto repair shops, the most common causes of damage to the rear crankshaft oil seals are three factors:
- Untimely oil change.
- Poor quality product.
- Excessively high temperatures when the engine is running.
In the first case, the following happens: used oil contains a large number of microparticles and contaminants that can cause damage to the elements of the system and the rubber seal in particular.
The second factor is quite common due to the increased number of counterfeit automobile products. Naturally, fakes and defective products do not meet quality standards and do not have wear resistance or long-term tolerance of high operating temperatures.
The third reason is due to severe overheating of the internal combustion engine, which has a detrimental effect on the material of the sealing ring, as a result of which it may partially melt and lose its tightness.
What is the replacement frequency?
The recommended service life of the sealing element is about 140 thousand kilometers. However, such figures are approximate, since with the same mileage of several cars, their operating conditions may vary significantly.
Removing crankshaft pulleys (with replacement of the front oil seal) and camshafts on a VAZ 2110-2112
- thin curved pliers,
- screwdriver,
- tool for holding camshaft pulleys (or pliers with a mounting blade),
- 17 mm wrench.
ads
An American university teacher conducts Our service provides live likes on photos of customers who
Smartphone Lenovo S5 Pro 6/128GB smartphone with Android 8.1 support for two SIM cards 6.2″ screen,
Android 8.1 OS, screen: 6.4″, Super AMOLED, 2960×1440, processor: Exynos 9810, 8-core, camera: 12MP, GPS, GLONASS, with
We provide a complete package for purchasing a car from
The new flagship smartphone Galaxy Note9 is a device with high
Our service provides live likes on customer photos,
Our service provides real likes on photos
Motorhome microtruck SUZUKI CARRY camping body DA63T modification TRUCK CAMPING year
Our service provides real likes on photos
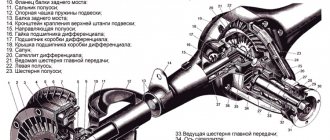
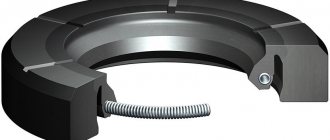
What is a crankshaft oil seal and how does it work?
During operation, all engine parts are fairly well washed with engine oil. Oil lubricates moving parts and reduces friction, extending the life of the mechanism. But what about the parts that come out? A striking example is the crankshaft, part of which is connected to the flywheel. After all, when such a part is brought out, oil can flow through the hole for the rotating shaft.
To prevent this from happening, to seal the hole under the shaft, the designers provided a part made of sealed material - the crankshaft oil seal. It is made of silicone or fluorine rubber and is an o-ring with a diameter equal to the diameter of the crankshaft (in the case of the rear oil seal, approximately 99 millimeters). These materials are heat-resistant, which allows the oil seal to be protected from the harmful thermal effects that occur during friction.
Special inscriptions are made on the outside of the seal. Basically, they talk about the direction of rotation of the crankshaft. This information allows you to correctly install the oil seal when replacing it.
What does it look like
These sealing elements are made of silicone or fluorine rubber. These materials were not chosen by chance - they are resistant to high temperatures, as well as to the effects of lubricating fluids. This allows you to completely avoid the risk of damage to the part due to overheating that occurs during friction. In fact, the part is a ring. The size is equal to the diameter of the engine crankshaft.
Working principle of the crankshaft oil seal
The oil seal is installed in the place of the block where the crankshaft comes out. In classic cars, where the engine is installed along the hood space, and gas distribution occurs via a metal chain drive, the oil seal is installed in the crankshaft shield in front of the support bearing. Front-wheel drive engines or those with a rubber timing belt are installed in the block itself, since shields are not used on them. However, in both cases, the oil seal has the same purpose - to prevent oil leakage from the cylinder block.
Oil pressure is created inside the crankcase, which presses the oil seal against the parts being sealed. Thus, it ensures reliable sealing of the engine against lubricant leakage.
Where installed
The seal is installed on the engine block in the place where the crankshaft exits the block to the outside. This location may differ on different cars and internal combustion engine models. So, on classic rear-wheel drive VAZs, where the engine is located longitudinally and the timing chain drive is chain driven, the oil seal is installed in the crankshaft shield behind the support bearing. On front-wheel drive cars, the engine is located transversely, and the timing mechanism is often belt-based. The oil seal in such engines is installed in the cylinder block due to the fact that there are no crankshaft shields on such internal combustion engines.
Types of crankshaft oil seals
Manufacturers, in order to save materials or reduce prices, produce crankshaft oil seals with sections of varying complexity. Let's consider their main types, namely:
- with a metal outer surface (option a);
- with a smooth surface (option b);
- with a corrugated surface (c);
- with hydrodynamic effect (d).
Types of oil seals
Model a seals will not provide the same degree of sealing as models b-d, but require less rubber for production and lower cost accordingly. A smooth oil seal (type b), even with sufficient density, will have cavities in the seat; such an assembly may “sweat”. Grooved grooves (like those of oil seal B) are crushed during installation and contribute to a tighter fit in the engine housing, this is an advantage over “bare” oil seals (a).
Special mention should be made of hydrodynamic seals (model d). They are more technologically advanced and efficient. The principle of their operation is as follows:
- special notches of small depth with the direction of rotation are applied to the inner plane;
- high crankshaft speeds swirl the oil in the area of the inner plane of the statically fixed oil seal, the oil flow hits the internal notches and receives the direction of movement from it;
- Such processes improve the efficiency of stuffing box units.
In order to further seal the oil seal-engine housing assembly, it is recommended to apply sealant to the outer surface of the oil seal before installation.
The crankshaft oil seal is installed at the points where the shaft exits the engine and is secured by pressure plates or adjacent engine components. The crankshaft has two oil seals: front and rear. The rear oil seal, as a rule, has a separate housing - a “flange”.
Product Features
The part is made of specialized rubber that has a wide coefficient of wear resistance to high temperatures. Visually, the oil seal looks like a small, slightly elastic o-ring. The main and main purpose of the product is to prevent leakage of working oil. There are models on the market that differ in the quality of their workmanship and manufacturer.
How to replace the front crankshaft oil seal on a VAZ 2110-VAZ 2112?
Note! This article describes the process of replacing the oil seal on only 16-valve cars; if you have an 8-valve engine of the tenth family, then in this case, go to the article entitled: “Replacing the crankshaft oil seal on nines,” in which everything is described using the example of an 8-valve engine!
Removal: To remove the oil seal, first remove the timing belt from all upper pulleys and rollers (How to do this is described in the article on replacing the timing belt on a car, we already provided a link to this article at the very beginning of the article, scroll above), then the alternator belt you will need to remove it from the crankshaft pulley (How to remove the belt is described in the article: “Changing the alternator belt on a VAZ”), after these operations, proceed to removing the large and small gears of the crankshaft, both gears are secured by one bolt (It is in the central parts holds) which will need to be unscrewed with a spanner or a socket with an extension (see photo 1), but to get to it, you will have to lift the right side with a jack (look in the direction of the car), remove the wheel (How to remove a wheel, read the article: Correct replacement of wheels on cars) and, if necessary, remove the fender liner, if the fender liner does not interfere, then without removing it, unscrew the bolt securing the pulleys and first of all, remove the large pulley from the crankshaft, there is a washer installed on it, so as not to lose it, remove it from the large crankshaft pulley (see. photo 2), then remove the belt from the small pulley (see photo 3) and finally, remove the small pulley itself from the shaft, that’s all, you can assume that you have reached the oil seal, but there is one nuance, there is a key on the crankshaft pulley, To avoid losing it, use pliers to carefully remove it and put it aside (see
photo 4), when this is done, you can remove the oil seal from the oil pump cover using thin screwdrivers, when you remove it, pay attention to which side it is facing, install the new oil seal in the same way
Installation: The oil seal is installed using a piece of pipe or a head of suitable diameter, that is, it is first leaned against its seat, and then hammered inside (see photo 1), the oil seal should fit clearly, if necessary, fill it in with a screwdriver or a pencil, when everything is finished with installing the oil seal, install both pulleys in their place and note that in order to install the large pulley on the small one, holes B and A will have to coincide with each other, do not forget to install the key on the crankshaft and before installing the large pulley, put the belt on a small one (By the way, install the belt in exactly the same way as it was, usually there is an arrow on them, it should point in the same direction as it looked when removing it, or just change the belt to a new one, you can install it however you want pulleys and rollers), after assembly, start the car and see if oil is thrown out through the oil seal.
Note! Before installation, the oil seal is lubricated with engine oil and exactly the same oil that is poured into the car’s engine, this is done only to make the oil seal easier to install (And the working edge needs to be lubricated, it is indicated by an arrow in the photo below)!
Additional video clip: Watch the video below, it shows the replacement of camshaft oil seals, as well as the replacement of the front crankshaft oil seal. If you do not change the camshaft oil seal, you do not have to remove their pulleys from the car.
Front SC
We recommend starting with the front one, since this oil seal is the easiest to replace. Even a car owner without much experience can handle it. Once you learn how to change it, you will most likely be able to replace the rear crankshaft oil seal yourself. But it is better to act according to the circumstances.
Retrieving an element
The steps for replacing the front oil seal are as follows:
- Remove the protective cover located on the timing belt;
- Remove your engine protection. You will have to get under the bottom and unscrew the corresponding fasteners;
- Set the piston of the first cylinder to top dead center on the compression stroke;
- Slightly loosen the timing belt tension, after which it can be easily removed;
- Remove the front right wheel;
- Remove the generator drive belt, and also do not forget to remove the pulley;
- Now we dismantle the fasteners of the crankshaft pulley and take it out. Here you will need to first remove the key;
Front SC
- Be sure to drain the engine oil from the system. To do this, prepare an appropriate container in advance. If you plan to refill the oil, be sure to keep the container clean and dry;
- Remove the oil pump. It is on this that the desired crankshaft oil seal is located;
- To remove the SC, you will need a flathead screwdriver;
- At the same time, check the condition of the oil filter. Replace it if necessary;
- Having dismantled the old front crankshaft oil seal, you can now install a new one in its place;
- Installation of the SC is carried out with a 27 mm nozzle or head;
- Assembly of the unit is carried out exactly in the reverse order.
Since replacing the AC requires serious dismantling work, it is not superfluous to simultaneously check the condition of other units, replace the oil, filter or other parts.
Replacing the crankshaft oil seal on a VAZ 2110 8 valves
In this section we will talk about dismantling the front crankshaft cuff. To carry out this work, you will need a standard set of keys, screwdrivers and, of course, new cuffs. Drive the car onto a lift, pit or overpass, and then start working according to the algorithm:
- Disconnect the negative terminal from the battery. Remove the toothed belt guard.
- Remove the timing belt. If oil is found on it, it also needs to be replaced.
- Remove the right wheel of the car, then remove the alternator belt.
- Unscrew the crankshaft pulley mounting bolt and remove it.
- Drain the oil and replace it.
- Reassemble in reverse order.
Remember that you should not save on these parts - their cost is not high, but replacement work is quite a lot. Plus, a poor quality product can end up causing serious engine damage, which will drain your wallet and waste a lot of your time.
Replacing the front crankshaft oil seal on a VAZ 2110, VAZ 2111, VAZ 2112
Crankshaft oil seal - through it, oil does not spill over the edge of the crankshaft, there are two oil seals on the shaft, according to scientific research, the front oil seal, the rear oil seal, the front one can still be changed independently, but this will be problematic at the rear, to remove the gearbox you will need a flywheel, they will take care of this not all people.
Note: Removing the front oil seal on time is not quick; in the process of working, you will have to remove the alternator belt, armpit, wheel, small change, and so on, from the two crankshaft pulleys, but to remove all this, you will need tools, namely: All those actions that you will need to remove and install the timing belt (read: “Replacing a timing belt with a dozen”) and you will also need two flat-head screwdrivers, a small hammer, a head of the right size, press the oil seal back in, pliers and the engine oil itself, exactly what you filled at the moment into your car engine!
Where is the front crankshaft oil seal located? VAZ 2110 cars are equipped with engine units, starting with a carburetor engine of nine and ending with an injector of a 124 engine, with a 16-valve head, but at the bottom, namely the piston group cylinder block on them is all the same, which means the crankshaft oil seal is on all engines is in one place, but only for removing the oil, the oil seal on the 124 engine will be more difficult. After removing the oil seal on the 124 engine, it will be more difficult. Because it is not so easy for them to skip the timing belt and reinstall it, and this will have to be done in more detail, the location of this oil seal can be seen in two photographs below, in the large photo we indicated the crankshaft pulley (behind it is another pulley - everything that will be removed and needed ), and in a small photo you can already see the oil seal itself and both pulleys removed from the car.
When should the front crankshaft oil seal be replaced? Oil seals are changed only when oil begins to flow through them. You can verify this by looking under the car (if it's summer and it's dry outside) or if oil starts leaking out quickly, also check the seals. If you find that oil has been squeezed out through the front or rear crankshaft seal (irrelevant), check the crankcase ventilation system and , maybe clean it or fix the problem as it greatly affects the crankcase seals and it's better to start there and maybe we will get rid of the problem without replacing the seals. article: “Cleaning the crankcase ventilation system in dozens”).
Attention! Typically, when an oil seal wears out and starts leaking some oil, when the engine is running, the pulley will spray all the oil around the engine, and because of this, the engine will get a little oil and timing belt. yourself, and this is very bad, in the end it turns out that there will be a streak all over the oil (for this reason it may jump and the car will start spinning) So look under the engine, if possible, remove the timing cover, look under it as often as possible and if you find, If the oil seal is a little broken and does not maintain the tightness of the lubrication system, then look immediately and there will be no problems with the car in the future and you will be sure that you will not be on the track for a long time!
Why is it necessary to change on time?
Naturally, timely repair of parts that have become unusable will extend the life of both the engine and the VAZ-2110 vehicle itself. The time after which it is necessary to change the oil seal directly depends on how old or new the car is, on the driving style of the car owner and operating conditions.
READ Replacing Brake Pads on Gazelle
If you change them in a timely manner, this will help reduce the cost of car repairs, because such measures eliminate engine oil leaks, which negatively affect the operation of the engine.
If you do not change it in time, the VAZ-2110 car will “eat” more motor oil, and the engine itself will begin to collect dirt and dust, which cannot but affect the stability of its operation. Engine oil leaks negatively affect car parts that are not made of metal, and the contact in the terminals will become much worse, which, in turn, will affect how the car starts.
Any car has parts, for example, crankshaft cuffs, that need to be changed according to the manual or as they wear out. Replacing the VAZ 2110 crankshaft oil seal, as well as valves, can be done at a service station or with your own hands.
Tools and materials needed to replace valve stem seals
This job requires a separate set of tools. Naturally, a regular service station has them in its “arsenal” at the beginning. But the owner of a Priora who decides to change the valve stem seals on his own will have to get them or rent them:
- A set of spanners (spanners).
- Set of sockets with a knob.
- Valve spring compressor.
- Set of hexagons.
- Screwdrivers.
- Mandrel.
- A device for removing and replacing valve stem seals and crackers.
- Magnet.
- Marker.
- Sealant for gaskets during replacement.
- A set of head gaskets to replace the old ones.
This is the small kit needed to carry out such an operation.
What is needed to replace the crankshaft oil seal
Oil leakage from the front of the crankcase of an internal combustion engine does not yet indicate that the problem is located directly in the oil seal. First, any vehicle owner needs to make sure that the ventilation system is in full working order. But if contamination of the crankcase itself or the hoses is detected, it is still too early to change the crankshaft seal of the VAZ 2114. But if the ventilation system is fully working, and oil continues to leak, then the problem is clearly in the oil seal and it certainly needs to be replaced in the near future.
What tools are needed to replace the oil seal on a VAZ 2114 8 valves:
- Sealant;
- Unused internal combustion engine oil;
- Jacks - for lifting the car (2 pieces);
- A special lubricant component based on graphite;
- Flat screwdriver;
- Unnecessary container for subsequent draining of oil into it;
- Full set of open-end wrenches;
- Complete set of socket heads;
- Gasket for oil pump;
- Crankshaft oil seal;
- Recoil devices;
- Hammer.
Replacing the crankshaft oil seal Priora
To carry out the work you will need:
- flat screwdriver;
- set of sockets and wrenches;
"Important! Before starting repairs, the gearbox and clutch must be dismantled. In addition, mark in advance the location of the flywheel relative to the crankshaft.”
- Using a socket or wrench, unscrew the six bolts securing the flywheel. In order to prevent the latter from rotating, use a screwdriver to lock the flywheel wheel.
- After the bolts are removed, you need to remove the locking plate and pull the flywheel towards you.
- Carry out a thorough inspection of the oil seal for leaks and signs of oil leakage.
- After detecting signs of malfunction, take a screwdriver in your hand and carefully pry up the O-ring from the side of the metal sleeve. Pull the product out. "Note! Immediately after removing the product, it is recommended to inspect and test the operation of the crankshaft bearing. If its rotation is difficult or it makes unpleasant sounds, then it is advisable to replace it too.”
- Take a new crankshaft oil seal (Prior 16 valves) and lubricate the working surface of the part with engine oil.
- Place the element with the lubricated edge inward (into the cylinder block) and tuck it as tightly as possible to the crankshaft bushing.
- For a tighter and more airtight connection, you will need to use a press-fit ring (mandrel). If one is not available, a regular union head with a radius a few millimeters smaller than the sealing ring is perfect.
- Install all elements in reverse order.