To ensure stable operation of a modern car engine, many different sensors are used to collect information about the operation of a particular system. Based on their data, the electronic control unit adjusts the quality of the fuel mixture, regulates its quantity entering the combustion chambers, determines the desired ignition timing, and turns on and off various additional mechanisms.
In this article we will talk about what the oxygen sensor (lambda probe) of the VAZ-2114 is, consider its design and principle of operation. In addition, we will try to understand the malfunctions of this element and methods for eliminating them.
What is an oxygen sensor
An oxygen sensor is an electromechanical device designed to determine the quantitative oxygen content in exhaust gases. Its use is mandatory for all cars with an environmental class above Euro-2.
Why is it needed? The fact is that modern environmental standards require a car to have a minimum content of harmful compounds in its exhaust. It is possible to achieve their reduction only by forming an ideal (stoichiometric) fuel mixture. It is for these purposes that the oxygen sensor, or, as it is also called, the lambda probe, serves. The electronic control unit, having received information about the oxygen content in the exhaust, increases or decreases the amount of air to form the mixture.
What problems to expect in the event of a breakdown?
Of course, certain symptoms begin to appear immediately. For the oxygen sensor on the VAZ 2107, as well as on other cars in which an injector is installed, this is expressed very specifically. The saddest thing for the driver is an increase (and a significant one) in fuel consumption. The car begins to “eat” gasoline with a very good appetite. The movement also occurs with jerks, as if the engine is “troubling” or sometimes it does not have enough air.
Consequently, engine performance deteriorates and the crankshaft speed may even fluctuate. In this case, the catalytic converter stops working in normal mode, therefore, in this case, you cannot even mention that your VAZ 2107 car meets any Euro standards. Because when testing exhaust toxicity, you will get very high CO levels.
How does an oxygen sensor work?
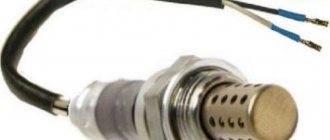
The VAZ-2114 lambda probe has a fairly simple design. It is based on a ceramic element with two electrodes. They are usually coated with zirconium dioxide. One of the electrodes is in contact with air (placed outside the exhaust pipes), and the second is in contact with exhaust gases.
The operating principle of the device is based on the potential difference that occurs between the contacts of the device during engine operation. The electronic control unit sends an electrical impulse to the sensor and analyzes its changes. Based on the increase or decrease in voltage at the probe contacts, the ECU “makes a conclusion” about the amount of oxygen in the exhaust.
Decoding errors
Each code consists of five characters: P 0 1 4 0. Let's say right away about the fourth and fifth characters - they indicate the serial number of the error. Now it’s worth taking a closer look at what the codes consist of
The first character may vary depending on the vehicle system:
- P – malfunctions in the operation of the power plant; the symbol also indicates defects in the automatic transmission.
- U – you need to look for a fault in the interaction node between the system units.
- B – defects in the operation of body systems, which include electric lifts, airbags, etc.
- C – chassis sensors have detected a malfunction in the chassis system.
Let's move on to the second character:
- 3 – reserve.
- 2 and 1 – codes set by the manufacturer.
- 0 – common code for on-board diagnostics (OBD-II).
The third symbol indicates to the motorist the type of breakdown:
- 1 and 2 - indicate defects in the operation of the fuel unit or the appearance of malfunctions during the air supply.
- 3 – breakdowns in the ignition unit.
- 4 – indicates auxiliary control.
- 5 – in idle mode, some components do not work correctly.
- 6 – electronic unit or its circuits.
- 7 and 8 – defects in the operation of the gearbox.
Lambda probe: signs of malfunction (VAZ-2114)
Failure of the “fourteenth” oxygen sensor is usually accompanied by the following symptoms:
- the “CHECK” warning light lights up on the instrument panel, warning the driver about an error;
- engine operation at idle speed is unstable (the speed fluctuates, the engine periodically stalls);
- a noticeable decrease in the power and traction characteristics of the power unit;
- the car “jerks” when accelerating;
- increased fuel consumption;
- excess level of toxic substances in exhaust gases (determined by measurement at a specialized station).
Sensor readings L-probe
Lambda probe oxygen sensor
Parameter of the control unit that allows you to determine the operation of the sensor The L-probe takes two values POOR/RICH. The surface of the L-probe sensor has the ability to lose and regain oxygen depending on the oxygen saturation in the exhaust gas. By changing its voltage from a maximum of 0.9-1.2V in a lean mixture to a minimum of 0.2-0.4V in a rich mixture, the sensor allows the control unit to adjust the fuel supply to maintain the stoichiometric composition of the mixture. Steep characteristic of the transition from rich to lean mixture of the L- sensor the probe does not allow you to determine the value of the mixture composition, so only two states can be seen on the tester screen: POOR, RICH. When the LEAN condition occurs, the system increases the fuel supply (injector opening time increases). The sensor should respond to an increase in fuel supply by changing the state POOR to RICH. After this, the system begins to reduce the fuel supply in order to return to the LEAN state. Good readings from the L-probe sensor should be accompanied by a change in the LEAN/RICH states once per second when the warm engine is idling (800-850 rpm). The operation of the sensor can be more clearly assessed by the ADC code parameter of the L-probe sensor. By the voltage of the output signal from the sensor, you can see in what state the delays in state changes occur. When the engine is idling, the system control is determined by the algorithm for maintaining the specified idle speed. This problem is solved by the system by controlling the air supply channel (control of the XX regulator) and the ignition timing. In this case, the operation of the feedback loop via the L-probe, i.e. Fuel management makes adjustments to this work. If the L-probe sensor is faulty, then maintaining idle speed becomes problematic. A rise in idle speed accompanies deteriorating sensor performance.
Rice. 16
Change in fuel supply and signal from the L-probe sensor during operation of the feedback loop
Errors associated with the L-probe sensor: P0134
– No oxygen sensor activity. The appearance of such a code means the oxygen sensor has failed.
P0135 P0131 P0132 P0171 P0172 P0171, P0172
Rice.
17 Contents | Read comments (3)
3
| Commented by: EllE | 08.11.06 |
| As far as I remember, and I just looked in the book: So 0.9-1.2 is a lean mixture, 0.2-0.4 is rich... So I think that everything is correct here... |
| Commented by: AL | 08.11.06 |
| In my opinion, there is an inaccuracy in the first paragraph and the third line. It should be:. . . from a maximum of 0.9-1.2V in a rich mixture to a minimum of 0.2-0.4V in a lean mixture. . . |
сапа https://automaslo.com/ buy ford formula 5w40 motor oil.
What can the electronic control unit tell you?
If a warning light comes on on the dashboard, indicating errors in engine operation, and its lighting is accompanied by the above problems, it is advisable to test the controller. Today this can be done both at a service station and at home. Of course, if you have a special tester and a laptop (tablet, smartphone) with the appropriate software. When connected, this device will give you codes for possible problems.
For VAZ-2114 vehicles, a malfunctioning lambda probe may indicate its malfunction with the following errors:
- P0130 – incorrect sensor signal;
- P0131 – excessive oxygen level in the exhaust gases;
- P0132 – oxygen content too low;
- P0133 – weak or slow sensor signal;
- P0134 – lack of sensor signal.
How is self-diagnosis performed?
Press the button to start diagnostics
We have sorted out the main errors on the Priora, now it’s worth finding out how self-diagnosis is performed. The VAZ 2170 with 16 valves has a special controller with which diagnostics are performed. If you have an on-board computer installed, then diagnostics are performed on it. There is also special equipment that allows for a more in-depth check of Priora 16 class systems.
Since most Priora 16 cars already have an on-board computer, we will consider the option without the use of special devices. Diagnostics begins with activation of the test mode. The work proceeds according to the following scheme:
- Turn off the ignition. Now we hold down the daily mileage reset button, without releasing the button, we start the ignition of the Priora 16 cl;
- On the instrument panel you will see a display with an indication. After turning on the ignition, all components of the instrument panel will light up. The needles of the temperature, speedometer, tachometer and other instruments will begin to move to the maximum level and back. This behavior indicates that self-diagnosis has begun;
- Let's move on to the right steering wheel switch. Here you will find a button for switching the on-board computer settings. Click on it, a message with the software version will appear on the instrument panel screen;
- The instrument panel error diagnosis will begin if you press this key again. Various codes will appear on the display, which you can decipher in the table below;
- When the diagnostics are complete, you can reset the error data. Press and hold the daily mileage reset button for about 5 seconds.
What can happen to the lambda probe
The lifespan of the lambda probe for the “fourteenth”, declared by the manufacturer, is 80 thousand kilometers. But this does not mean at all that it cannot fail much earlier or last twice as long.
The cause of a malfunction of the VAZ-2114 lambda probe may be:
- overheating of the working element;
- violation of the tightness of the connection between the sensor and the exhaust manifold body;
- clogging of the device contacts due to the use of low-quality fuel, or oil (coolant) getting into gasoline.
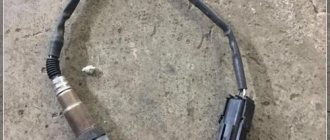
What kind of lambda probe for VAZ-2114
On the first Samar models of the fourteenth model with one and a half liter engines, sensors 0 258 005 133 were installed. This lambda probe ensured the operation of the power unit in accordance with the requirements of Euro-2 standards.
Since 2004, VAZ-2114 engines began to be equipped with Bosch sensors 0 258 006 537. They differ from the previous modification by the presence of a heating element. It is noteworthy that all oxygen sensors for the “fourteeners” are interchangeable.
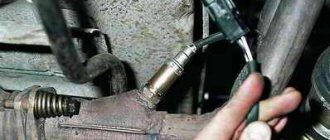
We check the performance of the oxygen sensor with our own hands
How to check the lambda probe on a VAZ-2114 for functionality? Full diagnostics of the device can only be done using an oscilloscope. But it is possible to determine whether it is working or not without complex electronics. To do this, you only need a voltmeter. Connect its “negative” probe to ground, and the “positive” probe to terminal “B” in the sensor connector, without disconnecting it from the on-board network. Turn on the ignition and look at the voltmeter reading. The voltage at the device terminals must match the battery voltage. If it is less, it means there may be a break in the sensor circuit.
If the voltage is okay, check the sensitivity of the working element of the probe. To do this, connect the “negative” probe of the volt sensor, and the “positive” probe to contact “A”. The voltage should be within 0.45 V. If this indicator is exceeded by more than 0.02 V, the sensor must be replaced.
Diagnostics
It should be noted that checking the functionality of the lambda probe should be carried out in conjunction with vehicle maintenance, at intervals of every 10 thousand kilometers. However, if the car was operated in unfavorable climatic conditions, which is applicable to Moscow, or in aggressive mode, maintenance should be carried out more often. This is the manufacturer's recommendation.
The manufacturer also does not recommend performing independent diagnostics or repairs if there are signs of any malfunction. To fix it, you should contact a service center.
Diagnosis by visual inspection
The beginning of any diagnosis begins with a visual examination. Primary methods for diagnosing an oxygen sensor include:
- visual inspection of the electrical wiring of the lambda probe for integrity and absence of mechanical damage or rupture;
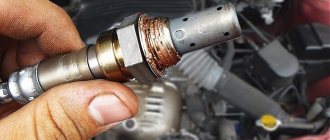
- inspection of the lambda probe itself. There should be no soot or hard deposits on its surface.
Carbon deposits on the oxygen sensor housing indicate a faulty electric heater or an excessively rich combustible mixture entering the combustion chambers.
Solid deposits on the sensor body indicate poor fuel quality and the presence of harmful impurities in it, or an incorrect proportion of the combustible mixture.
If there are no visible causes of the malfunction, more detailed diagnostics are performed.
Detailed diagnostics
At the service center, by connecting a diagnostic computer, all electronic systems of the car are checked. If one of them malfunctions, the on-board computer detects the error and stores it in its error register. Each error has its own code, which makes it easy to find out the source of the problem.
In the absence of a diagnostic computer, plumbing diagnostics are required, which involves partial disassembly and diagnostics with a voltmeter. It consists of the following operations:
- starting the engine and warming up to operating temperature;
- engine stop;
- disconnecting the sensor connector and connecting a voltmeter to it;
- restarting the internal combustion engine and one-time increase in idle speed to 2500 thousand per minute;
- disconnecting the vacuum pipe from the fuel pressure regulator;
- checking the voltmeter readings. If the reading is equal to or less than 0.8 V, the 2110 oxygen sensor is faulty. It cannot be repaired, therefore, replacement is necessary;
- checking the oxygen sensor to detect a lean fuel mixture. In this case, the air supply to the engine is artificially cut off. If the voltmeter reading is 0.2 V or less, the sensor is working. Other readings indicate a sensor malfunction.
Also in the service center, using a voltmeter, it is possible to check the signal supplied to the lambda probe from the electronic control unit. If the supplied voltage is higher than 0.45 V, more detailed diagnostics of the control unit is necessary.
Repair or replacement
Having determined that the lambda probe of the “fourteenth” is faulty, you can either try to repair it or simply replace it. Restoring the sensor involves cleaning its contacts from carbon deposits. This may be the reason why the device has stopped functioning normally.
To begin, the sensor must be unscrewed from the manifold or exhaust pipe. This is not always easy to do. The fact is that its body very often sticks to the specified elements of the exhaust system. In this case, anti-rust liquid (WD-40 or similar) can help. Treat the joint with this liquid and wait half an hour.
When the sensor is unscrewed, pay attention to its body. It is not removable. The contacts that we have to clean are located behind the slots in the case at the bottom.
Important: do not clean contacts mechanically (knife, sandpaper, file, etc.)! This will only aggravate the situation and permanently disable the sensor.
Contacts should only be cleaned using chemicals. For example, orthophosphoric acid. Simply place the lower part of the probe in acid for half an hour, and then dry it on a gas burner.
There is no need to disassemble the sensor by sawing its body. As practice shows, after such a procedure, its performance does not return.
If you decide to replace the lambda probe, buy a new device that meets the specifications from a car dealership and install it in place of the old one. With the ignition on, start the engine, warm it up and check if the CHECK warning light is on.
Ways to deceive the electronic control unit
There are three more ways to restore the engine to its former performance without buying a new oxygen sensor. Without a doubt, they were invented by our craftsmen. And they consist in the fact that it is necessary to mislead the electronic control unit so that it does not notice errors in the operation of the sensor.
The first method is mechanical. To implement this, a special spacer (bushing) is screwed in between the lambda probe and the manifold body (intake pipe). Its use allows you to distance the sensor contacts from the exhaust gases. Thus, the amount of oxygen between them artificially increases, and the electronic control unit “remains satisfied” with the result obtained.
A similar VAZ 2114 lambda probe costs about 500 rubles. And if you have a lathe, you can make it yourself.
The next way to deceive the ECU is electronic. Its essence is to install a primitive converter in the sensor circuit, consisting of one resistor (1 MΩ) soldered into the gap in the blue wire of the connector and one capacitor (1 μF) connected between the blue and white wires. As a result of such a simple deception, the electronic control unit will constantly receive a signal of the required voltage and perceive the operation of the lambda probe as proper.
Alternatively, you can also reflash the controller by changing its software. But it is better to entrust such manipulations with the “brain” of the engine to specialists.
Additional error resolution options
Reset error on Mitsubishi Lancer 10
Diagnostics and replacement of the oxygen sensor on the VAZ 2110
We list for you a few more options that may be useful to car owners of different cars, both domestic and imported:
- Sometimes, with error P0133 on a Hyundai Santa Fe, it is enough to replace the first oxygen sensor with the original one for the error to disappear.
- ECU flashing. This is especially true for Hyundai cars. There is an opinion that Korean software is not suitable for use in Russian conditions.
- The already mentioned sensor replacement (for different cars).
- Replacing a cracked intake manifold or repairing it (welding the housing).
- Cleaning fuel injectors.
- Replacing the crankshaft position sensor (CPS).
- Fill with quality gasoline! This will ensure the correct air/fuel mixture is formed. If you filled in with low-quality gasoline, then try pouring in obviously good fuel and driving the car at high speeds (up to 4000 rpm). If necessary, forcefully erase the error from the ECU memory.
- If you use HBO, check its settings. In some cases, the equipment may produce a mixture that is too rich or lean.
- When using the same gas equipment, an error is possible due to the gas rail. It may not always block the flow of gas to all cylinders, and therefore the oxygen sensor considers the response to be slow. Replacing the rack with a new one helps.
- You can reflash the electronic unit to the Euro 2 standard with software disabling the sensors.
Exhaust system corrugation for Hyundai Accent - On Hyundai Accent cars, the cause of the error may be burnout of the exhaust system corrugation. This is usually accompanied by the appearance of an extraneous sound from under the bottom of the car when you press the gas, an increase in fuel consumption to 13...18 liters per 100 km, as well as a loss of dynamics and power. There is only one way out - replacing the corrugation.
According to statistics, error P0133 most often appears on Hyundai and VAZ cars. However, other car owners are not immune from it. We have tried to collect comprehensive information on this issue for you. We hope that with its help you will be able to troubleshoot problems in your car yourself.
Results
Slow response in the front oxygen sensor circuit (Bank 1 Sensor 1) for enrichment/leanness is not critical, and if code P0133 occurs, the car can be used. However, we still recommend that you figure out the problem and fix it as quickly as possible. Indeed, because of this error, increased fuel consumption often occurs, and the dynamics of the car also decreases. Checking and searching for the cause comes down to checking the lambda sensor itself, the electrical circuits before it and the ECM section working in tandem with it (the reference voltage of the oxygen sensor when the engine is off should be about 0.45 V, and when warmed up it should vary from 0.1 to 0.9 And with rapid change). Depending on the result - replacement/repair of the faulty element. Although it is possible that the problem may lie in low-quality fuel or incorrect operation of the injectors.
How to extend the life of a lambda probe
To ensure that your oxygen sensor lasts as long as possible, do not neglect the following tips:
- use only high-quality fuel;
- do not allow oil and other process liquids to get into the fuel;
- Monitor the operating temperature of the engine, do not allow it to overheat;
- carry out diagnostics of the oxygen sensor in accordance with the schedule of routine maintenance provided by the manufacturer;
- If you identify signs indicating problems with the lambda probe, do not delay diagnosis.
Causes of malfunction
So, we list the possible causes of error P0133 and the corresponding options for eliminating them:
Lambda probe signal graph
- Depressurization of the intake or exhaust manifold (sometimes both at the same time). Check the tightness of these components. In particular, the intake manifold should not suck in air.
- Problems with the fuel system. Here it is necessary to check the correct operation of the injectors, the performance of the fuel pump, and the fuel vapor recovery system.
- Malfunction of the control circuits or the lambda probe itself. Examine the wiring for damage, and also “ring” it. If possible, replace the sensor with a known working one to check the original one (in many cars the first and second oxygen sensors are interchangeable, for example, on the Lada Priora, so you can try simply swapping them).
Also, when checking, it is recommended to check the “mass” of the oxygen sensor. This is usually done using a so-called “control” or hand-held electrical tester. To do this, one of its contacts is connected to the “+” of the battery, and the second to the output contact directly on the sensor. If grounding is normal, the “control” lamp or tester indicator should light up. Otherwise, look for an open circuit.