03/02/2022 12,873 Cylinder block
Author: Victor
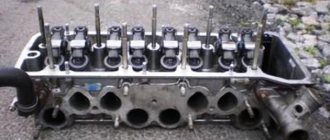
The cylinder head is the main component of a vehicle's power unit. The appearance of problems in its operation will lead to serious consequences, including engine failure and the inability to operate the vehicle. How to identify a microcrack in the cylinder head and how to repair the fault yourself will be discussed below.
[Hide]
Causes
Identifying a microcrack in a cylinder head is not easy. Before diagnosing problems, we recommend understanding the reasons why the cylinder head may crack.
Exceeding the permissible temperature difference
Often, cracks and defects in the cylinder head appear as a result of disruption of the combustion process of the air-fuel mixture in the chamber. This may occur due to incorrect operation of the fuel component or incorrectly installed ignition. Such problems will lead to an increase in engine temperature by 200 degrees or more compared to standard. As a result, microcracks will appear on the thinnest walls of the block head. We are talking about holes for nozzles, nozzle cups, etc.
“Man-made” mechanical impact
In a cylinder head 406 or another cylinder head, the problem may be due to mechanical stress. For example, the mounting hole for the valve seat will rupture in a place next to the injector seat. This occurs as a result of overtightening the nozzle itself. In this place, the thickness of the metal of the head is no more than 2 mm. It is possible to identify such microcracks, but repairing them is usually impractical.
Problems of this kind can be avoided by taking into account the following nuances:
- Before installation, new washers should be heated on a stove or over gas. The parts are heated until they turn blue, after which they are lowered into cold water and cooled. These actions ensure the softness of the washers.
- Copper washers and other types of seals previously used should not be placed under the nozzles.
- Before installing new washers, their condition should be checked using a magnet. There is a possibility of purchasing copper-plated parts.
- After taking these points into account, the injector can be tightened, but it is important to comply with the regulations established by the automobile manufacturer. If these steps do not help to achieve tightness, it is recommended to contact a specialist.
The appearance of microcracks in the cylinder head of a VAZ car or other car is often caused by the installation of guide bushings in thin-walled heads. When installing, you must carefully check the dimensions of the outer diameter of the bushing, as well as the dimensions of the hole for its fixation. The installation technology must not be violated - bushings cooled in liquid nitrogen are pressed into the heated block head. If this rule is not followed, it will lead to radial defects from the outer diameter of the guide bushing.
Factory defects
The need to determine damage to the block head arises due to defects during production. The cylinder head itself has a complex configuration, and its walls are characterized by different thicknesses. During manufacturing, errors may be made that will lead to failure of metal in certain places and disruption of its structure. As a result, this leads to the appearance of small voids and an increased rate of rust formation in them. During subsequent operation, the surface of the water jacket and the combustion chamber will be connected, or cracks will occur due to serious weakening in thin areas.
If the metal structure is damaged, the intermolecular bonds of the cylinder head will be greatly weakened. This will cause the material to become more brittle, leading to defects. In practice, faults of this type are usually found in the jumpers between the holes for seats and injectors. Cracks appear in the channels located behind the valves.
A video about damage to the block head was published by the YouTube channel.
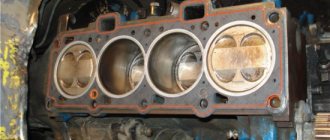
Microcrack in the cylinder
The signs are such that even a microcrack in the head will not be repeated, but I will immediately be taken aback by the method of repairing such a cylinder. It’s good if you can visually find such a crack, it could be a chip in the cylinder, but more often it is not visible, but it appears when the engine is running and heats up to operating temperature.
I encountered a microcrack when the engine was running for a long time, and suddenly a microcrack appeared, but it was unknown where it was.
I came across several cars with a VAZ 2106 block bored for 82mm pistons. and basically worked fine. But I do not recommend doing this, since the cylinder liner becomes very thin, and there is a high possibility of such a crack forming.
I always warn the owner of the car after I remove the head and do not find a burnout in the gasket or a crack in the head or block, that there can be two reasons, and I give him a choice of what to start with first, replacing the head or we will line the block.
The main thing is that the boring person who bores the cylinders and lines the block is a professional in his field. A good boring machine can perfectly fill even an obvious crack in the cylinder. Therefore, immediately warn the borer that there is a microcrack in some cylinder (I don’t know the details of how the cylinders are lined), but several such engine blocks have been running for several years after the liner and everything is fine.
Usually the owner of the car chooses to start with the block sleeve, and if that doesn’t help, then of course you will have to change the head.
I know one ninety-ninth who drives with such a microcrack; the driver simply screws the cap slightly onto the expansion tank so that it does not swell, and it does not boil.
Typical places for cracks to form in the cylinder head
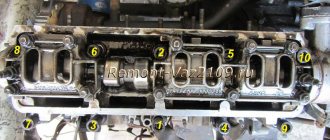
Identifying a microcrack in the cylinder head is a difficult task for an experienced specialist. After all, damage does not form in the same place. However, finding them is actually not that difficult. Especially if you have a list of places that you can inspect visually:
- Between engine valves. The defect will be visible immediately. It usually appears under the valve seats located nearby.
- In diesel power units, microcracks can extend from the valve to the prechamber. Such a flaw is not difficult to find, but it is problematic to see it, since it appears directly under the prechamber and does not come out.
- Cracks often form between valves and spark plugs. You can see such a malfunction without any problems.
- Sometimes damage occurs under the valve guides. There is no problem visible here. The valve channel is quite dark, and the defect itself is usually covered with a guide sleeve. Therefore, visual diagnosis is not suitable here.
Checking the cylinder head
To check the cylinder head for cracks, it must be pressurized, that is, all holes must be hermetically sealed, and air must be blown into the channels. If you put the head in water, bubbles will come out of the crack. Or vice versa - plug all the holes and pour water into the channel, then pump air into it with a pump, creating a pressure of 0.6-0.7 MPa, and let the head stand for 1=2 hours.
If the water goes away, it means the head is broken.
There are also dyes that are used to tint water. They are very clearly visible on the crack. And the holes in the cooling jacket are closed very easily: a rubber gasket, which is slightly larger than the hole, is placed on the nick, a metal plate is placed on top, which is screwed to the head.
And no water will pass like that.
And a pump is connected to the fitting that will protrude from the head and air is pumped in. This type of crimping allows you to identify all cracks.
Signs of cracks
Damage to the cylinder head housing can be identified according to the symptoms. Let us consider in detail the symptoms that will allow you to check and determine the presence of microcracks.
Oil system
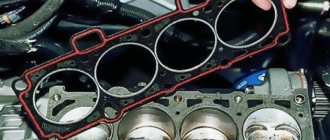
The first sign is mixing of engine and coolant fluids. As a result, an emulsion is formed in the power unit. Foam with a white tint appears on the surface of the oil. A film of lubricant forms in the coolant expansion tank. The same signs indicate damage to the cylinder head gasket.
Fluid leaking through a crack in the cylinder head
Inlet channel
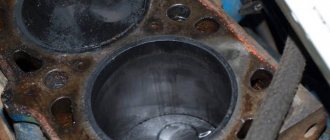
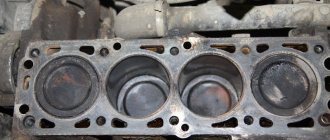
When cracks appear in the cylinder head, coolant will leak into the inlet channel. Because of this, the pistons of the power unit will be washed almost to a shine. You can see them by looking through the spark plug hole. If antifreeze gets into the intake channel, white smoke will come out of the muffler. But this sign is not always observed.
Release channel
If a crack appears in the exhaust duct, the refrigerant will pass through the pipe in the form of vapor. After warming up and before, the power unit will release steam, but you won’t be able to see it visually. Consumables leave the expansion tank. There will be no smell from exhaust gases.
The combustion chamber
Through the defect that appears, part of the consumable material will enter the combustion chamber, but its volume is usually insignificant. This is due to the large difference in pressure. During engine operation, the air-fuel mixture burns. This contributes to high blood pressure. Because of this, exhaust gases will enter the cooling system. As a result, the pressure will be higher.
This will lead to an increase in the volume of cooling system lines. And the smell of exhaust gases will begin to come from the expansion tank. While there is high pressure in the cooling system, consumables can enter the combustion chamber. There will be a vacuum and air intake here. As a result of the large pressure difference, coolant enters the combustion chamber. The main symptom is cleaned pistons, a smell in the expansion tank, and an increase in the volume of hoses. In this case, the radiator of the heating system will be cold due to the appearance of an air plug in it.
Microcracks
A microcrack in the cylinder is probably the biggest headache for both the car owner and the mechanic he contacts. The whole point is that it cannot be seen visually, but the symptoms are that the gasket under the head is starting to burn out.
I have come across such engines several times. But there can also be a microcrack in the head. The sign of a microcrack in the cylinder and head is the same as the beginning of burnout of the gasket under the head.
- A guy drove up in a VAZ-2106 and said the car was boiling all the time, he waited a little until the engine stopped boiling, opened the radiator cap and added coolant to the radiator, started the engine at idle.
- I started looking into the radiator, I saw how bubbles were coming out of the radiator (but if you added liquid to the radiator, then usually several bubbles pop up at once, but they quickly stop), in front-wheel drive cars the reservoir into which coolant is poured begins to swell and bubbles also appear.
- If the gasket under the head is badly burned, then the liquid goes into the cylinder, through the piston the liquid seeps into the engine block and enters the oil, a sign that the oil becomes the color of a white emulsion and increases in volume.
I immediately determined that the gasket was starting to burn out, I removed the head and the gasket was new (very fresh) and there was no hint of burnout, I asked if they had already changed the gasket, he said two days ago he bought the head second hand, they replaced it and it has been boiling ever since.
I asked if it was boiling on the old head before, he said, no, it was boiling, but it was leaking due to a burnt-out valve, I decided to buy this head, especially since they offered it inexpensively so that I wouldn’t have to worry about it.
I say, you have two options, buy another head, or bring the old one, I’ll fix it, he decided to repair the old one (the head was really badly damaged, I had to change all the valves and valve guides).
- I installed the repaired head and the boiling stopped.
- But what’s funny is that after a while another guy drove up to me in a VAZ-2107 and also complained that the engine was boiling, opened the hood and recognized the head that was causing the six to boil (there was a spot of red paint on it, that’s why I remembered it).
- I asked him, he changed the head a long time ago, he said, the other day. I told him the story of this head. Visually, I never found a microcrack in this head, and I still couldn’t figure out where it was.
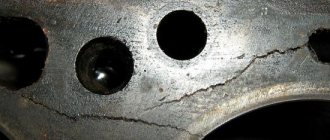
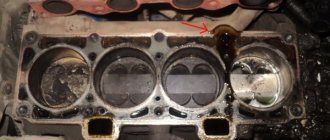
- Most often, a microcrack in the head occurs as shown in the photo, and most often in my practice it occurs in the second or third cylinder. The photo shows in red the location of the microcrack. It’s easier to find a microcrack this way: clean off the carbon deposits with a knife in the place where the crack is shown, and it will appear.
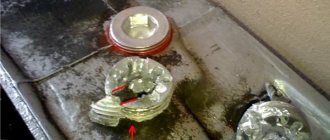
And once I came across a head with two microcracks at once, it is in the photo and the cracks are shown by arrows, I found them right away, I just had to remove the carbon deposits with a knife.
The sign of these microcracks in this Niva was this: the second and third cylinders were tripped, at low speeds, the antifreeze escaped and flew out through the muffler, bubbles also entered the radiator, but the antifreeze did not go into the oil.
Maybe because this engine has a very good piston group, but if the piston group were bad, then antifreeze would penetrate into the block. It remains a mystery why the antifreeze did not penetrate into the oil through the pistons; I think very little of it entered the cylinders, mainly the pressure forced the air into the head and completely sucked drops into the cylinders.
How can I check?
Before making repairs or replacing the cylinder head, it must be checked. Below we will consider methods that will allow you to identify the presence of damage to the cylinder head at home. A video about diagnosing the cylinder head for microcracks was filmed by the Hydraulics Repair channel.
Magnetic powder diagnostics
This method is the fastest way to find out about the presence of defects. The essence of the method is to install magnets on all sides of the cylinder head. After their installation, the block head should be sprinkled with metal shavings. This will cause it to move towards the magnets. And chips will remain on the defects, which will make it possible to identify damage.
Pressure test
There are several ways to detect a crack in the cylinder head: immerse the head under water or not. Diagnostic method with cylinder head immersion:
- Remove the cylinder head from the engine. We will not describe the removal process, since it is individual for each vehicle.
- Tightly close all circuit channels at the top of the device.
- Immerse the block head in the container. Pour hot water into it. The container must be large so that the cylinder head is completely immersed in it.
- After this, supply compressed air to the device circuit. There are defects and cracks in the place where the bubbles appeared.
You don't have to immerse the cylinder head in water:
- Securely close all channels on the device circuit.
- Prepare a soap solution by mixing soap and water.
- Pour the resulting solution onto the surface of the cylinder head cover.
- Apply compressed air to the circuit. There are microcracks in the place where soap bubbles appeared. A video about diagnosing a cylinder head under pressure was made by Pavel Shilin.
Water test
This method is performed using water. Only the cylinder head does not need to be lowered into it; the liquid is poured directly inside. For diagnostics you will need a pump:
- Close all existing openings tightly.
- Pour liquid into the device channel.
- Take a pump and pump air into the channel. It is advisable that the tool have a pressure gauge. The air supply pressure must be at least 0.7 MPa.
- After this, the cylinder head should stand for 2-3 hours. If water leaves it, this indicates the presence of microcracks on the body. Accordingly, more detailed diagnostics and repairs will be required.
Diagnostics using liquid
How to check the cylinder head for microcracks using a coloring liquid:
- First, the surface of the device must be completely rinsed. To clean, use acetone or another solvent. You can also use kerosene.
- Afterwards you need to prepare the coloring liquid. It is applied to the surface of the block head, then wait 3-5 minutes.
- Then you need to use a rag to wash off any remaining liquid. You need to look at the cylinder head housing - if there are cracks, you can see the damage.
Repair methods
Shallow microcracks on the planes of contact between the cylinder head and the cylinder head, as well as almost all defects on the outside can be repaired. External splits can be repaired using cold or electric welding. “Cold” welding means applying a special polymer composition to the defect. Before repairing, it is necessary to thoroughly clean the area around the defect, and it is also advisable to drill the ends of the crack to remove residual stress and prevent further splitting of the part.
Removing cracks in the block and cylinder head using electric welding requires preheating the part. Aluminum parts are heated to at least 250ºС, and cylinder blocks made of heavy metals, which include cast iron, to 350-400ºС. This minimizes the risk of local deformation of the part in the welding area. Before heating and melting the defect, the crack in the cylinder head/cylinder block is cleaned with abrasive, and its ends are drilled to relieve residual stress. Using this method, you can remove not only microcracks, but also restore missing parts of the part and weld broken brackets.
Seal
Do-it-yourself damage repair
The appearance of defects on the engine cylinder head is a serious problem. But it can be solved if the damage is minor.
In what cases is replacement needed?
The cylinder head must be replaced in case of serious damage. If the cracks are large and cannot be eliminated, then the cylinder head must be replaced. But before doing this, you can try to repair the device.
Preparing the head for welding
Cleaning the surface for repairing the cylinder head of the power unit
Before welding, the defect must be separated. Using a milling machine, the metal on the cylinder head structure is drilled out along the length of the damage. The result should be a groove, the depth of which will be 6-8 mm. Its width should be approximately the same. As for the shape, it is better to make it wedge-shaped, this will allow the metal to be welded more efficiently. To cut cracks between the seats, they must be dismantled and then cut.
When the preparation process is completed, the cylinder head of the power unit is heated to a temperature of about 230 degrees, but not more than 250. Otherwise, the device may fail. Heating is performed to reduce the stress in the steel that occurs during welding. To perform this task, it is advisable to use a stove or burner. The use of a blowtorch is not allowed, as it will quickly overheat the structure.
Welding the cylinder head
The welding process is performed as follows:
- A metal piece corresponding to the dimensions of the damage to the block head is prepared.
- The welding procedure is carried out using a gas installation. You should also have filler materials on hand. Practice shows that argon-arc welding gives the best effect. Connect ground to the device structure. It is necessary to ensure that the arc burns between the cylinder head and the electrode; here, place a cut piece of metal used to seal the defect. The process of welding the head of a power unit by welding is described in detail in the video (author - YouTube channel).
After completion of the process, the working surface must be cleaned and crimped. If there is no damage on the plane that will be adjacent to the cylinder head, milling must be done. It is necessary to ensure that the surface is as smooth as possible.
Alternative Methods
There are alternative methods to repair the cylinder head. Let's look at them in detail.
Epoxy paste
When using this method, the cylinder head must be stripped on both sides. A metal brush is used for this. In the place of damage it is necessary to drill holes with a diameter of 3-4 mm. They are threaded. Plugs made of copper or aluminum are screwed in flush. The damage must be processed around the entire perimeter using a chisel or an abrasive wheel. The tool is used at an angle from 60 to 90 degrees, the depth should be no more than 70% of the wall thickness.
- Notches are made around the damage using a chisel. They are made with a chisel at a distance of up to 3 cm, this will ensure surface roughness. The plane is degreased using fuel or acetone.
- Epoxy paste is prepared. Using a spatula, apply the first layer of the substance and immediately the second, the thickness of each should be at least 2 mm.
After this, wait a day, no more than 28 hours. During this time the substance will harden. If you want to achieve a quick effect, the cylinder head design can be heated to 100 degrees. Then it will take three hours to harden. When the block head is ready, its surface should be cleaned with a file.
Drilling holes around damage in the cylinder head
Epoxy paste and fiberglass patch
The thickness of the patch is 3 mm. The preparation process is the same as in the above method. The difference is that a fiberglass patch must be applied to each layer of the substance. It is soaked in paste in advance and rolled with a roller for better fixation. The total distance from the extreme part of the patch to the edge of the damage or defect should be at least 15 mm. After fixation, the next layer is installed. It should overlap the previously installed patch by at least 10 mm on each side. No more than eight layers are allowed. After installing the latter, the surface is covered with paste.
Setting the pins
- To install them, holes with a diameter of 4-5 mm are drilled at the ends of the damage on the cylinder head of the power unit. On each side of the defect.
- Using a drill of the same diameter, holes are drilled along the full length of the damage. The distance between them will be 7-8 mm.
- The thread is cut and copper rods are installed. The depth of their installation corresponds to the thickness of the cylinder head wall surface. After installation, the rods should be cut with a hacksaw. The ends are left 2 mm above the plane of the block head.
- The next step is to drill holes between the mounted pins. They should overlap the previous ones by 1/4 of the diameter.
- The carving is done, the rods are installed and trimmed. What you end up with is a strip of pins screwed into each other.
- The ends of the twigs are driven in with a hammer, the blows are not strong. This will caulk the pins and make a large seam. For reliability, the surface is coated with epoxy resin.
- Upon completion of the repair, the cylinder head is pressure tested.
Conclusions: repair or purchase
Welding is considered the most effective method. To do this, you will need a special material whose composition is similar to that used in the manufacture of the assembly. Repairs are made using argon welding or a gas torch. After the procedure is completed, the seam is cleaned, milled, and polished. Next, a control check is carried out.
This method is quite effective. However, special welding is required by an experienced craftsman. Therefore, repairs will not be cheap. But a new cylinder head, especially for foreign cars, costs a lot. As an option, you can purchase a contract part: it is removed from a used car that, for one reason or another, is not suitable for further use. In this case, you can be sure that you are installing an original part and not a counterfeit one.
Photo gallery
Photos of microcracks are shown below.
A crack in the block or complete disappointment - logbook Lada 2108 1.5i Grean 2001 on DRIVE2
Previously, I already wrote about the fact that I capitalized the head, and in this blog I will tell you how the story about its installation ended in more detail.
In general, we installed the cylinder head, changed all the pipes, sealed everything, installed new gaskets everywhere. Let's start it up.
Does not start.
We check all sensors. All is good. We unscrew the spark plugs, they are dry)) The thought immediately appeared that the fuel lines were mixed up. We swapped the lines. Let's start it up.
He barely grasps it.
We check whether we have set the marks correctly... Everything is fine! But it won’t start! What is the reason?
We measured the compression. All cylinders have 11 atmospheres with the throttle closed. Everything seems ok! Let's start it up.
Does not start.
We look into the expander. And soooo gases come out and it smells like gasoline.
Only one thought comes to mind. Since the head was pressed and pulled through with a torque wrench, there is probably a crack in the cylinder block...
If anyone has other suggestions, write in the comments, I’ll be looking forward to your options!)) And so I’m probably waiting for an engine replacement...
Mileage: 67000 km
Video “Do-it-yourself cylinder head crack repair”
Using the example of a 1991 Nissan Sunny car, familiarize yourself with the process of repairing damage and defects to the cylinder head of the power unit (the material was filmed and made public by the Russian Smekalka l Russian Savvy channel).
Do you have any questions? Specialists and readers of the AUTODVIG website will help you ask a question
Was this article helpful?
Thank you for your opinion!
The article was useful. Please share the information with your friends.
Yes (100.00%)
No
X
Please write what is wrong and leave recommendations on the article
Cancel reply
Rate this article: ( 6 votes, average: 5.00 out of 5)
Discuss the article:
Liner defects in the engine cylinder block: wear, broken collar, cracks
Damage to the piston group of a car engine is an extremely unpleasant problem, the solution of which quite often requires major repairs. One of the components that can be damaged in this group is the cylinder liner. It constantly operates in an aggressive temperature environment due to fuel detonation, which, if the slightest defect occurs, will lead to its failure. In this article, we will look at what problems can occur with the cylinder liner, and how they can be prevented and eliminated.
Contents: 1. Common defects of the cylinder block liner 2. Wear of the outer surface of the cylinder block liner 3. Cracks in the cylinder block liner 4. Fracture of the cylinder block liner collar 5. Damage to the cylinder block liner mirror
There are 4 main defects inherent in the cylinder block liner of the piston group:
- Increased wear on the outer surface of the part;
- The appearance of cracks in the liner area;
- Fracture (or other mechanical damage) of the cylinder liner flange;
- Damage to the mirror (inner surface) of the sleeve.
Each of these defects leads to problems in engine operation and potential failure.
Wear of the outer surface of the cylinder block liner
Perhaps the most common problem with this part of all those mentioned above. During operation, almost the entire outer area of the cylinder block liner comes into contact with the coolant. This causes the cavitation process to occur, which occurs due to the formation of small bubbles in the liquid, which “explode” at the surface of the liner when it vibrates. This causes wear on the outer surface of the cylinder liner.
This situation is dangerous because the slightest damage to the outer surface of the part can lead to the formation of corrosion in microcracks. Over time, these cracks grow and the liner cannot fully contain the coolant. Through it, the liquid enters the engine crankcase, and an emulsion forms in the engine oil.
It is possible to eliminate wear on the outer surface of the cylinder block liner by removing the part and applying polymer composites to areas with cracks. But it is worth noting that such repairs are not always economically feasible, since this work is quite labor-intensive, and the effect of such actions is low, and after some time the sleeve will have to be replaced.
To reduce wear on the outer area of the liner, it is recommended to use high-quality coolants that are recommended by manufacturers for a specific motor.
Cracks in the cylinder liner
The problem discussed above causes the formation of microcracks on the surface of the liner. But more serious damage may occur on the part if the motor is operated in an aggressive mode or in violation of operating rules. For example, the formation of cracks on the liner will lead to:
- Using low-quality fuel or fuel that is not recommended by the engine manufacturer;
- Aggressive start at high speeds;
- Frequent vehicle movement at high speeds;
- Driving on a cold engine;
- Using low quality motor oil;
- Poorly performed repair work related to the engine.
In addition to factors that depend on the driver of the car, it is also worth noting that the formation of cracks in liners is possible due to a manufacturing defect.
There are a number of symptoms that indicate the presence of cracks in the cylinder liners:
- Reduced car engine power;
- Formation of an emulsion in the engine oil and expansion tank;
- Incorrect temperature conditions in the absence of problems with the thermostat;
- The smell of exhaust gases from the expansion tank.
If the listed symptoms occur, it is recommended to stop using such a car and go to a service station, where specialists can carry out diagnostics and determine the presence or absence of cracks on the liners.
To diagnose cracks in the cylinder block liner, the following methods are used:
- X-ray - examination of the engine using special equipment;
- The introduction of coloring chemical solutions to detect the presence of cracks.
If cracks have formed in the cylinder block liner, it cannot be repaired and the part will need to be replaced.
Broken cylinder liner collar
Inside the cylinder block of a car engine there is a small rounded recess that secures the liner in this block. This recess is usually called the “shoulder saddle”. If the seat is damaged, the sleeve will no longer fit entirely over the seat area.
Please note: The cylinder head gasket is located on top of the cylinder block. It must fit as tightly as possible to the top of the bead seat. The maximum force on the shoulder seat is transmitted through the bolts and gasket, and when bolting the gasket, it is necessary to exclude the possibility of its horizontal movement.
A fracture of the cylinder liner collar can occur for a number of reasons:
- Incorrect parts selected. For example, the height and size of the cylinder head gasket does not correspond to the required dimensions;
- Ingress of debris. If there is high-hard debris between the cylinder block liner and the collar, for example, pieces of an old gasket or sand, this will cause the collar to break;
- Distortion in the area of the sleeve collar seat;
- Incorrectly carried out repair or restoration work on the cylinder block liner.
Service station specialists, when assembling the engine after a major overhaul or in other cases, must follow strict rules that will avoid breaking the collar:
- Prevent the entry of various debris, that is, carry out work on a clean surface;
- Select the correct cylinder head gasket, based on the engine manufacturer’s recommendations;
- Select the correct rings to be installed under the sleeves. In this case, you need to check them for defects before installation;
- Refer to the information in the vehicle maintenance book when tightening the cylinder head bolts.
If damage to the cylinder head collar occurs, it is possible to eliminate the problem with a defective liner by welding the metal, but most often it is advisable to replace the liner.
Damage to the cylinder liner mirror
Various types of defects can also occur inside the cylinder block liner. Most often, this is the formation of scratches and scuffs, which reduce the tightness of the piston rings, which leads to a decrease in engine compression.
Most often, this problem occurs on cars that regularly drive on dusty roads, especially if a low-quality air filter is installed. Foreign objects can also get inside the cylinder block liner through a leaky connection of air ducts or with various liquids - fuel, engine oil.
To restore the smoothness of the cylinder liner mirror, the chrome plating method is used. If the damage is extensive, the liner will need to be replaced.
(121 votes, average: 4.42 out of 5)
Alternative methods
To begin with, minor cracks can also be repaired using epoxy paste and fiberglass. Before starting work, the metal surface must be thoroughly degreased. Layers of paste and fiberglass alternate when applied, the last layer should be epoxy.
Among the most popular technologies today, it is also worth noting a solution called SEAL-LOCK. The advantages of this method include the absence of the need to dismantle the engine. The method is suitable for repairing serious holes or cracks in the cylinder block. Also, repairs do not require the use of a welding machine.
The method is based on filling the crack with a special layer of soft metal, which as a result is securely bonded to the surface of the part being restored.
- The crack is localized, after which the edges of the split are drilled. Next, holes are drilled across the crack at the pitch established by the technology. Cable ties are inserted into these holes to tie both edges of the crack. The staples are selected according to the type of split, as they can have different lengths and differ in shape.
- Next, a hole is drilled in the space between the installed brackets, after which the conical thread is cut using a special tap. After this, it is necessary to treat the resulting hole with a composition to remove the oxide film. Then a cone plug is screwed into the machined threaded hole with little force, the material of which is in active contact with the metal of the part being repaired.
- Next, the part of the plug that rises above the plane needs to be filed a little, after which screwing is carried out with great force, which is created by a special tool. Under such force, the soft plug will break in the place where the cut was previously made. Protruding residues are additionally sanded.
- The next step is to drill the next hole. This hole is drilled so as to achieve partial overlap of the previous threaded hole with the plug installed. The repair procedure involves filling the entire crack with plugs.
Riveting the seam eliminates possible voids and also accelerates the diffusion of rivet materials and the part. The result will be the appearance of a plastic seam that has a strong connection with the surface. This seam has a number of advantages compared to a welded seam:
- does not suffer from temperature changes;
- is able to maintain integrity under operating conditions at high temperatures;
- does not receive significant stress;
Broken cylinder liner. Causes of failure and elimination
The cylinder liner belongs to the piston system. The peculiarity of the sleeves is that they operate in a critically aggressive environment, including: high temperature, sudden temperature changes from 500 to 2500 degrees, vibration loading and detonation. As a result of the above points, the liner wears out to the point of deformation and crack formation. To avoid more serious problems with other engine systems, cylinder damage must be diagnosed early.
About defects in engine liners
There are 4 possible sleeve defects in total:
- natural wear of the outer part of the liner (due to the use of low-quality coolant, if the liner is of a wet type)
- cracks
- liner flange fracture
- wear of the internal part (mirror) due to direct contact with the piston.
How to repair damaged areas
Sealing by electric welding
Drill out the cracks with a drill so that they do not go further and begin to grow during work. Sand.
We heat the block to 600-650 degrees. For embedding, we use a filler rod made of a cast-iron-copper alloy, 5 mm in diameter, and flux. Protect the seam from oxidation using borax.
There should be an even layer on the surface of the engine block with a protrusion of no more than 2 mm. After this, cool the block in a heating cabinet.
Welding the patch
To perform this operation, you need to select a piece of metal that matches the size of the crack. Next you need to weld the selected material. The next stage is grinding and coating the treated area with a special paste.
Well, now you know what a cracked cylinder head is, as well as how to deal with this problem. In any case, it is better to prevent a breakdown than to fight it.
Source