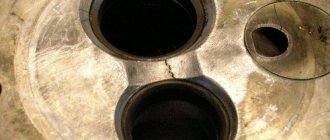
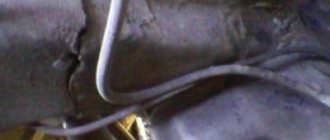
The consequences of a crack in the cylinder block and methods for detecting it depend on its location. Among the main symptoms are the appearance of an emulsion in the coolant reservoir or sump, increased pressure in the cooling system and, as a result, engine overheating. We will talk about the causes and consequences of cracks in the cylinder head/cylinder head walls, which method is better for detecting microcracks and whether this can be done without disassembling the engine. We will separately consider repairing cracks in the cylinder block, in which antifreeze leaks along the outer part of the cylinder block.
Possible symptoms and causes
The following describes the signs by which you can indirectly determine a crack in the block or head. Although, the described symptoms may also indicate other malfunctions.
- The engine overheats and antifreeze completely leaks out of the system. If there is no question about the tightness of the cooling system itself, in this case it is necessary to check how well the cylinder head bolts are tightened. Important: be careful, they may burst when pulling the bolts.
- Incorrect operation of the temperature control device (thermocouple), due to overheating, deformation of the cylinder head occurs.
- A malfunction of the expansion tank plug, in which the valve does not hold pressure, air pockets form.
- In warm weather, the engine temperature fluctuates. The temperature sensor needle makes sharp jumps in the direction of increasing or decreasing temperatures.
- Engine vibration or “triple”, this is especially noticeable when going uphill. As practice shows, this is one of the common symptoms of the formation of microcracks. Important: to confirm the presence of microcracks on the cylinder block or to verify that there is a crack in the cylinder head, unscrew the spark plug. If the candle is wet, try the liquid on your tongue. The sweet taste means that it is antifreeze entering the oil through a microcrack. Add coolant and turn on the engine without closing the hood and expansion tank cap. If the liquid immediately begins to boil, this is a sure sign of a crack in the cylinder head.
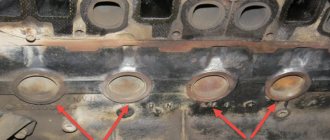
- There is a high probability of cracks appearing near the intake valve guide or bushing. In this case, the head will have to be replaced.
- Gases escape. To determine the leak, you can put a rubber medical glove on the expansion tank or radiator neck and secure it with a rubber band. If the glove inflates, there is a problem.
It is better to use imported and silicate-free antifreeze G-11 for aluminum blocks. For cast iron cylinder blocks it is better to use standard red antifreeze. It is designed for temperatures -80 +135.
Note: cracks may appear on the upper surface of the cylinder block due to poor washing and purging of the block before assembly. As a result, dirt and liquid remain in the threaded holes for the bolts.
Determination methods
To finally verify the formation of microcracks, there are several ways to determine defects.
- Magnets are installed on the device body or cylinder head. Metal shavings are poured on top. It begins to move towards the places where the magnets are installed, getting into the cracks.
- Apply special liquid paint to the cylinder head surface thoroughly washed with acetone or kerosene and wait 10 minutes. After this, use a clean rag to wipe off the remaining paint. Defects after this method are detected immediately.
- Liquid can be used to check integrity. To do this, you need to seal all the holes and pour water into the channel. Using a pump, we pump air into the channel at a pressure of 0.7 MPa. Leave the block in this state for several hours. The leaking water will indicate that there are defects in the block head. In the same way, integrity is checked by immersing the block in a container of water. In this case, the bubbles will show the location of the cracks.
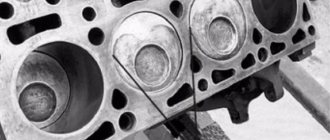
» alt=»»> Locations of defects that should not be addressed.
- on valve seats;
- on the cylinder mirrors;
- on the plane of contact between the block and the head.
Pressure diagnostics
This technique is performed in several ways: immersion in water or without it. Read below on how to perform these operations.
Immersion in water:
- Initially, close all channels of the spare part that may be adversely affected by water.
- After this, place the part in a container filled with water over 40 degrees Celsius.
- Then use compressed air (there is a crack in the places where bubbles appear).
The procedure without “immersion” is performed as follows:
- As in the previous case, make sure that all GBU channels are closed.
- Pour the soap solution onto the lid.
- Supply air masses into the circuit of the “sick” part. If there is a defect, soap masses form at this place.
How to repair damaged areas
Sealing by electric welding
Drill out the cracks with a drill so that they do not go further and begin to grow during work. Sand.
We heat the block to 600-650 degrees. For embedding, we use a filler rod made of a cast-iron-copper alloy, 5 mm in diameter, and flux. Protect the seam from oxidation using borax.
There should be an even layer on the surface of the engine block with a protrusion of no more than 2 mm. After this, cool the block in a heating cabinet.
Arc welding
In this case, heating the block is not required. Electronic wire is used as a filler material. Argon is used as a welding medium. Do not allow overheating above 60 degrees.
Sealing cylinder head cracks
Heat the head to a temperature of 200 degrees. We use an acetylene torch for this. Sealing is carried out using direct current. The diameter of the electrode is selected depending on the width and thickness of the wall.
Welding the patch
We select a piece of metal the size of a crack. We wrap a tin around copper alloy electrodes and weld the patch. We sand and finally coat with epoxy paste.
Application of epoxy paste
Cut the crack by grinding and drill the ends of the cracks with a drill with a diameter of no more than 85 mm. Place copper plugs into the holes. We make a notch along the outlines of the cracks to create an artificial roughness.
We degrease the surface using acetone and heat it with an infrared lamp to a temperature of 80 degrees. Apply epoxy paste to the fracture in the following sequence:
- 1 layer 1 mm,
- the second 2-3 mm,
- third 3-4 mm.
Maintain for 24 hours at a temperature of 20 degrees, then it is necessary to dry the repair area in a drying chamber at a temperature of 90 degrees for one hour. » alt=»»> After drying, clean the glued area and smooth it by sanding.
Source
Solutions to the problem
One of the most common is the welding method (electric or gas). In the case of repairing an engine block made of cast iron, it is necessary to first drill out the crack at the ends 0.5 cm deep, then cut it along its entire length with a chisel, grinding wheel or similar tool so that the angle of application is 90 degrees.
The depth of impact should reach 80% of the total wall thickness. Before starting welding work, the block must be heated to a temperature of at least 600 degrees Celsius.
Next, you need to start welding using a neutral flame of a gas torch (gas welding method), using a five-millimeter (in diameter) copper filler rod or flux. The metal is applied to the damaged area evenly, completely, allowing the seam to protrude outward by no more than 1.5 millimeters.
Having completed the welding process, the block must be subjected to gradual cooling in a special pit or heating cabinet.
If electric welding equipment is used for work, you can do without heating the engine block to be restored. In this case, it is necessary to use reverse polarity direct current. If you want to install a steel patch in place of the crack, you will have to use copper-based electrodes in a tin wrapper.
For greater safety, the weld area can be coated with epoxy-based paste.
Another way to repair cracked structural elements of an engine block is to seal the cracks with a special epoxy-based repair paste. In this case, the area where the crack is located is thoroughly cleaned inside and out using a metal-based brush. Then holes with a diameter of no more than 4 millimeters are drilled at the ends of the crack and used for cutting threads.
A plug made of wire on an aluminum or copper base is screwed into the resulting hole. Next, the surface of the crack is processed using a tool (chisel, grinder, wheel, etc.) to a depth of up to 75°/o of the total value, making an impact at an angle from 60 to 90 degrees.
Along the entire length of the crack, retreating from its edge within three centimeters, it is necessary to apply notches using a tool. The surface of the block prepared for repair is degreased using gasoline or acetone, and then proceed to applying an epoxy-based paste.
The paste is applied in two layers, each of which should not have a thickness of more than 2 millimeters. Hardening of the material occurs within one to two days, depending on the final thickness of the layers. If the repair area is heated to one hundred degrees Celsius, the curing time will be reduced to three hours.
After the paste has hardened, the surface is leveled and ground using a file or abrasive materials.
You can also repair cracks in the block and engine head using a fiberglass patch and the already familiar epoxy-based repair paste. In essence, this method differs little from the previous one. The only difference is that each layer of applied paste is covered with a duplicate layer of fiberglass, followed by covering the surface of such a patch with paste and leveling it using roller devices. In this case there can be no more than eight layers in total.
You can also repair the surface of the block by installing pins on it. In this case, holes are drilled not only at the ends of the crack (up to 0.5 cm deep), but also along its entire perimeter, 7-8 millimeters apart.
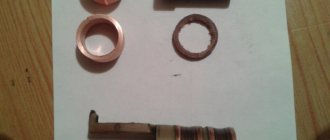
Next, threads are cut and copper rods are installed (the depth should correspond to the thickness of the block wall). Then the excess parts of the rods are cut off (as a result, they should not protrude above the surface by more than 2 millimeters).
And in the spaces between the installed pins, additional holes are drilled, the diameter of which should be a quarter larger than the size of the plugs. Copper rods are also placed into these holes and trimmed.
The resulting row of pins is hammered until a continuous, seamless seam is formed. If desired, the resulting surface can be further strengthened by coating the outside with an epoxy-based paste. Upon completion of the repair, the unit must be pressure tested.
Repairing a cracked cylinder head is done in the same way , but only if the areas where the valve guide bushing is located, the combustion chamber or the valve seat in the seat area are not cracked.
The engine block is cracked: what to do?
Among internal combustion engine breakdowns, it is worth special mentioning the appearance of cracks in the cylinder block and cylinder head. Such cracks in the engine housing and other components are quite common. During operation, many components in the internal combustion engine design are subjected to serious mechanical and thermal loads, which create natural wear and tear on the power unit. The block also cracks as a result of accidents; the walls of the cylinder block or cylinder head can be pierced by engine parts (connecting rod, etc.) as a result of the power plant jamming.
Our email: [email protected]
The problem of repairing cracks in a cast-iron cylinder block in a car service center, and repairing defects in cast-iron parts in general, is very acute.
Cast iron is a treacherous metal, the high carbon content (from 3% to 7.5% in the form of cementite Fe 3 C) makes it low-ductility and difficult to weld, so repairing cast iron products is very delicate. We'll show you the basic principles of coating when repairing heads
cast iron
car cylinder blocks
(cylinder heads) using DYMET® installations.
The photographs below show repaired DYMET® cast iron cylinder blocks and show the stages of the work.
To begin with, we will carry out preliminary preparation of the cylinder head for repair - we will “fix” and then “cut” the defect in the cast iron block
.
This means that, using a milling cutter or other tool, we create
a small groove about 1.5-2.5 mm deep on a crack in a cast iron block
. In order to prevent the crack from spreading, we drill along the edges. Important! – A crack in a cast iron block
should not move when heated, so we fix it with pins or welding at one or more points.
Next, to increase adhesion, it is necessary to give the surface the roughness necessary for the spraying process. Good roughness and adhesion are the basis for reliable adhesion of the coating to cast iron. To treat the surface of the cylinder head, we use the abrasive composition K-00-04-16, that is, we hit the surface with abrasive powder until the roughness suits us - when the cast iron becomes “white” and adhesion increases. If repair work is on stream, it is advisable to use an SD-6 abrasive blasting machine for abrasive processing. You can increase adhesion by applying a thin layer of coating in 3 (third) or 2 (second) mode of operation of the device to the places for future coating on the cast iron block head
cylinders
Let's start filling the crack
composition A-20-11 in 4 (fourth) mode along the entire length of the previously prepared groove. Powder composition A-20-11 perfectly covers cracks and holes. The spraying process first involves the growth of tubercles at the edges of the crack, then the crack is closed.
So, instead of a crack-groove on the surface of a cast-iron block, we have a mound of sprayed metal. It is necessary to carefully cut off the excess coating to the base metal with any proper tool; if we remove a little more, it’s not a big deal, since after that we apply the final sealing coating. To do this, apply to the filled crack in the cast iron block.
in modes 2 and 3, copper composition S-01-01), or copper with zinc (composition S-01-11). But the already familiar A-20-11 composition is also suitable for us.
When repairing a crack in a cast iron cylinder head
the part is slightly heated by hot air, fifteen minutes is enough to cool down.
After 15 minutes, we perform quality control of the repair and sprayed coating. If the preparation of a crack in cast iron
for spraying was not proper (the vast majority of cases are due to poor tack), then we will see a hair-thin crack.
If the crack is quite long (the assessment comes with experience), it is necessary to “cut” and spray again. For short cracks,
we get by with drilling.
Note that the cost of consumables, energy and labor when repairing cylinder head and cracks in cast iron blocks with DIMET® is negligible compared to the cost of new parts.
For your attention, a review of the repair of the cylinder head of Motorservice LLC:
Find out the cost of DYMET devices for cylinder head repair by filling out the form below. Please indicate your region, field of activity, and your email address for a response. Thank you!
Removing cracks in the cylinder block and cylinder head
Engine blocks and heads consist of various metal alloys. Technologies that exist today often make it possible to restore damaged elements. Next, we will look at ways to fix the breakdown and answer the question of how to remove cracks in the cylinder block and repair cracks in the cylinder head. In some cases, you can repair cracks yourself.
One of the most widely used methods for eliminating cracks in the cylinder block and cylinder head is sealing defects in silumin and cast iron blocks using welding.
Audi 1988, 75 l. With. - just
Biysk
Audi 80, 1988
65 000 ₽
Omsk
Audi 80, 1990
120 000 ₽
Barnaul
Audi 80, 1989
45 000 ₽
Funny
Audi 80, 1989
75 000 ₽
See more cars on Drome
Participate in the discussion can only registered users.
Login Register
How to find a crack
The following methods are used to identify cracks:
- ultrasonic detection method;
- use of magnetically sensitive equipment;
- pneumatic crimping method;
- searching for cracks using hydraulic control;
In practice, crack detection in many car repair shops is carried out by pumping air or water into the faulty engine element. In the case of air, the part is additionally immersed in a bath and defects are found by bubbles. If water is pumped into the element, then the need for immersion is eliminated, since cracks are diagnosed by liquid seepage.
To determine the exact boundaries of the crack, a pair of magnets are attached to both sides of the split, and the space between the magnets is filled with special conductive filings. The presence of a crack will cause the magnetic field lines to break, causing sawdust to partially cluster on the crack surface. This method allows you to clearly identify a crack in the cylinder block or cylinder head.
Water test
This method is similar to the previous one. The whole difference between them is that you don’t need to lower the head with water, but quite the opposite - you need to pour it into the head:
- Check all the holes for leaks.
- Then pour the channel into the water.
- Next, using a pump, pump air into the channel.
- Leave the part to be treated for several hours. If you notice that the water has gone, it means there is a problem with the head and it needs to be changed or, at best, repaired (which will be cheaper, but... will not guarantee the longevity of this component).
Repairing cracks using welding
It should be noted that splits must be eliminated in strict accordance with all recommendations. Residual mechanical stresses in the weld area can lead to damage to its integrity and the need for repeated repairs.
A cast iron block is repaired by drilling out the ends of the crack and then grinding the entire length of the split at a 90-degree angle. Drilling is necessary to prevent further spread. As for welding, at the initial stage the cylinder block is heated to 650 degrees Celsius. After this, a continuous seam is applied using a cast iron-copper rod and flux. The final stage is the gradual cooling of the part, which requires a special heating cabinet.
In order not to warm up the block, you can use electric welding and copper electrodes in a tin wrapper. Upon completion, the surface of the resulting seam is degreased with acetone and an additional layer of epoxy paste is applied with a special spatula. Epoxy hardens within 24 hours at room temperature and about 2 hours when heated to 100 degrees Celsius. The final stage will be sanding the treated seam.
Alternative methods
To begin with, minor cracks can also be repaired using epoxy paste and fiberglass. Before starting work, the metal surface must be thoroughly degreased. Layers of paste and fiberglass alternate when applied, the last layer should be epoxy.
Among the most popular technologies today, it is also worth noting a solution called SEAL-LOCK. The advantages of this method include the absence of the need to dismantle the engine. The method is suitable for repairing serious holes or cracks in the cylinder block. Also, repairs do not require the use of a welding machine.
The method is based on filling the crack with a special layer of soft metal, which as a result is securely bonded to the surface of the part being restored.
- The crack is localized, after which the edges of the split are drilled. Next, holes are drilled across the crack at the pitch established by the technology. Cable ties are inserted into these holes to tie both edges of the crack. The staples are selected according to the type of split, as they can have different lengths and differ in shape.
- Next, a hole is drilled in the space between the installed brackets, after which the conical thread is cut using a special tap. After this, it is necessary to treat the resulting hole with a composition to remove the oxide film. Then a cone plug is screwed into the machined threaded hole with little force, the material of which is in active contact with the metal of the part being repaired.
- Next, the part of the plug that rises above the plane needs to be filed a little, after which screwing is carried out with great force, which is created by a special tool. Under such force, the soft plug will break in the place where the cut was previously made. Protruding residues are additionally sanded.
- The next step is to drill the next hole. This hole is drilled so as to achieve partial overlap of the previous threaded hole with the plug installed. The repair procedure involves filling the entire crack with plugs.
Riveting the seam eliminates possible voids and also accelerates the diffusion of rivet materials and the part. The result will be the appearance of a plastic seam that has a strong connection with the surface. This seam has a number of advantages compared to a welded seam:
- does not suffer from temperature changes;
- is able to maintain integrity under operating conditions at high temperatures;
- does not receive significant stress;
Let's look at repairs using Seal-Lock technology step by step.
- Visual inspection for cracks, use of ultrasonic or magnetic particle methods to detect hidden cracks.
- Determining the crack boundary and drilling along the edges to prevent further development.
- Drilling side holes to install staples perpendicular to the crack. The staples, made from high-strength steel and heat-treated, stop further expansion of the crack when screws are installed (this process is described below). The paper clips are pre-forged using a special Seal-Lock pneumatic hammer.
- The next step is to install special conical screws along the entire crack between the already installed staples. For each screw, a hole is drilled and the thread is cut with a special conical tap. Each hole is coated with Seal-Lock to prevent voids from forming in the sealing area. Thermal resistance of the sealant is 1700? C.
- Installing a screw into a threaded hole (Selans - for cast iron parts, Alumalans - for aluminum parts) with the force necessary for a tight tension in the threads. The part remaining on the surface is cut off and a hole is drilled nearby, along the crack, so that part of the material of the cut screw is drilled. And so on until the entire crack is filled.
- Forging metal of paper clips, screws and the part being repaired with a pneumatic hammer. In this way, a continuous row of plug material is created, connected to each other and to the part at the molecular level. It is a seamless connection.
- Sanding the repair area. If required, pressure testing is performed.
This technology eliminates holes in the engine block. The puncture site is machined into shape to make the patch easier to fabricate. When installed, the manufactured patch fits tightly to the seat. At the resulting junction of the two parts, conical bolts are installed with overlap.
With this repair method, if the defect is in an easily accessible place, eliminating the malfunction is possible without dismantling or disassembling the engine.
Summarizing the Seal-Lock technology described above, the use of a special material of staples and screws made repairs simpler and more reliable. These parts are made of a durable and at the same time ductile alloy, capable of bonding metals together at the molecular level under light loads and without heating.
This is interesting: Do-it-yourself motor installation