Print this article Font size 16
Today we will talk about how you can remove the engine from a VAZ 2110 car on your own. The procedure is far from simple, but sometimes without it it is not possible to restore the machine’s functionality.
Upcoming work
It is necessary to remove the engine for various reasons:
- There is a desire or opportunity to install a new, more powerful engine as part of tuning;
- Major intervention in the power unit is required;
- A failed engine is being replaced, etc.
Installation of pistons and connecting rods
The next step is to install the pistons on the connecting rods. Pistons and connecting rods have a certain direction in relation to the engine. The arrow on the pistons indicates the forward direction, that is, they should be directed from the flywheel towards the front cover.
There are numbers on the connecting rods; they should face forward in the same way.
Taking this direction into account, we connect the piston and connecting rod using a piston pin. Before installing the pin, the piston must be heated; just place it in hot water for a few minutes. In the piston, the pin is locked on both sides by retaining rings.
Why do you need routine and major engine repairs?
As already mentioned, current repair work should be understood as the procedure for disassembling and assembling a vehicle engine with the subsequent replacement of some parts. Most often, replacements and upgrades require components such as:
- liners - main and connecting rod;
- piston rings;
- valve seals.
These replacements are a necessity, albeit periodic. They will not only increase engine resources, but also change the quality of its operation.
Source
Installing piston rings
Now you need to install the piston rings on the piston. As a rule, three rings are installed on one piston. The upper and middle compression and lower oil rings are removable. The rings have an engraving, the inscription should be facing up,
if it is not there, then you can navigate by the chamfer, which is located either along the inner or outer diameter of the piston rings. This chamfer acts as a stiffening rib, which creates resistance to the loads that arise when gases expand in the combustion chamber. If there is a chamfer along the inner diameter, then the ring is placed with the chamfer up, if along the outer diameter, then with the chamfer down. The oil slip rings also have an engraving that should face up; if it is not there, then the direction of the ring does not matter.
The rings on the pistons must be placed in such a way that the ring connectors are not located under each other and do not fall into the groove under the pin. Since, for example, the middle ring connector is located on one side of the piston, the upper and lower ring connectors must be on the other side of the piston, and must be spaced apart from each other, but not fall into the piston pin recess
How to remove the engine on a VAZ 2110 (video)
Today we will talk about how you can remove the engine from a VAZ 2110 car on your own. The procedure is far from simple, but sometimes without it it is not possible to restore the machine’s functionality.
Upcoming work
It is necessary to remove the engine for various reasons:
- There is a desire or opportunity to install a new, more powerful engine as part of tuning;
- Major intervention in the power unit is required;
- A failed engine is being replaced, etc.
Knocks in the engine
It is not uncommon for even ordinary knocking sounds in the engine to become the cause of its complete failure. Therefore, be careful if you suddenly hear extraneous knocking noises coming from under the hood.
A knock in the engine almost always indicates serious problems, so it is not recommended to get to the service center on your own. Call a tow truck or cling to someone with a rope to get to a service station or garage to determine the cause of the sounds.
The knocking noise can be caused by various components of the 8-valve and 16-valve engines installed on the VAZ 2110.
Source of knocking
What you need to know
This is a dangerous type of knocking. You need to immediately stop the engine and tow it to the service station or garage. The knock is low-pitched and comes from the bottom of the crankcase. As the load increases or the speed increases, the noise increases; the knocking sound is often accompanied by a drop in oil pressure.
No less dangerous type of knock. You need to stop quickly. Get to the garage or car service only in tow. This sound is ringing, metallic, medium in tone, rhythmic. As the load on the engine increases, the knocking noise increases, but disappears completely when the spark plugs are turned off.
A less dangerous knocking option, in which you can get to the service center under your own power, but with minimal engine load. The sound is rhythmic, high-precision, and has a strong metallic tint. It comes from the engine in any operating mode, and intensifies with increasing loads. When I turn off the spark plugs, the sound goes away completely.
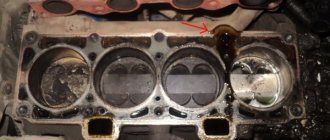
Worn pistons and cylinders
The knocking does not pose a danger to the engine. If the engine load is light, you can get to the service center or garage under your own power. The sound is similar to the clinking of clay dishes, and is especially audible on a cold engine. When the engine warms up the sound disappears
This is not a dangerous type of knocking in the engine, allowing you to get to the garage or car service station under your own power. Against the background of a dull noise, a metallic knock is heard, which is best heard at medium and low crankshaft speeds from the cylinder head above the valves. This type of knocking noise occurs due to a breakdown of the hydraulic compensators, which should be replaced to eliminate the problem.
Potentially dangerous to the engine if ignored and nothing is done. Sometimes they lead to the need for major engine repairs or replacement. If you do not delay repairs, knocking can be eliminated by simply replacing the knock sensor. Without overloading the engine, you can get to the garage or service station under your own power. The sound is ringing, metallic, and comes from the engine mainly when accelerating. The cause of knocking is a malfunction of the knock sensor, low-grade fuel and engine overload due to early upshift. It is necessary to replace the sensor and add additives to the fuel to remove carbon deposits inside the combustion chamber and on the valves
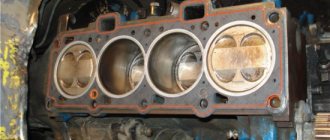
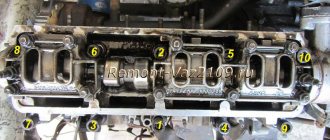
Installing pistons into liners
Once the rings are installed, the pistons can be inserted into the cylinder liners. To do this, tighten the piston rings with a clamp. We install the liner into the lower head of the connecting rod. In such a way that the lock on the liner fits into the recess of the connecting rod head bed. We insert the connecting rods with the piston into the sleeve until the clamp stops. Taking into account the direction of the piston, and with light blows, preferably using a wooden block, we force the piston into the sleeve. By guiding the lower end of the connecting rod into the crankpin of the crankshaft. After the connecting rod rests against the crankshaft with its liner. We install the connecting rod bearing into the connecting rod cover, and put the cover on the studs. In this case, it is imperative to take into account that the liners on the connecting rod and the cover are located in relation to each other, lock to lock.
We tighten the cover with nuts in two stages. The final tightening must be done using a torque wrench with a force of 42.32-53.51 N*m . Install the remaining pistons in the same way. Always be mindful of their direction in relation to the engine.
Cost of model 21114 with a volume of 1.6 liters
I think that there is no need to explain and talk in detail about the fact that not only 1.5 liter engines, but also 1.6 liters were installed on the VAZ 2110. Due to the increase in displacement, engine power also became slightly higher - up to 81.6 hp.
Also, the engine characteristics were affected by the increased piston stroke in the cylinder to 76.5 mm compared to 71 mm. Although, with all the improvements, this motor has a certain design feature - a bubbling sound during operation, which is due to the fact that the piston is not fully compatible with the cylinder in size.
The price of this unit is also 49,000 rubles.
Installing the back cover
and the rear one after changing the seals in them.
Installing the oil pick-up
We install an oil intake and an emergency oil level sensor.
Functionality check
Before changing pillows, you should check the functionality of the old ones. It may happen that the cause of vibration and knocking is not in them.
You can learn about the influence of the crankshaft sensor on engine operation in this material: https://vazweb.ru/desyatka/dvigatel/datchik-kolenvala.html
- We put the VAZ 2110 on supports;
- We install a jack with a backing made of board or timber under the oil pan and jack up the engine until the cushions are freed from its weight;
- We check all the pillows, namely: • Are there any cracks on them; • How easy it is to separate them from the substrate (it is made of metal); • Are they still hard? • If no obvious deficiencies are found, and replacement is not yet necessary, check the play between the frame and the plates; • Lubricate the cushions with a protective compound, lower the motor, tighten the fasteners and nuts.
Installing the clutch disc and basket
We install the clutch disc and basket on the flywheel. The clutch disc must be centered in relation to the internal bearing of the shaft cranks using a special shaft. On which there are two surfaces, one corresponds to the inner diameter of the bearing, the other corresponds to the inner diameter of the splined part of the clutch disc. The clutch disc is located with its protruding part towards the basket. After centering, install and tighten the clutch basket.
Drain the old fluid
Before changing the lubricant, warm up the engine to operating temperature, and also find a pit or overpass for work. If possible, use a lift - it will be most convenient.
To drain the oil, proceed as follows:
- We unscrew the filler plug, preventing the formation of a vacuum in the engine and better drainage of oil.
- Place the prepared container under the drain hole.
- Unscrew the drain plug using a wrench.
- Drain the old motor fluid.
- We work carefully so as not to burn our hands, as the oil is hot. If the plug falls into the container along with the used oil, don't worry - you can get it out later.
- The oil will drain for about 10 minutes - be patient and wait until the process is complete.
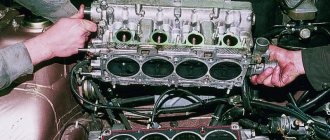
Tightening torque for cylinder head VAZ 2112 16 valves
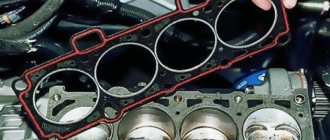
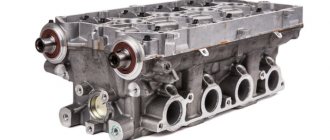
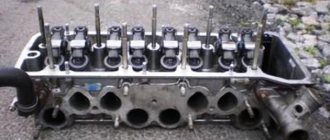
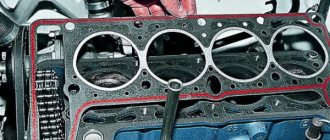
On the side of the front cover, install the timing belt drive toothed pulley. Then we install the cylinder head.
First install the cylinder head gasket. We check that all the holes in the gasket match the holes in the engine block. We tighten the cylinder head with coupling bolts in four stages.
The procedure for tightening the cylinder head of a VAZ 2112 16 valves
Tightening is carried out according to the tightening diagram
The first stage with a force of 20 N*m. the second stage with a force of 69.4-85.7 N*m. the third step is to tighten the bolt 90 degrees; The fourth step is to tighten the bolt again by 90 degrees. I wrote a description of the installation of timing mechanisms in another article, which you can read at this link: Replacing the timing belt. The repair of the VAZ 2110 engine has come to an end. Now it needs to be installed on the car.
How to remove a window regulator
Most VAZ 2110-2112 cars have electric windows, so this is the example where everything will be shown. To do this job we will need several tools, a list of which is given below:
- Phillips screwdriver;
- 10 mm socket head;
- extension;
- ratchet handle.
First, check out the detailed video review that I made specifically for this article.
Video on replacing the front door window lifter on a VAZ 2110-2112
Everything is done in literally 10 minutes, and you are unlikely to encounter any particular difficulties during this repair process.
Photo report on the removal and installation of the VAZ 2110 electric window
So, before you do anything, you will first need to remove the front door trim. Then, lowering the glass to the required height (so that the bolts securing it to the rail become accessible), unscrew everything with a 10mm head, as shown in the photo:
And the glass can be raised as high as possible so that it does not create problems when dismantling the window regulator. After this, unscrew all the nuts securing the VAZ 2110 electric window, which are shown in the photographs below:
- Top rack mount
- Bottom mount
- Three lift nuts
Now you can stick your hand into the hole in the door and disconnect the plug with wires from the motor:
Now you need to move the rail together with the mechanism (motor) all the way back, that is, to the back of the door. The result of the work done is clearly shown below:
And then we carefully try to remove the entire structure through the upper hole in the door.
When installing, follow the reverse sequence.
In terms of cost, I can only give an approximate price, and it is about 500 rubles for the motor and about another hundred for the rack and cable.
- Replacement of outer and inner CV joints
- Removing and replacing the instrument panel
- Replacing the heater damper gearmotor
- How to tighten the steering rack
- Replacing caliper guide pins
2 comments on “How to remove a window regulator”
Good material. It’s a pity that I didn’t say so from the very beginning. And yet, after watching the video, I decided not to go there. Thanks to the author of the video.
I had to change the electric window lifter motor on a VAZ 2112, right door. Having seen that the window lifter was on a cable, I tried and succeeded in the following: Without unscrewing the window lifter mechanism itself, I unscrewed the 3 nuts securing the electric motor. Then, moving the electric motor aside so that the pins would come out of the door body, I removed the lower pin along with the plastic base, pulling it down along the motor body. After that, I bent the electric motor to the right, since the cable allows this, and unscrewed the remaining 2 studs by hand. And having pulled the electric motor from the gear on the cables, he took out the electric motor. I reassembled it in reverse order. It may not be very convenient, but there is no need to unscrew and lower the glass too much. It will lower slightly when the studs are aligned when installing the electric motor into the gear.