A question such as replacing brake hoses on a VAZ 2109 and 2110, at first glance, seems simple for a car enthusiast who has an idea of what a wrench and a screwdriver are. But there are still some nuances that you need to know about for high-quality technical performance. We will talk about them in this article.
Replacing the front brake hoses on a VAZ 2109 and 2110 does not require any additional equipment from the car owner. This can be done even without a hole, right in the yard or garage, on a homemade small overpass, or just on the asphalt in a convenient place. The rear ones will most likely require an inspection hole or a lift.
Why do you need to change?
Why is it necessary to periodically inspect the brake system, in particular the hoses? One of my friends on the highway, at a speed of 100 kilometers per hour, when pressing the pedal, suddenly “lost the brakes.” The pedal simply went to the floor, and the car continued to rush towards the accident. It’s good that he knew how to slow down the car by changing gears, so to speak, “with the engine.” Gradually slowing down, he stopped on the side of the road and, wiping sweat from his forehead, opened the hood.
As it turned out, the brake fluid was “gone”, and at the nearest service station they discovered a break in the rear right brake hose, and all the others had such a degree of wear that they could “shoot” at any moment.
Problems and their solutions
There are several common problems associated with brakes on a VAZ 2110 car. The reasons for their occurrence may be different, but the solution is always the same - timely and high-quality repairs.
- The brakes have completely lost their effectiveness, pressing the pedal does not cause any reaction. In such a situation, it is categorically impossible to drive anywhere under your own power, even if we are talking about a trip to a service station? How do you brake? About a wall or pillar? Call a tow truck and start repairs. In some situations, the problem can be solved on the spot, but these are temporary measures.
- During braking, strong vibrations are observed, most often in the steering column. At the same time, when you press the pedal, it is difficult to hold the steering wheel in your hands. There may be several reasons for this: If you have non-ventilated discs installed, similar situations may arise during rain or when braking through a puddle. Such devices do not like moisture, so to get rid of vibrations, replace the disks with ventilated ones;
- Another cause of vibrations is faulty drums. If there are dark spots on the working surface of the drums, the unit wears unevenly. Immediate repair or complete replacement of mechanisms is required;
- Be sure to check for signs of deformation on the front brake discs. They often cause vibrations.
- The vacuum booster air filter may be clogged, causing the brake pedal to feel stiff;
As you can see, the brake system of the VAZ 2110 car is far from perfect in its factory version, but it performs its functions effectively and reliably. All possible malfunctions can easily be fixed independently, but in some situations it is advisable to contact a professional service station.
Required tools and replacement
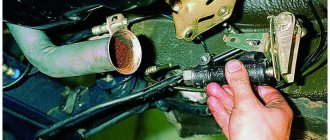
- Using a jack, lift the front wheel and remove it. Don't forget that the wheel bolts can also become stuck. To make them easily unscrew, spray WD-40 from a can several times and wait about 10 minutes. If the bolts are unscrewed but the wheel cannot be removed, there is also a “folk” method. For these purposes, some drivers carry a piece of board and a small sledgehammer in the trunk. We place the board next to the wheel and hit it with a sledgehammer several times. The wheel should come off;
- Hold the tip on the brake hose with a “15” wrench. At the same time, turn the fitting on the tube with a “ten”;
- To prevent brake fluid from leaking, put on a protective cap. If the nut is stuck, use VD. We wait 10-15 minutes, unscrew;
- Next, you need to remove the sensor wires from the rubber holders based on pad wear;
- The hose coupling must be removed from the shock absorber strut holder;
- Unscrew the “15” hose fitting from the cylinder. The copper seal ring also needs to be replaced. Usually seals are sold as a set;
- Install the new hose, carefully tightening the nuts;
- We repeat the procedure in a similar way on the other front wheel (since, we remind you, it is best to change the hoses at least in pairs);
- After everything, we bleed the brake system, checking the presence of fluid in the reservoir (by level). If necessary, top up!
Replacing the rear brake hose
- We unscrew the fitting using two keys: 10 and 15;
- Remove the hose from the eyelet securing the rear beam to the body;
- We put a protective cap on the end of the tube;
- Using two wrenches, disconnect the hose and tube. Remove the brake hose. When replacing it, do not forget about the seals;
- We put everything back in reverse order. We perform the same procedure on the other rear wheel. We pump the hydraulic drive (brake).
Thus, you are convinced that replacing brake hoses on VAZ 2109 and 2110 is not such a difficult matter. And with your own hands, if you have certain skills, it’s quite possible!
Brake hoses have to be changed quite often; according to the “garage guys”, this consumable part often does not last even six months. But, if you use the car carefully, it will require replacement in a year, or even two.
To extend their service life, wipe them with special additives, for example, Roil Platinum™ and wrap them with textile tape. At the same time, you need to remember that from time to time you need to check the condition under the electrical tape.
The worst thing is when the hose breaks on the road. The first sign of a breakdown is that the pedal “goes to the floor.” At the same time, it is impossible to brake quickly. In this case, you need to plug the torn end, for example, with a bolt. When one of the circuits does not work, the ABS also stops working, and during sharp braking the car turns around. The following is step-by-step instructions for replacing them with new ones.
Principle of operation
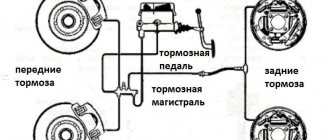
Hydraulic dual-circuit brakes with diagonal distribution are predominantly efficient and reliable. This is due to the fact that if one circuit fails, the second will allow your car to brake.
The circuit system is arranged as follows - one of them is responsible for the left rear and right front wheel, and the second circuit is responsible for the left front and right rear wheel.
This way, you will be able to brake without damaging the brakes or causing other problems with the system.
How to change the brake hose on a VAZ 2109-2115?
1. The first thing to do is disconnect the negative (-) cable from the battery terminal.
2. Next, you need to remove the wheel whose brake hose needs to be replaced.
3. Then remove the wire connecting the block and the wear sensor.
4. With a sharp movement, push the tip of the wire out of the block on the other side.
6. Holding the tip of the tube with a “10” wrench, unscrew the hose from the brake pipe. At the same time, use the “15” key to hold the tip. If the nuts have “soured” in the tube mount, it should be cut in half and the tip removed from the tube.
7. Remove the tip and seal from the bracket on the rack and body. Using a 15mm wrench, unscrew the tip from the wheel cylinder... remove the hose.
When is it necessary to replace pipes and other elements of the brake system?
Brake pipes are changed quite rarely. The need for this arises only if the machine has been in use for a long time, in unfavorable conditions conducive to the development of corrosion, or in the event of any mechanical damage.
You can assess the condition of these components yourself by looking under the car body, or by bringing your “iron horse” for inspection by technicians from the service center. According to the regulations, diagnostics of all components of the brake system must be carried out at least once a year, preferably at the end of the winter period. You can combine the inspection with the next oil change.
Rubber hoses on all wheel cylinders must be replaced, regardless of their condition, every 70-100 thousand km. mileage Pipelines are replaced only as needed.
To carry out the work you will need the following tools:
- Jack;
- Phillips screwdrivers;
- Set of wrenches for: “10”, “14”, “17”;
- Clamping key to “10”;
- Clamping pliers;
- Balloon wrench;
- Anti-corrosion composition;
- Brake fluid (to replenish the system).
What to consider?
The design of the brake system and the principle of its operation are almost identical for all car models. Accordingly, the method of its restoration is also the same for all brands of vehicles.
All pipeline repair work can be carried out in a repair pit, overpass or on a flat area by lifting the machine with a jack.
A set of tubes can be purchased at any auto store. You can order a pipeline of a given length, already bent as required, specifically for a specific car model. Or you can buy a universal copper line, and then give it the required shape and length yourself. The latter option is more economical, however, and there is much more fuss.
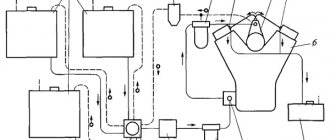
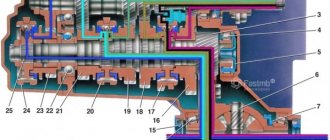
Braking system design
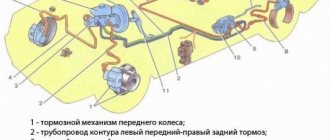
The most important component of the VAZ 2110 brake system circuit is a vacuum booster and a dual-circuit regulator. The latter is responsible for creating pressure in the rear brake devices.
The brake drive is equipped with a piping system, which is divided into two circuits, brake devices and hoses. They allow the front and rear wheels to brake.
To activate the braking system, a special pedal is located inside the passenger compartment at the driver’s feet. In the VAZ 2110 car it is located in the middle. The main elements of the hydraulic drive are:
- Vacuum booster. Its design helps create pressure directed towards the master cylinder piston. This creates a braking effect.
- Pressure regulator drive. Through it, the brake fluid is directed to the rear devices of the braking system.
- Directly the brake pressure regulator of the VAZ 2110. Its function is to be responsible for the pressure force. The unit reduces or increases this indicator, depending on the load on the rear axle of the car.
- Master cylinder with reservoir and pistons. On the filler neck of this tank there is a sensor that monitors the emergency level of brake fluid.
- Front wheel brake mechanism. Its design includes cylinders, pads and a disc, plus a special alarm that warns of wear or malfunction of the lining.
- Rear wheel brake mechanism. Here the system is not disk, but drum. At least, this is the design the factory envisages. Some VAZ 2110 owners believe that drum mechanisms are not reliable and efficient enough, and therefore install disk devices in their place.
The main stages of replacing brake pipes on a VAZ 2109, 2110
You can replace the pipeline lines in the direction from the main brake cylinder to each wheel according to the following diagram.
- Disconnect the battery terminals.
- Raise the car to the desired height using a jack.
- Remove the car wheels.
- Using a “10” wrench, unscrew the nut securing the tube to the master cylinder and install a plug for dust and dirt in the supply hole.
- Carefully release the pipeline towards the wheels. Remove the protective plastic box and remove the line from the metal and plastic holders. Try to do this carefully so as not to damage the clips.
- Unscrew the brake hose fitting and remove the damaged line.
- Start installing the new tube in the opposite direction: from the wheel to the master cylinder.
- Reinstall all holders, replacing worn or damaged parts as necessary.
- Blow out the pipeline with compressed air, connect it to the system and bleed the brake system according to the instructions, replenishing the missing fluid as necessary.
Tip: when replacing a pipeline, it is advisable to fill the system with new brake fluid.
Important: when installing a new line, plug it at the inlet and outlet. Dry all connections to prevent dirt from entering the system. During the installation process, it is advisable to treat the surface of the copper or steel pipeline with an anti-corrosion coating.
Don't forget to change the connecting tube between the wheel calipers. To do this, use a brake wrench set to “10” so as not to strip the thread, unscrew the fittings and install a new tube. This element is replaced after replacing the elastic hose on the wheel.
Features of replacing brake hoses
When replacing brake pipes on a VAZ 2110, it is a good idea to check the condition of the elastic hoses. If you notice even minor cracks and mechanical damage on them, replace them. Also install new hoses if the service life of the old ones has already exceeded the required limit.
The elastic hose replacement scheme consists of the following steps:
- Clean the cylinder well with a wire brush, treating it with rust remover if necessary;
- Using a “14” wrench, unscrew the wheel caliper fitting;
- Plug the caliper hole to prevent dirt from getting into it;
- Using wrenches “17” and “10”, unscrew the fitting and disconnect the hose from the tube;
- Remove the elastic hose holder;
- Install the new hose in sequence from tube to caliper.
Replacing the brake system elements described above is not a very pleasant matter. However, if you are going to replace the piping and hoses, be glad that you won't have to do it anytime soon.
Device
The VAZ-2110 brake system consists of a master cylinder with an installed fluid reservoir, from which the lines of two circuits emerge.
The schematic diagram is shown below.
One circuit interacts with the mechanisms of the front right and rear left wheels, the second - vice versa, hence the diagonal system.
Between the pedal and the cylinder there is a non-separable vacuum booster.
The front wheel lines of both circuits, coming out of the main cylinder, go directly to the working cylinders of the calipers.
The lines going to the rear mechanisms are first connected to the pressure regulator, and then from it to the mechanisms themselves.
This regulator is designed to adjust the fluid pressure in the lines at different loads on the rear axle.