We repair Niva VAZ-21213; 21214: Illustrated Guide
This section presents auto parts for products of the Volzhsky Automobile Plant (VAZ), the largest manufacturer of passenger cars in Russia. If you need to replace a failed device or component of your Lada or Niva, you have come to exactly the right place; all the necessary spare parts for the VAZ are presented here.
The section contains more than 25,000 items of goods. Thanks to a convenient search and electronic catalog, you can easily find parts for any line of cars from the leader of the domestic automobile industry: we have spare parts for both new VAZ models (Granta, Kalina, Priora, Largus), and for rear- and front-wheel drive long-known to Russian motorists (Samara , OKA, “classic”, etc.), as well as all-wheel drive VAZs (Niva, Chevrolet Niva). You will find gearboxes, cylinder blocks, engines, clutches from various manufacturers, pistons, shock absorbers, oil seals, steering rods, clutch actuators and much more for your car here.
We cooperate with leading manufacturers of VAZ spare parts, suppliers of the Tolyatti Automobile Plant conveyor. Each product meets all necessary quality standards.
Sources
- https://examiner.edocar.ru/skachat-rukovodstvo-po-ekspluatatsii-niva-21213.html
- https://www.avtoall.ru/vaz/search/Brake light switch/
Chevrolet Niva | Adjusting the parking brake
Adjusting the parking brake
The parking brake is structurally completely independent from the service brakes. Therefore, there is little wear on the parking brake. Brake drum corrosion or dirty brake pads reduce braking torque. If old pads are being adjusted, the parking brake must be run in.
To do this, from a speed of 40 km/h, carefully tighten the parking brake until the braking process begins. Maintaining speed, tighten the brake one notch and drive for about 400 m.
Thus, traces of corrosion are removed and deposited wear products are removed.
Adjustment of the parking brake is required when: a) Replacing the parking brake pads. b) Replacing the brake drum. c) Adjusting the position of the pads. d) The need for a large tightening (more than 10 teeth).
The parking brake cable and all moving elements must move easily.
| 1. Remove one wheel bolt from both rear wheels. 2. Raise and place the vehicle on stands. |
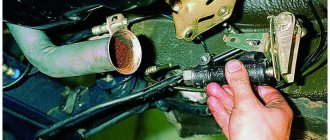
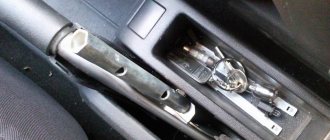
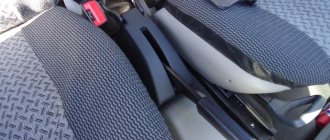
3. Remove the parking brake lever cover forward through the handle. Refer to accompanying illustration.
| Service stations use a special device BMW-341030 to adjust the parking brakes. The device consists of two socket wrenches that fit into each other, adjusted to different sizes of the locknut and the adjusting nut. If there is no such device, it is necessary to remove the lever cover and, if necessary, the center console. |
4. Remove the parking brake lever cover. To do this, loosen the bolt (4). Unscrew the bolts (5) and (6), having first removed the caps. Remove the cover. To do this, pull the cover up from the back towards the driver's seat and remove it.
5. Unscrew the two locknuts and adjusting bolts (arrows in the accompanying illustration) of the parking brake cable. Loosen the cables completely.
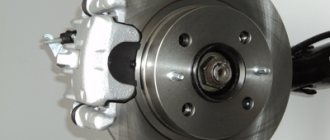
6. Completely remove one mounting bolt on each wheel. Rotate the wheel so that the hole is in the lower position. Shine a flashlight into the hole. The adjusting nut should be visible.
| The wheel, as shown in the accompanying illustration, does not need to be removed. |
7. By rotating the adjusting nut (1) with a screwdriver (2), press the brake pads so that the wheel cannot be turned by hand. After this, turn the adjusting nut back 8 teeth. If the adjusting nut on the left side of the car rotates in the direction of the arrow (refer to the accompanying illustration), the brake pads are adjacent to the drum. On the right side of the car, the nut rotates in the opposite direction.
8. After adjustment, check whether the wheels rotate freely. If not, unscrew the adjusting nut. The wheels must rotate freely.
9. Adjust the brake cables. To do this, tighten the brake lever by 4 teeth and screw in the adjusting nuts (arrows in the illustration) so that the left and right rear wheels can turn evenly by hand. Release the parking brake lever and check that the wheels rotate freely. Repeat the adjustment if necessary.
10. Release the brake lever completely. 11. Turn on the ignition. The parking brake warning light should not light up. 12. Tighten the parking brake lever 1 tooth. In this case, there should be no braking of the rear wheels. Otherwise, the adjustment must be made again. 13. Tighten the parking brake lever 2 notches. The indicator light should now light up. If not, bend the enable contact on the brake lever. 14. Turn off the ignition. 15. Tighten the locknuts while holding the adjusting nuts. 16. Secure the side cover of the parking brake lever. Replace the bolt caps. 17. Hook the front parking brake lever cover from below and secure from above. 18. Lower the car onto its wheels. 19. Screw in the two bolts securing the rear wheels and tighten them to a torque of 100 Nm. Install the wheel caps.
Source: www.allanda-auto.ru
FakeHeader
Comments 14
Also sometimes the handbrake switch is buggy, but the recipe is simple - raise the handbrake, if the handbrake lamp does not light up with your finger, I press/release the handbrake switch and the light comes on)))
This trick didn’t work for me, an autopsy showed oxidation of the contacts...
Wipe with alcohol and it will be as good as new)))
At such prices for alcohol, it’s easier to leave it for wiping your own body)))
I installed a warning light on the brake pedal - it’s even simpler and more reliable.
Can you tell me more about this procedure?
Finally freed. We were overwhelmed with work, and the customer also came from another city