Until the end of the 90s of the 20th century, all domestic cars were not spoiled with technical innovations that simplified the life of the driver. The braking system (TS) was no exception to the general rules.
For example, the driver of a VAZ-2109, one of the most popular cars of that time, could not boast of having active safety systems (ABS, EBD, SBC, HBA, etc.) and enjoy their benefits when braking. However, front-wheel drive VAZ cars represent a whole driving era, satisfying the post-Soviet hunger for owning your own vehicle.
General structure of the vehicle
Speaking about the braking system of the VAZ-2109 car, it should be recognized that it would be more correct to use the term “VAZ-2108 braking system”. It was on the G8 that the scheme of the specified vehicle was implemented. The components, parts and assemblies of the new product have been refined and optimized. But the new braking system was not fundamentally different from the braking system of Russian rear-wheel drive cars.
The “nine” vehicle is represented by a working and a parking vehicle.
The structure of the working vehicle includes:
- a brake mechanism, the functions of which include direct braking;
- a brake actuator that serves to convert and deliver the driver’s command to brake and the effort he exerts for this.
The operation scheme of the VAZ-2109 brake mechanism is based on the operation of friction mechanisms that implement the principle of friction of parts.
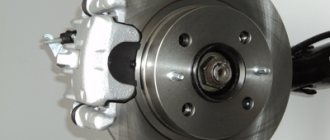
The brake mechanisms themselves are located in the wheels and are made up of a rotating part (disc or drum) and a stationary part (special pads). Domestic cars of the VAZ family use a disc principle on the front wheels and a drum principle on the rear. The latest VAZ-2109 models began to be equipped with an electronic system for monitoring the wear of the front pads.
Kinds
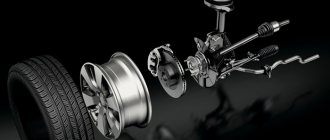
Analyzing the wheel rim market, the entire range can be divided into three types:
- Stamped steel;
- Light alloy cast;
- Light alloy forged.
Many cars, including the VAZ 2109, were equipped with stamped wheels from the factory. Outwardly, they are completely unattractive, and over time they lose their external characteristics. Let's be honest, this is a relic of the past.
But at the same time, steel stampings have their advantages, due to which this type of disc is still produced and is in impressive demand among consumers:
- Affordable price. These are the cheapest options available today;
- High strength indicators. Considering the quality of our roads, many people think primarily about quality, safety, and not external data;
- Reliability. They do not have to be changed almost every season, which results in impressive savings;
- With strong impacts, the stampings do not break or crack. They crumple as much as possible, which opens up opportunities for recovery and restoration;
- Easy to remove and change without outside help.
But let's be completely honest. With all their positive qualities, the disgusting appearance forces car owners to abandon reliability and durability in favor of image and external attractiveness. Moreover, you should not think that light-alloy options are absolutely fragile and break only from one type of damage.
Light alloy
If we talk about alloy wheels, they are made, as you may have guessed, from special light alloys.
A total of three types of alloys are used.
| Alloy type | Peculiarities |
| Titanium | An excellent choice in all respects except cost. These are the most expensive alloy wheels, which, nevertheless, last a long time, are reliable, and look simply excellent. |
| Aluminum | Many people put aluminum alloy first, taking into account external characteristics, strength indicators and availability. An important advantage of aluminum is that it is not susceptible to corrosion. With proper use, aluminum alloy lasts a long time and maintains the excellent appearance of the car. |
When choosing alloy wheel sets, be sure to compare their strengths and weaknesses
Appearance is far from the only criterion you need to pay attention to when purchasing.
Advantages and disadvantages of light alloy
Compared with steel wheels, choosing light alloy options provides car owners with a fairly extensive list of advantages.
But it is also important to know about the disadvantages
| Advantages | Flaws |
|
|
Brake device VAZ 2108,09,10-15
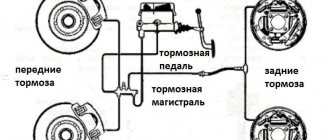
The brake drive of the VAZ-2109 car has a classic version, based on a dual-circuit hydraulic (liquid) operating principle.
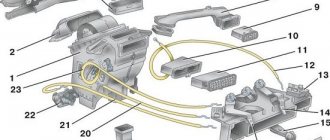
The drive circuit includes:
- brake pedal;
- expansion tank (with liquid level sensor);
- vacuum brake booster;
- master cylinder;
- hoses and pipelines;
- wheel cylinders;
- pressure regulator.
Compared to rear-wheel drive models, the VAZ-2109 brake system has some improvements in components and assemblies - master and working cylinders, vacuum booster, pressure regulator, mechanical parts, etc.
However, these changes are of a highly specialized nature and are understandable only to professionals who provide car service and repair.
Although there is a more significant innovation. Unlike “classic” models, the VAZ-2109 brake system has a slightly different operating principle for the drive.
The service braking system of domestic front-wheel drive cars uses a diagonal division of drive circuits: one of the circuits is responsible for the operation of the right front and rear left mechanisms, and the other - the front left and right rear.
Such a scheme for the functioning of independent circuits significantly increases the safety of braking and minimizes the possibility of a general failure in the operation of the braking system. It allows you to compensate for faults in one circuit by redistributing functions to another circuit.
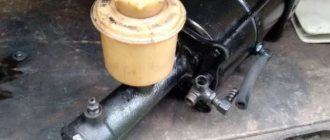
The parking brake system of the VAZ-2109 (in driver's parlance - “handbrake”) is based on the mechanical cable principle of extending the rear shoes and blocking the brake drums. It has some improved technical solutions (compared to the “classics”), which greatly facilitates its repair.
Ineffective brake operation
It is much more difficult when the system works, but is inefficient or unstable. There may be a lot of surprises here. For example, if the right and left brake cylinders operate unevenly, you most likely need to pay attention to the pressure regulator. It either does not work at all or requires adjustment and improvement. It may also turn out that even after the system has been completely restored, lubricant has got onto the working surface of the brake pads of one of the wheels, as a result of which the braking will be uneven, one pair of pads is oily, and the second is working normally.
Less often, but such a problem as incomplete disinhibition also occurs. If this applies to all wheels at once, then in this case it is enough to adjust the free play of the brake pedal. In this case, you need to check the play on the vacuum booster rod. Its value should be within 1.5-2 mm for a VAZ 2109. If one of the wheels does not release the brakes, in this case, again, either the pressure regulator or one of the brake cylinders must be blamed. The fact is that the piston could get stuck in a certain position and prevent the brake pad from fully releasing the wheel.
The vacuum brake booster of the Nine rarely fails, and its habits are well known to all owners - if the pedal suddenly becomes wooden and stiff, then the booster requires repair or adjustment. Most likely, the problem is in the hose that connects the booster reservoir and the engine intake tract.
Basics of vehicle operation
Malfunctions of a vehicle's braking system fundamentally undermine road safety. For example, inadequate braking can cause an accident, making the distance to the vehicle in front insufficient for an accident-free stop.
But what if there is a need to use emergency braking? That is why the operation and repair of the brake system is an important part of the driver’s responsibilities.
The most popular malfunctions of the VAZ-2109 brake system include:
- inefficiency (both working and parking vehicles);
- brake fluid leak;
- increasing the idle speed of the hydraulic drive pedal;
- withdrawal (displacement) of the car from straight-line motion at the moment of braking;
- increasing the required force on the brake pedal.
Most often, vehicle repairs are caused by wear and failure of pads, discs or drums, hydraulic drive elements (main or wheel cylinders, hoses).
The driver must constantly monitor the braking system, promptly detect and eliminate deficiencies, and carry out the necessary repairs in a timely manner.
To do this, you should not neglect periodic visual analysis of the components and assemblies of the system that are in direct contact with the environment for mechanical damage and corrosion.
Monitoring the level of brake fluid in the expansion tank is facilitated by the presence of a mechanical sensor and an electrical (light) alarm located on the dashboard (in the form of a red lamp with an exclamation mark).
Basic faults and brake repair options
The best fix is prevention. When operating the VAZ 2108, it is necessary to strictly adhere to the scheduled maintenance periods for the brake system. This applies to the friction linings of the front disc and rear drum brakes. Complete wear of the friction linings threatens unexpected brake failure in an extreme situation. Periodically check the condition of the linings, monitor their level of wear, and replace if necessary.
Carefully monitor the brakes of the VAZ 2108 in terms of fluid leakage through worn gaskets and seals. Excessive wear of the sealing elements is fraught with the risk of insufficient force in the brake cylinders, failure of the pedal when driving the VAZ 2108, and an increase in the braking distance. All this creates very serious risks. Brakes are a critical safety system for drivers, passengers and other road users.
Traffic regulations requirements for the serviceability of a vehicle
Traffic regulations exclude the possibility of driving if the service brake system is malfunctioning (ineffective or leaking). The driver must repair the working vehicle on site or refuse to operate the vehicle altogether, using towing (if permitted by Section 20 of the Rules) or transportation (transportation by tow truck).
The ineffectiveness of the handbrake is determined by specific fixed indicators associated with the stationary state of the vehicle. Thus, a VAZ-2109 car with a full load must remain stationary on a slope of at least 16%, and in equipped condition (ready for movement - with a driver, but without load) - at least 23%.
If the specified requirements are not met (and, consequently, the parking brake system is malfunctioning), the driver is also obliged to refrain from operating the vehicle. However, at the same time, he is allowed to move, subject to precautions, to the place where the car will be parked or repaired.
Thus, the braking system of the VAZ-2109 has proven its effectiveness during operation. That is why it was extended to other front-wheel drive models of the famous domestic brand. Thus, the braking system of the VAZ-2110 and the entire family of “tenths” is an exact copy of the “nine” vehicle.
More details about standard sizes
All over the world it is common to use the European designation system. For example, simple wheels for tubeless on a VAZ-2109 are 4 1/2 J-13H2 ET30.
J – coded parameters for the rim flange in mm (this includes rounding radii, tilt angles, etc.). This paragraph includes a list of dimensions to obtain a highly specialized conclusion when conducting technical tests. There are other categories - D, E, F, etc.
H2 – double hump or annular offset of the rim flange HUMP (it keeps the tubeless tire from slipping). There are also such variations of humps - H (simple), A (asymmetrical), CH (combined), FH (flat).
13 – bore diameter in inches.
The drawing below clearly shows the main parameters for the structure of the arrangement of technological holes and protrusions.
ET30 or ET+30 – wheel offset in mm. The dimensions of the distances between the middle of the width of the disk and the mating plane (where the disk and hub are in contact) are indicated, respectively equal to 30 mm. Based on where the product is manufactured, the marking changes to OFFSET (negative) or DEPORT (positive).
For a minus value, a designation with a similar sign is used, for example “-ET30”.
REPAIR OF THE BRAKE SYSTEM OF A VAZ 2109 CAR
The VAZ 2109 car is equipped with a working brake system with diagonal separation of circuits, this increases safety when driving the car. The operation of the front right and rear left brake mechanisms is provided by one circuit of the brake hydraulic drive, the right rear and left front - by another brake circuit. In case of untimely failure of one circuit in the brake system, the second one can be used, and it provides sufficient operational efficiency. The hydraulic brake drive includes a vacuum booster pos. 6, dual-circuit regulator pos. 9 rear brake pressure. The hand brake provides braking of the rear wheels. Repair of any brake unit of a VAZ 2109 car is carried out after detection of malfunctions.
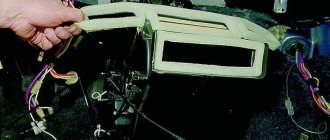
Replacing brake pads
If the thickness of the friction linings on a VAZ 2109 car has become less than 1.5 mm, the rivet connection with the base has become weak, there are chips or deep scratches on the surfaces of the linings, they must be removed.
Tip: The pads need to be changed on each side in pairs. Do not install old parts, which may result in uneven braking. This is especially dangerous for front-wheel drive vehicles.
Work order:
- The car is fixed in a stationary state.
- The battery is disconnected.
- Check the brake fluid level. To prevent it from spilling when the pistons are squeezed, it must be pumped out to about.
- The wheel is removed.
- The surfaces of the caliper and brake disc are cleaned of dirt.
- At the stand, the seal is removed from the bracket, which also serves as a brake hose holder.
- The antennae of the lock washer of the guide pin fixation bolt are bent.
- The bolt is unscrewed and the body is folded back.
- The brake pads are removed.
- When replacing pads, use a caliper to check the thickness of the friction linings; it should not be less than 1.5 mm.
- Assembly is performed in reverse order.
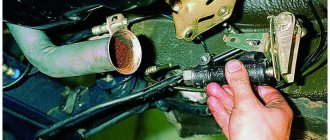
Replacing the master brake cylinder
Repairing the main brake cylinder on a VAZ 2109 most often does not lead to the desired result. Therefore, it needs to be replaced with a new one. So:
- The car is de-energized. The negative terminal is disconnected from the battery.
- The block with wires is disconnected from the sensor indicating the brake fluid level.
- The brake pipes are loosened without unscrewing them.
Replacing the master brake cylinder
- The fixing nuts to the main brake vacuum booster are unscrewed, the brake pipes are unscrewed and disconnected.
- The brake cylinder is removed from the studs.
- If necessary, remove the brake fluid reservoir. To do this, you need to slowly rock the device's leg out of the socket bushing.
- After inspection, elimination of defects or replacement, the cylinder is installed in place.
- Once the new assembly is installed, the nuts can be fully tightened.
- The reservoir is put in place, brake fluid is filled to the “MAX” mark.
- All the air present there is displaced. To do this, the hole for installing the front brake pipes is closed with fingers. An assistant gently presses the brake, which creates pressure in the system until air comes out of the holes.
- Without lowering the brake pedal, when fluid appears, put on and tighten the brake pipes.
- The rear tubes are connected in the same way.
- The job ends with bleeding the brakes.
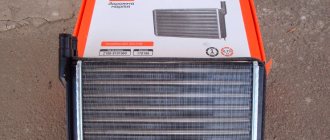
Replacing brake pipes
The VAZ 2108 brake pipelines include elements of two types:
- rubber reinforced hoses;
- steel tubes.
Both of them cannot be repaired. When they fail, they are replaced. If the pipeline leaks while on the move, it can be temporarily insulated with several layers of electrical tape, but only in order to get to the service center and replace the damaged element. Beware of buying hoses from unreliable sellers; there are a lot of crude fakes on the market. Try to purchase spare parts from branded stores and car service centers.
Some VAZ 2108 owners replace corrosion-prone steel tubes with more reliable copper ones. They cut off a copper tube of suitable length, flare the ends and install them in place of the standard ones. The corrosion resistance of such a pipeline increases significantly, but the justification of the costs remains controversial.
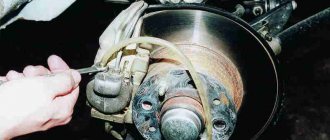
HOW TO REPLACE REAR BRAKE CYLINDERS
Smudges on the brake flap or the inside of the wheels most often indicate poor condition of the seals, less often the failure of the piston - the formation of scratches on it, which caused a seal failure. Repairing the brake cylinder is possible, but most often it needs to be replaced.
Work order
So:
- The VAZ 2109 is placed in first gear and the wheel is removed.
- The drum and brake pads are removed, which can only be disconnected, and the upper spring tie is removed.
- Using a metal brush, remove dirt from the bolts that secure the cylinder to the brake flap and the brake pipe. The bolts are loosened.
- The brake pipe is plugged with a rubber cap or a piece of wood.
- The tube unscrews completely.
- The bolts securing the brake cylinder are unscrewed, while holding it with your hand from the reverse side. The part is removed.
- The new cylinder is installed in the reverse order.
- After completing the work, it is necessary to bleed the rear brake circuit.
Bleeding the brakes
If during the repair process the components of the brake system were removed or disassembled: the vacuum booster, brake cylinders or lines, air may enter the system. When replacing elements in one circuit, you can bleed only in this circuit; in other cases: when removing the master cylinder or replacing brake pipes, the entire system requires bleeding. When performing work, you need the help of another person, brake fluid, rubber and vinyl tubes, and a plastic bottle. Leveling sequence:
- Right rear and left front wheel; left rear and right front:
- The caps are removed from all fittings. Their tightening is weakened.
- New fluid is poured into the reservoir.
- An assistant should press the brake pedal seven to nine times to
Increase system pressure:
- Continuing to press the pedal to the floor, a rubber hose is put on the fitting, its tightening is loosened, and air is released from the system along with the brake fluid. It is clearly visible by the air bubbles escaping into the plastic bottle. One end of the hose is lowered into the liquid, as shown in the photo.
Bleeding brakes VAZ 2109
- The fitting is screwed in and the pressure is built up again.
- This operation is carried out until the entire system is pumped until all the air comes out of it. During pumping, the liquid level in the tank is periodically checked.
- All fittings are pulled through and rubber caps are put on to protect against contamination.
- Brake fluid changes when its lubricating properties deteriorate. This subsequently leads to increased wear on the caliper cylinders in the brake system, which push the brake pads out and press them against the rotor. The instructions recommend replacing the brake fluid after two or three years.
Replacing brake fluid
Tip: When working with liquid you need to be very careful. The toxic composition must be washed off immediately with soap and warm water. When adding to the tank, make sure that the solution does not get on the plastic.
So:
- When pumping the brakes, air is displaced from the system; when replacing old fluid with new fluid, pumping continues until clean fluid comes out of the fittings.
- You need to drain the old one from all wheels, crosswise. During operation, it is necessary to periodically add brake fluid.
Replacing brake discs
When braking a VAZ 2108, friction linings rub against the brake disc of the front wheel. The temperature in the contact patch can reach 800 degrees Celsius. In this case, not only the linings wear out intensively, but also the disc itself. From time to time it has to be changed.
The minimum standard value for the thickness of the VAZ 2108 brake disc is 10.8 mm. The measurement is made using a caliper with the wheel removed. The thickness of the disk should be measured in three or four places, turning the hub around its axis. The minimum thickness value must exceed the standard value. If the VAZ 2108 disk is thinner than it should be, replace it.
The order of work is as follows.
- Remove the two screws securing the brake caliper to the steering knuckle.
- Without disconnecting the hose, secure the caliper by hanging it using a suitable piece of wire from the shock absorber strut spring.
- Spray WD-40 onto the pins that secure the brake disc to the hub.
- Let sit for 15 minutes and remove the pins.
- Carefully beating the disk with a mallet from the inside out, dismantle it.
The new disk is installed on the VAZ 2108 in the exact opposite order to that described.
HOW TO REPAIR THE HANDBRAKE LEVER
Repairing the device consists of replacing the worn mechanism with a new one after removing it from the VAZ 2109 car. Damage can be: wear of the locking teeth, jamming or breakage of the lever, failure of the locking mechanism. So:
- The battery is turned off.
- Under the car, the nuts securing the equalizer to the drive cable are unscrewed, first the lock nut is unscrewed, then the adjusting nut.
- The equalizer is removed from the handbrake lever rod.
- In the car interior, all decorative trim between the front seats is removed. The plastic cover of the tunnel is removed, before this the cover is removed from the handle for shifting gears. The hatch into the tunnel is removed.
- The carpet is moved to the side.
- The retaining ring and drive rod are removed from the axle.
Repair of handbrake drive lever
- If necessary, the handle is unscrewed and removed, and the tension spring is changed.
- Assembly of the mechanism is performed in reverse order.
Changing wheels
During operation, alloy wheels can be damaged, so they need to be restored or replaced with new ones.
Alas, the peculiarity of “casting” is that if the damage is severe enough, it is not possible to restore it. And it is not always advisable to try to restore the rollers, since this procedure can be even more expensive than buying a new set.
Please note that aggressive driving through holes and potholes is dangerous not only for the wheels themselves, but also for the suspension. After all, during an impact, all its energy is transferred through the disk to the suspension
This is not typical for stamped steel analogues. They themselves are deformed, but do not harm the suspension.
Damage to stamping
It is recommended to replace a damaged disk at a service station that is equipped with special equipment. The wheel may get stuck, and it will be impossible to remove it manually in your garage.
Contact a workshop for restoring skating rinks. Ask how much this procedure will cost and estimate the cost of a new kit. This way you will understand what is best to do in your particular case. Self-recovery is impossible for the simple reason that it requires appropriate experience, tools and expensive equipment. There is no point in purchasing it for a one-time restoration.
REPLACING THE VACUUM BOOSTER
The mechanism on the VAZ 2109 car is changed after confirmation of its inoperability. In other cases, the vacuum booster assembly is dismantled during body repairs. The work is performed under the hood and inside the car:
- The vacuum hose is disconnected from the brake booster.
- The brake fluid level sensor and the block with power wires are disconnected.
- Then the work is carried out inside the car. The locking bracket is removed from the pin that connects the brake pedal and the vacuum booster rod. The parts are separated.
- Under the hood, the nuts securing the main cylinder brake are unscrewed. The cylinder is removed and set aside.
Advice: Care must be taken to ensure that the brake pipes are not deformed.
- The nuts holding the bracket and amplifier to the car body are unscrewed, and the entire assembly is removed.
- After repair work, assembly is performed in the reverse order.
Checking the vacuum booster check valve
A malfunction of the vacuum booster is determined by difficult movement of the brake pedal. This degrades braking performance and can ultimately affect driving safety. Before replacing the old amplifier, it is necessary to check its operation and the operation of the check valve. The functionality of the mechanism is checked by pressing the brake pedal several times. This will create increased pressure in the system. The brake pedal should be in the highest position. When the pedal is not lowered, the engine starts. If there are no faults, the pedal goes to the floor. Otherwise, it is necessary to check the tightness of the check valve and the quality of the hose connection.
The procedure for checking a check valve on a VAZ 2109
So:
- The tightness is checked at the junction of the hoses and the fitting on the inlet pipe and the check valve.
- The valve itself is checked. Before this, the hose is disconnected, and the valve is removed from the amplifier using a screwdriver.
- A sealed bulb is pulled onto the fitting, and by squeezing it, air is released through the valve. After releasing the bulb, if it does not unclench, then the valve is in good condition and holds the vacuum. Otherwise, it needs to be changed.
Brake fluid leak
You can find out where the brake fluid goes only by visually inspecting the brake valves, front calipers, and rear cylinders. The presence of drips will indicate a leak. If the fluid leaves, but no traces of it are visually visible, most likely the master brake cylinder is to blame, which allows fluid to pass into the vacuum brake booster chamber. This problem also does not arise instantly and before reaching a critical point, when the pedal goes to the floor and the brakes do not work, it will lose elasticity for some time until air enters the system.
HOW TO REPLACE THE BRAKE PRESSURE REGULATOR
The distribution of the load, in other words, across the brake cylinders of the brake fluid, when turning, is carried out by the VAZ 2109 brake pressure regulator. The appearance of body skids during braking may indicate a malfunction of the regulator, if the remaining components are in working condition:
- The elastic lever must be disconnected from the rear suspension beam. For this purpose, the locking ring is removed, then the finger and earring are removed.
- All brake pipes are disconnected from the regulator using a special wrench. After disconnection, all tubes must be marked. This will make the work easier when assembling the unit. To prevent oil leakage, all holes are plugged.
- The bracket is removed from the studs on the body along with the regulator.
- The regulator is disconnected from the bracket and a new one is installed in its place.
- Assembly is performed in reverse order.
Periodic maintenance and timely repair of all components of the brake system will ensure the reliability and safety of the VAZ 2109 car. You can watch the video on how to properly carry out repair work.
Sources
- masteravaza.ru/tormoza/remont-tormozov-tormoza/vaz-2109-remont-tormozov-392
- znanieavto.ru/stop/tormoznaya-sistema-vaz-2109.html
- drive2.ru/l/4899916394579103916/
- twokarburators.ru/shema-rabochey-tormoznoy-sistemy-2108-2109/
- ladaautos.ru/vaz-2109/sxema-prokachka-i-remont-tormoznoj-sistemy-vaz-2109.html
Installing rear disc brakes
Since the time of the VAZ 2101 “kopek”, the front brakes of Zhiguli have been disc, and the rear have been drum. The decision to use such a combination is explained by the peculiarities of domestic roads and off-road conditions. Drum brakes, more familiar to our car enthusiasts, in the second half of the sixties, when the first Zhiguli models were being developed, demonstrated significantly higher mileage than the disc brakes adopted in Europe. Since then, technology has come a long way, and the service life of disc brakes has increased significantly. But they still retain the advantages in braking efficiency. If you are not embarrassed by the prospect of changing friction linings and brake discs more often, tuning the VAZ 2108 brakes, which consists of replacing drums with discs, makes sense.
If you have the proper experience and appropriate equipment, you can perform such a replacement yourself at your own risk. Keep in mind that you will not be able to pass the inspection without a bribe. Such modernization is not provided for by the design of the VAZ 2108 and, accordingly, is prohibited. What is not allowed is not allowed - this is a matter of safety, and not only yours.
If you decide to replace, keep in mind that the diameter of the rear brake discs should be 2–3 cm smaller than the diameter of the front ones. If the front brakes have a 13-inch diameter disc, then the rear brakes should use a 12-inch diameter disc. Otherwise, the VAZ 2108 becomes prone to skidding when braking, even on a dry, hard-surfaced road. Especially with a lightly loaded rear axle.
Do not attempt to grind a brake rotor yourself. Even if you are a lathe operator, you will not find professional non-destructive testing equipment in a private garage. This is about safety, better not take risks. In automobile stores you can buy ready-to-install disc sets for the VAZ 2108, including a new flange and a special spacer to match the dimensions of the hub and caliper disc.
Dismantling the drum brake is carried out with the wheel removed.
| Procedure | Subtleties |
| Unscrew the nut securing the parking brake cable, remove the drum mounting bolts. | If the drum is stuck and cannot be removed, tap it with light blows from all sides and remove. |
| Disconnect two guides and one tension spring. Remove the pads and body of the old brake, then the hose and plug it. Remove the brake cylinder. Remove the hub and flange of the suspension arm. | The flange should not be reused. If it was not supplied with disc brakes, please purchase it separately. |
| To install VAZ 2108 disc brakes, start by installing the hub with the disc on the flange. | To do this you will need bolts 5mm longer than before. |
Install the brake pads. Remove the plug and connect the hydraulic drive hose. Secure the parking brake cable to the appropriate bracket.
After completing the installation of the brakes on both rear wheels, bleed the brake system to remove air introduced into it during work.