You begin to appreciate many things after they are gone. The same applies to the additional options of the VAZ 2110. Central locking (CL), for example, you can not notice as long as it works properly or you can do without it altogether. But you quickly get used to good things, don’t you? Therefore, when something that provides us with a comfortable ride fails, you immediately begin to rush around in search of answers “how to fix it.”
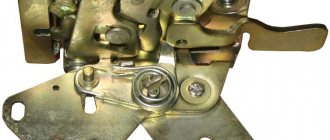
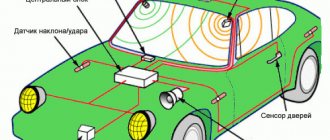
Central locking device VAZ 2110
VAZ cars are not least good for their high maintainability. Whenever something happens to your iron horse, you can almost certainly solve the problem yourself without the help of specialists at a service station. “Ten” was no exception in this regard.
As for the central locking system specifically on Lada 110 cars, this is really a rich topic for discussion. Ignorance of elementary circuits and the operating principle of the unit can confuse many motorists. However, servicing the mechanism is quite simple. And given the enviable frequency of its failure, it turns out that knowing “how” is simply vital.
What is the central locking on the VAZ 2110?
The purpose of this type of device is to centrally control the automatic mechanism for opening and closing all doors in the car at once. This is especially convenient for working in conjunction with an alarm system and when operating a car in general. However, the reliability of the operation of the central locking system should definitely be checked every time by moving the handles of all four doors before going about your business for a long time, since the actuator can often fail and one of the doors may remain unlocked.
Structurally, the VAZ 2110 central lock consists of the following elements:
- electronic transistor control unit;
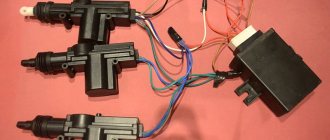
- gearmotor actuators, also known as activators (one for each door);
- a limit switch that determines the current state of the door (open or closed);
- electrical wiring and other installation elements.
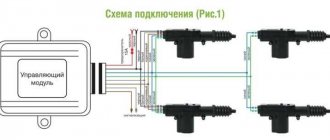
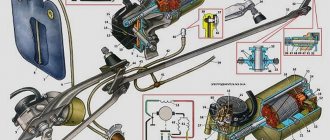
Central locking diagram for VAZ 2110
Installation of electric door lock drives
On VAZ 2110 family vehicles, the manufacturer can install a door lock system. It simultaneously locks all doors when the left front door is locked with the key, as well as when the left front door lock button is pressed. Thus, this locking system is a so-called “central locking”, which in its factory version does not allow the car doors to be unlocked and locked remotely. The capabilities of electronic alarm systems allow you to remotely control the door locks and, if you are going to install one of these systems on your car, this function can be easily implemented. If your car does not have a factory locking system (this is the most common configuration option), then in addition to the alarm system you will have to install electric locking drives. The electric locking drive is a gearmotor that combines a DC electric motor with excitation from permanent magnets and a gearbox with a rack-and-pinion type engagement. Geared motors are installed in the car doors, and their rods are connected to the lock lock rods.
The gearmotor is usually sold together with a set of parts necessary for its installation. The kit includes: a mounting plate, a set of fasteners and a coupling (for connecting the gearmotor rod with the lock lock rod), as well as the gearmotor rod.
Why the central locking on the VAZ 2110 does not work correctly
The problem of improper operation of the actuator is not at all uncommon for cars in the domestic automobile industry. Despite the fact that there are a number of reasons for the failure of mechanism parts, the principle of operation of the automatic door closing system is quite simple, and the malfunctions are very typical in their entirety. This means that any motorist can deal with them.
You don’t have to grab your head and run to the workshop in search of a qualified specialist. Thanks to the diagnostic recommendations below, you yourself are very likely to become one. If, for some reason, you don’t want to get your hands dirty, at least no one else will dare to mess with you. And this, you see, also costs a lot.
Installation details
Very often, even the so-called silent locks (which are usually installed instead of old, noisy ones) are further modified.
There are several methods, but it is important to install a gasket between the body and the mechanism, since there remains a gap that affects the penetration of air, dust, and also the volume of sound. If it suddenly turns out that after installation the door does not latch, you can solve the problem in several ways:
If it suddenly turns out that after installation the door does not latch, you can solve the problem in several ways:
- Strengthening the lower springs (better suited for an old, noisy mechanism);
- Installing a cube of foam rubber in place of the bullet spring;
- By installing one large spring from below.
Problems in the operation of the activator electric drive
The central locking actuator is quite fragile and does not tolerate overload. The activator body, made of plastic, can easily melt if the frequency of door closing is excessively high. The duration of the control pulse also plays an equally important role. Try to always remember about the extreme fragility of the activator and not to load it during operation.
It is easy to guess that the activator is located in each individual door of the car. If the body of one of them melts due to overheating of the electric drive commutator, this becomes the cause of many problems:
- the activator on individual doors stops functioning;
- Constant overloads in a jammed electric drive cause the fuse to fail.
The actuator mechanism is entirely made of plastic. Gears can easily wear out and break during operation, or melt when the commutator overheats. As a result, when the central locking operates, characteristic creaking sounds are heard - a sure sign of imminent failure of the activators. Likewise, if the gearbox of the mechanism is humming, but the doors do not open or close.
Malfunctions of this kind can also be associated with all sorts of defects in the gearmotor and its traction. If you have recently replaced your central locking system, the reason may be that it was installed incorrectly. The mechanism may also be incorrectly adjusted or the fastening may be damaged. In any case, the door trim should be removed and checked visually.
Car lock device
Several types of unlocking devices are produced with Finnish, safe, frame and pin keys. The cost of a whole castle starts from 1000 rubles, but the cylinder costs less. VAZs are equipped with a domestic mechanism with pins that have right and left teeth. Each of them has its own name. Those in the middle are called code ones. If the mechanism jams due to wear, lack of lubrication or temperature changes, the grooves become blocked and do not return to their original position when the key is turned.
Pin devices are easy to pick with a master key, and they can break if not properly maintained. It is quite possible to repair a classic VAZ larva without having to replace it. The price of a VAZ 2110 door lock starts from 500 rubles. This kit includes a locking mechanism for the driver's door and trunk.
Problem in the operation of the central locking electrical circuit on VAZ cars
The first possible problem follows smoothly from those mentioned in the previous section. Overload in the operation of activators leads to an increase in the operating current in the supply circuit above the rated value. As a result, the fuse blows and the central locking of the VAZ 2110 simply “dies”.
It is by checking the fuse that the diagnosis of central locking malfunctions begins. By the way, it is located in a very specific place and it is not easy to find it right away even if you know where to look. In order to get to it, you will need to fold back the central panel with the fuses and dig into the entire wiring harness in the niche that opens behind it. The “comrade” you need is packaged in a special plastic cup and connected to the pink wire.
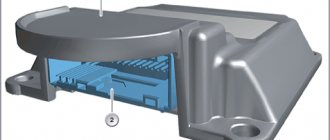
Central locking unit VAZ 2110
Another very common and obvious problem is the central locking connector. It is located in the most unfavorable place for this in the interior body, under the foot mat. A large amount of moisture and dirt inevitably gets there. Electrical contacts are intensively oxidized. As a result, the power supply circuit involuntarily breaks at the point where the plug connector is connected.
conclusions
We briefly examined possible problems in the operation of the VAZ central locking system. Despite the fact that this device can break down with enviable regularity, especially due to the failure of activators, the maintainability of the mechanism and ease of maintenance are really high. You can be sure that in order to thoroughly understand and repair the automatic door opening and closing system on VAZ 2110 cars, you now only need a little practice.
Good day to all. In my last post, I asked you for help and advice on repairing the central locking system. Thank you all for your comments and responsiveness. Today in this post I will tell you how this problem was solved. So, initially the problem was that the car was armed, but the locks would not close. They also did not close by manual pressing. It was decided to take everything apart and look. During disassembly, I found out that the driver's door has a regular two-wire actuator, instead of the required 5-pin one. The remaining three contacts went to the lock itself; these were wires to the limit switch for the open/closed positions.
Well, everything seems to be working at this stage. I forcibly applied +12V to the actuator for a short time, for a short time, otherwise there will be an overload and it will either burn out or the brushes will close. He's twitching, which means he's alive. I went further to look for the reason. I thought that the wires might have frayed in the place where they enter the door. He pulled out the bunch, and for good reason. Some wires had broken insulation - I fixed it with electrical tape.
Let's go further, I read that there is a central locking control unit. We need to find him now. I opened up the floor covering to see where the beam went. As a result, I found the end under the heater on the driver's side of the connector and on it a circuit rewound with electrical tape. Even then I felt that there was probably a problem with it, but out of ignorance, I continued my search further.
As you can see, 6 wires come here. Pink 12V, black mass, white, brown, yellow, red - I described them above. Here is the entire detailed wiring diagram, the colors matched.
In the end, I realized that all the signals reach this block, there is power to it, but there is nothing at the output. So he's dead after all. Having gone shopping, everywhere they offered me an 8-pin block, and only on the fourth day did luck smile on me and I bought the original 6-pin central locking block for the VAZ 2110. It was immediately installed in its place, with bated breath I pressed the signal light - and hurray! closed, opened. Everything is as it should be!
Well, since I’ve already taken apart a lot of things, I’ve pulled up all the masses at the same time. I also found two free two-pin chips in the same place in the driver’s feet under the stove. Maybe someone knows what they are for.
This review discusses how to connect an alarm system to the central locking of the following cars: VAZ-21099, as well as 2110 and 2115. There are three standard connection schemes: for central locking controlled by negative polarity, positive and variable. But different cars have their own nuances. Sometimes it is necessary to add a fuse to the “+12 Volt” wire, sometimes, on the contrary, this is not required. VAZ locks, in turn, belong to the simplest type, the first. But the standard scheme published on the Internet is not suitable for them.
Problem with the operation of the VAZ-2110 central locking control unit
Electronics, of course, are reliable things. Modern control modules for the central locking VAZ 2110 are assembled using a transistor control circuit. This eliminates their mechanical wear. The shelf life of key components is measured in tens of years. The control unit is located under the plastic dashboard cover on the right side of the driver's seat.
However, power transistors can easily fail when the activators are overloaded and the collector is short-circuited. It may even happen that the signal from the control unit will constantly be sent to the lock drive if the transistor is broken. Otherwise, it will simply not turn on.
Checking the control unit is extremely simple. The voltage from the negative terminal of the battery, or directly from the pink wire supplying the control unit, is supplied to the contacts of the gearmotor (activator) in series to the red and yellow conductors. All of the above contacts can be found directly on the eight-pin connector of the control unit.
Thanks for subscribing!
Also, the control unit may issue erroneous control commands due to incorrect operation of the limit sensor. Being a mechanical device, the main door switch can simply wear out. As a result, the control unit simply will not be able to function correctly, since it will not know in what position the car doors are currently located, whether the driver's door lock is closed or open.
Reasons for replacing the lock cylinder
Blocking of the internal or external mechanism occurs due to improper operation, burglary or severe frost. Prerequisites for the device to break soon: creaking, difficulty turning the key, the rod has difficulty entering/exiting the core. At such moments, the larva can be saved if you go through it: apply lubricant to individual elements and remove contaminants.
For VAZ 2110, replacing the driver's door lock cylinder will be required when:
- climatic changes;
- failure of the locking ring;
- pin falling out;
- violation of the integrity of the thrust cap;
- wear of columns or teeth.
If individual fragments malfunction, they begin to cling to each other, blocking the rotation function. In winter, moisture often gets into the core and freezes. Because of this, the key turns with difficulty, jams the unlocking mechanism, or becomes blocked. Repairs have to be carried out from the passenger compartment and entered into the car through the back door.
How well do central locking and alarm systems work together in VAZ-2110 cars?
As you know, a modern alarm system involves autonomous control of all opening parts of the car. For this reason, it is possible to connect the VAZ 2110 central locking system to the alarm system. The connection diagram for the signaling device is included in the operating instructions for the device. The central locking control circuit also seems to have an additional unused connector for this purpose.
However, in reality it is not so simple. Control signals from the alarm system to the central locking system will conflict with the information received from the limit switch installed in the driver's door. For this reason, the standard central locking control circuit with which VAZ 2110 cars are supplied from the factory should be slightly altered.
The essence of the modification is extremely simple. According to the circuit diagram, the limit switch is connected to the eight-pin connector of the central locking control unit via two wires: brown and white. These wires from the unit should be disconnected.
Now the limit switch will be connected to the alarm control circuit, and the alarm will set control signals to the electronic unit of the central locking. Perhaps the diagram described “on fingers” may seem somewhat incomprehensible to you. But it will be very easy to understand the above by studying the diagram proposed below.
Central lock VAZ 2110
To better understand the idea of connecting an alarm, it is still worth studying the instructions included with it. Thanks to this, you will have a clear idea of how to implement this idea in practice. But the essence of the connection will remain the same. The work requires minimal effort and is generally very simple.
Settings
After the alarm system on the VAZ 2114 is fully connected, its final configuration should be performed.
It is carried out as follows:
- Disable security.
- Set the ignition key in the lock to o.
- Press the button labeled Valet 6 times in a row.
- After the step marked “3”, immediately turn on the ignition (6 beeps should sound).
- Using the Valet button, select the required function (their list is given in the table below). To set it to the required value, press the corresponding key on the alarm key fob.
In this case, the most optimal (recommended) settings will be the following:
- for function 12 - value 3;
- for function 11 - value 4;
- for function 9 - value 3.
You can check whether the alarm is connected and configured correctly as follows:
- Disconnect the yellow cord coming out of block A91 from terminal 15 of the ignition switch.
- Turn the ignition key and start the engine.
- Pay attention to the alarm LED - if connected correctly, it should blink continuously.
The last thing I would like to talk about today is the importance of correctly connecting the tachometer, which directly affects the operation of the autostart.
To avoid errors, it is recommended to make this connection strictly in the following order:
- connect the red wire from the BUBD connector to the positive 12 volt terminal;
- connect the black wire of the 18-pin connector to the vehicle ground;
- Connect the gray-black wire of the same connector to the wire coming from the tachometer.
If you then turn on the ignition, then if the tachometer is connected correctly, the alarm indicator will begin to blink evenly.