Many VAZ 2107 car owners carry out repair work on their car on their own. And the clutch mechanism is no exception. Although this task is labor-intensive and cannot be called simple, the owners of 2107 have long learned to do it on their own. Today we will tell you how to replace the clutch disc of a VAZ 2107: the video will be presented at the end of the material.
The clutch in a vehicle plays the role of ensuring smooth gear shifting by briefly disconnecting the VAZ engine from the transmission system. It is precisely because the car has a clutch that it can move off smoothly without overloading the engine and helping to increase the service life of most of its elements. This includes the gearbox itself.
VAZ 2107 car
How to center the clutch disc?
Ford Mondeo I 1993 - 1996
I want to change the clutch! How to center the clutch disc? I don't have the input shaft from the Ford box! What can you think of? Anyone who has encountered this, please tell me! Maybe something will work or something to do? Thank you.
There are several ways to center the clutch disc:
- Expose it to the eye. If you take your time and look carefully and thoughtfully, everything will work out. Accuracy is quite enough.
- If the eye is deceiving, then loosen the fastening of the basket so that the driven disk dangles freely in it. And when putting on the box, first we catch the driven disk with the input shaft, and then the KV bearing. Lastly, tighten the clutch basket bolts.
- Carve the wooden mandrel. Measure the inner diameter of the bearing in HF and the inner diameter of the spline in the driven disk and make a mandrel based on these dimensions.
For example, on a Ford Focus, alignment is done this way:
A “12” head is used (50 mm long and 17/15 mm in diameter).
The driven disk is centered along its splined hole and the hole in the crankshaft flange (under the shank of the gearbox input shaft).
When installed, the “basket” is centered on three pins pressed into the flywheel.
for repair Ford Mondeo I
Subscribe to our channel in Yandex.Zen
Even more useful tips in a convenient format
Installation of clutch VAZ 2101, 2106, 2107
Installing a clutch from a Chevy Niva on a VAZ 2107
After the survey in my previous post, it would be quite logical for a post about replacing tires to appear. This would have been the case if it weren’t for the long weekend. But first things first (there’s a lot of text and numbers below). Some photos had to be combined due to restrictions on the number of uploaded files.
About 30 - 40 thousand kilometers ago a Sachs clutch was installed. The grip is good and strong. Even with hard use, the smell of a burning clutch did not appear. In short, it’s just the thing for dumping. But in city traffic jams the thing is quite inconvenient: the clutch pedal is hard. This became especially noticeable after installing the vacuum seal from 21214. I even began to notice that my left leg was clearly stronger and more pumped up than my right.
The beginning of the RCS from Shniva was made (in the trunk) back in February, when I changed the RCS. The process was slowed down by the lack of some parts and funds for them. Perhaps that's enough prelude, let's move on to the process. I'll try to describe it in more detail. It took: - Flywheel from Chevy Niva (21230-1005115). I took a regular one (not lightweight) for a regular clutch. AvtoVAZ, 1,605.5 rub. For the Valeo clutch you will need a different flywheel, respectively, for the Valeo clutch; — Clutch kit (2123-1601000). I chose Trialli production. 2,200 rub. Valeo (4,700 rubles) was a little expensive for me, VIS could only be assembled in parts in different stores (I couldn’t find a kit). It would have turned out even cheaper than Trialli, but I didn’t bother. In the end, someone has to test)) At least on the Internet there are more positive reviews about Trialli than negative ones. The kit includes: — clutch driven disc (21233-1601130); — clutch release bearing (21233-1601080); — clutch pressure plate (basket) (21233-1601085); — ChevyNiva clutch slave cylinder (21230-1602510). As I wrote above, I bought it back in February of this year. 570r; — Bolt 8Х19 for fastening the VAZ-2108 clutch basket (21080-1601207), 6 pcs. 36r; The following two parts were purchased as a set (21230-1602492-00, 125r): — Clutch slave cylinder bracket (2123-1602492). I first found the bracket and bought it separately (52r). The problem was finding the plate (below). I had to buy it again, but with a plate; — Plate (bar) of the clutch slave cylinder (2123-1602157). The price is a penny, but it is very difficult to find; — Copper gasket for the clutch slave cylinder 2101-1602596 (5r). In addition, it was purchased (so as not to climb too much): — Clutch fork 21010-1601200 (77 rubles); — Clutch fork boot (“ship”) 2101-1601211 (RUR 33.25); — Clutch master cylinder 2101-1602610 (260r); — Elastic coupling 2123-2202120 (688 rub.); — Engine rear cover gasket 2101-1005155 (8.55r); — Laying the exhaust pipe 2103-1203020-02 (15r); — Set of gaskets for 5-speed gearbox 2107 (38 rub.); — Rear crankshaft oil seal 21010-1005160-02 (150r); — Repair kit for gearbox shifter 2101-1703109/07 (15r); — Gearbox input shaft oil seal 2101-1701043 (19r); — RCS fastening bolt 13826811 (during the previous RCS replacement, I broke one) (5r.); — Third support for 5-speed gearbox (aka third engine support) 2107-1001045 (105r); — The rear input shaft bearing (2107-1701033) has been running for two years now. It was not possible to replace it this time; — Transmission oil Shell Spirax S5 75W90, 1 l. (498r).
If owners of injection 2107 with Euro-2 decide to repeat this, I strongly recommend purchasing two more catalyst bolts 2110-1206058 and an o-ring 2110-1206057.
Almost everything is in the photo
Let's move on to the process. It is most convenient to work on an overpass or lift. Better yet, have a tipper. I don’t have that luxury, so I had to make an overpass using improvised materials. I just laid two boards, put pieces of railway sleepers under one end of the boards, drove in and lifted the other side of the boards. It turned out to be raised by about 30 cm. Then everything was as recommended in the manual when removing the gearbox and flywheel. In principle, this is the case; no additional actions in the form of welding/sawing are required. I started to disassemble: — I disconnected the battery just in case; — threw off the “beard” along with the gearshift lever;
The carpet seems to have been cut by the service technician when they changed the clutch last time(
— removed the crankcase protection and anthers; — drained the oil from the gearbox. If climbing into the box is not part of your plans, then it is not necessary to drain it; — Removed the clutch master and slave cylinders. I removed the GCS for replacement, I’ll tell you in advance; — unscrewed and removed the starter from the clutch housing;
Bottom view of the already removed starter and exhaust
— unscrewed and removed the speedometer cable from the speed sensor; — unscrewed/disconnected the sensors (speed sensor, lambda probe);
Speed sensor connector
Lambda probe, also known as exhaust oxygen concentration sensor
— removed the exhaust pipe; — removed the heat shield; — removed the propeller shaft bracket 2101-2202125; — unscrewed the elastic coupling from the gearbox shank, moved the cardan to the side, and removed the coupling;
Stump for safety before unscrewing the gearbox support
— unscrew the screws of the clutch housing cover (2101-1601120); — threw off the box along with the clutch housing;
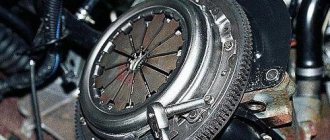
— removed the clutch with the basket;
I took the photo while sitting
- Removed the flywheel and rear engine cover.
To make it easier to unscrew the bolts of the flywheel and clutch basket, you need to screw one bolt securing the bell into place, insert a mounting tool or a screwdriver into the flywheel crown and rest it, the mounting tool or a screwdriver against the screwed-in bolt. The rear cover (also known as the crankshaft rear oil seal holder 2101-1005153) was removed to replace the oil seal. There were no leaks, just a little fogging and the oil seal itself was slightly stiff. So I replaced it so that I wouldn’t have to mess around with it later because of such nonsense. The front bearing of the gearbox input shaft was normal; I did not touch it. And there was no spare bearing. The procedure for replacing the oil seal is simple: remove one, install another. The main thing is not to lose the two square-head screws and not to damage the seal itself during installation. For seating, I used an old oil seal as a kind of mandrel.
Next I installed flywheel 21230-1005115. The Cheviflywheel differs from the classic one only in the contact area with the clutch driven disc. Those. no modifications are required. I forgot to weigh it. The only caveat: when installing, you should focus on the position of the groove (marked with an arrow in the picture). This is a kind of mark for balancing and it corresponds, if my memory serves me correctly, to the position at TDC of the fourth cylinder. Well, of course, you need to clamp it gradually, with the moment from the Murzilka, crosswise.
There is wear on the old flywheel, but not particularly significant. There are no cracks, although there are signs of overheating.
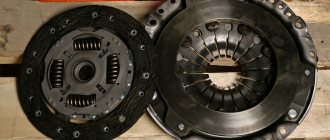
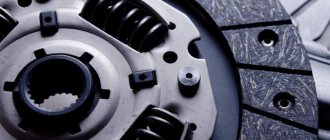
Next, I installed the basket along with the driven disk. Here I had a strategic miscalculation: the days when I could set the clutch by eye and finger are already gone. Instead of a mandrel, I had to use improvised means in the form of a socket wrench extension and a caliper. Contents and packaging:
The box was worn out after a week of driving in the trunk.
To compare photos of clutches, if you can call it that
For comparison, I also took measurements of the diameters of the driven disks:
200 mm for the classic driven disk and 215 mm for the Shniv one
The output on the old driven disk is not critical; it can still be used for quite a long time:
Hu from xy and so it’s clear
As recommended by the pioneers, I screwed the clutch basket with clutch basket bolts from 2108 (in the list above) to avoid a flywheel wedge. The bolts from 08 just have a smaller head, that's all.
Bolt 2108 on top, 2101 on bottom
The clutch is installed (for some reason I didn’t take a photo), let’s move on to the box. Otherwise they are already diligently trying to disassemble it))
Save to AlbumBy the way, there are rumors here (especially among the female population) that I am raising my daughter incorrectly. In justification, I will say this: no one forces her to choose between cars and dolls, shovels for sandboxes and keys. There's just something in the blood))
Initially, the plan was to replace the rear bearing of the gearbox input shaft due to its humming noise. But, having looked through the Murzilka and realizing that it was impossible to do without a complete disassembly, it was decided to limit ourselves for now to replacing the oil seal of the same input shaft. Again, time was short. Along the way, the clutch fork and its boot were replaced:
The fork is still normal, just worn in places.
But there are two cracks on the boot
I didn’t clean the outside of the gearbox, but it’s still planned to have it rebuilt in the near future (if possible). I just wiped it a little and renewed the oil. There are no problems with the box, only the bearing is humming. Although, as practice shows, few people bother with this.
I also took a photo of the flywheel box to compare the flywheel masses:
The difference was 30 grams. But it’s worth considering that the 2123 basket is larger and clearly heavier than the classic one. The next day the following were replaced and installed (photo for comparison): — Gearbox support:
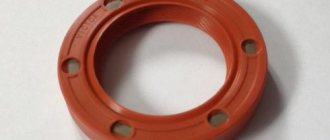
— Release bearing from Shniva:
The release lever in the clutch kit from Shniva is some kind of plastic, I’m thinking of replacing it with something stronger the next time I remove the gearbox
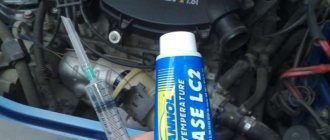
— Clutch master cylinder.
The GCS has not been changed even once since the purchase of the car (if it was changed, I don’t remember. If you look closely, there is a rusty mark near the cuff. Apparently it was still leaking and hence the squeaks when you press the pedal.
— Shniva immediately screwed the clutch slave cylinder to the clutch hydraulic hose. It is better to use a new copper washer (between the hose and the control center). As a last resort, you can use the old one, but before that it is better to level its planes with a fine file or emery wheel.
You can’t tell from the old RCS that it was installed a couple of months ago.
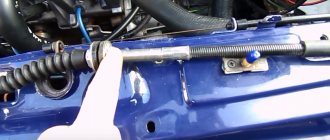
— I unscrewed the remains of the RCS mounting bolt. I broke it off when I was changing a leaking control valve back in the winter; — I installed the gearbox, muffler, etc. in the reverse order of removal. Instead of the classic elastic coupling, I installed an elastic coupling from ChevyNiva. The landing dimensions are the same, only Shnivskaya is a little more massive and, according to reviews, more reliable than the classic one. I connected the cardan and removed the shipping strip from the elastic coupling. This is a strip of tin that can be removed after installation. I’m writing this because some people just don’t know about it and drive around with this strip rustling along the bottom.
Despite the mileage of the jub being even more or less, I didn’t take any risks and replaced it. By the way, the shipping strip can be seen in the photo.
Connected all sensors. — Installed the RCS in place. Everything returns to its normal place, without any modifications. When installing the RCS boot, it is better to lubricate it with something slippery, otherwise there is a possibility that the boot will wrap around the mounting bolt. I used Fairy. There is no need to adjust the length of the rod, because the rod is self-feeding.
RCS is in place. Doesn't affect anything.
For reference: the bolts, or rather the screw-in part, without a head, of the RCS fastenings should be no more than 47-48 mm, otherwise there is a risk of the flywheel (the basket mounting bolts) jamming on the protruding ends of the bolts. And one more thing: the RCS plate is installed with its convex part towards the RCS body. After installation, I bled the hydraulic drive. I assembled everything in the cabin, installed parts from the gearbox rocker repair kit:
Dull blister. The quality is the same, but there’s not much to choose from(
Reinstalled the crankcase protection and anthers. The traditional breaking of bolts was not avoided: one bolt securing the crankcase protection was broken during removal. And he’s almost unscrewed it already. It’s not clear what’s wrong, because I lubricated it with graphite and ran the threads with a tap. Once again I made sure that everything was screwed on, filled and bled. Carefully rolled off the overpass. Well, tests right away. What can I say, I was somewhat surprised, no less than after installing the VUT 21214: the pedal is unusually weightless, as if it had not been pumped. I tried to move. No, everything is fine. True, out of habit, I set off with a slip. I drove it for a ride, everything switches smoothly and doesn’t make any noise. Apparently my release lever was still making a little noise. It’s just a pity that the rear bearing of the gearbox input shaft was not replaced; there would have been general silence. At the moment I have already driven 480 km, the feelings are only positive (ugh three times). Slowly (and for the umpteenth time) I’m getting used to my car. I slip from time to time. I haven’t played around with speed yet, I accelerated to a maximum of 140 km/h (according to GPS). Gears shift normally, the “look how I can do it” mode is maintained “excellent”. It even seemed to become faster. No lag was noticed when changing gears quickly. I noticed one more feature: after installation, the clutch “grabbed” closer to the floor, after a while (100 - 150 km) everything returned to normal and the need to make an adjustable rod disappeared. This is the “homeless overpass” I used.
Have the manual handy just in case
Manufacturing a clutch cable drive for a classic
Cable clutch drive for classics
1. Introduction
Hello to all lovers of classic Lada cars! To all those who have ever thought or dreamed of having a cable-operated clutch on a classic. There are many reasons for this. Firstly, hydraulics are more complex in design than cable-type ones. Many people constantly have problems with brake fluid leaks. The left leg is constantly tense - the clutch pedal moves hard. Pumping is not a very pleasant thing. Another thing is the cable one: simplicity of design, soft travel of the clutch pedal, sensitivity of the pedal. With a cable, the car's handling improves, i.e. increases the safety of you and your passengers. They didn’t pay attention: after driving a classic and immediately changing to, for example, a nine, you immediately notice how easy it is to start and drive, it would seem, “a child can handle it”! There are several reasons for this: one of them is the clutch; correct location of the gear shift lever and brake sensitivity (will not be discussed in this article), etc. Types of clutch release applicable for our modification (maybe someone wants to do it differently):
Fig.1 Straight fork with hydraulic drive (used in VAZ 2101-2107)
Rice. 2 Direct reverse fork (used on old foreign cars, Ford Granada/Scorpio) i.e. when the clutch is disengaged, it moves not towards the rear axle, but towards the engine.
Fig.3 Straight fork with cable drive (used on Subaru Legacy, some older foreign cars)
Rice. 4 Fork with the lever moved upward and the cable fastened to the lever (used on some foreign cars, in VW Golf 3) i.e. It is not the cable itself that is movable, but the casing.
Rice. 5 Straight fork with cable drive (used in VAZ 1111-OKA)
So, let's begin. We need: 1. VAZ 2110 clutch pedal assembly.
Pedal assembly 2110 assembled
2. Clutch cable for VAZ 2110 (who will buy a pedal on the website - the cable is included in the kit). 3. VAZ 2110 hand brake cable. 4. VAZ 2110 hand brake cable. From here I will try to describe in detail the entire process of alterations.
2.Pedal installation
We remove the entire hydraulic mechanism Fig. 6, namely the positions marked with numbers.
Fig.6 Hydraulic mechanism
Next, completely remove the windshield wiper with rods. We take our VAZ 2110 pedal bracket and remove the template from it. For convenience, I made 2 templates: one from cardboard; and the other from a plastic document folder, because... it is more rigid Fig. 7:
Fig.7 Photo of the template for the bracket
Here is a visual drawing of the template:
Fig.8 Drawing of the template for the bracket
I think there will be no problems in making the template
Fig.9 Drilling a hole for the pedal bracket
The template is applied to the body, and the area to be cut is marked with a marker. It is drilled out and cut with a round file. Pay attention to pos. a, Fig. 9 - the right edge of the cut rectangle must strictly coincide in a straight line with the center of the drainage hole (VERY IMPORTANT). In the process of drilling a rectangular hole in the body, we will come across the so-called gusset for strengthening the steering wheel fastening (pos. .b). It’s okay - we use ordinary pliers to break out part of the gusset from the interior side (shown with a red dashed stripe) /
At the end of the article it will be:
https://www.drive2.ru/l/3705584/, https://www.drive2.ru/l/3741899/, https://www.drive2.ru/l/994949/
next article:
Repair and installation of the Polonaise gearbox VAZ 2107
Contents of the article: Gearbox bearings Gearbox assembly Gearbox installation Gearbox bearings I once had a previous one
Rating 0.00 [0 Vote(s)]
How to center the clutch disc?
I'll change the clutch. How to center a disk without a primary shaft? Thank you.
Replacing the clutch on Ford Mondeo cars is a pressing problem. Unfortunately, if you do not have a factory Ford shaft, this will not be easy. When replacing this mechanism, it is necessary to center the disk. Read about the ways in which this can be implemented in the article.
Methods for centering the clutch
The disc in the clutch mechanism can be centered using factory or improvised methods. To do this, it is not necessary to go to a service center or workshop. Below are the main calibration methods:
- Alignment can be done by eye. If you approach the issue thoughtfully and without haste, it is quite possible to set up a high-quality disc.
- If you are not confident in your own abilities, then loosen the clutch driven disc until it is “loose”. When assembling the mechanism, you should start with the driven disk, and then put on the KV bearing. The last step is to tighten all fasteners.
- Having made measurements of the bearing and spline in the disk in advance, you can make a mandrel from wood. This accuracy will be sufficient.
Let's look at alignment using the Ford Focus as an example. A 12 mm head is used, which is installed in the spline hole and in the crankshaft.
Puller drawings. Repair equipment. Tool
Rear hub and brake disc remover.
A device for removing the CV joint from the gearbox.
Made from an old open-end wrench with a welded pipe.
A vodka cap is suitable, but other suitable containers can be used. The principle is shown in the figure. We apply oil and everything goes completely smoothly.
The puller consists of three parts. Moreover, different half rings are needed for the outer and inner CV joints.
A set of mandrels for pressing oil seals into the gearbox.
Drawing of a mandrel for installing oil seals.
Device for grinding valves.
Device for grinding valves.
A device for grinding valves using an electric drill.
The device for grinding valves using a drill is a crank mechanism.
The procedure for assembling the device and the nature of the connection of its parts are given below.
The rotational motion from the electric drill is transmitted to the roller 1, disk 11 with the crank (pin) 12 and is converted into the rocking movement of the slide 4, which, in turn, is converted into the required rocking movement of the lever 9.
Lever 9 is connected to roller 7, which ensures the lapping movement. The connection of the roller 7 with the valve is carried out using a suction cup.
Valve grinding occurs as follows. We hold the drill with one hand, and with the other we hold on to body 5. There is no need to press the valve, the weight of the drill is enough. During operation, we gradually turn the device, moving the grinding zone. An external sign of the end of lapping is the receipt of an even, continuous matte or shiny strip 1.2 mm wide on the working surfaces of the valve and its seat.
Replacing the clutch cable of VAZ 2113, 2114 and 2115
Another repair and restoration operation to restore the clutch’s functionality can be done with your own hands - replacing the cable. It is less labor intensive. Replacing the VAZ 2114 clutch cable is carried out in the following order:
How much does it cost to replace a clutch at a service center?
If, after reading the instructions, you have any doubts about carrying out the work yourself, you can always contact the services. The cost of replacement may vary depending on the city, but on average it is about 1500-2000 rubles. This price includes replacement of the clutch basket, disc and release bearing. Note that the work can be done without a hole, so almost any car service will carry out this procedure in a couple of hours.
Depending on the urgency of the repair, you can try to make a replacement yourself. The only thing that requires experience in this procedure is adjusting the cable. Services charge no more than 200 rubles for this procedure. The work is not difficult, so any service technician can handle it.
Source
Replacing the VAZ 2114 clutch with your own hands - signs of malfunction, adjustment, which one to choose
Daily driving of a car, especially in urban conditions, seriously accelerates the wear and tear of all consumables and components of the car. The appearance of extraneous sounds and noises when changing gears in a VAZ 2114 is a clear sign of an exhausted clutch resource. If you have such symptoms, you need to quickly go to a service center, or conduct diagnostics yourself and replace the worn element. When driving with a worn clutch disc, the likelihood of dangerous road situations increases, especially when overtaking at high speeds. Because Replacing a VAZ 2114 clutch does not involve much difficulty; you can do this work yourself. We will consider the signs of a malfunction of this unit, and also provide detailed instructions for replacing it.
Useful video that clearly demonstrates the replacement process:
Removing the clutch
1.Hang it in front of the car, preferably higher on jacks on both sides.
- Unscrew and remove both front wheels and place them under the car for your safety.
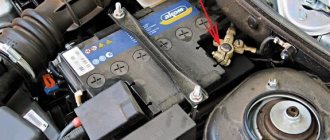
- Remove the battery and air filter (required)
- Disconnect the clutch cable from the gearbox and remove it from the bracket (two 17 mm wrenches)
- Unscrew the bolts securing the ball joints to the steering knuckles (17 mm wrench);
- Loosen the rear mounting of the left trailing arm (24 mm socket);
- Unscrew the bolts securing the left extension bracket (17 mm head) and rotate the lever 90 degrees downwards;
- Disconnect the ground from the gearbox (if it is attached to it, use a 13 mm wrench);
- Unscrew the lower flywheel protection cover (10 mm wrench);
- Unscrew the left power unit support (two 17 mm keys);
- Unscrew the rear support of the power unit from the body (17 mm wrench) and the gear shift drive clamp (two 13 mm wrenches), remove the gear shift drive
- Unscrew three bolts and one nut securing the gearbox to the engine;
- Carefully, tilt the power unit, remove the gearbox from the engine and leave it hanging on the drives;
- Very carefully, using an 8 mm socket with sharp edges, unscrew the clutch basket;
Which clutch to choose for a VAZ 2114?
Depending on your budget, you can choose several disk options. When replacing a worn disk, the release bearing must also be replaced. Check the status of your cart. If there is damage and wear on it, it will also need to be replaced soon. Let's consider several options in three price categories:
- The original clutch disc from Lada-Detal has article number 2109-1601130 . Its cost in different stores varies from 1500 to 2000 rubles .
- SACHS - parts from this company are known to most VAZ 2114 owners. Despite the rather high cost of the kit - 6,000 rubles , it is quite in demand among car enthusiasts.
- Herzog is an option for those who want to save money. The price for a driven disk starts from 500 rubles. The quality is pretty mediocre.
Clutch replacement process
The process of replacing the clutch disc is not very difficult, but requires careful attention to each step. Do not deviate from the following instructions:
- First, remove the front wheels and disconnect the battery. Also remove the air filter box and the plugs adjacent to the mass flow sensor;
- Disconnect the clutch cable. Also, the clutch fork must be disconnected;
- To gain full access to the gearbox, the engine protection is removed;
- Next, the starter is dismantled;
- Loosen the nuts on both hubs. Unscrew the left nut completely;
- Remove the gear shift actuator;
- Remove the engine mount from the box side;
- Drain the gearbox oil;
- Disconnect the inner CV joints with a pry bar;
- Disconnect the bolts securing the clutch basket to the flywheel and remove the complete set;
- With the basket removed, disconnect the release bearing and clean the input shaft from dirt;
- If necessary, replace the entire basket assembly. Reassemble all elements in reverse order.
Don't forget to fill the gearbox with new oil after assembly.
To save time and reduce the number of manipulations, you can replace the clutch without removing the box. At the stage of detaching the fastening bolts, it is enough to move the box to the left. This will be enough to replace the disk without removing it. Having studied the question of how to replace the clutch on a VAZ 2114 with your own hands, you can do the work of changing the disc yourself, but to adjust the cable it is better to turn to professionals. Incorrect adjustment can lead to the fact that when the gears are engaged, the rocker will jam and other problems may arise. Instructions with step-by-step adjustment can be found online.